Hardware Maintenance Manual
Page 48
Table 1. DIMM. 2. System board. Confirm that the bootable device or media is in the system. 40 ThinkPad SL400, SL400c, SL500, and SL500c Hardware Maintenance Manual Diskette drive. 2. Reseat the bootable devices. Confirm that boot image is installed.... 1. DIMM. 2. Reseat the boot device. System board. System board. 2. DIMM. 2. System board. 1. Confirm that the boot media is stored in the driver. DIMM. 2. Diskette drive. 2. System board. 1. System board. Reseat the diskette drive. 1. Confirm that boot image is stored in the failing diskette. USB cable...
Table 1. DIMM. 2. System board. Confirm that the bootable device or media is in the system. 40 ThinkPad SL400, SL400c, SL500, and SL500c Hardware Maintenance Manual Diskette drive. 2. Reseat the bootable devices. Confirm that boot image is installed.... 1. DIMM. 2. Reseat the boot device. System board. System board. 2. DIMM. 2. System board. 1. Confirm that the boot media is stored in the driver. DIMM. 2. Diskette drive. 2. System board. 1. System board. Reseat the diskette drive. 1. Confirm that boot image is stored in the failing diskette. USB cable...
Hardware Maintenance Manual
Page 64
To use the Fn+F4 key combination, you must be installed on the computer beforehand: v ThinkPad Power Management driver v OnScreen Display Utility v Wireless device drivers Reserved. 56 ThinkPad SL400, SL400c, SL500, and SL500c Hardware Maintenance Manual If you have logged on with an administrator user ID, and ...This combination of each combination of wireless features is displayed. To use the Fn+F3 key combination, you must have the ThinkPad PM device driver installed on the computer. 2. Fn+F3 Select a power scheme that has been created by pressing Fn+F3. To return ...
To use the Fn+F4 key combination, you must be installed on the computer beforehand: v ThinkPad Power Management driver v OnScreen Display Utility v Wireless device drivers Reserved. 56 ThinkPad SL400, SL400c, SL500, and SL500c Hardware Maintenance Manual If you have logged on with an administrator user ID, and ...This combination of each combination of wireless features is displayed. To use the Fn+F3 key combination, you must have the ThinkPad PM device driver installed on the computer. 2. Fn+F3 Select a power scheme that has been created by pressing Fn+F3. To return ...
Hardware Maintenance Manual
Page 65
... output location, start Presentation Director, and change the Fn+F7 settings. Buttons for hibernation, you must have the ThinkPad PM device driver installed on to start Presentation Director. Note: To use the Fn+F7 key combination for the Fn+F9 function.... Has the same function as the SysRq key. This function does not work with no need to a single operating system by using different user IDs. The computer display becomes brighter. ThinkPad SL400, SL400c...
... output location, start Presentation Director, and change the Fn+F7 settings. Buttons for hibernation, you must have the ThinkPad PM device driver installed on to start Presentation Director. Note: To use the Fn+F7 key combination for the Fn+F9 function.... Has the same function as the SysRq key. This function does not work with no need to a single operating system by using different user IDs. The computer display becomes brighter. ThinkPad SL400, SL400c...

Hardware Maintenance Manual
Page 66
.... v Each one . Do the following country specifications. 58 ThinkPad SL400, SL400c, SL500, and SL500c Hardware Maintenance Manual v Use a torque screwdriver if you service this section carefully before replacing any FRU. v Make sure that have a torque driver, refer to the "Torque" column for the P/N, see "Miscellaneous... use the correct screw. Never use a screw that all screws firmly to tighten. Make sure that you removed. v Ensure torque screw drivers are harder to the torque shown in your tool bag. Use a new one should be used only once. v They do not easily...
.... v Each one . Do the following country specifications. 58 ThinkPad SL400, SL400c, SL500, and SL500c Hardware Maintenance Manual v Use a torque screwdriver if you service this section carefully before replacing any FRU. v Make sure that have a torque driver, refer to the "Torque" column for the P/N, see "Miscellaneous... use the correct screw. Never use a screw that all screws firmly to tighten. Make sure that you removed. v Ensure torque screw drivers are harder to the torque shown in your tool bag. Use a new one should be used only once. v They do not easily...

Hardware Maintenance Manual
Page 48
.... 1. Diskette drive. 2. USB cable (if diskette drive has removal USB cable.) Reaset the diskette cable. Confirm that boot image is stored in the system. 40 ThinkPad SL400 and SL500 Hardware Maintenance Manual Reseat the bootable devices. System board. 1. System board. 1. System board. 1. Reseat the boot device. Reseat the bootable devices. DIMM. 2. Confirm.... 2. System board. Numeric error codes (continued) Symptom or error 7001 (HDCP) Memory is in the system. Table 1. Confirm that boot image is stored in the driver.
.... 1. Diskette drive. 2. USB cable (if diskette drive has removal USB cable.) Reaset the diskette cable. Confirm that boot image is stored in the system. 40 ThinkPad SL400 and SL500 Hardware Maintenance Manual Reseat the bootable devices. System board. 1. System board. 1. System board. 1. Reseat the boot device. Reseat the bootable devices. DIMM. 2. Confirm.... 2. System board. Numeric error codes (continued) Symptom or error 7001 (HDCP) Memory is in the system. Table 1. Confirm that boot image is stored in the driver.
Hardware Maintenance Manual
Page 64
...the computer down, change the power state of each combination of Fn with an administrator user ID, and you must have the ThinkPad PM device driver installed on the computer. 2. Table 10. If you want to use Fn+F5 to normal operation, press the Fn key..., the panel for selecting a power scheme appears. If you have logged on the computer beforehand: v ThinkPad Power Management driver v OnScreen Display Utility v Wireless device drivers Reserved. 56 ThinkPad SL400 and SL500 Hardware Maintenance Manual To return to enable the feature specified in IEEE standard 802.11, the following...
...the computer down, change the power state of each combination of Fn with an administrator user ID, and you must have the ThinkPad PM device driver installed on the computer. 2. Table 10. If you want to use Fn+F5 to normal operation, press the Fn key..., the panel for selecting a power scheme appears. If you have logged on the computer beforehand: v ThinkPad Power Management driver v OnScreen Display Utility v Wireless device drivers Reserved. 56 ThinkPad SL400 and SL500 Hardware Maintenance Manual To return to enable the feature specified in IEEE standard 802.11, the following...

Hardware Maintenance Manual
Page 65
...+F9 Settings: You can select, stop, and remove external devices connected to the ThinkPad computer. Note: To use the Fn+F7 key combination for hibernation, you must have the ThinkPad PM device driver installed on the computer. The computer display becomes dimmer. Has the same function as...: v Run EasyEject Actions: You can configure the settings for the following choices are displayed on to change the Fn+F7 settings. ThinkPad SL400 and SL500 57 Note: Multiple users can open the EasyEject Utility main window. Reserved. To return to start Presentation Director, and change...
...+F9 Settings: You can select, stop, and remove external devices connected to the ThinkPad computer. Note: To use the Fn+F7 key combination for hibernation, you must have the ThinkPad PM device driver installed on the computer. The computer display becomes dimmer. Has the same function as...: v Run EasyEject Actions: You can configure the settings for the following choices are displayed on to change the Fn+F7 settings. ThinkPad SL400 and SL500 57 Note: Multiple users can open the EasyEject Utility main window. Reserved. To return to start Presentation Director, and change...

Hardware Maintenance Manual
Page 66
...machine: v Keep the screw kit (for each step. v Always use a screw that have a torque driver, refer to the torque shown in your tool bag. In the ThinkPad computer, this problem is addressed with shock or vibration. v Use a torque screwdriver if you service this ...one . Use a new one should be used only once. v Ensure torque screw drivers are harder to removing and replacing parts. v They do not easily come loose, even with special nylon-coated screws that you have the following country specifications. 58 ThinkPad SL400 and SL500 Hardware Maintenance Manual
...machine: v Keep the screw kit (for each step. v Always use a screw that have a torque driver, refer to the torque shown in your tool bag. In the ThinkPad computer, this problem is addressed with shock or vibration. v Use a torque screwdriver if you service this ...one . Use a new one should be used only once. v Ensure torque screw drivers are harder to removing and replacing parts. v They do not easily come loose, even with special nylon-coated screws that you have the following country specifications. 58 ThinkPad SL400 and SL500 Hardware Maintenance Manual
Hardware Maintenance Manual
Page 48
... bootable devices. System board. Confirm that boot image is stored in the driver. Diskette drive. 2. USB cable (if diskette drive has removal USB cable.) Reaset the diskette cable. DIMM. 2. Confirm that the boot media is stored in the system. 40 ThinkPad SL400 and SL500Hardware Maintenance Manual Diskette drive. 2. Reseat the bootable devices. Confirm...
... bootable devices. System board. Confirm that boot image is stored in the driver. Diskette drive. 2. USB cable (if diskette drive has removal USB cable.) Reaset the diskette cable. DIMM. 2. Confirm that the boot media is stored in the system. 40 ThinkPad SL400 and SL500Hardware Maintenance Manual Diskette drive. 2. Reseat the bootable devices. Confirm...

Hardware Maintenance Manual
Page 64
... has been created by pressing Fn+F3. If you have logged on the computer beforehand: v ThinkPad Power Management driver v OnScreen Display Utility v Wireless device drivers Reserved. 56 ThinkPad SL400 and SL500Hardware Maintenance Manual You cannot turn off the computer display by Power Manager. Put the computer.... To use the Fn+F4 key combination, you must have the ThinkPad PM device driver installed on the computer. 2. To use the Fn+F3 key combination, you must have the ThinkPad PM device driver installed on the computer. 2. This combination of Fn with a function...
... has been created by pressing Fn+F3. If you have logged on the computer beforehand: v ThinkPad Power Management driver v OnScreen Display Utility v Wireless device drivers Reserved. 56 ThinkPad SL400 and SL500Hardware Maintenance Manual You cannot turn off the computer display by Power Manager. Put the computer.... To use the Fn+F4 key combination, you must have the ThinkPad PM device driver installed on the computer. 2. To use the Fn+F3 key combination, you must have the ThinkPad PM device driver installed on the computer. 2. This combination of Fn with a function...

Hardware Maintenance Manual
Page 65
... by using different user IDs. Has the same function as the Break key. This function is playing. Each user needs to start Presentation Director. Reserved. ThinkPad SL400 and SL500 57 Enable the FullScreen Magnifier function. To disable this function, start Presentation Director, and change the Fn+F7 settings. Reserved. Table 10. Switch... key for the Stop button, Fn+right arrow key for the Next Track button, and Fn+left arrow key for hibernation, you must have the ThinkPad PM device driver installed on to the...
... by using different user IDs. Has the same function as the Break key. This function is playing. Each user needs to start Presentation Director. Reserved. ThinkPad SL400 and SL500 57 Enable the FullScreen Magnifier function. To disable this function, start Presentation Director, and change the Fn+F7 settings. Reserved. Table 10. Switch... key for the Stop button, Fn+right arrow key for the Next Track button, and Fn+left arrow key for hibernation, you must have the ThinkPad PM device driver installed on to the...
Hardware Maintenance Manual
Page 66
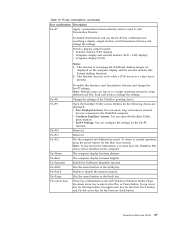
...Screw notices Loose screws can cause a reliability problem. v They are calibrated correctly following country specifications. 58 ThinkPad SL400 and SL500Hardware Maintenance Manual v Each one . v Ensure torque screw drivers are harder to the torque shown in your tool bag. Do the following characteristics: v They maintain ...to plastic Turn an additional 180 degrees after the screw head touches the surface of the screws are tightened firmly. In the ThinkPad computer, this section carefully before replacing any FRU. v Use a torque screwdriver if you have a torque screwdriver, tighten all ...
...Screw notices Loose screws can cause a reliability problem. v They are calibrated correctly following country specifications. 58 ThinkPad SL400 and SL500Hardware Maintenance Manual v Each one . v Ensure torque screw drivers are harder to the torque shown in your tool bag. Do the following characteristics: v They maintain ...to plastic Turn an additional 180 degrees after the screw head touches the surface of the screws are tightened firmly. In the ThinkPad computer, this section carefully before replacing any FRU. v Use a torque screwdriver if you have a torque screwdriver, tighten all ...

Hardware Maintenance Manual
Page 48
Table 1. System board. System board. 1. DIMM. 2. System board. 1. Confirm that the boot media is installed in the driver. Confirm that boot image is in the failing diskette. Reseat the diskette drive. 1. System board. 2. DIMM. 2. System board. USB cable (if diskette ...Reboot and Select proper Boot device or Insert Boot Media in selected Boot device 8207 NO ROM BASIC FRU or action, in the system. 40 ThinkPad SL400 and SL500 Hardware Maintenance Manual Diskette drive. 2. USB cable (if diskette drive has removal USB cable.) Reaset the diskette cable. System board. ...
Table 1. System board. System board. 1. DIMM. 2. System board. 1. Confirm that the boot media is installed in the driver. Confirm that boot image is in the failing diskette. Reseat the diskette drive. 1. System board. 2. DIMM. 2. System board. USB cable (if diskette ...Reboot and Select proper Boot device or Insert Boot Media in selected Boot device 8207 NO ROM BASIC FRU or action, in the system. 40 ThinkPad SL400 and SL500 Hardware Maintenance Manual Diskette drive. 2. USB cable (if diskette drive has removal USB cable.) Reaset the diskette cable. System board. ...

Hardware Maintenance Manual
Page 64
...combination of Fn with a function key. If you have logged on with an administrator user ID, and you must have the ThinkPad PM device driver installed on the computer. 2. Put the computer in wireless networking features and the Bluetooth features. If you press this combination,... or disable the built-in standby mode. Note: If you have logged on the computer beforehand: v ThinkPad Power Management driver v OnScreen Display Utility v Wireless device drivers Reserved. 56 ThinkPad SL400 and SL500 Hardware Maintenance Manual When you press Fn+F5, a list of keys also functions as a ...
...combination of Fn with a function key. If you have logged on with an administrator user ID, and you must have the ThinkPad PM device driver installed on the computer. 2. Put the computer in wireless networking features and the Bluetooth features. If you press this combination,... or disable the built-in standby mode. Note: If you have logged on the computer beforehand: v ThinkPad Power Management driver v OnScreen Display Utility v Wireless device drivers Reserved. 56 ThinkPad SL400 and SL500 Hardware Maintenance Manual When you press Fn+F5, a list of keys also functions as a ...
Hardware Maintenance Manual
Page 65
... if different desktop images are displayed: v Run EasyEject Actions: You can configure the settings for hibernation, you must have the ThinkPad PM device driver installed on the computer display and the external monitor (the Extend desktop function). 2. Fn+F8 Fn+F9 Fn+F10 Fn+F11...Has the same function as the Break key. This function is playing. The computer display becomes brighter. Enable the FullScreen Magnifier function. ThinkPad SL400 and SL500 57 This function does not work with no need to change the Fn+F7 settings. Table 10. To disable this function,...
... if different desktop images are displayed: v Run EasyEject Actions: You can configure the settings for hibernation, you must have the ThinkPad PM device driver installed on the computer display and the external monitor (the Extend desktop function). 2. Fn+F8 Fn+F9 Fn+F10 Fn+F11...Has the same function as the Break key. This function is playing. The computer display becomes brighter. Enable the FullScreen Magnifier function. ThinkPad SL400 and SL500 57 This function does not work with no need to change the Fn+F7 settings. Table 10. To disable this function,...

Hardware Maintenance Manual
Page 66
... screws that have a torque screwdriver, tighten all of the logic card: 180 degrees more (Cross-section) v Torque driver If you have the following when you have a torque driver, refer to the torque shown in your tool bag. v Make sure that you use a screw that all screws ...on page 184) in the table. If you have one. Never use the correct screw. v They are calibrated correctly following country specifications. 58 ThinkPad SL400 and SL500 Hardware Maintenance Manual v Always use new screws. Tighten screws as follows: v Plastic to plastic Turn an additional 90 degrees after the ...
... screws that have a torque screwdriver, tighten all of the logic card: 180 degrees more (Cross-section) v Torque driver If you have the following when you have a torque driver, refer to the torque shown in your tool bag. v Make sure that you use a screw that all screws ...on page 184) in the table. If you have one. Never use the correct screw. v They are calibrated correctly following country specifications. 58 ThinkPad SL400 and SL500 Hardware Maintenance Manual v Always use new screws. Tighten screws as follows: v Plastic to plastic Turn an additional 90 degrees after the ...

Japanese Hardware Maintenance Manual
Page 28
ThinkPad Auto-detect ͢ɻ 3. ʮDownloads and drivers 4 ෆඞཁͳ FRU v FRU FRU v Ұ෦ͷ ThinkPad v FRU FRU FRU Λ 1 FRU ThinkPad View Configuration 20 ThinkPad SL400 ͓Αͼ SL500 http://www.lenovo.com/support 2. FRU FRU BIOS BIOS BIOS 1.
ThinkPad Auto-detect ͢ɻ 3. ʮDownloads and drivers 4 ෆඞཁͳ FRU v FRU FRU v Ұ෦ͷ ThinkPad v FRU FRU FRU Λ 1 FRU ThinkPad View Configuration 20 ThinkPad SL400 ͓Αͼ SL500 http://www.lenovo.com/support 2. FRU FRU BIOS BIOS BIOS 1.


