Hardware Maintenance Manual
Page 14
... for operator safety and correct system function. Note: The use of a grounding system to guard against your skin to eliminate static on a double-insulated or battery-operated system, use an ESD common ground or reference point. Use the round ground prong of the electrical outlet can be considered sensitive to electrostatic... but not necessary. - v Use the black side of the computer is especially useful when handling ESD-sensitive devices. Protect against ESD damage by a certified electrician. 6 ThinkPad R61, R61e, and R61i (15.4-inch widescreen) Hardware Maintenance Manual
... for operator safety and correct system function. Note: The use of a grounding system to guard against your skin to eliminate static on a double-insulated or battery-operated system, use an ESD common ground or reference point. Use the round ground prong of the electrical outlet can be considered sensitive to electrostatic... but not necessary. - v Use the black side of the computer is especially useful when handling ESD-sensitive devices. Protect against ESD damage by a certified electrician. 6 ThinkPad R61, R61e, and R61i (15.4-inch widescreen) Hardware Maintenance Manual

Hardware Maintenance Manual
Page 36
... Form v Battery Rundown v View Test Log v Print Log v Save Log v Full Erase Hard Drive v Quick Erase Hard Drive PC-Doctor for Rescue and Recovery In some models of the categories listed below to run the test, click "Run Diagnostics" on the Rescue and Recovery main screen. 28 ThinkPad R61, R61e, and R61i (15.4-inch...
... Form v Battery Rundown v View Test Log v Print Log v Save Log v Full Erase Hard Drive v Quick Erase Hard Drive PC-Doctor for Rescue and Recovery In some models of the categories listed below to run the test, click "Run Diagnostics" on the Rescue and Recovery main screen. 28 ThinkPad R61, R61e, and R61i (15.4-inch...
Hardware Maintenance Manual
Page 38
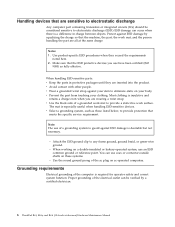
... or icon still does not turn on , replace the battery pack. Then reinstall the battery pack. To check the battery pack, do not click), and the percentage of its capacity. Remove the battery pack and measure the voltage between battery terminals 5 and 7. If the voltage is less than ... the computer and leave it is more than +11.0 V dc, measure the resistance between battery terminals 1 (+) and 7 (-). If the resistance is correct, replace the system board. 30 ThinkPad R61, R61e, and R61i (15.4-inch widescreen) Hardware Maintenance Manual If it at least 3 hours, even if the...
... or icon still does not turn on , replace the battery pack. Then reinstall the battery pack. To check the battery pack, do not click), and the percentage of its capacity. Remove the battery pack and measure the voltage between battery terminals 5 and 7. If the voltage is less than ... the computer and leave it is more than +11.0 V dc, measure the resistance between battery terminals 1 (+) and 7 (-). If the resistance is correct, replace the system board. 30 ThinkPad R61, R61e, and R61i (15.4-inch widescreen) Hardware Maintenance Manual If it at least 3 hours, even if the...
Hardware Maintenance Manual
Page 46
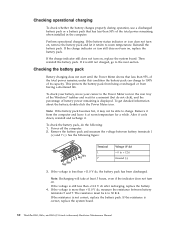
... system status, RAM, VRAM, and setup data are using the ACPI operating system and have set the mode to Hibernate when battery becomes low, and the battery charge becomes critically low. To cause the computer to go into hibernation mode automatically in either of the following conditions: v If... resume timer elapses. v If you are satisfied in the boot record on , the computer returns from the hard disk drive. 38 ThinkPad R61, R61e, and R61i (15.4-inch widescreen) Hardware Maintenance Manual Pressing Fn+F4 keys. Pressing the power button. - v If the timer conditions are using...
... system status, RAM, VRAM, and setup data are using the ACPI operating system and have set the mode to Hibernate when battery becomes low, and the battery charge becomes critically low. To cause the computer to go into hibernation mode automatically in either of the following conditions: v If... resume timer elapses. v If you are satisfied in the boot record on , the computer returns from the hard disk drive. 38 ThinkPad R61, R61e, and R61i (15.4-inch widescreen) Hardware Maintenance Manual Pressing Fn+F4 keys. Pressing the power button. - v If the timer conditions are using...
Hardware Maintenance Manual
Page 48
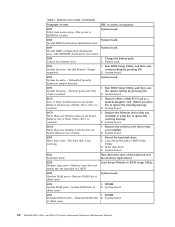
... are found. System board. 0200 Hard disk error-The hard disk is not correct. 0190 Critical low-battery error 1. Reseat the hard disk drive. 2. Run interactive tests of them. System board. 0232 1. Charge the battery pack. 2. Battery pack. 0191 System Security-Invalid Remote Change requested. 1. Remove all but one of the keyboard and.... System board. 0231 System RAM error-System RAM fails at offset nnnn. DIMM. Extended RAM error- Extended RAM fails 2. System board. at offset nnnn. 40 ThinkPad R61, R61e, and R61i (15.4-inch widescreen) Hardware Maintenance Manual
... are found. System board. 0200 Hard disk error-The hard disk is not correct. 0190 Critical low-battery error 1. Reseat the hard disk drive. 2. Run interactive tests of them. System board. 0232 1. Charge the battery pack. 2. Battery pack. 0191 System Security-Invalid Remote Change requested. 1. Remove all but one of the keyboard and.... System board. 0231 System RAM error-System RAM fails at offset nnnn. DIMM. Extended RAM error- Extended RAM fails 2. System board. at offset nnnn. 40 ThinkPad R61, R61e, and R61i (15.4-inch widescreen) Hardware Maintenance Manual

Hardware Maintenance Manual
Page 54
... damage. Replace any error is detected, replace the FRU shown by the computer. Battery pack e. Optical disk or diskette in loop mode at the time of causes that all of the following : 1. LCD assembly 46 ThinkPad R61, R61e, and R61i (15.4-inch widescreen) Hardware Maintenance Manual Undetermined problems If the diagnostic tests did not...
... damage. Replace any error is detected, replace the FRU shown by the computer. Battery pack e. Optical disk or diskette in loop mode at the time of causes that all of the following : 1. LCD assembly 46 ThinkPad R61, R61e, and R61i (15.4-inch widescreen) Hardware Maintenance Manual Undetermined problems If the diagnostic tests did not...

Hardware Maintenance Manual
Page 58
...® v ThinkPad Modem (MDC-1.5, 56 kbps HDA) or Internal Modem (on board) v UltraNav® Yes Battery v Li-ion battery (6 cells) 4.8 Ah v Li-ion battery (6 cells) 5.2 Ah v Li-ion battery (9 cells) 7.8 Ah v Ultrabay Enhanced Li Polymer battery (3 cells)... (option) AC adapter v 65-watt type v 90-watt type Preinstalled operating system v Windows XP Professional v Windows Vista® Home Basic (32 bit) v Windows Vista Home Premium (32 bit) v Windows Vista Business (32 bit) v Windows Vista Business (64 bit) v Windows Vista Ultimate (32 bit) 50 ThinkPad R61, R61e, and R61i...
...® v ThinkPad Modem (MDC-1.5, 56 kbps HDA) or Internal Modem (on board) v UltraNav® Yes Battery v Li-ion battery (6 cells) 4.8 Ah v Li-ion battery (6 cells) 5.2 Ah v Li-ion battery (9 cells) 7.8 Ah v Ultrabay Enhanced Li Polymer battery (3 cells)... (option) AC adapter v 65-watt type v 90-watt type Preinstalled operating system v Windows XP Professional v Windows Vista® Home Basic (32 bit) v Windows Vista Home Premium (32 bit) v Windows Vista Business (32 bit) v Windows Vista Business (64 bit) v Windows Vista Ultimate (32 bit) 50 ThinkPad R61, R61e, and R61i...
Hardware Maintenance Manual
Page 60
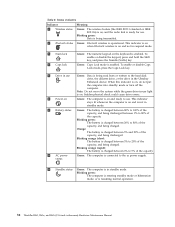
...20% of the capacity, and being read from or written to use . Blinking orange (rapid): The battery is enabled. This indicator stays lit whenever the computer is on , and the radio link is charged ...enable or disable Caps Lock mode, press the Caps Lock key. 5 Drive in standby mode. 7 Battery status Green: The battery is being charged. Status indicators Indicator 1 Wireless status 2 Bluetooth status R Meaning Green: The wireless... status Green: The computer is resuming normal operation. 52 ThinkPad R61, R61e, and R61i (15.4-inch widescreen) Hardware Maintenance Manual Table 8.
...20% of the capacity, and being read from or written to use . Blinking orange (rapid): The battery is enabled. This indicator stays lit whenever the computer is on , and the radio link is charged ...enable or disable Caps Lock mode, press the Caps Lock key. 5 Drive in standby mode. 7 Battery status Green: The battery is being charged. Status indicators Indicator 1 Wireless status 2 Bluetooth status R Meaning Green: The wireless... status Green: The computer is resuming normal operation. 52 ThinkPad R61, R61e, and R61i (15.4-inch widescreen) Hardware Maintenance Manual Table 8.

Hardware Maintenance Manual
Page 62
... do as follows: 1. Conexant Smart Modem Interrupt b. Press Enter to the ThinkPad computer, detach it. Run Diagnostics --> ThinkPad Devices --> ExpressCard slot. 1. FRU tests The following tests in Diagnostics --> Communication: a. Power Diagnostics --> ThinkPad Devices --> AC Adapter, Battery 1 (Battery 2) LCD unit 1. Turn on a horizontal surface, and run Diagnostics --> Fixed... screen, press F1 to the computer while the test is attached to start the diagnostic program. 54 ThinkPad R61, R61e, and R61i (15.4-inch widescreen) Hardware Maintenance Manual Turn on the computer.
... do as follows: 1. Conexant Smart Modem Interrupt b. Press Enter to the ThinkPad computer, detach it. Run Diagnostics --> ThinkPad Devices --> ExpressCard slot. 1. FRU tests The following tests in Diagnostics --> Communication: a. Power Diagnostics --> ThinkPad Devices --> AC Adapter, Battery 1 (Battery 2) LCD unit 1. Turn on a horizontal surface, and run Diagnostics --> Fixed... screen, press F1 to the computer while the test is attached to start the diagnostic program. 54 ThinkPad R61, R61e, and R61i (15.4-inch widescreen) Hardware Maintenance Manual Turn on the computer.
Hardware Maintenance Manual
Page 72
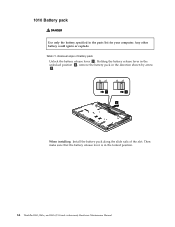
1010 Battery pack DANGER Use only the battery specified in the locked position. 64 ThinkPad R61, R61e, and R61i (15.4-inch widescreen) Hardware Maintenance Manual Removal steps of the slot. Then make sure that the battery release lever is in the parts list for your computer. Holding the battery release lever in the unlocked position 2 , remove the battery pack in the direction shown by arrow 3. 1 2 3 When installing: Install the battery pack along the slide rails of battery pack Unlock the battery release lever 1 . Any other battery could ignite or explode. Table 11.
1010 Battery pack DANGER Use only the battery specified in the locked position. 64 ThinkPad R61, R61e, and R61i (15.4-inch widescreen) Hardware Maintenance Manual Removal steps of the slot. Then make sure that the battery release lever is in the parts list for your computer. Holding the battery release lever in the unlocked position 2 , remove the battery pack in the direction shown by arrow 3. 1 2 3 When installing: Install the battery pack along the slide rails of battery pack Unlock the battery release lever 1 . Any other battery could ignite or explode. Table 11.

Hardware Maintenance Manual
Page 74
..., nylon-coated (1) 2 Color Black Torque 0.167 Nm (1.7 kgfcm) 66 ThinkPad R61, R61e, and R61i (15.4-inch widescreen) Hardware Maintenance Manual v Never remove the drive while the system is operating or is sensitive to it if possible. The hard disk drive is in order: v "1010 Battery pack" on it . v Before removing the drive, have the...
..., nylon-coated (1) 2 Color Black Torque 0.167 Nm (1.7 kgfcm) 66 ThinkPad R61, R61e, and R61i (15.4-inch widescreen) Hardware Maintenance Manual v Never remove the drive while the system is operating or is sensitive to it if possible. The hard disk drive is in order: v "1010 Battery pack" on it . v Before removing the drive, have the...

Hardware Maintenance Manual
Page 76
... the procedures given in order: v "1010 Battery pack" on page 64 Note: In models with or without a fingerprint reader. Removal steps of palm rest 1 1 1 1 Step 1 Icon Screw (quantity) M2 × 17 mm, pan-head, nylon-coated (4) Color Black Torque 0.167 Nm (1.7 kgfcm) 68 ThinkPad R61, R61e, and R61i (15.4-inch widescreen) Hardware Maintenance Manual
... the procedures given in order: v "1010 Battery pack" on page 64 Note: In models with or without a fingerprint reader. Removal steps of palm rest 1 1 1 1 Step 1 Icon Screw (quantity) M2 × 17 mm, pan-head, nylon-coated (4) Color Black Torque 0.167 Nm (1.7 kgfcm) 68 ThinkPad R61, R61e, and R61i (15.4-inch widescreen) Hardware Maintenance Manual
Hardware Maintenance Manual
Page 80
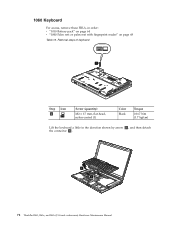
Removal steps of keyboard 1 Step 1 Icon Screw (quantity) M2 × 17 mm, flat-head, nylon-coated (1) Color Black Torque 0.167 Nm (1.7 kgfcm) Lift the keyboard a little in order: v "1010 Battery pack" on page 64 v "1040 Palm rest or palm rest with fingerprint reader" on page 68 Table 16. 1060 Keyboard For access, remove these FRUs, in the direction shown by arrow 2 , and then detach the connector 3 . 2 3 72 ThinkPad R61, R61e, and R61i (15.4-inch widescreen) Hardware Maintenance Manual
Removal steps of keyboard 1 Step 1 Icon Screw (quantity) M2 × 17 mm, flat-head, nylon-coated (1) Color Black Torque 0.167 Nm (1.7 kgfcm) Lift the keyboard a little in order: v "1010 Battery pack" on page 64 v "1040 Palm rest or palm rest with fingerprint reader" on page 68 Table 16. 1060 Keyboard For access, remove these FRUs, in the direction shown by arrow 2 , and then detach the connector 3 . 2 3 72 ThinkPad R61, R61e, and R61i (15.4-inch widescreen) Hardware Maintenance Manual

Hardware Maintenance Manual
Page 82
1070 Optical drive for R61e and R61i For access, remove these FRUs, in this figure. Then pull out the optical drive 3 . 74 ThinkPad R61, R61e, and R61i (15.4-inch widescreen) Hardware Maintenance Manual Removal steps of optical drive 1 Step 1 Screw (quantity) M3 × 4 mm, flat-head, nylon-coated (1) Color Black Torque 0.392 Nm (4 kgfcm) 2 3 Push the optical drive by using a screwdriver 2 as shown in order: v "1010 Battery pack" on page 64 v "1040 Palm rest or palm rest with fingerprint reader" on page 68 v "1060 Keyboard" on page 72 Table 17.
1070 Optical drive for R61e and R61i For access, remove these FRUs, in this figure. Then pull out the optical drive 3 . 74 ThinkPad R61, R61e, and R61i (15.4-inch widescreen) Hardware Maintenance Manual Removal steps of optical drive 1 Step 1 Screw (quantity) M3 × 4 mm, flat-head, nylon-coated (1) Color Black Torque 0.392 Nm (4 kgfcm) 2 3 Push the optical drive by using a screwdriver 2 as shown in order: v "1010 Battery pack" on page 64 v "1040 Palm rest or palm rest with fingerprint reader" on page 68 v "1060 Keyboard" on page 72 Table 17.

Hardware Maintenance Manual
Page 88
1110 Keyboard bezel and speakers For access, remove these FRUs, in order: v "1010 Battery pack" on page 64 v "1040 Palm rest or palm rest with fingerprint reader" on page 68 v "1060 Keyboard" on page 72 Table 21. Removal steps ...-coated (3) Color Silver Torque 0.167 Nm (1.7 kgfcm) 2 2 Step 2 Screw (quantity) M2 × 17 mm, pan-head, nylon-coated (2) Color Black Torque 0.167 Nm (1.7 kgfcm) 80 ThinkPad R61, R61e, and R61i (15.4-inch widescreen) Hardware Maintenance Manual
1110 Keyboard bezel and speakers For access, remove these FRUs, in order: v "1010 Battery pack" on page 64 v "1040 Palm rest or palm rest with fingerprint reader" on page 68 v "1060 Keyboard" on page 72 Table 21. Removal steps ...-coated (3) Color Silver Torque 0.167 Nm (1.7 kgfcm) 2 2 Step 2 Screw (quantity) M2 × 17 mm, pan-head, nylon-coated (2) Color Black Torque 0.167 Nm (1.7 kgfcm) 80 ThinkPad R61, R61e, and R61i (15.4-inch widescreen) Hardware Maintenance Manual
Hardware Maintenance Manual
Page 94
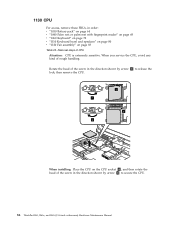
... direction shown by arrow 1 to secure the CPU. 86 ThinkPad R61, R61e, and R61i (15.4-inch widescreen) Hardware Maintenance Manual then remove the CPU. 2 1 a b 3 When installing: Place the CPU on the CPU socket a , and then rotate the head of the screw in order: v "1010 Battery pack" on page 64 v "1040 Palm rest or palm...
... direction shown by arrow 1 to secure the CPU. 86 ThinkPad R61, R61e, and R61i (15.4-inch widescreen) Hardware Maintenance Manual then remove the CPU. 2 1 a b 3 When installing: Place the CPU on the CPU socket a , and then rotate the head of the screw in order: v "1010 Battery pack" on page 64 v "1040 Palm rest or palm...

Hardware Maintenance Manual
Page 98
... USB sub card with cable, and PC Card/ExpressCard (or PC Card/Smart Card) bezel assembly For access, remove these FRUs, in order: v "1010 Battery pack" on page 64 v "1040 Palm rest or palm rest with cable, and PC Card/ExpressCard (or PC Card/Smart Card) bezel assembly 12 1 ...-coated (8) Color Black 2 M2 × 3.5 mm, flat-head, nylon-coated (1) Black Torque 0.167 Nm (1.7 kgfcm) 0.167 Nm (1.7 kgfcm) 90 ThinkPad R61, R61e, and R61i (15.4-inch widescreen) Hardware Maintenance Manual Removal steps of base cover, USB sub card with fingerprint reader" on page 68 v "1060 Keyboard" on page...
... USB sub card with cable, and PC Card/ExpressCard (or PC Card/Smart Card) bezel assembly For access, remove these FRUs, in order: v "1010 Battery pack" on page 64 v "1040 Palm rest or palm rest with cable, and PC Card/ExpressCard (or PC Card/Smart Card) bezel assembly 12 1 ...-coated (8) Color Black 2 M2 × 3.5 mm, flat-head, nylon-coated (1) Black Torque 0.167 Nm (1.7 kgfcm) 0.167 Nm (1.7 kgfcm) 90 ThinkPad R61, R61e, and R61i (15.4-inch widescreen) Hardware Maintenance Manual Removal steps of base cover, USB sub card with fingerprint reader" on page 68 v "1060 Keyboard" on page...
Hardware Maintenance Manual
Page 104
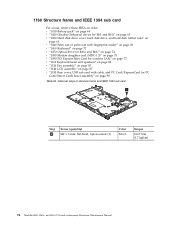
... Color Silver Torque 0.167 Nm (1.7 kgfcm) 96 ThinkPad R61, R61e, and R61i (15.4-inch widescreen) Hardware Maintenance Manual 1160 Structure frame and IEEE 1394 sub card For access, remove these FRUs, in order: v "1010 Battery pack" on page 64 v "1020 Ultrabay Enhanced device for R61 and R61i" on page 65 v "1030 Hard disk drive... cover, hard disk drive, and hard disk rubber rails" on page 66 v "1040 Palm rest or palm rest with fingerprint reader" on page 68 v "1060 Keyboard" on page 72 v "1070 Optical drive for R61e and R61i" on page...
... Color Silver Torque 0.167 Nm (1.7 kgfcm) 96 ThinkPad R61, R61e, and R61i (15.4-inch widescreen) Hardware Maintenance Manual 1160 Structure frame and IEEE 1394 sub card For access, remove these FRUs, in order: v "1010 Battery pack" on page 64 v "1020 Ultrabay Enhanced device for R61 and R61i" on page 65 v "1030 Hard disk drive... cover, hard disk drive, and hard disk rubber rails" on page 66 v "1040 Palm rest or palm rest with fingerprint reader" on page 68 v "1060 Keyboard" on page 72 v "1070 Optical drive for R61e and R61i" on page...
Hardware Maintenance Manual
Page 112
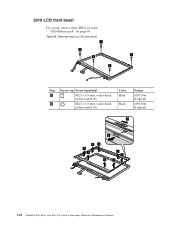
Removal steps of LCD front bezel 1 2 1 2 2 Step 1 2 Screw cap Screw (quantity) M2.5 × 6.5 mm, wafer-head, nylon-coated (2) M2.5 × 6.5 mm, wafer-head, nylon-coated (3) Color Black Black Torque 0.392 Nm (4 kgfcm) 0.392 Nm (4 kgfcm) 4 5 33 3 3 3 3 3 3 104 ThinkPad R61, R61e, and R61i (15.4-inch widescreen) Hardware Maintenance Manual 2010 LCD front bezel For access, remove these FRUs, in order: v "1010 Battery pack" on page 64 Table 28.
Removal steps of LCD front bezel 1 2 1 2 2 Step 1 2 Screw cap Screw (quantity) M2.5 × 6.5 mm, wafer-head, nylon-coated (2) M2.5 × 6.5 mm, wafer-head, nylon-coated (3) Color Black Black Torque 0.392 Nm (4 kgfcm) 0.392 Nm (4 kgfcm) 4 5 33 3 3 3 3 3 3 104 ThinkPad R61, R61e, and R61i (15.4-inch widescreen) Hardware Maintenance Manual 2010 LCD front bezel For access, remove these FRUs, in order: v "1010 Battery pack" on page 64 Table 28.
Hardware Maintenance Manual
Page 114
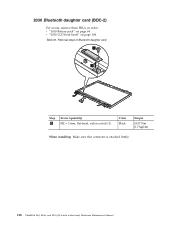
2030 Bluetooth daughter card (BDC-2) For access, remove these FRUs, in order: v "1010 Battery pack" on page 64 v "2010 LCD front bezel" on page 104 Table 30. Removal steps of Bluetooth daughter card 1 2 Step 1 Screw (quantity) M2 × 3 mm, flat-head, nylon-coated (1) Color Black Torque 0.167 Nm (1.7 kgfcm) When installing: Make sure that connector is attached firmly. 106 ThinkPad R61, R61e, and R61i (15.4-inch widescreen) Hardware Maintenance Manual
2030 Bluetooth daughter card (BDC-2) For access, remove these FRUs, in order: v "1010 Battery pack" on page 64 v "2010 LCD front bezel" on page 104 Table 30. Removal steps of Bluetooth daughter card 1 2 Step 1 Screw (quantity) M2 × 3 mm, flat-head, nylon-coated (1) Color Black Torque 0.167 Nm (1.7 kgfcm) When installing: Make sure that connector is attached firmly. 106 ThinkPad R61, R61e, and R61i (15.4-inch widescreen) Hardware Maintenance Manual

