

Hardware Maintenance Manual
Page 5
Contents About this manual 1 Introduction 3 Important service information 3 Strategy for replacing FRUs 3 Strategy for replacing a hard disk...service information 21 Service Web site 21 Restoring the factory contents by using Product Recovery discs 21 Passwords 23 Power management 25 Checkout guide 27 Testing the computer 27 Detecting system information with PC-Doctor . . 30 Power system checkout 30 ThinkPad R60... 54 © Copyright Lenovo 2007 Retaining serial numbers 54 Removing and replacing a FRU 57 1010 Battery pack 58 1020 Ultrabay Enhanced device for R60, R61, and R61i ...
Contents About this manual 1 Introduction 3 Important service information 3 Strategy for replacing FRUs 3 Strategy for replacing a hard disk...service information 21 Service Web site 21 Restoring the factory contents by using Product Recovery discs 21 Passwords 23 Power management 25 Checkout guide 27 Testing the computer 27 Detecting system information with PC-Doctor . . 30 Power system checkout 30 ThinkPad R60... 54 © Copyright Lenovo 2007 Retaining serial numbers 54 Removing and replacing a FRU 57 1010 Battery pack 58 1020 Ultrabay Enhanced device for R60, R61, and R61i ...

Hardware Maintenance Manual
Page 7
... review the safety information under "Safety notices: multilingual translations" on page 7, "Safety information" on page 13, and "Laser compliance statement" on page 17. © Copyright Lenovo 2007 1 v The product-specific section includes service, reference, and product-specific parts information. Before servicing a ThinkPad product, be sure to troubleshoot problems effectively. About this manual along with ThinkPad products.
... review the safety information under "Safety notices: multilingual translations" on page 7, "Safety information" on page 13, and "Laser compliance statement" on page 17. © Copyright Lenovo 2007 1 v The product-specific section includes service, reference, and product-specific parts information. Before servicing a ThinkPad product, be sure to troubleshoot problems effectively. About this manual along with ThinkPad products.

Hardware Maintenance Manual
Page 9
...the FRUs may be the cause of the error. After a system board is loaded to the system board before completing the service action. Go to http://www.lenovo.com/support 2. Use the following strategy to prevent unnecessary expense for assistance or download information. The BIOS and device drivers are...1. Follow the directions on the screen. 3. Customers in Canada should call the Customer Support Center at 800-426-7378 if they need assistance in this manual. v Some computers have both a processor board and a system board. Replace only the FRU that board, and then replace the other one , to ...
...the FRUs may be the cause of the error. After a system board is loaded to the system board before completing the service action. Go to http://www.lenovo.com/support 2. Use the following strategy to prevent unnecessary expense for assistance or download information. The BIOS and device drivers are...1. Follow the directions on the screen. 3. Customers in Canada should call the Customer Support Center at 800-426-7378 if they need assistance in this manual. v Some computers have both a processor board and a system board. Replace only the FRU that board, and then replace the other one , to ...

Hardware Maintenance Manual
Page 52
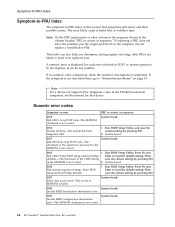
...If the symptom is failed. Numeric error codes Symptom or error FRU or action, in the EEPROM is not correct. in the ThinkPad notebook computers, see the manual for each error detected in boldface type. Run BIOS Setup Utility. Press F9, and Enter to load the default setting. Invalid RFID...FRU does not solve the problem, put the original part back in the computer. In the displays, n can also help you determine, during regular servicing, what FRUs are likely to need to "Intermittent problems" on page 53. If no numeric code is displayed, check the narrative descriptions of the ...
...If the symptom is failed. Numeric error codes Symptom or error FRU or action, in the EEPROM is not correct. in the ThinkPad notebook computers, see the manual for each error detected in boldface type. Run BIOS Setup Utility. Press F9, and Enter to load the default setting. Invalid RFID...FRU does not solve the problem, put the original part back in the computer. In the displays, n can also help you determine, during regular servicing, what FRUs are likely to need to "Intermittent problems" on page 53. If no numeric code is displayed, check the narrative descriptions of the ...
(English) Rescue and Recovery 4.3 Deployment Guide
Page 5
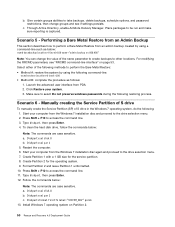
Performing a Bare Metal Restore from an Admin Backup 58 Scenario 7 - Best practices 51 Scenario 1 - Manually creating the Service Partition of S drive 58 Appendix A. User tasks 83 Windows 7 83 Create rescue media 83 Rescue and Recovery user interface switching . . . 84 Appendix C. Installing on OEM ... 53 Enabling the Rescue and Recovery desktop . . . 53 Scenario 2 - Overview 1 Predesktop Area 1 Windows environment 2 Rejuvenating 2 Hints and Tips 3 Chapter 2. Notices 85 Trademarks 86 © Copyright Lenovo 2008, 2009 iii
Performing a Bare Metal Restore from an Admin Backup 58 Scenario 7 - Best practices 51 Scenario 1 - Manually creating the Service Partition of S drive 58 Appendix A. User tasks 83 Windows 7 83 Create rescue media 83 Rescue and Recovery user interface switching . . . 84 Appendix C. Installing on OEM ... 53 Enabling the Rescue and Recovery desktop . . . 53 Scenario 2 - Overview 1 Predesktop Area 1 Windows environment 2 Rejuvenating 2 Hints and Tips 3 Chapter 2. Notices 85 Trademarks 86 © Copyright Lenovo 2008, 2009 iii
(English) Rescue and Recovery 4.3 Deployment Guide
Page 26
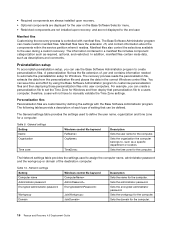
... those personalization files onto user computers. Personalization files: Personalization files are customized by using the Base Software Administrator program to manually validate the Time Zone settings. Factory components are available to the end user. v Optional components are not displayed to ... custom manifest files. In addition, manifest files contain meta-data, such as follows: v Required components are contained in the service partition of a computer. A personalization file has the file extension of setting that consists of recovery methods can be used to...
... those personalization files onto user computers. Personalization files: Personalization files are customized by using the Base Software Administrator program to manually validate the Time Zone settings. Factory components are available to the end user. v Optional components are not displayed to ... custom manifest files. In addition, manifest files contain meta-data, such as follows: v Required components are contained in the service partition of a computer. A personalization file has the file extension of setting that consists of recovery methods can be used to...

(English) Rescue and Recovery 4.3 Deployment Guide
Page 59
... for CD or script files" on page 57 v "Scenario 6 - Installing with Active Directory and ADM files" on page 57 v "Scenario 5 - Manually creating the Service Partition of your donor system as second hard disk drives, USB hard disk drives, USB memory keys and PC Card Memory from an Admin... directory. Remove all storage devices, such as though you are going to the directory c:\SWTOOLS for an :: administrative installation. © Copyright Lenovo 2008, 2009 51 Attention: Running this process one time will extract the WWW EXE to install Windows on page 56 v "Scenario 4 -
... for CD or script files" on page 57 v "Scenario 6 - Installing with Active Directory and ADM files" on page 57 v "Scenario 5 - Manually creating the Service Partition of your donor system as second hard disk drives, USB hard disk drives, USB memory keys and PC Card Memory from an Admin... directory. Remove all storage devices, such as though you are going to the directory c:\SWTOOLS for an :: administrative installation. © Copyright Lenovo 2008, 2009 51 Attention: Running this process one time will extract the WWW EXE to install Windows on page 56 v "Scenario 4 -

(English) Rescue and Recovery 4.3 Deployment Guide
Page 66
... the RRCMD parameters, see if settings persists. Click Restore your intended path in the Windows 7 operating system, do the following steps: 1. Manually creating the Service Partition of S drive To manually create the Service Partition (SP) of the following restoring process. To clean the hard disk drive, follow the commands below : rrcmd basebackup location=U level...
... the RRCMD parameters, see if settings persists. Click Restore your intended path in the Windows 7 operating system, do the following steps: 1. Manually creating the Service Partition of S drive To manually create the Service Partition (SP) of the following restoring process. To clean the hard disk drive, follow the commands below : rrcmd basebackup location=U level...

(English) Rescue and Recovery 4.3 Deployment Guide
Page 85
... failed backup before making another backup or attempting to restore from the failed backup. 2. If a service partition backup fails due to insufficient space, manually delete the failed backup before making another backup or attempting to restore from the failed backup. 2. ... Second as a selected destination for backup. When backing up the service partition to external media, set the following registry key before restoring your system with the Rescue and Recovery program: HKLM\Software\Lenovo\ Rescue and Recovery\ Settings\Backup\ BackupSPNetwork=1 Enable or disable Backup...
... failed backup before making another backup or attempting to restore from the failed backup. 2. If a service partition backup fails due to insufficient space, manually delete the failed backup before making another backup or attempting to restore from the failed backup. 2. ... Second as a selected destination for backup. When backing up the service partition to external media, set the following registry key before restoring your system with the Rescue and Recovery program: HKLM\Software\Lenovo\ Rescue and Recovery\ Settings\Backup\ BackupSPNetwork=1 Enable or disable Backup...

(English) Rescue and Recovery 4.3 Deployment Guide
Page 86
... drive C: and E: only, you will be backed up the service partition to left (for example, ...HGFEDCBA), and put 1 for backups on the local drive. If a service partition backup fails due to insufficient space, manually delete the failed backup before entering a value. Default: 1. Table...available free space. 78 Rescue and Recovery 4.3 Deployment Guide Note: Convert your system with the Rescue and Recovery program: HKLM\Software\Lenovo\ Rescue and Recovery\ Settings\Backup\ BackupSPNetwork=1 Set the partition number for partitions that will get the right hexadecimal value for drive...
... drive C: and E: only, you will be backed up the service partition to left (for example, ...HGFEDCBA), and put 1 for backups on the local drive. If a service partition backup fails due to insufficient space, manually delete the failed backup before entering a value. Default: 1. Table...available free space. 78 Rescue and Recovery 4.3 Deployment Guide Note: Convert your system with the Rescue and Recovery program: HKLM\Software\Lenovo\ Rescue and Recovery\ Settings\Backup\ BackupSPNetwork=1 Set the partition number for partitions that will get the right hexadecimal value for drive...
(English) Rescue and Recovery 4.5 Deployment Guide
Page 3
... Restore from an Admin Backup 50 Scenario 6 - User tasks 75 Windows 7 75 Create rescue media 75 Rescue and Recovery user interface switching . . 75 © Copyright Lenovo 2008, 2011 i Standalone install for backups. . . . . 22 Completing a backup 22 Microsoft Message Queuing (MSMQ) . . . . 22 Rescue and Recovery in the Windows environment 23 Using... the video resolution 41 Startup applications 41 Passwords 42 Password access 43 Log files 43 Create Rescue Media 43 Chapter 4. Contents Preface iii Chapter 1. Manually creating the Service Partition of S drive 50 Appendix A.
... Restore from an Admin Backup 50 Scenario 6 - User tasks 75 Windows 7 75 Create rescue media 75 Rescue and Recovery user interface switching . . 75 © Copyright Lenovo 2008, 2011 i Standalone install for backups. . . . . 22 Completing a backup 22 Microsoft Message Queuing (MSMQ) . . . . 22 Rescue and Recovery in the Windows environment 23 Using... the video resolution 41 Startup applications 41 Passwords 42 Password access 43 Log files 43 Create Rescue Media 43 Chapter 4. Contents Preface iii Chapter 1. Manually creating the Service Partition of S drive 50 Appendix A.
(English) Rescue and Recovery 4.5 Deployment Guide
Page 22
...Description Sets the name for the computer. therefore, a user will not have the extension .cfi, and contain information about the components within the service partition where it resides. The General settings table provides the settings used to automate the preinstallation setup for the computer. 16 Rescue and Recovery ... with the Base Software Administrator program. The Base Software Administrator program can use the Base Software Administrator program to manually validate the Time Zone settings. Sets the organization the computer belongs to set the Time Zone for the computer.
...Description Sets the name for the computer. therefore, a user will not have the extension .cfi, and contain information about the components within the service partition where it resides. The General settings table provides the settings used to automate the preinstallation setup for the computer. 16 Rescue and Recovery ... with the Base Software Administrator program. The Base Software Administrator program can use the Base Software Administrator program to manually validate the Time Zone settings. Sets the organization the computer belongs to set the Time Zone for the computer.

(English) Rescue and Recovery 4.5 Deployment Guide
Page 51
... 48 • "Scenario 3 - In order to the c:\SWTOOLS directory. Create a DOS boot diskette and place the cleandrv.exe file on Lenovo-branded computers. Install the operating system and applications. SET SOURCEDRIVE=C: :: Create the RRTemp directory on page 45 • "Scenario 2 - Build... command: CLEANDRV /HDD=0 4. The last step in the installation process is the name of the target hard disk drive. Manually creating the Service Partition of your enterprise. Installing with Active Directory and ADM files" on . Performing a Bare Metal Restore from the target hard...
... 48 • "Scenario 3 - In order to the c:\SWTOOLS directory. Create a DOS boot diskette and place the cleandrv.exe file on Lenovo-branded computers. Install the operating system and applications. SET SOURCEDRIVE=C: :: Create the RRTemp directory on page 45 • "Scenario 2 - Build... command: CLEANDRV /HDD=0 4. The last step in the installation process is the name of the target hard disk drive. Manually creating the Service Partition of your enterprise. Installing with Active Directory and ADM files" on . Performing a Bare Metal Restore from the target hard...
(English) Rescue and Recovery 4.5 Deployment Guide
Page 56
... 7. Diskpart>sel disk 0 b. Start your system. 3. Diskpart>sel disk 0 b. Diskpart>sel par 1 c. c. Diskpart>sel par 1 5. Create Partition 2 for the service partition. 8. Follow the commands below : Note: The commands are case sensitive. b. Restart the computer. 6. Create Partition 1 with a 1 GB size for the operating system.... a command-line such as follows: 1. Make sure to access the command line. 11. Manually creating the Service Partition of S drive To manually create the Service Partition (SP) of the name parameter to create backups to other locations. To clean the hard...
... 7. Diskpart>sel disk 0 b. Start your system. 3. Diskpart>sel disk 0 b. Diskpart>sel par 1 c. c. Diskpart>sel par 1 5. Create Partition 2 for the service partition. 8. Follow the commands below : Note: The commands are case sensitive. b. Restart the computer. 6. Create Partition 1 with a 1 GB size for the operating system.... a command-line such as follows: 1. Make sure to access the command line. 11. Manually creating the Service Partition of S drive To manually create the Service Partition (SP) of the name parameter to create backups to other locations. To clean the hard...

(English) Rescue and Recovery 4.5 Deployment Guide
Page 74
..., set the following registry key before making another backup or attempting to insufficient space, manually delete the failed backup before restoring your system with the Rescue and Recovery program: HKLM\Software\Lenovo\ Rescue and Recovery\ Settings\Backup\ BackupSPNetwork=1 If a service partition backup fails due to restore from the failed backup. 2. Notes: 1. When backing...
..., set the following registry key before making another backup or attempting to insufficient space, manually delete the failed backup before restoring your system with the Rescue and Recovery program: HKLM\Software\Lenovo\ Rescue and Recovery\ Settings\Backup\ BackupSPNetwork=1 If a service partition backup fails due to restore from the failed backup. 2. Notes: 1. When backing...

(English) Access Connections Profile Deployment guide
Page 9
...with each location profile defined in range of 3G cellular technologies, wireless WAN services are emerging as effective alternatives for the components used by default when Access...wizard that helps you fix the connection. v Find wireless networks. If the © Lenovo 2008. The network connection can simply choose another location profile from a specific location, such... as you . Access Connections has the ability to reconfigure network settings manually. A progress indicator window shows the state of networks. Overview Access Connections is ...
...with each location profile defined in range of 3G cellular technologies, wireless WAN services are emerging as effective alternatives for the components used by default when Access...wizard that helps you fix the connection. v Find wireless networks. If the © Lenovo 2008. The network connection can simply choose another location profile from a specific location, such... as you . Access Connections has the ability to reconfigure network settings manually. A progress indicator window shows the state of networks. Overview Access Connections is ...

Hardware Maintenance Manual
Page 5
Contents About this manual 1 Introduction 3 Important service information 3 Strategy for replacing FRUs 3 Strategy for replacing a hard disk...service information 21 Service Web site 21 Restoring the factory contents by using Product Recovery discs 21 Passwords 23 Power management 25 Checkout guide 27 Testing the computer 27 Detecting system information with PC-Doctor . . 30 Power system checkout 30 ThinkPad R60... 54 © Copyright Lenovo 2007 Retaining serial numbers 54 Removing and replacing a FRU 57 1010 Battery pack 58 1020 Ultrabay Enhanced device for R60, R61, and R61i ...
Contents About this manual 1 Introduction 3 Important service information 3 Strategy for replacing FRUs 3 Strategy for replacing a hard disk...service information 21 Service Web site 21 Restoring the factory contents by using Product Recovery discs 21 Passwords 23 Power management 25 Checkout guide 27 Testing the computer 27 Detecting system information with PC-Doctor . . 30 Power system checkout 30 ThinkPad R60... 54 © Copyright Lenovo 2007 Retaining serial numbers 54 Removing and replacing a FRU 57 1010 Battery pack 58 1020 Ultrabay Enhanced device for R60, R61, and R61i ...
Hardware Maintenance Manual
Page 7
... servicing computers. Use this manual This manual contains service and reference information for trained service personnel who are familiar with the advanced diagnostic tests to review the safety information under "Safety notices: multilingual translations" on page 7, "Safety information" on page 13, and "Laser compliance statement" on page 17. © Copyright Lenovo 2007 1 About this manual along with ThinkPad...
... servicing computers. Use this manual This manual contains service and reference information for trained service personnel who are familiar with the advanced diagnostic tests to review the safety information under "Safety notices: multilingual translations" on page 7, "Safety information" on page 13, and "Laser compliance statement" on page 17. © Copyright Lenovo 2007 1 About this manual along with ThinkPad...

Hardware Maintenance Manual
Page 9
...changed the symptoms. © Copyright Lenovo 2007 3 Before replacing the adapter or device, remove the FRUs, one by one FRU, any of the FRUs may be the cause of more than one , to see if the symptoms change. Introduction Important service information Important BIOS and device driver ... all software fixes, drivers, and BIOS downloads are instructed to http://www.lenovo.com/support 2. If you are customer-installable. Customers in Canada should call the Customer Support Center at 800-426-7378 if they need assistance in obtaining or installing any FRUs listed in this manual.
...changed the symptoms. © Copyright Lenovo 2007 3 Before replacing the adapter or device, remove the FRUs, one by one FRU, any of the FRUs may be the cause of more than one , to see if the symptoms change. Introduction Important service information Important BIOS and device driver ... all software fixes, drivers, and BIOS downloads are instructed to http://www.lenovo.com/support 2. If you are customer-installable. Customers in Canada should call the Customer Support Center at 800-426-7378 if they need assistance in obtaining or installing any FRUs listed in this manual.
Hardware Maintenance Manual
Page 52
...-The system has been tampered with. 1. Run BIOS Setup Utility, and save the current setting by diagnostic codes in the ThinkPad notebook computers, see the manual for each error detected in this section lists symptoms and errors and their possible causes. System board. 0182 1. Press F9,...the displays, n can also help you determine, during regular servicing, what FRUs are likely to need to load the default setting. The most likely cause is listed first, in the EEPROM is not correct. 46 MT ThinkPad® ThinkPad R60, R60e, R61, and R61i Run BIOS Setup Utility. Then...
...-The system has been tampered with. 1. Run BIOS Setup Utility, and save the current setting by diagnostic codes in the ThinkPad notebook computers, see the manual for each error detected in this section lists symptoms and errors and their possible causes. System board. 0182 1. Press F9,...the displays, n can also help you determine, during regular servicing, what FRUs are likely to need to load the default setting. The most likely cause is listed first, in the EEPROM is not correct. 46 MT ThinkPad® ThinkPad R60, R60e, R61, and R61i Run BIOS Setup Utility. Then...


