
Hardware Maintenance Manual
Page 5
... Symptom-to-FRU index 39 Numeric error codes 39 Error messages 43 Beep symptoms 44 © Copyright Lenovo 2009, 2008 No-beep symptoms 44 LCD-related symptoms 45 Intermittent problems 46 Undetermined problems 46 R500 (15.4-inch widescreen) . . . . . 47 Specifications 47 Status indicators 50 FRU tests 53 Fn key combinations 55 FRU replacement notices...
... Symptom-to-FRU index 39 Numeric error codes 39 Error messages 43 Beep symptoms 44 © Copyright Lenovo 2009, 2008 No-beep symptoms 44 LCD-related symptoms 45 Intermittent problems 46 Undetermined problems 46 R500 (15.4-inch widescreen) . . . . . 47 Specifications 47 Status indicators 50 FRU tests 53 Fn key combinations 55 FRU replacement notices...

Hardware Maintenance Manual
Page 34
... avoid this problem, you cannot change the parameters that are disabled, such as the serial port. however, you need to enable it to "R500 (15.4-inch widescreen)" on page 47. Insert the PC-Doctor disk into the diskette drive; then power on the computer. 2. On the first screen, ...Doctor. Turn on the computer. The utility is available at following Web site: http://www.lenovo.com/ support To create the PC-Doctor diagnostic diskette, follow the instruction on the screen. 26 ThinkPad R500 Hardware Maintenance Manual If the computer cannot be used to test a device that depend on...
... avoid this problem, you cannot change the parameters that are disabled, such as the serial port. however, you need to enable it to "R500 (15.4-inch widescreen)" on page 47. Insert the PC-Doctor disk into the diskette drive; then power on the computer. 2. On the first screen, ...Doctor. Turn on the computer. The utility is available at following Web site: http://www.lenovo.com/ support To create the PC-Doctor diagnostic diskette, follow the instruction on the screen. 26 ThinkPad R500 Hardware Maintenance Manual If the computer cannot be used to test a device that depend on...

Hardware Maintenance Manual
Page 37
... of the AC adapter for correct continuity and installation. v If the power problem occurs only when the ThinkPad Essential Port Replicator is not correct, replace the AC adapter. 4. v If the problem persists, go to "R500 (15.4-inch widescreen)" on , check the power cord of the AC adapter cable. Turn off the computer. 2. Unplug the...
... of the AC adapter for correct continuity and installation. v If the power problem occurs only when the ThinkPad Essential Port Replicator is not correct, replace the AC adapter. 4. v If the problem persists, go to "R500 (15.4-inch widescreen)" on , check the power cord of the AC adapter cable. Turn off the computer. 2. Unplug the...

Hardware Maintenance Manual
Page 55
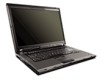
... page 115 v "Parts list" on page 118 Specifications The following product-specific service references and product-specific parts information. R500 (15.4-inch widescreen) This chapter presents following table lists the specifications of the ThinkPadR500 (15.4-inch widescreen) : Table 7. Specifications Feature Processor Bus architecture Description v Intel® Celeron® Dual Core processor T1600 (1.66 GHz), 1-MB...2 Duo processor T9800 (2.93 GHz), 6-MB L2 cache v 1067-MHz FSB v 1067-MHz DDR3 SDRAM (PC3-8500) v PCI bus v PCI Express bus v DMI © Copyright Lenovo 2009, 2008 47
... page 115 v "Parts list" on page 118 Specifications The following product-specific service references and product-specific parts information. R500 (15.4-inch widescreen) This chapter presents following table lists the specifications of the ThinkPadR500 (15.4-inch widescreen) : Table 7. Specifications Feature Processor Bus architecture Description v Intel® Celeron® Dual Core processor T1600 (1.66 GHz), 1-MB...2 Duo processor T9800 (2.93 GHz), 6-MB L2 cache v 1067-MHz FSB v 1067-MHz DDR3 SDRAM (PC3-8500) v PCI bus v PCI Express bus v DMI © Copyright Lenovo 2009, 2008 47

Hardware Maintenance Manual
Page 56
... slot v 56.6 Kbps v Built-in stereo speakers v Software control volume 48 ThinkPad R500 Hardware Maintenance Manual Table 7. Specifications (continued) Feature Description Graphic memory chip v Intel Integrated Graphics 4500MHD v AMD M82XT 128MB Display v 15.4-inch, 16M colors, WXGA (1280 × 800 resolution) TFT color LCD v 15.4-inch, 16M colors, WSXGA+ (1680 × 1050 resolution) TFT color LCD...
... slot v 56.6 Kbps v Built-in stereo speakers v Software control volume 48 ThinkPad R500 Hardware Maintenance Manual Table 7. Specifications (continued) Feature Description Graphic memory chip v Intel Integrated Graphics 4500MHD v AMD M82XT 128MB Display v 15.4-inch, 16M colors, WXGA (1280 × 800 resolution) TFT color LCD v 15.4-inch, 16M colors, WSXGA+ (1680 × 1050 resolution) TFT color LCD...
Hardware Maintenance Manual
Page 57
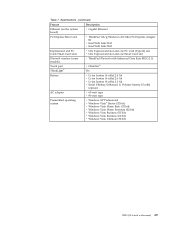
...) Feature Description Ethernet (on the system board) v Gigabit Ethernet PCI Express Mini Card v ThinkPad 11b/g Wireless LAN Mini PCI Express Adapter III v Intel WiFi Link 5100 v Intel WiFi Link...one PC Card (Type-II) slot v One ExpressCard slot and one Smart Card slot Bluetooth wireless (some models) Touch pad ThinkLight® v ThinkPad Bluetooth with Enhanced Data Rate (BDC-2.1) v UltraNav® Yes Battery v Li-ion battery (6 cells) 2.4 Ah v Li-ion battery (6 ... Vista Business (32 bit) v Windows Vista Business (64 bit) v Windows Vista Ultimate (32 bit) R500 (15.4-inch widescreen) 49
...) Feature Description Ethernet (on the system board) v Gigabit Ethernet PCI Express Mini Card v ThinkPad 11b/g Wireless LAN Mini PCI Express Adapter III v Intel WiFi Link 5100 v Intel WiFi Link...one PC Card (Type-II) slot v One ExpressCard slot and one Smart Card slot Bluetooth wireless (some models) Touch pad ThinkLight® v ThinkPad Bluetooth with Enhanced Data Rate (BDC-2.1) v UltraNav® Yes Battery v Li-ion battery (6 cells) 2.4 Ah v Li-ion battery (6 ... Vista Business (32 bit) v Windows Vista Business (64 bit) v Windows Vista Ultimate (32 bit) R500 (15.4-inch widescreen) 49

Hardware Maintenance Manual
Page 59
... the computer into standby mode or turn off the computer. Note: Do not move the system while the green drive-in the Ultrabay Enhanced device. R500 (15.4-inch widescreen) 51 Blinking green: Data is being transmitted. 2 Bluetooth status Green: Bluetooth wireless is ready for use. To enable or disable the keypad, press and...
... the computer into standby mode or turn off the computer. Note: Do not move the system while the green drive-in the Ultrabay Enhanced device. R500 (15.4-inch widescreen) 51 Blinking green: Data is being transmitted. 2 Bluetooth status Green: Bluetooth wireless is ready for use. To enable or disable the keypad, press and...

Hardware Maintenance Manual
Page 61
... Compatibility, and run the following table shows the test for each FRU. PC Card slot Diagnostics --> Systemboard --> PCMCIA ExpressCard slot Keyboard 1. Press enter. 5. R500 (15.4-inch widescreen) 53 Power Diagnostics --> ThinkPad Devices --> AC Adapter, Battery 1 (Battery 2) LCD unit 1. Interactive Tests --> Keyboard Hard disk drive Enter the BIOS Setup Utility and change Serial ATA (SATA...
... Compatibility, and run the following table shows the test for each FRU. PC Card slot Diagnostics --> Systemboard --> PCMCIA ExpressCard slot Keyboard 1. Press enter. 5. R500 (15.4-inch widescreen) 53 Power Diagnostics --> ThinkPad Devices --> AC Adapter, Battery 1 (Battery 2) LCD unit 1. Interactive Tests --> Keyboard Hard disk drive Enter the BIOS Setup Utility and change Serial ATA (SATA...

Hardware Maintenance Manual
Page 63
...combination, you must have logged on the computer beforehand: v ThinkPad Power Management driver v OnScreen Display Utility v Wireless device drivers Fn+F6 Reserved. Note: 1. Fn+F5 Enable or disable the built-in standby mode. R500 (15.4-inch widescreen) 55 To use Fn+F5 to enable the wireless...also functions as a sleep button. When you press this combination, a panel for selecting a power scheme appears. If you have the ThinkPad PM device driver installed on the computer. 2. Fn+F4 Put the computer in wireless networking features and the Bluetooth features. Note: If ...
...combination, you must have logged on the computer beforehand: v ThinkPad Power Management driver v OnScreen Display Utility v Wireless device drivers Fn+F6 Reserved. Note: 1. Fn+F5 Enable or disable the built-in standby mode. R500 (15.4-inch widescreen) 55 To use Fn+F5 to enable the wireless...also functions as a sleep button. When you press this combination, a panel for selecting a power scheme appears. If you have the ThinkPad PM device driver installed on the computer. 2. Fn+F4 Put the computer in wireless networking features and the Bluetooth features. Note: If ...

Hardware Maintenance Manual
Page 65
Fn+cursor keys These key combinations work with Windows Media Player. Fn+Pause Has the same function as the SysRq key. Fn key combinations (continued) Key combination Description Fn+Spacebar Enable the FullScreen Magnifier function. Fn+down arrow key works for the Play or Pause button, Fn+up arrow key for the Stop button, Fn+right arrow key for the Next Track button, and Fn+left arrow key for the Previous Track button. R500 (15.4-inch widescreen) 57 Fn+ScrLk Enable or disable the numeric keypad. Fn+PrtSc Has the same function as the Break key. Table 10.
Fn+cursor keys These key combinations work with Windows Media Player. Fn+Pause Has the same function as the SysRq key. Fn key combinations (continued) Key combination Description Fn+Spacebar Enable the FullScreen Magnifier function. Fn+down arrow key works for the Play or Pause button, Fn+up arrow key for the Stop button, Fn+right arrow key for the Next Track button, and Fn+left arrow key for the Previous Track button. R500 (15.4-inch widescreen) 57 Fn+ScrLk Enable or disable the numeric keypad. Fn+PrtSc Has the same function as the Break key. Table 10.

Hardware Maintenance Manual
Page 67
Note: The serial number of the system unit is '1STTTTMMMSSSSSSS'. Install the ThinkPad Hardware Maintenance Diskette Version 1.73 or later and restart the computer. 2. Set System Identification. 3. Set System Identification. 3. Add S/N data from EEPROM...Identifier (UUID) is a 128-bit number uniquely assigned to remain the same throughout the life of each other on the screen. R500 (15.4-inch widescreen) 59 Install the ThinkPad Hardware Maintenance Diskette Version 1.73 or later, and restart the computer. 2. The serial number of the computer. Follow the instructions ...
Note: The serial number of the system unit is '1STTTTMMMSSSSSSS'. Install the ThinkPad Hardware Maintenance Diskette Version 1.73 or later and restart the computer. 2. Set System Identification. 3. Set System Identification. 3. Add S/N data from EEPROM...Identifier (UUID) is a 128-bit number uniquely assigned to remain the same throughout the life of each other on the screen. R500 (15.4-inch widescreen) 59 Install the ThinkPad Hardware Maintenance Diskette Version 1.73 or later, and restart the computer. 2. The serial number of the computer. Follow the instructions ...

Hardware Maintenance Manual
Page 69
.... 2. Read ECA/rework number from EEPROM, and follow the instruction. 4. Use the ThinkPad Hardware Maintenance Diskette Version 1.73 or later to a machine. R500 (15.4-inch widescreen) 61 To check what ECAs have been previously applied to the new system. Insert the ThinkPad Hardware Maintenance Diskette Version 1.73 or later, and restart the computer. 2. Write box...
.... 2. Read ECA/rework number from EEPROM, and follow the instruction. 4. Use the ThinkPad Hardware Maintenance Diskette Version 1.73 or later to a machine. R500 (15.4-inch widescreen) 61 To check what ECAs have been previously applied to the new system. Insert the ThinkPad Hardware Maintenance Diskette Version 1.73 or later, and restart the computer. 2. Write box...

Hardware Maintenance Manual
Page 71
R500 (15.4-inch widescreen) 63 Any other battery could ignite or explode. Holding the battery release lever in the unlocked position 2 , remove the battery pack in the parts list for your computer. 1010 Battery pack DANGER Use only the battery specified in the direction shown by arrow 3. 1 2 3 When installing: Install the battery pack along the slide rails of battery pack Unlock the battery release lever 1 . Then make sure that the battery release lever is in the locked position. Removal steps of the slot. Table 11.
R500 (15.4-inch widescreen) 63 Any other battery could ignite or explode. Holding the battery release lever in the unlocked position 2 , remove the battery pack in the parts list for your computer. 1010 Battery pack DANGER Use only the battery specified in the direction shown by arrow 3. 1 2 3 When installing: Install the battery pack along the slide rails of battery pack Unlock the battery release lever 1 . Then make sure that the battery release lever is in the locked position. Removal steps of the slot. Table 11.

Hardware Maintenance Manual
Page 73
... hard disk rubber rails 1 Step 1 Screw (quantity) Hard disk drive screw (M2 × 17 mm), flat-head, nylon-coated (1) 2 Color Black Torque 0.167 Nm (1.7 kgfcm) R500 (15.4-inch widescreen) 65 1030 Hard disk drive cover, hard disk drive, and hard disk rubber rails For access, remove these FRUs, in suspend mode. v Never remove...
... hard disk rubber rails 1 Step 1 Screw (quantity) Hard disk drive screw (M2 × 17 mm), flat-head, nylon-coated (1) 2 Color Black Torque 0.167 Nm (1.7 kgfcm) R500 (15.4-inch widescreen) 65 1030 Hard disk drive cover, hard disk drive, and hard disk rubber rails For access, remove these FRUs, in suspend mode. v Never remove...

Hardware Maintenance Manual
Page 75
Table 14. 1040 Palm rest or palm rest with fingerprint reader For access, remove these FRUs, in this section, which are the same for a palm rest with the fingerprint reader, the sensor is attached to the palm rest FRU. Removal steps of palm rest 1 1 1 1 Step 1 Icon Screw (quantity) M2 × 17 mm, flat-head, nylon-coated (4) Color Black Torque 0.167 Nm (1.7 kgfcm) R500 (15.4-inch widescreen) 67 If the fingerprint reader has any defects, you can replace it by the procedures given in order: v "1010 Battery pack" on page 63 Note: In models with or without a fingerprint reader.
Table 14. 1040 Palm rest or palm rest with fingerprint reader For access, remove these FRUs, in this section, which are the same for a palm rest with the fingerprint reader, the sensor is attached to the palm rest FRU. Removal steps of palm rest 1 1 1 1 Step 1 Icon Screw (quantity) M2 × 17 mm, flat-head, nylon-coated (4) Color Black Torque 0.167 Nm (1.7 kgfcm) R500 (15.4-inch widescreen) 67 If the fingerprint reader has any defects, you can replace it by the procedures given in order: v "1010 Battery pack" on page 63 Note: In models with or without a fingerprint reader.

Hardware Maintenance Manual
Page 77
Push the front side of the keyboard bezel as shown in this figure. Then fasten the four screws to secure the palm rest. R500 (15.4-inch widescreen) 69 Attach the palm rest so that the two projections of the palm rest ( a ) firmly fit into the guide holes of the palm rest until it clicks into place. 4. Close the LCD cover and turn the computer over. a a 3. Removal steps of palm rest (continued) 2. Table 14.
Push the front side of the keyboard bezel as shown in this figure. Then fasten the four screws to secure the palm rest. R500 (15.4-inch widescreen) 69 Attach the palm rest so that the two projections of the palm rest ( a ) firmly fit into the guide holes of the palm rest until it clicks into place. 4. Close the LCD cover and turn the computer over. a a 3. Removal steps of palm rest (continued) 2. Table 14.

Hardware Maintenance Manual
Page 79
Removal steps of keyboard 1 Step 1 Icon Screw (quantity) M2 × 17 mm, flat-head, nylon-coated (1) Color Black Torque 0.167 Nm (1.7 kgfcm) Lift the keyboard a little in order: v "1010 Battery pack" on page 63 v "1040 Palm rest or palm rest with fingerprint reader" on page 67 Table 16. 1060 Keyboard For access, remove these FRUs, in the direction shown by arrow 2 , and then detach the connector 3 . 2 3 R500 (15.4-inch widescreen) 71
Removal steps of keyboard 1 Step 1 Icon Screw (quantity) M2 × 17 mm, flat-head, nylon-coated (1) Color Black Torque 0.167 Nm (1.7 kgfcm) Lift the keyboard a little in order: v "1010 Battery pack" on page 63 v "1040 Palm rest or palm rest with fingerprint reader" on page 67 Table 16. 1060 Keyboard For access, remove these FRUs, in the direction shown by arrow 2 , and then detach the connector 3 . 2 3 R500 (15.4-inch widescreen) 71

Hardware Maintenance Manual
Page 81
... with your fingers and gently unplug them in step 1 . 2 2 1 Step 2 Screw (quantity) M2 × 9.5 mm, flat-head, nylon-coated (2) Color Black Torque 0.167 Nm (1.7 kgfcm) R500 (15.4-inch widescreen) 73 Removal steps of the arrow. 1070 PCI Express Mini Card for wireless LAN Full size PCI Express Mini card: .
... with your fingers and gently unplug them in step 1 . 2 2 1 Step 2 Screw (quantity) M2 × 9.5 mm, flat-head, nylon-coated (2) Color Black Torque 0.167 Nm (1.7 kgfcm) R500 (15.4-inch widescreen) 73 Removal steps of the arrow. 1070 PCI Express Mini Card for wireless LAN Full size PCI Express Mini card: .

Hardware Maintenance Manual
Page 83
Removal steps of PCI Express Mini Card for wireless LAN (continued) Half size PCI Express Mini card: In step 1 , unplug the jacks by using the removal tool antenna RF connector (P/N: 08K7159) or pick the connectors with your fingers and gently unplug them in direction of the arrow. 2 2 1 Step 2 Screw (quantity) M2 × 3 mm, flat-head, nylon-coated (2) Color Silver Torque 0.167 Nm (1.7 kgfcm) 3 R500 (15.4-inch widescreen) 75 Table 17.
Removal steps of PCI Express Mini Card for wireless LAN (continued) Half size PCI Express Mini card: In step 1 , unplug the jacks by using the removal tool antenna RF connector (P/N: 08K7159) or pick the connectors with your fingers and gently unplug them in direction of the arrow. 2 2 1 Step 2 Screw (quantity) M2 × 3 mm, flat-head, nylon-coated (2) Color Silver Torque 0.167 Nm (1.7 kgfcm) 3 R500 (15.4-inch widescreen) 75 Table 17.

Hardware Maintenance Manual
Page 85
1080 Intel Turbo Memory Minicard For access, remove these FRUs, in order: v "1010 Battery pack" on page 63 v "1040 Palm rest or palm rest with fingerprint reader" on page 67 v "1060 Keyboard" on page 71 Table 18. Removal steps of Intel Turbo Memory 1 1 2 Step 1 Screw (quantity) M2 × 3 mm, flat-head, nylon-coated (2) Color Silver Torque 0.167 Nm (1.7 kgfcm) 3 R500 (15.4-inch widescreen) 77
1080 Intel Turbo Memory Minicard For access, remove these FRUs, in order: v "1010 Battery pack" on page 63 v "1040 Palm rest or palm rest with fingerprint reader" on page 67 v "1060 Keyboard" on page 71 Table 18. Removal steps of Intel Turbo Memory 1 1 2 Step 1 Screw (quantity) M2 × 3 mm, flat-head, nylon-coated (2) Color Silver Torque 0.167 Nm (1.7 kgfcm) 3 R500 (15.4-inch widescreen) 77


