Hardware Maintenance Manual
Page 4
... board and USB cable assembly 97 1220 DC-in cable and base cover 99 2010 LCD front bezel 103 2020 Speaker assembly 104 2030 Integrated camera 105 2040 Antenna assembly 105 2050 Hinges, LCD panel, LCD cable, and LCD rear cover assembly 107 Chapter 9. Locations 111 Front view 111 Rear view...
... board and USB cable assembly 97 1220 DC-in cable and base cover 99 2010 LCD front bezel 103 2020 Speaker assembly 104 2030 Integrated camera 105 2040 Antenna assembly 105 2050 Hinges, LCD panel, LCD cable, and LCD rear cover assembly 107 Chapter 9. Locations 111 Front view 111 Rear view...
Hardware Maintenance Manual
Page 59
...return to use the Fn+F4 key combination, you must be changed. © Copyright Lenovo 2009, 2012 53 Enable or disable the built-in sleep (standby) mode. When you press Fn+F6, the camera setting window is displayed. Fn+F2 Lock the computer. To use the combination to put...F5 to use the Fn+F3 key combination, you must have the ThinkPad PM device driver installed on the computer beforehand: • ThinkPad Power Management driver • OnScreen Display Utility • Wireless device drivers Change the camera settings and the setting of the microphone mute button. If you press...
...return to use the Fn+F4 key combination, you must be changed. © Copyright Lenovo 2009, 2012 53 Enable or disable the built-in sleep (standby) mode. When you press Fn+F6, the camera setting window is displayed. Fn+F2 Lock the computer. To use the combination to put...F5 to use the Fn+F3 key combination, you must have the ThinkPad PM device driver installed on the computer beforehand: • ThinkPad Power Management driver • OnScreen Display Utility • Wireless device drivers Change the camera settings and the setting of the microphone mute button. If you press...
Hardware Maintenance Manual
Page 111
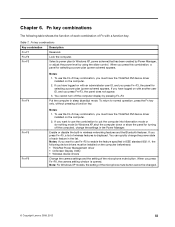
...a FRU 105 Step 1 Screw (quantity) M2 × 3 mm, wafer-head, nylon-coated (2) Color Black Torque 0.181 Nm (1.85 kgfcm) 2030 Integrated camera For access, remove these FRUs in order: • "1010 Battery pack" on page 61 • "1100 Wireless WAN slot cover and PCI Express Mini Card...; "1180 LCD unit" on page 87 • "2010 LCD front bezel" on page 103 • "2020 Speaker assembly" on page 104 Removal steps of integrated camera 1 2 1 3 Step 1 Screw (quantity) M2 × 3 mm, wafer-head, nylon-coated (2) When installing: Make sure that the connector is attached firmly. 2040 ...
...a FRU 105 Step 1 Screw (quantity) M2 × 3 mm, wafer-head, nylon-coated (2) Color Black Torque 0.181 Nm (1.85 kgfcm) 2030 Integrated camera For access, remove these FRUs in order: • "1010 Battery pack" on page 61 • "1100 Wireless WAN slot cover and PCI Express Mini Card...; "1180 LCD unit" on page 87 • "2010 LCD front bezel" on page 103 • "2020 Speaker assembly" on page 104 Removal steps of integrated camera 1 2 1 3 Step 1 Screw (quantity) M2 × 3 mm, wafer-head, nylon-coated (2) When installing: Make sure that the connector is attached firmly. 2040 ...

Hardware Maintenance Manual
Page 112
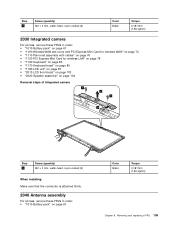
For ThinkPad SL510 and L510: 1 1 1 1 1 1 When installing: Route the cables as shown in this figure. When you route the cables, make sure that they are not subjected ... • "1180 LCD unit" on page 87 • "2010 LCD front bezel" on page 103 • "2020 Speaker assembly" on page 104 • "2030 Integrated camera" on page 105 Removal steps of antenna assembly Release the antenna cables from the cable guides of the LCD rear cover assembly and from the...
For ThinkPad SL510 and L510: 1 1 1 1 1 1 When installing: Route the cables as shown in this figure. When you route the cables, make sure that they are not subjected ... • "1180 LCD unit" on page 87 • "2010 LCD front bezel" on page 103 • "2020 Speaker assembly" on page 104 • "2030 Integrated camera" on page 105 Removal steps of antenna assembly Release the antenna cables from the cable guides of the LCD rear cover assembly and from the...

Hardware Maintenance Manual
Page 114
... LCD unit" on page 87 • "2010 LCD front bezel" on page 103 • "2020 Speaker assembly" on page 104 • "2030 Integrated camera" on page 105 • "2040 Antenna assembly" on page 105 Removal steps of hinges, LCD panel, LCD cable, and LCD rear cover assembly For... ThinkPad SL510 and L510: 1 1 1 1 Step 1 Screw (quantity) M2 × 5 mm, wafer-head, nylon-coated (4) For ThinkPad SL410 and L410: 1 Color Black Torque 0.181 Nm (1.85 kgfcm) 1 Step 1 Screw (quantity) M2 × 5 mm, wafer-...
... LCD unit" on page 87 • "2010 LCD front bezel" on page 103 • "2020 Speaker assembly" on page 104 • "2030 Integrated camera" on page 105 • "2040 Antenna assembly" on page 105 Removal steps of hinges, LCD panel, LCD cable, and LCD rear cover assembly For... ThinkPad SL510 and L510: 1 1 1 1 Step 1 Screw (quantity) M2 × 5 mm, wafer-head, nylon-coated (4) For ThinkPad SL410 and L410: 1 Color Black Torque 0.181 Nm (1.85 kgfcm) 1 Step 1 Screw (quantity) M2 × 5 mm, wafer-...

Hardware Maintenance Manual
Page 117
...) 14 Touch pad buttons 15 Touch pad 16 TrackPoint buttons 17 TrackPoint pointing stick 18 UltraNav 19 Volume control buttons © Copyright Lenovo 2009, 2012 111 Front view 1 Integrated camera 2 Built-in microphone 3 Built-in stereo speakers 4 Power switch 5 ac power connector 6 ThinkVantage button 7 System status indicators Note: For... or travel cover 9 Media Card reader 10 USB connector 11 Wireless radio switch 12 Power status indicators Note: For the description of ThinkPad SL410, L410, SL510, and L510 features and hardware components. Chapter 9.
...) 14 Touch pad buttons 15 Touch pad 16 TrackPoint buttons 17 TrackPoint pointing stick 18 UltraNav 19 Volume control buttons © Copyright Lenovo 2009, 2012 111 Front view 1 Integrated camera 2 Built-in microphone 3 Built-in stereo speakers 4 Power switch 5 ac power connector 6 ThinkVantage button 7 System status indicators Note: For... or travel cover 9 Media Card reader 10 USB connector 11 Wireless radio switch 12 Power status indicators Note: For the description of ThinkPad SL410, L410, SL510, and L510 features and hardware components. Chapter 9.

Hardware Maintenance Manual
Page 150
CRU ID 1 LCD front bezel for 14W 75Y4787 N 2 Integrated camera with microphone (0.3M) 60Y3325 N • 0616-CTO, 22x, 25x, 26x, 27x, 28x, 29x, 2Cx, 2Dx, 2Ex, 2Fx, 2Gx, 2Hx, 2Jx, 2Kx, 2Lx 63Y0171 • 2842-..., 67x, 68x, 69x, 6Ax, 6Bx, 6Cx, 6Dx, 6Ux, 6Yx, 76x, 77x, 78x, 79x, 7Ax, 7Vx, 7Wx, 7Xx, 7Yx, 7Zx, 82x • 2931-CTO, 23x 2 Integrated camera with microphone (2.0M) 60Y3327 N • 0616-CTO 63Y0159 • 2842-CTO, 35x, 36x, 37x, 39x, 3Bx, 3Dx, 3Qx, 47x, 48x, 49x, 4Ax, 4Bx, 4Cx, 4Dx...
CRU ID 1 LCD front bezel for 14W 75Y4787 N 2 Integrated camera with microphone (0.3M) 60Y3325 N • 0616-CTO, 22x, 25x, 26x, 27x, 28x, 29x, 2Cx, 2Dx, 2Ex, 2Fx, 2Gx, 2Hx, 2Jx, 2Kx, 2Lx 63Y0171 • 2842-..., 67x, 68x, 69x, 6Ax, 6Bx, 6Cx, 6Dx, 6Ux, 6Yx, 76x, 77x, 78x, 79x, 7Ax, 7Vx, 7Wx, 7Xx, 7Yx, 7Zx, 82x • 2931-CTO, 23x 2 Integrated camera with microphone (2.0M) 60Y3327 N • 0616-CTO 63Y0159 • 2842-CTO, 35x, 36x, 37x, 39x, 3Bx, 3Dx, 3Qx, 47x, 48x, 49x, 4Ax, 4Bx, 4Cx, 4Dx...

Hardware Maintenance Manual
Page 153
... 27R2465 93P5705 93P5725 93P5733 93P5721 04W0411 45M2851 N Table 10. Parts list-15.6-inch HD LCD No. CRU ID 1 LCD front bezel for 15W 75Y4788 N 2 Integrated camera with microphone (0.3M) • 2847-CTO, 22x, 44x, 4Hx, 5Cx, 5Dx, 84x, 85x, 86x, 87x, 88x, 2Zx, 7Kx, 7Lx, 7Mx, 7Nx, 6Nx, 6Px, 6Qx,..., 4Sx, 4Tx, 4Ux, 4Yx, 52x, 53x, 54x, 55x, 56x, 5Bx, R3x, R4x, R5x, RDx, RFx, RGx, RHx, RJx • 5072-CTO 60Y3325 N 63Y0171 2 Integrated camera with microphone (2.0M) 60Y3327 N • 2847-CTO, 23x, 34x, 35x, 36x, 37x, 38x, 39x, 3Dx, 3Ex, 42x, 43x, 45x, 46x, 47x, 48x, 49x, 63Y0159 4Ax...
... 27R2465 93P5705 93P5725 93P5733 93P5721 04W0411 45M2851 N Table 10. Parts list-15.6-inch HD LCD No. CRU ID 1 LCD front bezel for 15W 75Y4788 N 2 Integrated camera with microphone (0.3M) • 2847-CTO, 22x, 44x, 4Hx, 5Cx, 5Dx, 84x, 85x, 86x, 87x, 88x, 2Zx, 7Kx, 7Lx, 7Mx, 7Nx, 6Nx, 6Px, 6Qx,..., 4Sx, 4Tx, 4Ux, 4Yx, 52x, 53x, 54x, 55x, 56x, 5Bx, R3x, R4x, R5x, RDx, RFx, RGx, RHx, RJx • 5072-CTO 60Y3325 N 63Y0171 2 Integrated camera with microphone (2.0M) 60Y3327 N • 2847-CTO, 23x, 34x, 35x, 36x, 37x, 38x, 39x, 3Dx, 3Ex, 42x, 43x, 45x, 46x, 47x, 48x, 49x, 63Y0159 4Ax...

Hardware Maintenance Manual
Page 156
.... FRU (15.6-inch HDx, LCD) 1 LCD front bezel 15W • 2847-CTO • 2873-CTO • 2875-CTO 2 Integrated camera with microphone (0.3M) • 2847-CTO • 2873-CTO • 2875-CTO 2 Integrated camera with microphone (2.0M) • 2847-CTO • 2873-CTO • 2875-CTO 2 Microphone • 2847-CTO • 2873...
.... FRU (15.6-inch HDx, LCD) 1 LCD front bezel 15W • 2847-CTO • 2873-CTO • 2875-CTO 2 Integrated camera with microphone (0.3M) • 2847-CTO • 2873-CTO • 2875-CTO 2 Integrated camera with microphone (2.0M) • 2847-CTO • 2873-CTO • 2875-CTO 2 Microphone • 2847-CTO • 2873...

(English) Setup Guide
Page 1
...using your computer Manage battery & power Enter sleep (standby) Manage wireless connections Change camera & microphone mute settings Change display settings Change input device settings Enter hibernation Multimedia controls...the battery pack: Note: This system does not support batteries that are not genuine Lenovo-made or authorized. Connect to power: Turn on -screen instructions: This process takes... Guide - For more details, refer to Access Help: For how to access special ThinkPad features. Unpack - Initial Setup Instructions Read the safety notices and important tips in Access...
...using your computer Manage battery & power Enter sleep (standby) Manage wireless connections Change camera & microphone mute settings Change display settings Change input device settings Enter hibernation Multimedia controls...the battery pack: Note: This system does not support batteries that are not genuine Lenovo-made or authorized. Connect to power: Turn on -screen instructions: This process takes... Guide - For more details, refer to Access Help: For how to access special ThinkPad features. Unpack - Initial Setup Instructions Read the safety notices and important tips in Access...

(English) Setup Guide
Page 2
... and Troubleshooting Guide. In the Windows Help and Support, click "Lenovo Access Help." Click Access Help. Green design Your computer is a comprehensive online manual that enable you for choosing a ThinkPad Notebook. Optimized network connectivity Advanced network connectivity options, such as an integrated camera*, an HDMI (High-Definition Interface) port, and an integrated Blu...
... and Troubleshooting Guide. In the Windows Help and Support, click "Lenovo Access Help." Click Access Help. Green design Your computer is a comprehensive online manual that enable you for choosing a ThinkPad Notebook. Optimized network connectivity Advanced network connectivity options, such as an integrated camera*, an HDMI (High-Definition Interface) port, and an integrated Blu...

