(English) Service and Troubleshooting Guide
Page 29
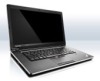
... For the telephone number of the Support Center for replacing all self-service CRUs. Optional-service CRUs can be removed and installed by customers or, during the warranty period, by a Lenovo service technician. Lenovo notebook computers contain both self-service and optional-service...wireless cards, notebook keyboards, and palm rests with fingerprint reader and touchpad may be CRUs. • Optional-service CRUs: these CRUs can be unplugged, or are listed in the table on page 5. © Copyright Lenovo 2011 17 Customer Replaceable Units (CRUs) Customer Replaceable Units (CRUs)...
... For the telephone number of the Support Center for replacing all self-service CRUs. Optional-service CRUs can be removed and installed by customers or, during the warranty period, by a Lenovo service technician. Lenovo notebook computers contain both self-service and optional-service...wireless cards, notebook keyboards, and palm rests with fingerprint reader and touchpad may be CRUs. • Optional-service CRUs: these CRUs can be unplugged, or are listed in the table on page 5. © Copyright Lenovo 2011 17 Customer Replaceable Units (CRUs) Customer Replaceable Units (CRUs)...
Hardware Maintenance Manual
Page 3
...Sleep mode 42 Hibernation mode 42 Symptom-to do first 27 Checkout guide 28 Diagnostics using PC-Doctor for DOS. . . . 28 Lenovo ThinkVantage Toolbox (Lenovo System Toolbox 31 PC-Doctor for CTO, CMV, and GAV products 25 Chapter 3. General checkout . . . . . 27 What...55 Chapter 8. Important service information 23 Strategy for replacing FRUs 23 Strategy for replacing a hard disk drive . . . 24 Important notice for wireless LAN . . 72 1110 Backup battery 74 1120 Bluetooth daughter card (BDC-2) . . . . . 75 1130 Keyboard 75 1140 Keyboard bezel 78 1150 LCD unit 80 1160 Top shielding...
...Sleep mode 42 Hibernation mode 42 Symptom-to do first 27 Checkout guide 28 Diagnostics using PC-Doctor for DOS. . . . 28 Lenovo ThinkVantage Toolbox (Lenovo System Toolbox 31 PC-Doctor for CTO, CMV, and GAV products 25 Chapter 3. General checkout . . . . . 27 What...55 Chapter 8. Important service information 23 Strategy for replacing FRUs 23 Strategy for replacing a hard disk drive . . . 24 Important notice for wireless LAN . . 72 1110 Backup battery 74 1120 Bluetooth daughter card (BDC-2) . . . . . 75 1130 Keyboard 75 1140 Keyboard bezel 78 1150 LCD unit 80 1160 Top shielding...
Hardware Maintenance Manual
Page 49
... board. This index can be replaced next. System board. 0210 Stuck Key (two short beeps) Change keyboard, and restart the computer. Note: Do the FRU replacement or other actions in the sequence shown in the column headed "FRU or action, in the ThinkPad Notebooks, see the manual for that... EEPROM is failed. (two short beeps) 0189 Invalid RFID configuration information area-The EEPROM checksum is listed first, in the computer. If replacing a FRU does not solve the problem, put the original part back in boldface type. If no numeric code is displayed, check the narrative...
... board. This index can be replaced next. System board. 0210 Stuck Key (two short beeps) Change keyboard, and restart the computer. Note: Do the FRU replacement or other actions in the sequence shown in the column headed "FRU or action, in the ThinkPad Notebooks, see the manual for that... EEPROM is failed. (two short beeps) 0189 Invalid RFID configuration information area-The EEPROM checksum is listed first, in the computer. If replacing a FRU does not solve the problem, put the original part back in boldface type. If no numeric code is displayed, check the narrative...
Hardware Maintenance Manual
Page 50
...board. 02F0 CPU ID:xx Failed. 1. System board. 44 Hardware Maintenance Manual DIMM. 2. Default configuration used . (two short beeps) 1. Table 2. Replace the backup battery and run BIOS Setup Utility to reset the time and date. 0254 System NV7 Volume checksum bad- System board. 02D0 System cache... Run interactive tests of the keyboard and the auxiliary input device. 0230 Shadow RAM error-Shadow RAM fails at offset nnnn. (two short beeps) System board. 0231 System RAM error-System RAM fails at offset nnnn. (two short beeps) 1. Replace the backup battery and run...
...board. 02F0 CPU ID:xx Failed. 1. System board. 44 Hardware Maintenance Manual DIMM. 2. Default configuration used . (two short beeps) 1. Table 2. Replace the backup battery and run BIOS Setup Utility to reset the time and date. 0254 System NV7 Volume checksum bad- System board. 02D0 System cache... Run interactive tests of the keyboard and the auxiliary input device. 0230 Shadow RAM error-Shadow RAM fails at offset nnnn. (two short beeps) System board. 0231 System RAM error-System RAM fails at offset nnnn. (two short beeps) 1. Replace the backup battery and run...

Hardware Maintenance Manual
Page 77
Table 17. Removing or replacing a FRU 71 Attach the cables to the system board firmly. 2. Attach the palm rest so that the two small projections of the palm rest firmly fit into the guide holes of palm rest assembly with cables (continued) 7 6 5 7 6 Table 18. Installation of the keyboard bezel as shown in this figure. Chapter 8. Removal steps of palm rest assembly with cables When installing: 1.
Table 17. Removing or replacing a FRU 71 Attach the cables to the system board firmly. 2. Attach the palm rest so that the two small projections of the palm rest firmly fit into the guide holes of palm rest assembly with cables (continued) 7 6 5 7 6 Table 18. Installation of the keyboard bezel as shown in this figure. Chapter 8. Removal steps of palm rest assembly with cables When installing: 1.

Hardware Maintenance Manual
Page 81
... 0.181 Nm (1.85 kgfcm) When installing: Make sure that the connector on bottom side of the card is attached firmly to the system board. 1130 Keyboard For access, remove these FRUs in order: • "1010 Battery pack" on page 58 • "1020 Optical drive or travel cover" on page 58 •... page 58 • "1020 Optical drive or travel cover" on page 58 • "1090 Palm rest assembly with cables" on page 69 Chapter 8. Removing or replacing a FRU 75
... 0.181 Nm (1.85 kgfcm) When installing: Make sure that the connector on bottom side of the card is attached firmly to the system board. 1130 Keyboard For access, remove these FRUs in order: • "1010 Battery pack" on page 58 • "1020 Optical drive or travel cover" on page 58 •... page 58 • "1020 Optical drive or travel cover" on page 58 • "1090 Palm rest assembly with cables" on page 69 Chapter 8. Removing or replacing a FRU 75

Hardware Maintenance Manual
Page 83
... figure. 3. Removal steps of the keyboard is housed firmly, gently press the keys with your thumbs and try to slide the keyboard toward you. 4. To make sure that the keyboard edges are under the frame as follows: Table 23. Removing or replacing a FRU 77 Attach the connectors. 2. Chapter 8. Secure the keyboard by tightening the screws from...
... figure. 3. Removal steps of the keyboard is housed firmly, gently press the keys with your thumbs and try to slide the keyboard toward you. 4. To make sure that the keyboard edges are under the frame as follows: Table 23. Removing or replacing a FRU 77 Attach the connectors. 2. Chapter 8. Secure the keyboard by tightening the screws from...

Hardware Maintenance Manual
Page 85
Table 24. Removing or replacing a FRU 79 Removal steps of keyboard bezel (continued) 3 6 3 4 5 Step 3 Screw (quantity) M2 × 3 mm, wafer-head, nylon-coated (2) Color Black Torque 0.181 Nm (1.85 kgfcm) When installing: Make sure that the connectors are attached firmly to the system board. Chapter 8.
Table 24. Removing or replacing a FRU 79 Removal steps of keyboard bezel (continued) 3 6 3 4 5 Step 3 Screw (quantity) M2 × 3 mm, wafer-head, nylon-coated (2) Color Black Torque 0.181 Nm (1.85 kgfcm) When installing: Make sure that the connectors are attached firmly to the system board. Chapter 8.
Hardware Maintenance Manual
Page 89
Table 25. Removal steps of top shielding assembly For ThinkPad Edge 15" and E50: Chapter 8. Removal steps of LCD unit (continued) 6 6 1160 Top shielding assembly For access, remove these FRUs in order: • "1010 Battery pack" on ... 67 • "1090 Palm rest assembly with cables" on page 69 • "1100 PCI Express Mini Card for wireless LAN" on page 72 • "1130 Keyboard" on page 75 • "1140 Keyboard bezel" on page 78 • "1150 LCD unit" on page 80 Table 26. Removing or...
Table 25. Removal steps of top shielding assembly For ThinkPad Edge 15" and E50: Chapter 8. Removal steps of LCD unit (continued) 6 6 1160 Top shielding assembly For access, remove these FRUs in order: • "1010 Battery pack" on ... 67 • "1090 Palm rest assembly with cables" on page 69 • "1100 PCI Express Mini Card for wireless LAN" on page 72 • "1130 Keyboard" on page 75 • "1140 Keyboard bezel" on page 78 • "1150 LCD unit" on page 80 Table 26. Removing or...

Hardware Maintenance Manual
Page 91
Note: If the test shows that HDD Active Protection System still functions. Run Diagnostics ➙ ThinkPad Devices ➙ HDD Active Protection Test. Removing or replacing a FRU 85 After replacing the system board, run PC-Doctor for DOS to make sure that the HDD Active Protection SystemTM still ...page 72 • "1110 Backup battery" on page 74 • "1120 Bluetooth daughter card (BDC-2)" on page 75 • "1130 Keyboard" on page 75 • "1140 Keyboard bezel" on a padded surface such as follows: 1. Table 26. Note: Dropping a system board from a height of any kind. •...
Note: If the test shows that HDD Active Protection System still functions. Run Diagnostics ➙ ThinkPad Devices ➙ HDD Active Protection Test. Removing or replacing a FRU 85 After replacing the system board, run PC-Doctor for DOS to make sure that the HDD Active Protection SystemTM still ...page 72 • "1110 Backup battery" on page 74 • "1120 Bluetooth daughter card (BDC-2)" on page 75 • "1130 Keyboard" on page 75 • "1140 Keyboard bezel" on a padded surface such as follows: 1. Table 26. Note: Dropping a system board from a height of any kind. •...
Hardware Maintenance Manual
Page 95
Removing or replacing a FRU 89 Step 2 Screw (quantity) M2 × 3 mm, wafer-head, nylon-coated (1) Color Black Cable routing: Route the USB cable assembly as shown in these figures. For ThinkPad Edge 15" and E50: Torque 0.181 Nm (1.85 kgfcm) For ThinkPad Edge 14" and E40: Chapter 8. • "1040 Hard disk drive (HDD...rest assembly with cables" on page 69 • "1100 PCI Express Mini Card for wireless LAN" on page 72 • "1130 Keyboard" on page 75 • "1140 Keyboard bezel" on page 78 • "1150 LCD unit" on page 80 • "1160 Top shielding assembly" on page 83 Table 29...
Removing or replacing a FRU 89 Step 2 Screw (quantity) M2 × 3 mm, wafer-head, nylon-coated (1) Color Black Cable routing: Route the USB cable assembly as shown in these figures. For ThinkPad Edge 15" and E50: Torque 0.181 Nm (1.85 kgfcm) For ThinkPad Edge 14" and E40: Chapter 8. • "1040 Hard disk drive (HDD...rest assembly with cables" on page 69 • "1100 PCI Express Mini Card for wireless LAN" on page 72 • "1130 Keyboard" on page 75 • "1140 Keyboard bezel" on page 78 • "1150 LCD unit" on page 80 • "1160 Top shielding assembly" on page 83 Table 29...

Hardware Maintenance Manual
Page 101
... 3 1 2 Chapter 8. Removal steps of LCD front bezel (continued) 22 2 2 2 2 2 22 When installing: Make sure that all the latches are attached firmly. Removing or replacing a FRU 95 Then secure the bezel with the screws. 2020 Speaker assembly For access, remove these FRUs in order: • "1010 Battery pack" on page... Palm rest assembly with cables" on page 69 • "1100 PCI Express Mini Card for wireless LAN" on page 72 • "1130 Keyboard" on page 75 • "1140 Keyboard bezel" on page 78 • "1150 LCD unit" on page 80 • "2010 LCD front bezel" on page 94 Table 32....
... 3 1 2 Chapter 8. Removal steps of LCD front bezel (continued) 22 2 2 2 2 2 22 When installing: Make sure that all the latches are attached firmly. Removing or replacing a FRU 95 Then secure the bezel with the screws. 2020 Speaker assembly For access, remove these FRUs in order: • "1010 Battery pack" on page... Palm rest assembly with cables" on page 69 • "1100 PCI Express Mini Card for wireless LAN" on page 72 • "1130 Keyboard" on page 75 • "1140 Keyboard bezel" on page 78 • "1150 LCD unit" on page 80 • "2010 LCD front bezel" on page 94 Table 32....

Hardware Maintenance Manual
Page 105
...; "1090 Palm rest assembly with cables" on page 69 • "1100 PCI Express Mini Card for wireless LAN" on page 72 • "1130 Keyboard" on page 75 • "1140 Keyboard bezel" on page 78 • "1150 LCD unit" on page 80 • "2010 LCD front bezel" on page 94 • "2020 Speaker...) 3 4 3 3 4 3 Step 3 Screw (quantity) M2 × 3 mm, small-head, nylon-coated (4) Color Black When installing: Make sure that the LCD connector is attached firmly. Removing or replacing a FRU 99 Table 34.
...; "1090 Palm rest assembly with cables" on page 69 • "1100 PCI Express Mini Card for wireless LAN" on page 72 • "1130 Keyboard" on page 75 • "1140 Keyboard bezel" on page 78 • "1150 LCD unit" on page 80 • "2010 LCD front bezel" on page 94 • "2020 Speaker...) 3 4 3 3 4 3 Step 3 Screw (quantity) M2 × 3 mm, small-head, nylon-coated (4) Color Black When installing: Make sure that the LCD connector is attached firmly. Removing or replacing a FRU 99 Table 34.
Hardware Maintenance Manual
Page 111
...installing the CRU, Lenovo will be used for full details. An N in the publications that ship with a replacement part you . you may find a list of the replacement CRU. You may request that the part is identified by no more than two screws. ThinkPad computers contain the ..., and hard disk drive. CRU information and replacement instructions are shipped with the replacement CRU; Parts list This chapter contains following types of the service parts. • "Overall" on page 106 • "LCD FRUs" on page 123 • "Keyboard" on page 138 • "Miscellaneous parts"...
...installing the CRU, Lenovo will be used for full details. An N in the publications that ship with a replacement part you . you may find a list of the replacement CRU. You may request that the part is identified by no more than two screws. ThinkPad computers contain the ..., and hard disk drive. CRU information and replacement instructions are shipped with the replacement CRU; Parts list This chapter contains following types of the service parts. • "Overall" on page 106 • "LCD FRUs" on page 123 • "Keyboard" on page 138 • "Miscellaneous parts"...


