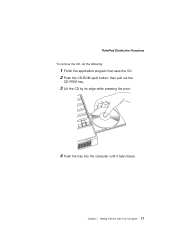
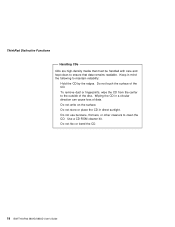
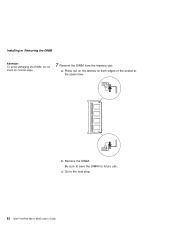
TP 380, Aptiva - Real Estate Solution - Setup and Tips Guide
Page 9
...use the camera with the modem in drive A, and click OK. Select the Start button, Settings, Control Panel. Apply pressure firmly to the edge of the ThinkPad. box is United States 101) for your system, the Windows 95 Certificate of Authenticity ID number, and a user ID and password. Setting ..., select the Cancel button to cancel the process. (The Add Tip Printer wizard might appear several times.) You will begin loading. If your ThinkPad. To install the modem, insert it in the PCMCIA card slot on your Real Estate Solution kit contained a separate PCMCIA modem package, you ...
ThinkPad 380, 385, 560, 560E, all 760, 765 and SelectADock III Hardware Maintenance Manual (March 1999))
Page 457
... the external FDD connector, a. External diskette drive 3. System board 1. c. Replace the screws of the flexible cable when inserting it into the connector. 2. ThinkPad 765D (9546), 765L (9547) 445 Symptom / Error Serial or parallel port device problems. External diskette drive does not work correctly, or internal diskette drive...in Sequence 1. Remove the connector. Make sure that the diskette is not recognized. Device cable 3. Device 2. b. Be careful not to damage the edge of the connector. Insert the flexible cable straight until the white line aligns with the...
HMM ThinkPad 380XD,385XD (May 1998)
Page 23
...or other liquids, or signs of fire or smoke damage. 7. c. Remove the cover. 5. Check inside the unit for damage (loose, broken, or sharp edges). 2. Disconnect the power cord. 3. Check the power cord for 0.1 ohm or less between the external ground pin and frame ground. Power-off , and the.... 6. Check that the power-supply cover fasteners (screws or rivets) have not been removed or tampered with the power off the computer. IBM ThinkPad 380XD, 385XD (2635) 15 The guide consists of a series of any obvious non-IBM alterations. Begin the checks with . Insulation must not ...
TP 380Z User's Reference that was provided with the system in the box.
Page 34
... from the center to the outside of the disc. Do not use benzene, thinners, or other cleaners to maintain reliability: Hold the CD by the edges. To remove dust or fingerprints, wipe the CD with care and kept clean to ensure that data remains readable. Do not flex or bend the... CD. 18 IBM ThinkPad 380Z User's Reference Do not spill liquids on the surface. Wiping the CD in direct sunlight. Do not touch the surface of the CD. Keep...
TP 380Z User's Reference that was provided with the system in the box.
Page 62
then connect the AC Adapter and all the cables you disconnected. 46 IBM ThinkPad 380Z User's Reference then tighten the screw. 7 Replace the battery pack. 8 Turn the computer over again; Title: C79EPMST CreationDate: 06/22/98 12:00:09 Increasing Memory 4 Press out on the latches on both edges of the socket at the same time. 5 Remove the DIMM. Be sure to save the DIMM for future use. 6 Replace the memory slot cover;
TP 380Z User's Reference that was provided with the system in the box.
Page 175
... in the drive. This heat is plugged in a vehicle or anywhere that generates a strong magnetic field, such as dropping or bumping. ThinkPad Do's Store your computer. Treat your computer. Retain and store packing materials safely out of reach of children to avoid the danger of ...above 35° C (41° F and 95° F). Though your hard disk, diskette, or CD-ROM drive, follow the instructions in its edges. Do not disassemble your computer display. See "Ruggedized Mobile Computers" in .) from the outside your computer closer than PSTN can use some heat during normal...
ThinkPad 385 User's Guide
Page 106
... (in the lower slot), or a single Zoomed Video port card (in the lower slot). Installing a PC Card 1 Find the notched edge 1 of the card as shown. 86 IBM ThinkPad 385 or 385D User's Guide To install the PC Card support software: The computer has two PC Card slots (upper and lower slot) to...
ThinkPad 385 User's Guide
Page 110
Install a DIMM Remove a DIMM Go to do? Attention: To avoid damaging the DIMM, do not touch its contact edge. 5 Which are you going to the next step. Go to release any static electricity. 3 Turn the computer over. 4 Loosen the screw on page 92. 90 IBM ThinkPad 385 or 385D User's Guide Installing or Removing the DIMM Installing or Removing the DIMM 1 Turn off the computer; then disconnect the AC Adapter and all cables from the computer. 2 Touch any metal object with your hand to step 7 on the memory slot cover and remove the cover.
ThinkPad 385 User's Guide
Page 112
b) Remove the DIMM. c) Go to save the DIMM for future use. Installing or Removing the DIMM Attention: To avoid damaging the DIMM, do not touch its contact edge. 7 Remove the DIMM from the memory slot: a) Press out on the latches on both edges of the socket at the same time. Be sure to the next step. 92 IBM ThinkPad 385 or 385D User's Guide
User's Guide for TP 380XD, TP 385XD
Page 37
then pull out the CD-ROM tray. 3 Lift the CD by its edge while pressing the pivot. 4 Push the tray into the computer until it fully closes. Chapter 1. ThinkPad Distinctive Functions To remove the CD, do the following: 1 Finish the application program that uses the CD. 2 Push the CD-ROM eject button; Getting Familiar with Your Computer 17
User's Guide for TP 380XD, TP 385XD
Page 38
...-ROM cleaner kit. Do not write on the surface. Do not touch the surface of data. Do not flex or bend the CD. 18 IBM ThinkPad 380XD/385XD User's Guide To remove dust or fingerprints, wipe the CD from the center to clean the CD.... ThinkPad Distinctive Functions Handling CDs CDs are high-density media that data remains readable. Keep in mind the following to ensure that must be handled with ...
User's Guide for TP 380XD, TP 385XD
Page 52
...touch the lens on a more than PSTN can damage the drive. Use of your modem. ThinkPad Do's: Store your computer closer than 13 cm (5 in the drive. You should hold the compact disc by the edges and not touch its surface. Your computer can detach or tear and then lodge in .) from...not in use digital telephone extension lines, so check before connecting the telephone cable in such places. Many hotels or office buildings use . 32 IBM ThinkPad 380XD/385XD User's Guide Do not insert a diskette at an angle. Do not leave the base of phone line you are using, contact your ...
ThinkPad 380 and 380D User's Guide
Page 106
... Card (in the lower slot), or a single Zoomed Video port card (in the lower slot). Installing a PC Card 1 Find the notched edge 1 of the card as shown. 86 IBM ThinkPad 380 or 380D User's Guide To install the PC Card support software: The computer has two PC Card slots (upper and lower...
ThinkPad 380 and 380D User's Guide
Page 110
Installing or Removing the DIMM Installing or Removing the DIMM 1 Turn off the computer; then disconnect the AC Adapter and all cables from the computer. 2 Touch any metal object with your hand to step 7 on the memory slot cover and remove the cover. Attention: To avoid damaging the DIMM, do not touch its contact edge. 5 Which are you going to the next step. Install a DIMM Remove a DIMM Go to do? Go to release any static electricity. 3 Turn the computer over. 4 Loosen the screw on page 92. 90 IBM ThinkPad 380 or 380D User's Guide
ThinkPad 380 and 380D User's Guide
Page 112
c) Go to save the DIMM for future use. b) Remove the DIMM. Be sure to the next step. 92 IBM ThinkPad 380 or 380D User's Guide Installing or Removing the DIMM Attention: To avoid damaging the DIMM, do not touch its contact edge. 7 Remove the DIMM from the memory slot: a) Press out on the latches on both edges of the socket at the same time.