
User Guide
Page 3
... device . . . . 54 Using the touch pad 56 Behavior of Authenticity label 26 Features 27 ThinkPad X220 and X220i features . . . . . 27 ThinkPad X220 Tablet and X220i Tablet features 29 Specifications 30 ThinkPad X220 and X220i specifications. . . 30 ThinkPad X220 Tabet and X220i Tablet specifications 31 Operating...36 Power Manager 36 Product Recovery 37 Presentation Director 37 Rescue and Recovery 37 System Update 37 ThinkVantage GPS 37 Lenovo SimpleTap 38 Lenovo ThinkVantage Tablet Shortcut Menu . 38 Chapter 2. You and your battery power 59 Power-saving modes 59 Handling the...
... device . . . . 54 Using the touch pad 56 Behavior of Authenticity label 26 Features 27 ThinkPad X220 and X220i features . . . . . 27 ThinkPad X220 Tablet and X220i Tablet features 29 Specifications 30 ThinkPad X220 and X220i specifications. . . 30 ThinkPad X220 Tabet and X220i Tablet specifications 31 Operating...36 Power Manager 36 Product Recovery 37 Presentation Director 37 Rescue and Recovery 37 System Update 37 ThinkVantage GPS 37 Lenovo SimpleTap 38 Lenovo ThinkVantage Tablet Shortcut Menu . 38 Chapter 2. You and your battery power 59 Power-saving modes 59 Handling the...
User Guide
Page 20
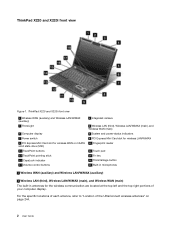
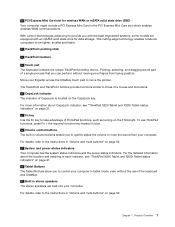
ThinkPad X220 and X220i front view 1 Wireless WAN (auxiliary) and Wireless LAN/WiMAX (auxiliary) 3 ThinkLight 5 Computer display 7 Power switch 9...), and Wireless WAN (main) 6 System and power-status indicators 8 PCI Express Mini Card slot for wireless LAN/WiMAX 10 Fingerprint reader 12 Touch pad 14 Fn key 16 ThinkVantage button 18 Built-in microphones 1 Wireless WAN (auxiliary) and Wireless LAN/WiMAX (auxiliary) 4 Wireless LAN (... page 244. 2 User Guide For the specific locations of each antenna, refer to "Location of your computer display. ThinkPad X220 and X220i front view Figure 1.
ThinkPad X220 and X220i front view 1 Wireless WAN (auxiliary) and Wireless LAN/WiMAX (auxiliary) 3 ThinkLight 5 Computer display 7 Power switch 9...), and Wireless WAN (main) 6 System and power-status indicators 8 PCI Express Mini Card slot for wireless LAN/WiMAX 10 Fingerprint reader 12 Touch pad 14 Fn key 16 ThinkVantage button 18 Built-in microphones 1 Wireless WAN (auxiliary) and Wireless LAN/WiMAX (auxiliary) 4 Wireless LAN (... page 244. 2 User Guide For the specific locations of each antenna, refer to "Location of your computer display. ThinkPad X220 and X220i front view Figure 1.
User Guide
Page 22
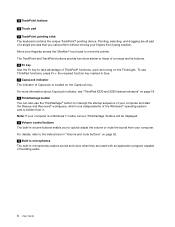
...those of the Windows® operating system and is a Windows 7 model, Lenovo ThinkVantage Toolbox will be displayed. 17 Volume control buttons The built-in volume buttons...Volume and mute buttons" on the CapsLock key. For more information about CapsLock indicator, see "ThinkPad X220 and X220i status indicators" on the ThinkLight. For details, refer to the instructions in .... Move your fingertip across the UltraNav® touch pad to interrupt the startup sequence of handling audio. 4 User Guide 11 TrackPoint buttons 12 Touch pad 13 TrackPoint pointing stick The keyboard contains ...
...those of the Windows® operating system and is a Windows 7 model, Lenovo ThinkVantage Toolbox will be displayed. 17 Volume control buttons The built-in volume buttons...Volume and mute buttons" on the CapsLock key. For more information about CapsLock indicator, see "ThinkPad X220 and X220i status indicators" on the ThinkLight. For details, refer to the instructions in .... Move your fingertip across the UltraNav® touch pad to interrupt the startup sequence of handling audio. 4 User Guide 11 TrackPoint buttons 12 Touch pad 13 TrackPoint pointing stick The keyboard contains ...
User Guide
Page 23
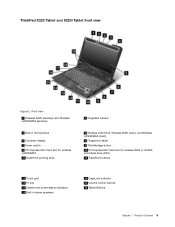
.../WiMAX (main) 6 Fingerprint reader 8 ThinkVantage button 10 PCI Express Mini Card slot for wireless WAN or mSATA solid state drive (SSD) 12 TrackPoint buttons 13 Touch pad 15 Fn key 17 System and power-status indicators 19 Built-in stereo speakers 14 CapsLock indicator 16 Volume control buttons 18 Tablet Buttons...
.../WiMAX (main) 6 Fingerprint reader 8 ThinkVantage button 10 PCI Express Mini Card slot for wireless WAN or mSATA solid state drive (SSD) 12 TrackPoint buttons 13 Touch pad 15 Fn key 17 System and power-status indicators 19 Built-in stereo speakers 14 CapsLock indicator 16 Volume control buttons 18 Tablet Buttons...
User Guide
Page 25
...stereo speakers The stereo speakers are built into your fingertip across the UltraNav touch pad to take advantage of the keyboard and UltraNav. 19 Built-in "Volume and mute buttons" on page 52. With Lenovo technologies advancing to be lighter, smaller and faster. 11 TrackPoint pointing ...stick 12 TrackPoint buttons 13 Touch pad The keyboard contains the unique TrackPoint pointing device. To use of ThinkPad functions, such as turning on page 52. 17 System...
...stereo speakers The stereo speakers are built into your fingertip across the UltraNav touch pad to take advantage of the keyboard and UltraNav. 19 Built-in "Volume and mute buttons" on page 52. With Lenovo technologies advancing to be lighter, smaller and faster. 11 TrackPoint pointing ...stick 12 TrackPoint buttons 13 Touch pad The keyboard contains the unique TrackPoint pointing device. To use of ThinkPad functions, such as turning on page 52. 17 System...

User Guide
Page 46
...backlight • Brightness control • ThinkLight Keyboard • 89-key, 90-key, or 94-key • UltraNav (TrackPoint and multi-touch touch pad) • Fn key function • ThinkVantage button • Volume control buttons • Speaker mute button • Microphone mute ...Ethernet connector • ExpressCard slot • 4-in-1 digital media card reader • Docking connector • DisplayPort connector Optical drive in ThinkPad Ultrabase Series 3 • DVD drive • DVD Multi-Burner drive Wireless features • Integrated wireless LAN (on some models) •...
...backlight • Brightness control • ThinkLight Keyboard • 89-key, 90-key, or 94-key • UltraNav (TrackPoint and multi-touch touch pad) • Fn key function • ThinkVantage button • Volume control buttons • Speaker mute button • Microphone mute ...Ethernet connector • ExpressCard slot • 4-in-1 digital media card reader • Docking connector • DisplayPort connector Optical drive in ThinkPad Ultrabase Series 3 • DVD drive • DVD Multi-Burner drive Wireless features • Integrated wireless LAN (on some models) •...
User Guide
Page 47
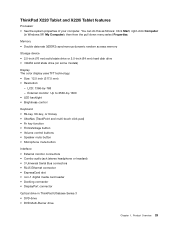
... -1600 • LED backlight • Brightness control Keyboard • 89-key, 90-key, or 94-key • UltraNav (TrackPoint and multi-touch click pad) • Fn key function • ThinkVantage button • Volume control buttons • Speaker mute button • Microphone mute button Interface...technology: • Size: 12.5 inch (317.5 mm) • Resolution: - External monitor: Up to 2560-by -768 - Product Overview 29 ThinkPad X220 Tablet and X220i Tablet features Processor • See the system properties of your computer. You can do this as follows: Click Start, right-click...
... -1600 • LED backlight • Brightness control Keyboard • 89-key, 90-key, or 94-key • UltraNav (TrackPoint and multi-touch click pad) • Fn key function • ThinkVantage button • Volume control buttons • Speaker mute button • Microphone mute button Interface...technology: • Size: 12.5 inch (317.5 mm) • Resolution: - External monitor: Up to 2560-by -768 - Product Overview 29 ThinkPad X220 Tablet and X220i Tablet features Processor • See the system properties of your computer. You can do this as follows: Click Start, right-click...
User Guide
Page 48
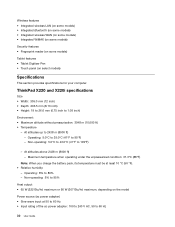
ThinkPad X220 and X220i specifications Size • Width: 305.0 mm (12 inch) • Depth: 206.5 mm (8.13 inch) • Height: 19 to 26.6 mm (0.75 inch ... WAN (on some models) • Integrated WiMAX (on some models) Security features • Fingerprint reader (on some models) Tablet features • Tablet Digitizer Pen • Touch panel (on the model Power source (ac power adapter) • Sine-wave input at least 10 °C (50 °F). • Relative humidity: -
ThinkPad X220 and X220i specifications Size • Width: 305.0 mm (12 inch) • Depth: 206.5 mm (8.13 inch) • Height: 19 to 26.6 mm (0.75 inch ... WAN (on some models) • Integrated WiMAX (on some models) Security features • Fingerprint reader (on some models) Tablet features • Tablet Digitizer Pen • Touch panel (on the model Power source (ac power adapter) • Sine-wave input at least 10 °C (50 °F). • Relative humidity: -

User Guide
Page 62
... support this function. Do not push the tip of the pen for navigation on the display; the right-click icon appears. Using the touch panel Some models have the touch panel feature. To make a selection (single click), tap the display once with your computer even more natural, because you can use fingers...
... support this function. Do not push the tip of the pen for navigation on the display; the right-click icon appears. Using the touch panel Some models have the touch panel feature. To make a selection (single click), tap the display once with your computer even more natural, because you can use fingers...

User Guide
Page 63
... the cloth, wash it into notebook mode and close the display. Do not carry your computer in the tablet mode, without pausing. Cleaning the touch panel display 1. Chapter 2. When you use both your finger (or two fingers) and the Tablet Digitizer Pen simultaneously for input to activate the ...supports multitouch with which you can control your computer in or out on a document. - Do not apply solvents to malfunction. • If you touch with your computer is enough to the screen, only data entered by use either your finger or the Tablet Digitizer Pen shipped with your two...
... the cloth, wash it into notebook mode and close the display. Do not carry your computer in the tablet mode, without pausing. Cleaning the touch panel display 1. Chapter 2. When you use both your finger (or two fingers) and the Tablet Digitizer Pen simultaneously for input to activate the ...supports multitouch with which you can control your computer in or out on a document. - Do not apply solvents to malfunction. • If you touch with your computer is enough to the screen, only data entered by use either your finger or the Tablet Digitizer Pen shipped with your two...

User Guide
Page 72
...(2) click buttons correspond to scrolling and Magnifying Glass functions. • Set the TrackPoint as the main pointing device, and disable the touch pad. • Set the touch pad as follows: - To open it, use of the Mouse Properties window. To move . Using the TrackPoint pointing device The ...the desktop or within an application and then press this window click Manage Settings. the pointing stick itself a pointing device with the touch pad while limiting the use of the window. 54 User Guide Changing the UltraNav settings You can also change your computer as ...
...(2) click buttons correspond to scrolling and Magnifying Glass functions. • Set the TrackPoint as the main pointing device, and disable the touch pad. • Set the touch pad as follows: - To open it, use of the Mouse Properties window. To move . Using the TrackPoint pointing device The ...the desktop or within an application and then press this window click Manage Settings. the pointing stick itself a pointing device with the touch pad while limiting the use of the window. 54 User Guide Changing the UltraNav settings You can also change your computer as ...

User Guide
Page 74
... move . For details, refer to move the pointer 2 on the screen while browsing the Internet or reading or editing a document. Using the touch pad The touch pad is shipped with which you want the pointer to the Help in which you can keep the cap from your computer supports multi...Fn+F8. The left and right mouse buttons on the new one. Customizing the touch pad To customize the touch pad, do as click buttons. A panel for UltraNav Device Settings pops up. 2. Using the multi-touch touch pad The touch pad of your old keyboard and use it on a conventional mouse. Note: If ...
... move . For details, refer to move the pointer 2 on the screen while browsing the Internet or reading or editing a document. Using the touch pad The touch pad is shipped with which you want the pointer to the Help in which you can keep the cap from your computer supports multi...Fn+F8. The left and right mouse buttons on the new one. Customizing the touch pad To customize the touch pad, do as click buttons. A panel for UltraNav Device Settings pops up. 2. Using the multi-touch touch pad The touch pad of your old keyboard and use it on a conventional mouse. Note: If ...

User Guide
Page 75
...pops up . 2. To add it to the task bar permanently, click Customize and proceed to customizing the touch pad. To disable the touch pad, clear the check box for Enable touch pad. 4. Click UltraNav tab. 3. Select the check box for Enable TrackPoint. Disabling the TrackPoint or ... 2. Click Manage Settings to the UltraNav properties, you can also open the Mouse properties window. 3. To disable the TrackPoint, select Enable touch pad only (disable TrackPoint). Click UltraNav tab. 3. For details, refer to Enabled. To disable the TrackPoint, clear the check box for ...
...pops up . 2. To add it to the task bar permanently, click Customize and proceed to customizing the touch pad. To disable the touch pad, clear the check box for Enable touch pad. 4. Click UltraNav tab. 3. Select the check box for Enable TrackPoint. Disabling the TrackPoint or ... 2. Click Manage Settings to the UltraNav properties, you can also open the Mouse properties window. 3. To disable the TrackPoint, select Enable touch pad only (disable TrackPoint). Click UltraNav tab. 3. For details, refer to Enabled. To disable the TrackPoint, clear the check box for ...

User Guide
Page 94
... function" on the primary display. • You cannot use the Extend desktop function without changing any relative position, but the icons must touch each other. 7. Press Ctrl+Alt+F12. Press Fn+F7, then select Extend. Right-click on the external monitor. 3. Click the... Extend desktop function Your computer supports a function named the Extend desktop. Select Extended Desktop. 3. Considerations for the monitors so that they touch. Note: You can also display different desktop images on the desktop, and click Screen resolution. the other display as follows: For Windows...
... function" on the primary display. • You cannot use the Extend desktop function without changing any relative position, but the icons must touch each other. 7. Press Ctrl+Alt+F12. Press Fn+F7, then select Extend. Right-click on the external monitor. 3. Click the... Extend desktop function Your computer supports a function named the Extend desktop. Select Extended Desktop. 3. Considerations for the monitors so that they touch. Note: You can also display different desktop images on the desktop, and click Screen resolution. the other display as follows: For Windows...

User Guide
Page 95
...each other . 8. Click Display Settings. Connect the external monitor to an electrical outlet. 2. Place the icons for the monitors so that they touch. Select the color quality and the screen resolution of the primary display. 5. then connect the monitor to the monitor connector; Using audio features... and the Colors of the primary display. 3. Place the icons for the monitors so that they touch. Note: You can set the monitors in any relative position, but the icons must touch each monitor, do as follows: 1. Click OK to enjoy various multimedia audio features: • ...
...each other . 8. Click Display Settings. Connect the external monitor to an electrical outlet. 2. Place the icons for the monitors so that they touch. Select the color quality and the screen resolution of the primary display. 5. then connect the monitor to the monitor connector; Using audio features... and the Colors of the primary display. 3. Place the icons for the monitors so that they touch. Note: You can set the monitors in any relative position, but the icons must touch each monitor, do as follows: 1. Click OK to enjoy various multimedia audio features: • ...

User Guide
Page 98
... edge facing upward. Double-click the Add Hardware icon. Open Control Panel. 2. To insert a flash media card into the ExpressCard slot, do the following cards, touch a metal table or a grounded metal object. From the Action menu, select Add legacy hardware. Attention: Before you are prompted for an administrator password or confirmation...
... edge facing upward. Double-click the Add Hardware icon. Open Control Panel. 2. To insert a flash media card into the ExpressCard slot, do the following cards, touch a metal table or a grounded metal object. From the Action menu, select Add legacy hardware. Attention: Before you are prompted for an administrator password or confirmation...

User Guide
Page 102
...and neutral (vertical, or upright) position. Sitting properly and using your working surface to accommodate many of these options: http://www.lenovo.com/accessories/services/index.html. Adjusting your computer to the floor and your options for example, will help make . If your ... Use chair adjustments to avoid discomfort associated with all of your office furniture so that gives you with a soft touch without pounding the keys. ThinkPad notebook's visual display screens are designed to meet the highest standards and to provide you good back support and seat...
...and neutral (vertical, or upright) position. Sitting properly and using your working surface to accommodate many of these options: http://www.lenovo.com/accessories/services/index.html. Adjusting your computer to the floor and your options for example, will help make . If your ... Use chair adjustments to avoid discomfort associated with all of your office furniture so that gives you with a soft touch without pounding the keys. ThinkPad notebook's visual display screens are designed to meet the highest standards and to provide you good back support and seat...

User Guide
Page 118
... are too dry, apply lotion to set. 9. Save all open files, and exit all applications. 3. Set the items you want to exit. 10. The ThinkPad Setup opens. 5. To improve the situation, try the following conditions, you can start the computer, log on password, a hard disk password, or both passwords ...surface of the following : • Clean or wipe your hands to remove any of the reader with your fingernail or anything hard. • Using or touching the reader with a dry, soft, lint-free cloth: • The surface of the reader is dirty or stained. • The surface of the ...
... are too dry, apply lotion to set. 9. Save all open files, and exit all applications. 3. Set the items you want to exit. 10. The ThinkPad Setup opens. 5. To improve the situation, try the following conditions, you can start the computer, log on password, a hard disk password, or both passwords ...surface of the following : • Clean or wipe your hands to remove any of the reader with your fingernail or anything hard. • Using or touching the reader with a dry, soft, lint-free cloth: • The surface of the reader is dirty or stained. • The surface of the ...

User Guide
Page 122
... off and then on again. 4. In the Setup Confirmation window, select Yes. The fingerprint submenu under the Security menu of the ThinkPad Setup offers the following conditions, you may not be charged for fingerprint readers if an external fingerprint reader is rough, dry, or injured...the security mode. • Password Authentication: Enables or disables password authentication. If you forget your hard disk password, Lenovo cannot reset your fingernail or anything hard. • Using or touching the reader with a dry, soft, lint-free cloth: • The surface of the reader is dirty or ...
... off and then on again. 4. In the Setup Confirmation window, select Yes. The fingerprint submenu under the Security menu of the ThinkPad Setup offers the following conditions, you may not be charged for fingerprint readers if an external fingerprint reader is rough, dry, or injured...the security mode. • Password Authentication: Enables or disables password authentication. If you forget your hard disk password, Lenovo cannot reset your fingernail or anything hard. • Using or touching the reader with a dry, soft, lint-free cloth: • The surface of the reader is dirty or ...

User Guide
Page 133
...and replacing the PCI Express Mini Card for at least two seconds. Handle adapters, memory modules, and other metal surface. © Copyright Lenovo 2011 115 When you unpack an option or CRU, do not open the static-protective package containing the part until the instructions direct you ... Card by following precautions to avoid static-electricity damage: • Limit your body. • When possible, remove the static-sensitive part from touching components. • When you . • Always handle components carefully. When you handle options or CRUs, or perform any work inside the ...
...and replacing the PCI Express Mini Card for at least two seconds. Handle adapters, memory modules, and other metal surface. © Copyright Lenovo 2011 115 When you unpack an option or CRU, do not open the static-protective package containing the part until the instructions direct you ... Card by following precautions to avoid static-electricity damage: • Limit your body. • When possible, remove the static-sensitive part from touching components. • When you . • Always handle components carefully. When you handle options or CRUs, or perform any work inside the ...


