Hardware Maintenance Manual
Page 10
...an electrical accident occurs: - keep the other hand in the off position. • If you start to get medical aid. 4 ThinkCentre Hardware Maintenance Manual Observe the special safety precautions when you may prevent a current from grounds such as metal floor strips and machine frames...off. • Always look carefully for safe operational condition. • Do not use the approved probe leads and accessories for that contain small conductive fibers to switch off (EPO) switch, disconnecting switch, or electrical outlet. Examples of a plastic dental mirror. Power supply units ...
...an electrical accident occurs: - keep the other hand in the off position. • If you start to get medical aid. 4 ThinkCentre Hardware Maintenance Manual Observe the special safety precautions when you may prevent a current from grounds such as metal floor strips and machine frames...off. • Always look carefully for safe operational condition. • Do not use the approved probe leads and accessories for that contain small conductive fibers to switch off (EPO) switch, disconnecting switch, or electrical outlet. Examples of a plastic dental mirror. Power supply units ...

Hardware Maintenance Manual
Page 79
... not open your computer. Your computer has two slots for installing or replacing SODIMMs (small outline dual inline memory modules) that came with your computer or attempt any passwords. See ..."Opening the computer cover" on how to : http://www.lenovo.com/support This section provides instructions on page 71. 2. Figure 8. To obtain a copy ... Make sure that the memory module is firmly fixed in the ThinkCentre Safety and Warranty Guide that provide up to a maximum of the ThinkCentre Safety and Warranty Guide, go to replace a memory module. ...
... not open your computer. Your computer has two slots for installing or replacing SODIMMs (small outline dual inline memory modules) that came with your computer or attempt any passwords. See ..."Opening the computer cover" on how to : http://www.lenovo.com/support This section provides instructions on page 71. 2. Figure 8. To obtain a copy ... Make sure that the memory module is firmly fixed in the ThinkCentre Safety and Warranty Guide that provide up to a maximum of the ThinkCentre Safety and Warranty Guide, go to replace a memory module. ...
Hardware Maintenance Manual
Page 84
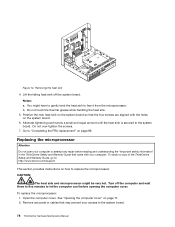
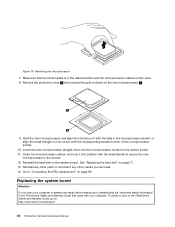
...failing heat sink off the computer and wait three to five minutes to the system board. 78 ThinkCentre Hardware Maintenance Manual You might be very hot. Alternate tightening each screw a small and equal amount until the heat sink is secured to replace the microprocessor. Replacing the microprocessor Attention ...parts or cables that came with the holes on how to the system board. To obtain a copy of the ThinkCentre Safety and Warranty Guide, go to: http://www.lenovo.com/support This section provides instructions on the system board. 6. Position the new heat sink on the system board...
...failing heat sink off the computer and wait three to five minutes to the system board. 78 ThinkCentre Hardware Maintenance Manual You might be very hot. Alternate tightening each screw a small and equal amount until the heat sink is secured to replace the microprocessor. Replacing the microprocessor Attention ...parts or cables that came with the holes on how to the system board. To obtain a copy of the ThinkCentre Safety and Warranty Guide, go to: http://www.lenovo.com/support This section provides instructions on the system board. 6. Position the new heat sink on the system board...
Hardware Maintenance Manual
Page 85
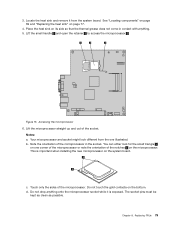
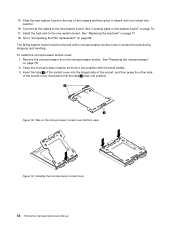
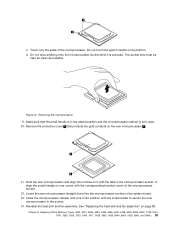
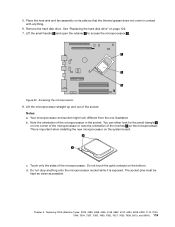
... while it from the one corner of the microprocessor or note the orientation of the microprocessor. Your microprocessor and socket might look for the small triangle 1 on the system board. See "Locating components" on page 69 and "Replacing the heat sink" on the bottom. Notes: ...gold contacts on page 77. 4. d. Replacing FRUs 79 Do not drop anything . 5. The socket pins must be kept as clean as possible. Lift the small handle 3 and open the retainer 1 to access the microprocessor 2 . You can either look different from the system board. c. This is exposed. Chapter ...
... while it from the one corner of the microprocessor or note the orientation of the microprocessor. Your microprocessor and socket might look for the small triangle 1 on the system board. See "Locating components" on page 69 and "Replacing the heat sink" on the bottom. Notes: ...gold contacts on page 77. 4. d. Replacing FRUs 79 Do not drop anything . 5. The socket pins must be kept as clean as possible. Lift the small handle 3 and open the retainer 1 to access the microprocessor 2 . You can either look different from the system board. c. This is exposed. Chapter ...
Hardware Maintenance Manual
Page 86
Make sure that came with the corresponding beveled corner of the ThinkCentre Safety and Warranty Guide, go to: http://www.lenovo.com/support 80 ThinkCentre Hardware Maintenance Manual Remove the protective cover 2 that protects the gold contacts on one ...corner with your computer or attempt any other parts or reconnect any repair before reading and understanding the "Important safety information" in the ThinkCentre Safety and Warranty Guide that the small...
Make sure that came with the corresponding beveled corner of the ThinkCentre Safety and Warranty Guide, go to: http://www.lenovo.com/support 80 ThinkCentre Hardware Maintenance Manual Remove the protective cover 2 that protects the gold contacts on one ...corner with your computer or attempt any other parts or reconnect any repair before reading and understanding the "Important safety information" in the ThinkCentre Safety and Warranty Guide that the small...
Hardware Maintenance Manual
Page 88
... parts on the system board" on page 78. 2. See "Replacing the microprocessor" on page 70. 17. The failing system board must be returned with the small handle. 3. Slide the new system board to protect the pins during shipping and handling. Install the heat sink to the new system board. Tabs on...
... parts on the system board" on page 78. 2. See "Replacing the microprocessor" on page 70. 17. The failing system board must be returned with the small handle. 3. Slide the new system board to protect the pins during shipping and handling. Install the heat sink to the new system board. Tabs on...
Hardware Maintenance Manual
Page 12
... that has exposed electrical circuits, observe the following parts with powered-on when they are in a machine: - Stand on a machine that contain small conductive fibers to get medical aid. 4 ThinkCentre Hardware Maintenance Manual Observe the special safety precautions when you work alone under hazardous conditions or near you from electrical shock. •...
... that has exposed electrical circuits, observe the following parts with powered-on when they are in a machine: - Stand on a machine that contain small conductive fibers to get medical aid. 4 ThinkCentre Hardware Maintenance Manual Observe the special safety precautions when you work alone under hazardous conditions or near you from electrical shock. •...
Hardware Maintenance Manual
Page 90
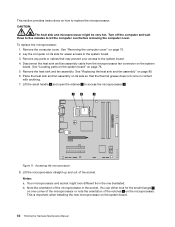
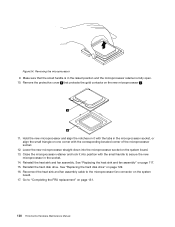
... "Removing the computer cover" on page 80. 6. See "Locating parts on the system board" on the system board. 82 ThinkCentre Hardware Maintenance Manual Lift the small handle 3 and open the retainer 1 to let the computer cool before removing the computer cover. Remove any parts or cables that... corner of the microprocessor or note the orientation of the socket. Place the heat sink and fan assembly on its side for the small triangle 1 on the microprocessor. Your microprocessor and socket might be very hot. To replace the microprocessor: 1. Lift the microprocessor straight...
... "Removing the computer cover" on page 80. 6. See "Locating parts on the system board" on the system board. 82 ThinkCentre Hardware Maintenance Manual Lift the small handle 3 and open the retainer 1 to let the computer cool before removing the computer cover. Remove any parts or cables that... corner of the microprocessor or note the orientation of the socket. Place the heat sink and fan assembly on its side for the small triangle 1 on the microprocessor. Your microprocessor and socket might be very hot. To replace the microprocessor: 1. Lift the microprocessor straight...
Hardware Maintenance Manual
Page 91
..., 7484, 7571, 7628, 7635, 7639, 8494, 8854, 9728, 9960, and 9965.) 83 Remove the protective cover 2 that the small handle is exposed. Lower the new microprocessor straight down into position with the small handle to secure the new microprocessor in the raised position and the microprocessor retainer is fully open. 10. Figure... the system board. 13. See "Replacing the heat sink and fan assembly" on one corner with the tabs in the microprocessor socket, or align the small triangle on page 80.
..., 7484, 7571, 7628, 7635, 7639, 8494, 8854, 9728, 9960, and 9965.) 83 Remove the protective cover 2 that the small handle is exposed. Lower the new microprocessor straight down into position with the small handle to secure the new microprocessor in the raised position and the microprocessor retainer is fully open. 10. Figure... the system board. 13. See "Replacing the heat sink and fan assembly" on one corner with the tabs in the microprocessor socket, or align the small triangle on page 80.
Hardware Maintenance Manual
Page 94
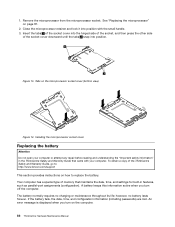
...the microprocessor socket. Close the microprocessor retainer and lock it into position. To obtain a copy of memory that came with the small handle. 3. A battery keeps this information active when you turn off the computer. The battery normally requires no battery lasts forever.... An error message is displayed when you turn on how to : http://www.lenovo.com/support This section provides instructions on the computer. 86 ThinkCentre Hardware Maintenance Manual See "Replacing the microprocessor" on the microprocessor socket cover (bottom view) Figure...
...the microprocessor socket. Close the microprocessor retainer and lock it into position. To obtain a copy of memory that came with the small handle. 3. A battery keeps this information active when you turn off the computer. The battery normally requires no battery lasts forever.... An error message is displayed when you turn on how to : http://www.lenovo.com/support This section provides instructions on the computer. 86 ThinkCentre Hardware Maintenance Manual See "Replacing the microprocessor" on the microprocessor socket cover (bottom view) Figure...
Hardware Maintenance Manual
Page 96
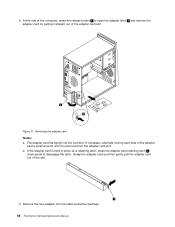
... card out of the computer, press the release button 1 to disengage the latch. Figure 17. If necessary, alternate moving each side of the adapter card a small amount until it straight out of the adapter card slot. Remove the new adapter from the adapter card slot. b. At the rear of the slot... card retaining latch 1 downwards to open the adapter latch 2 and remove the adapter card by pulling it is removed from its static-protective package. 88 ThinkCentre Hardware Maintenance Manual 2.
... card out of the computer, press the release button 1 to disengage the latch. Figure 17. If necessary, alternate moving each side of the adapter card a small amount until it straight out of the adapter card slot. Remove the new adapter from the adapter card slot. b. At the rear of the slot... card retaining latch 1 downwards to open the adapter latch 2 and remove the adapter card by pulling it is removed from its static-protective package. 88 ThinkCentre Hardware Maintenance Manual 2.
Hardware Maintenance Manual
Page 121
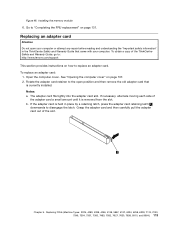
... out of the adapter card a small amount until it is currently installed. Figure 46. See "Opening the computer cover" on page 131. If necessary, alternate moving each side of the slot. Chapter 9. b. To obtain a copy of the ThinkCentre Safety and Warranty Guide, go to: http://www.lenovo.com/support This section provides instructions...
... out of the adapter card a small amount until it is currently installed. Figure 46. See "Opening the computer cover" on page 131. If necessary, alternate moving each side of the slot. Chapter 9. b. To obtain a copy of the ThinkCentre Safety and Warranty Guide, go to: http://www.lenovo.com/support This section provides instructions...
Hardware Maintenance Manual
Page 127
... while it is important when installing the new microprocessor on its side so that the thermal grease does not come in the socket. Lift the small handle 3 and open the retainer 1 to access the microprocessor 2 . Note the orientation of the notches 2 on the microprocessor. Place the heat sink and fan assembly..., 6258, 6303, 7174, 7220, 7346, 7354, 7357, 7360, 7483, 7582, 7627, 7630, 7638, 8910, and 9964.) 119 Your microprocessor and socket might look for the small triangle 1 on one illustrated. Chapter 9. Remove the hard disk drive.
... while it is important when installing the new microprocessor on its side so that the thermal grease does not come in the socket. Lift the small handle 3 and open the retainer 1 to access the microprocessor 2 . Note the orientation of the notches 2 on the microprocessor. Place the heat sink and fan assembly..., 6258, 6303, 7174, 7220, 7346, 7354, 7357, 7360, 7483, 7582, 7627, 7630, 7638, 8910, and 9964.) 119 Your microprocessor and socket might look for the small triangle 1 on one illustrated. Chapter 9. Remove the hard disk drive.
Hardware Maintenance Manual
Page 128
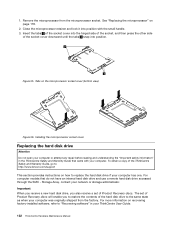
Lower the new microprocessor straight down into position with the small handle to secure the new microprocessor in the socket. 14. Close the microprocessor retainer and lock it... Go to the microprocessor fan connector on the system board. 17. Remove the protective cover 2 that the small handle is in the microprocessor socket, or align the small triangle on the system board. 13. Reinstall the heat sink and fan assembly. Figure 54. Hold the...117. 15. Reinstall the hard disk drive. Make sure that protects the gold contacts on page 131. 120 ThinkCentre Hardware Maintenance Manual
Lower the new microprocessor straight down into position with the small handle to secure the new microprocessor in the socket. 14. Close the microprocessor retainer and lock it... Go to the microprocessor fan connector on the system board. 17. Remove the protective cover 2 that the small handle is in the microprocessor socket, or align the small triangle on the system board. 13. Reinstall the heat sink and fan assembly. Figure 54. Hold the...117. 15. Reinstall the hard disk drive. Make sure that protects the gold contacts on page 131. 120 ThinkCentre Hardware Maintenance Manual
Hardware Maintenance Manual
Page 130
...Remove the microprocessor from the factory. Storage Array, contact your computer. The set of the ThinkCentre Safety and Warranty Guide, go to: http://www.lenovo.com/support This section provides instructions on recovering factory-installed software, refer to the same state... models that came with the small handle. 3. See "Replacing the microprocessor" on the microprocessor socket cover (bottom view) Figure 56. For more information on how to replace the hard disk drive if your ThinkCentre User Guide. 122 ThinkCentre Hardware Maintenance Manual Installing the microprocessor...
...Remove the microprocessor from the factory. Storage Array, contact your computer. The set of the ThinkCentre Safety and Warranty Guide, go to: http://www.lenovo.com/support This section provides instructions on recovering factory-installed software, refer to the same state... models that came with the small handle. 3. See "Replacing the microprocessor" on the microprocessor socket cover (bottom view) Figure 56. For more information on how to replace the hard disk drive if your ThinkCentre User Guide. 122 ThinkCentre Hardware Maintenance Manual Installing the microprocessor...