User Manual
Page 14
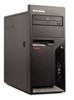
For machine types: 6176, 6179, 7064, 7094, 9349, 9356, 9357, 9439, 9488, 9702, 9708, 9709, 9789, 9851, 9948 Dimensions Width: 175 mm (6.9 inches) Height: 402 mm (15.8 inches) Depth: 440 mm (17.3 inches) Weight Maximum configuration as ...
For machine types: 6176, 6179, 7064, 7094, 9349, 9356, 9357, 9439, 9488, 9702, 9708, 9709, 9789, 9851, 9948 Dimensions Width: 175 mm (6.9 inches) Height: 402 mm (15.8 inches) Depth: 440 mm (17.3 inches) Weight Maximum configuration as ...
Hardware Maintenance Manual
Page 1
ThinkCentre Hardware Maintenance Manual Machine Type:6176, 6177, 6178, 6305, 7064, 7065, 7066, 7094, 7096, 7098, 9349, 9351, 9352, 9356, 9357, 9358, 9359, 9438, 9439, 9481, 9482, 9487, 9488, 9489, 9622, 9702, 9703, 9704, 9708, 9709, 9784, 9785, 9788, 9789, 9792, 9794, 9807, 9851, 9853, 9859, 9948, 9949, and 9952
ThinkCentre Hardware Maintenance Manual Machine Type:6176, 6177, 6178, 6305, 7064, 7065, 7066, 7094, 7096, 7098, 9349, 9351, 9352, 9356, 9357, 9358, 9359, 9438, 9439, 9481, 9482, 9487, 9488, 9489, 9622, 9702, 9703, 9704, 9708, 9709, 9784, 9785, 9788, 9789, 9792, 9794, 9807, 9851, 9853, 9859, 9948, 9949, and 9952

Hardware Maintenance Manual
Page 3
ThinkCentre Hardware Maintenance Manual Machine Type:6176, 6177, 6178, 6305, 7064, 7065, 7066, 7094, 7096, 7098, 9349, 9351, 9352, 9356, 9357, 9358, 9359, 9438, 9439, 9481, 9482, 9487, 9488, 9489, 9622, 9702, 9703, 9704, 9708, 9709, 9784, 9785, 9788, 9789, 9792, 9794, 9807, 9851, 9853, 9859, 9948, 9949, and 9952
ThinkCentre Hardware Maintenance Manual Machine Type:6176, 6177, 6178, 6305, 7064, 7065, 7066, 7094, 7096, 7098, 9349, 9351, 9352, 9356, 9357, 9358, 9359, 9438, 9439, 9481, 9482, 9487, 9488, 9489, 9622, 9702, 9703, 9704, 9708, 9709, 9784, 9785, 9788, 9789, 9792, 9794, 9807, 9851, 9853, 9859, 9948, 9949, and 9952
Hardware Maintenance Manual
Page 5
...7065, 7096, 9351, 9358, 9438, 9481, 9489, 9703, 9784, 9788, 9792, 9853, 9949 . . 29 Types 7064, 7094, 9349, 9356, 9357, 9439, 9488, 9702, 9708, 9709, 9789, 9851, 9948 . . 30 Chapter 4. Contents Chapter 1. Diagnostics 35 PC-Doctor for Windows 35 PC-Doctor for Windows PE 35 Running ...Setup Utility program . . . . . 43 Chapter 7. Replacing FRUs (Types 7064, 7094, 9349, 9356, 9357, 9439, 9488, 9702, 9708, 9709, 9789, 9851, 9948 91 © Copyright Lenovo 2005, 2010 v Using the Setup Utility . . 41 Starting the Setup Utility program 41 Viewing and changing settings 41 Using passwords...
...7065, 7096, 9351, 9358, 9438, 9481, 9489, 9703, 9784, 9788, 9792, 9853, 9949 . . 29 Types 7064, 7094, 9349, 9356, 9357, 9439, 9488, 9702, 9708, 9709, 9789, 9851, 9948 . . 30 Chapter 4. Contents Chapter 1. Diagnostics 35 PC-Doctor for Windows 35 PC-Doctor for Windows PE 35 Running ...Setup Utility program . . . . . 43 Chapter 7. Replacing FRUs (Types 7064, 7094, 9349, 9356, 9357, 9439, 9488, 9702, 9708, 9709, 9789, 9851, 9948 91 © Copyright Lenovo 2005, 2010 v Using the Setup Utility . . 41 Starting the Setup Utility program 41 Viewing and changing settings 41 Using passwords...

Hardware Maintenance Manual
Page 6
...Automatic Power-On features 776 FRU lists 143 Machine Type 6176 143 Machine Type 6177 158 Machine Type 6178 173 Machine Type 6179 187 vi ThinkCentre Hardware Maintenance Manual Machine Type 6305 202 Machine Type 7064 218 Machine Type 7065 233 Machine Type 7066 248 Machine Type 7094 263 Machine Type...Type 9359 400 Machine Type 9438 415 Machine Type 9439 431 Machine Type 9481 451 Machine Type 9482 471 Machine Type 9487 493 Machine Type 9488 510 Machine Type 9489 525 Machine Type 9622 540 Machine Type 9702 554 Machine Type 9703 572 Machine Type 9704 588 Machine Type 9708 ...
...Automatic Power-On features 776 FRU lists 143 Machine Type 6176 143 Machine Type 6177 158 Machine Type 6178 173 Machine Type 6179 187 vi ThinkCentre Hardware Maintenance Manual Machine Type 6305 202 Machine Type 7064 218 Machine Type 7065 233 Machine Type 7066 248 Machine Type 7094 263 Machine Type...Type 9359 400 Machine Type 9438 415 Machine Type 9439 431 Machine Type 9481 451 Machine Type 9482 471 Machine Type 9487 493 Machine Type 9488 510 Machine Type 9489 525 Machine Type 9622 540 Machine Type 9702 554 Machine Type 9703 572 Machine Type 9704 588 Machine Type 9708 ...

Hardware Maintenance Manual
Page 38
Dimensions Width: 175mm (6.9 in.) Height: 402 mm (15.8in.) Depth: 440 mm (17.3 in .) Weight Maximum configuration as shipped: 11 kg (24 lbs) For all machine types 30 ThinkCentre Hardware Maintenance Manual Dimensions Width: 331 mm (13 in.) Height: 104 mm (4.1in.) Depth: 412 mm (16.2 in .) Weight Maximum configuration as shipped: 8.8 kg (19.4 lbs) Types 7064, 7094, 9349, 9356, 9357, 9439, 9488, 9702, 9708, 9709, 9789, 9851, 9948 This section lists the physical specifications.
Dimensions Width: 175mm (6.9 in.) Height: 402 mm (15.8in.) Depth: 440 mm (17.3 in .) Weight Maximum configuration as shipped: 11 kg (24 lbs) For all machine types 30 ThinkCentre Hardware Maintenance Manual Dimensions Width: 331 mm (13 in.) Height: 104 mm (4.1in.) Depth: 412 mm (16.2 in .) Weight Maximum configuration as shipped: 8.8 kg (19.4 lbs) Types 7064, 7094, 9349, 9356, 9357, 9439, 9488, 9702, 9708, 9709, 9789, 9851, 9948 This section lists the physical specifications.

Hardware Maintenance Manual
Page 99
...Only the major FRUs are to be done by trained service technicians only. Replacing FRUs (Types 7064, 7094, 9349, 9356, 9357, 9439, 9488, 9702, 9708, 9709, 9789, 9851, 9948) Important Before you work safely. This chapter does not contain a remove and replace procedure for ...) 3 Power connector 12 4 Standard mouse connector 13 Ethernet connector USB connectors (2) Microphone connector Audio line out connector © Copyright Lenovo 2005, 2010 91 Rear connectors The following illustrations help you replace any FRU, read "Important Safety Information" on the rear of the computer.
...Only the major FRUs are to be done by trained service technicians only. Replacing FRUs (Types 7064, 7094, 9349, 9356, 9357, 9439, 9488, 9702, 9708, 9709, 9789, 9851, 9948) Important Before you work safely. This chapter does not contain a remove and replace procedure for ...) 3 Power connector 12 4 Standard mouse connector 13 Ethernet connector USB connectors (2) Microphone connector Audio line out connector © Copyright Lenovo 2005, 2010 91 Rear connectors The following illustrations help you replace any FRU, read "Important Safety Information" on the rear of the computer.

Hardware Maintenance Manual
Page 101
...-sensitive devices" on page 6 before opening the cover. This procedure describes how to remove the cover. 1. Replacing FRUs (Types 7064, 7094, 9349, 9356, 9357, 9439, 9488, 9702, 9708, 9709, 9789, 9851, 9948) 93
...-sensitive devices" on page 6 before opening the cover. This procedure describes how to remove the cover. 1. Replacing FRUs (Types 7064, 7094, 9349, 9356, 9357, 9439, 9488, 9702, 9708, 9709, 9789, 9851, 9948) 93

Hardware Maintenance Manual
Page 103
... side. 2. To reinstall the bezel, align the plastic tabs on the right side of the chassis. Replacing FRUs (Types 7064, 7094, 9349, 9356, 9357, 9439, 9488, 9702, 9708, 9709, 9789, 9851, 9948) 95 3. Replacing the power supply This procedure describes how to lay the computer on the left side. 4.
... side. 2. To reinstall the bezel, align the plastic tabs on the right side of the chassis. Replacing FRUs (Types 7064, 7094, 9349, 9356, 9357, 9439, 9488, 9702, 9708, 9709, 9789, 9851, 9948) 95 3. Replacing the power supply This procedure describes how to lay the computer on the left side. 4.
Hardware Maintenance Manual
Page 105
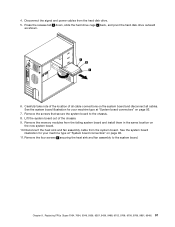
... the system board illustration for your machine type at "System board connectors" on page 92. 11. Replacing FRUs (Types 7064, 7094, 9349, 9356, 9357, 9439, 9488, 9702, 9708, 9709, 9789, 9851, 9948) 97 Press the release tab 1 down, slide the hard drive cage 2 back, and pivot the hard disk drive outward...
... the system board illustration for your machine type at "System board connectors" on page 92. 11. Replacing FRUs (Types 7064, 7094, 9349, 9356, 9357, 9439, 9488, 9702, 9708, 9709, 9789, 9851, 9948) 97 Press the release tab 1 down, slide the hard drive cage 2 back, and pivot the hard disk drive outward...

Hardware Maintenance Manual
Page 107
... new system board into the chassis and align the screw holes with the small handle. 19. Replacing FRUs (Types 7064, 7094, 9349, 9356, 9357, 9439, 9488, 9702, 9708, 9709, 9789, 9851, 9948) 99 Important: To avoid damaging the microprocessor contacts, do not tilt the microprocessor when installing it on the microprocessor...
... new system board into the chassis and align the screw holes with the small handle. 19. Replacing FRUs (Types 7064, 7094, 9349, 9356, 9357, 9439, 9488, 9702, 9708, 9709, 9789, 9851, 9948) 99 Important: To avoid damaging the microprocessor contacts, do not tilt the microprocessor when installing it on the microprocessor...

Hardware Maintenance Manual
Page 109
b. a. This is exposed. The socket pins must be kept as clean as possible. Note the orientation of the socket. Do not touch the gold contacts on the new system board. Lift the microprocessor straight up and out of the notches 1 on the microprocessor. Important: Touch only the sides of the microprocessor. Chapter 9. Do not drop anything onto the microprocessor socket while it is important when reinstalling the microprocessor on the bottom. 7. Replacing FRUs (Types 7064, 7094, 9349, 9356, 9357, 9439, 9488, 9702, 9708, 9709, 9789, 9851, 9948) 101
b. a. This is exposed. The socket pins must be kept as clean as possible. Note the orientation of the socket. Do not touch the gold contacts on the new system board. Lift the microprocessor straight up and out of the notches 1 on the microprocessor. Important: Touch only the sides of the microprocessor. Chapter 9. Do not drop anything onto the microprocessor socket while it is important when reinstalling the microprocessor on the bottom. 7. Replacing FRUs (Types 7064, 7094, 9349, 9356, 9357, 9439, 9488, 9702, 9708, 9709, 9789, 9851, 9948) 101

Hardware Maintenance Manual
Page 111
.... See the system board illustration for your machine type at "System board connectors" on page 92. 3. Replacing FRUs (Types 7064, 7094, 9349, 9356, 9357, 9439, 9488, 9702, 9708, 9709, 9789, 9851, 9948) 103 Install the heat sink and fan assembly on page 93. See "Removing the cover" on the system board...
.... See the system board illustration for your machine type at "System board connectors" on page 92. 3. Replacing FRUs (Types 7064, 7094, 9349, 9356, 9357, 9439, 9488, 9702, 9708, 9709, 9789, 9851, 9948) 103 Install the heat sink and fan assembly on page 93. See "Removing the cover" on the system board...
Hardware Maintenance Manual
Page 113
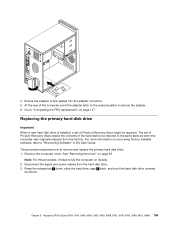
... from the factory. The set of the hard disk to be required. Remove the computer cover. Replacing FRUs (Types 7064, 7094, 9349, 9356, 9357, 9439, 9488, 9702, 9708, 9709, 9789, 9851, 9948) 105 Note: For this procedure, it helps to "Recovering Software" in the User Guide. This procedure describes how to...
... from the factory. The set of the hard disk to be required. Remove the computer cover. Replacing FRUs (Types 7064, 7094, 9349, 9356, 9357, 9439, 9488, 9702, 9708, 9709, 9789, 9851, 9948) 105 Note: For this procedure, it helps to "Recovering Software" in the User Guide. This procedure describes how to...

Hardware Maintenance Manual
Page 115
Slide the new hard disk drive into the drive cage until it snaps into the chassis. Chapter 9. Align the drive cage pivot pin with the slot 1 in the upper drive cage and slide the hard disk drive into position. 9. Replacing FRUs (Types 7064, 7094, 9349, 9356, 9357, 9439, 9488, 9702, 9708, 9709, 9789, 9851, 9948) 107 8.
Slide the new hard disk drive into the drive cage until it snaps into the chassis. Chapter 9. Align the drive cage pivot pin with the slot 1 in the upper drive cage and slide the hard disk drive into position. 9. Replacing FRUs (Types 7064, 7094, 9349, 9356, 9357, 9439, 9488, 9702, 9708, 9709, 9789, 9851, 9948) 107 8.
Hardware Maintenance Manual
Page 117
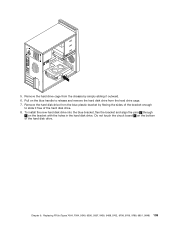
... hard disk drive. 8. Chapter 9. Pull on the bracket with the holes in the hard disk drive. Replacing FRUs (Types 7064, 7094, 9349, 9356, 9357, 9439, 9488, 9702, 9708, 9709, 9789, 9851, 9948) 109 Remove the hard disk drive from the blue plastic bracket by simply sliding it free of the hard...
... hard disk drive. 8. Chapter 9. Pull on the bracket with the holes in the hard disk drive. Replacing FRUs (Types 7064, 7094, 9349, 9356, 9357, 9439, 9488, 9702, 9708, 9709, 9789, 9851, 9948) 109 Remove the hard disk drive from the blue plastic bracket by simply sliding it free of the hard...

Hardware Maintenance Manual
Page 119
... the computer. Remove the computer cover. See "Removing and replacing the front bezel" on page 117. Replacing FRUs (Types 7064, 7094, 9349, 9356, 9357, 9439, 9488, 9702, 9708, 9709, 9789, 9851, 9948) 111 Disconnect the signal and power cables from the rear of the optical drive. 3. 11. Replacing an optical drive...
... the computer. Remove the computer cover. See "Removing and replacing the front bezel" on page 117. Replacing FRUs (Types 7064, 7094, 9349, 9356, 9357, 9439, 9488, 9702, 9708, 9709, 9789, 9851, 9948) 111 Disconnect the signal and power cables from the rear of the optical drive. 3. 11. Replacing an optical drive...

Hardware Maintenance Manual
Page 121
Pull on the chassis and push the rubber mounts through the holes. 5. Replacing FRUs (Types 7064, 7094, 9349, 9356, 9357, 9439, 9488, 9702, 9708, 9709, 9789, 9851, 9948) 113 Chapter 9. Install the new rear fan assembly by aligning the rubber mounts of the system fan assembly with the holes on the tips of the rubber mounts until the fan assembly is in place. 4.
Pull on the chassis and push the rubber mounts through the holes. 5. Replacing FRUs (Types 7064, 7094, 9349, 9356, 9357, 9439, 9488, 9702, 9708, 9709, 9789, 9851, 9948) 113 Chapter 9. Install the new rear fan assembly by aligning the rubber mounts of the system fan assembly with the holes on the tips of the rubber mounts until the fan assembly is in place. 4.

Hardware Maintenance Manual
Page 123
... audio/USB assembly This procedure describes how to remove and replace the front audio/USB assembly. 1. Replacing FRUs (Types 7064, 7094, 9349, 9356, 9357, 9439, 9488, 9702, 9708, 9709, 9789, 9851, 9948) 115 Remove the front audio/USB assembly. 6. 7.
... audio/USB assembly This procedure describes how to remove and replace the front audio/USB assembly. 1. Replacing FRUs (Types 7064, 7094, 9349, 9356, 9357, 9439, 9488, 9702, 9708, 9709, 9789, 9851, 9948) 115 Remove the front audio/USB assembly. 6. 7.

Hardware Maintenance Manual
Page 125
... , the computer might need to turn off. Replace any cables, including telephone lines and power cords. Replacing FRUs (Types 7064, 7094, 9349, 9356, 9357, 9439, 9488, 9702, 9708, 9709, 9789, 9851, 9948) 117
... , the computer might need to turn off. Replace any cables, including telephone lines and power cords. Replacing FRUs (Types 7064, 7094, 9349, 9356, 9357, 9439, 9488, 9702, 9708, 9709, 9789, 9851, 9948) 117