
User Manual
Page 13
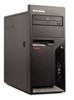
For machine types: 6178, 6305, 7066, 7098, 9352, 9359, 9482, 9487, 9622, 9704, 9785, 9794, 9807, 9859, 9952 Dimensions Width: 325 mm (12.8 inches) Height: 107 mm (4.21 inches) Depth: 410 ...: Windows Vista might not be identified by model) v Linux® v Microsoft Windows® XP Specifications This section lists the physical specifications for compatibility1 (varies by Lenovo as shipped: 8.8 kg (19.4 lbs) 1. Chapter 2. Corrections and additions to this list are being certified or tested for compatibility, check the Web site of this...
For machine types: 6178, 6305, 7066, 7098, 9352, 9359, 9482, 9487, 9622, 9704, 9785, 9794, 9807, 9859, 9952 Dimensions Width: 325 mm (12.8 inches) Height: 107 mm (4.21 inches) Depth: 410 ...: Windows Vista might not be identified by model) v Linux® v Microsoft Windows® XP Specifications This section lists the physical specifications for compatibility1 (varies by Lenovo as shipped: 8.8 kg (19.4 lbs) 1. Chapter 2. Corrections and additions to this list are being certified or tested for compatibility, check the Web site of this...
Hardware Maintenance Manual
Page 1
ThinkCentre Hardware Maintenance Manual Machine Type:6176, 6177, 6178, 6305, 7064, 7065, 7066, 7094, 7096, 7098, 9349, 9351, 9352, 9356, 9357, 9358, 9359, 9438, 9439, 9481, 9482, 9487, 9488, 9489, 9622, 9702, 9703, 9704, 9708, 9709, 9784, 9785, 9788, 9789, 9792, 9794, 9807, 9851, 9853, 9859, 9948, 9949, and 9952
ThinkCentre Hardware Maintenance Manual Machine Type:6176, 6177, 6178, 6305, 7064, 7065, 7066, 7094, 7096, 7098, 9349, 9351, 9352, 9356, 9357, 9358, 9359, 9438, 9439, 9481, 9482, 9487, 9488, 9489, 9622, 9702, 9703, 9704, 9708, 9709, 9784, 9785, 9788, 9789, 9792, 9794, 9807, 9851, 9853, 9859, 9948, 9949, and 9952

Hardware Maintenance Manual
Page 3
ThinkCentre Hardware Maintenance Manual Machine Type:6176, 6177, 6178, 6305, 7064, 7065, 7066, 7094, 7096, 7098, 9349, 9351, 9352, 9356, 9357, 9358, 9359, 9438, 9439, 9481, 9482, 9487, 9488, 9489, 9622, 9702, 9703, 9704, 9708, 9709, 9784, 9785, 9788, 9789, 9792, 9794, 9807, 9851, 9853, 9859, 9948, 9949, and 9952
ThinkCentre Hardware Maintenance Manual Machine Type:6176, 6177, 6178, 6305, 7064, 7065, 7066, 7094, 7096, 7098, 9349, 9351, 9352, 9356, 9357, 9358, 9359, 9438, 9439, 9481, 9482, 9487, 9488, 9489, 9622, 9702, 9703, 9704, 9708, 9709, 9784, 9785, 9788, 9789, 9792, 9794, 9807, 9851, 9853, 9859, 9948, 9949, and 9952
Hardware Maintenance Manual
Page 5
...Replacing FRUs (Types 7064, 7094, 9349, 9356, 9357, 9439, 9488, 9702, 9708, 9709, 9789, 9851, 9948 91 © Copyright Lenovo 2005, 2010 v About this manual . . . . . 1 Important Safety Information 1 Important information about replacing RoHS compliant FRUs 1 Chapter 2..... . . 33 Problem determination tips 33 Chapter 5. General information. . . . 29 The ThinkVantage Productivity Center program . . 29 Additional information resources 29 Specifications 29 Types 7066, 7098, 9352, 9359, 9482, 9487, 9622, 9704, 9794, 9859, 9785, 9807, 9952 . . 29 Types 7065, 7096, 9351, 9358, 9438, 9481, 9489...
...Replacing FRUs (Types 7064, 7094, 9349, 9356, 9357, 9439, 9488, 9702, 9708, 9709, 9789, 9851, 9948 91 © Copyright Lenovo 2005, 2010 v About this manual . . . . . 1 Important Safety Information 1 Important information about replacing RoHS compliant FRUs 1 Chapter 2..... . . 33 Problem determination tips 33 Chapter 5. General information. . . . 29 The ThinkVantage Productivity Center program . . 29 Additional information resources 29 Specifications 29 Types 7066, 7098, 9352, 9359, 9482, 9487, 9622, 9704, 9794, 9859, 9785, 9807, 9952 . . 29 Types 7065, 7096, 9351, 9358, 9438, 9481, 9489...

Hardware Maintenance Manual
Page 6
... 6176 143 Machine Type 6177 158 Machine Type 6178 173 Machine Type 6179 187 vi ThinkCentre Hardware Maintenance Manual Machine Type 6305 202 Machine Type 7064 218 Machine Type 7065 233 Machine Type 7066 248 Machine Type 7094 263 Machine Type 7096 278 Machine Type 7098 293 Machine Type... Machine Type 9853 699 Machine Type 9859 714 Machine Type 9948 730 Machine Type 9949 745 Machine Type 9952 760 Chapter 12. Replacing FRUs (Types 7066, 7098, 9352, 9359, 9482, 9487, 9622, 9704, 9785, 9794, 9807, 9859, 9952 119 Locations 119 Front connectors 119 Rear connectors 119 ...
... 6176 143 Machine Type 6177 158 Machine Type 6178 173 Machine Type 6179 187 vi ThinkCentre Hardware Maintenance Manual Machine Type 6305 202 Machine Type 7064 218 Machine Type 7065 233 Machine Type 7066 248 Machine Type 7094 263 Machine Type 7096 278 Machine Type 7098 293 Machine Type... Machine Type 9853 699 Machine Type 9859 714 Machine Type 9948 730 Machine Type 9949 745 Machine Type 9952 760 Chapter 12. Replacing FRUs (Types 7066, 7098, 9352, 9359, 9482, 9487, 9622, 9704, 9785, 9794, 9807, 9859, 9952 119 Locations 119 Front connectors 119 Rear connectors 119 ...
Hardware Maintenance Manual
Page 37
... Publications • Troubleshooting information • Parts information • Downloads and drivers • Links to -date information for your computer. Types 7066, 7098, 9352, 9359, 9482, 9487, 9622, 9704, 9794, 9859, 9785, 9807, 9952 This section lists the physical specifications for ... from the World Wide Web. Additional information resources If you have Internet access, the most ThinkCentre products. The ThinkVantage Productivity Center program also contains information to http://www.lenovo.com/support/. Dimensions Width: 325 mm (12.8 in.) Height: 107 mm (4.21in.) Depth...
... Publications • Troubleshooting information • Parts information • Downloads and drivers • Links to -date information for your computer. Types 7066, 7098, 9352, 9359, 9482, 9487, 9622, 9704, 9794, 9859, 9785, 9807, 9952 This section lists the physical specifications for ... from the World Wide Web. Additional information resources If you have Internet access, the most ThinkCentre products. The ThinkVantage Productivity Center program also contains information to http://www.lenovo.com/support/. Dimensions Width: 325 mm (12.8 in.) Height: 107 mm (4.21in.) Depth...

Hardware Maintenance Manual
Page 127
... computer. Locations This section provides illustrations to connect the cables on the rear of the computer. FRU replacements are documented. Replacing FRUs (Types 7066, 7098, 9352, 9359, 9482, 9487, 9622, 9704, 9785, 9794, 9807, 9859, 9952) Important Before you determine where to help... locate the various connectors, controls, and components of your computer. © Copyright Lenovo 2005, 2010 119 This chapter does not contain a remove and replace procedure for all computer models will help you replace any FRU, read ...
... computer. Locations This section provides illustrations to connect the cables on the rear of the computer. FRU replacements are documented. Replacing FRUs (Types 7066, 7098, 9352, 9359, 9482, 9487, 9622, 9704, 9785, 9794, 9807, 9859, 9952) Important Before you determine where to help... locate the various connectors, controls, and components of your computer. © Copyright Lenovo 2005, 2010 119 This chapter does not contain a remove and replace procedure for all computer models will help you replace any FRU, read ...

Hardware Maintenance Manual
Page 129
1 Hard disk drive 2 Microprocessor and heat sink 3 Optical drive (such as a CD or DVD drive) 4 Diskette drive 5 Memory connectors (2) 6 Battery 7 Power-supply assembly System board connectors This illustration shows the location of parts on the system board. Chapter 10. Replacing FRUs (Types 7066, 7098, 9352, 9359, 9482, 9487, 9622, 9704, 9785, 9794, 9807, 9859, 9952) 121
1 Hard disk drive 2 Microprocessor and heat sink 3 Optical drive (such as a CD or DVD drive) 4 Diskette drive 5 Memory connectors (2) 6 Battery 7 Power-supply assembly System board connectors This illustration shows the location of parts on the system board. Chapter 10. Replacing FRUs (Types 7066, 7098, 9352, 9359, 9482, 9487, 9622, 9704, 9785, 9794, 9807, 9859, 9952) 121

Hardware Maintenance Manual
Page 131
... some models, you might need to pivot the drive-bay assembly upward and pivot the hard disk drive upward to the computer. Replacing FRUs (Types 7066, 7098, 9352, 9359, 9482, 9487, 9622, 9704, 9785, 9794, 9807, 9859, 9952) 123 Accessing system board components and drives 1. Disconnect the cables attached to access...
... some models, you might need to pivot the drive-bay assembly upward and pivot the hard disk drive upward to the computer. Replacing FRUs (Types 7066, 7098, 9352, 9359, 9482, 9487, 9622, 9704, 9785, 9794, 9807, 9859, 9952) 123 Accessing system board components and drives 1. Disconnect the cables attached to access...

Hardware Maintenance Manual
Page 133
... the memory module straight down into the connector until the retaining clips close. 6. Go to "Completing the FRU replacement" on page 141. Replacing FRUs (Types 7066, 7098, 9352, 9359, 9482, 9487, 9622, 9704, 9785, 9794, 9807, 9859, 9952) 125 Position the replacement memory module over the memory connector. Chapter 10. Locate...
... the memory module straight down into the connector until the retaining clips close. 6. Go to "Completing the FRU replacement" on page 141. Replacing FRUs (Types 7066, 7098, 9352, 9359, 9482, 9487, 9622, 9704, 9785, 9794, 9807, 9859, 9952) 125 Position the replacement memory module over the memory connector. Chapter 10. Locate...

Hardware Maintenance Manual
Page 135
... drives, shut down your operating system, and turn off all power cords from electrical outlets. 3. See "Opening the cover" on page 119. 4. Replacing FRUs (Types 7066, 7098, 9352, 9359, 9482, 9487, 9622, 9704, 9785, 9794, 9807, 9859, 9952) 127 Hazardous voltage, current, and energy levels are connected to remove and replace...
... drives, shut down your operating system, and turn off all power cords from electrical outlets. 3. See "Opening the cover" on page 119. 4. Replacing FRUs (Types 7066, 7098, 9352, 9359, 9482, 9487, 9622, 9704, 9785, 9794, 9807, 9859, 9952) 127 Hazardous voltage, current, and energy levels are connected to remove and replace...

Hardware Maintenance Manual
Page 137
... the FRU replacement" on page 122. 2. Open the computer cover. Chapter 10. Replacing FRUs (Types 7066, 7098, 9352, 9359, 9482, 9487, 9622, 9704, 9785, 9794, 9807, 9859, 9952) 129 Note: Use only the screws provided by Lenovo. 12. These computers automatically control the voltage. • If the voltage supply range is 100...
... the FRU replacement" on page 122. 2. Open the computer cover. Chapter 10. Replacing FRUs (Types 7066, 7098, 9352, 9359, 9482, 9487, 9622, 9704, 9785, 9794, 9807, 9859, 9952) 129 Note: Use only the screws provided by Lenovo. 12. These computers automatically control the voltage. • If the voltage supply range is 100...

Hardware Maintenance Manual
Page 139
... downward until the tabs 2 snap into position with a microprocessor socket cover to the rear of the chassis until it into position. 12. Replacing FRUs (Types 7066, 7098, 9352, 9359, 9482, 9487, 9622, 9704, 9785, 9794, 9807, 9859, 9952) 131 Install a new retention module or move the retention module from the new...
... downward until the tabs 2 snap into position with a microprocessor socket cover to the rear of the chassis until it into position. 12. Replacing FRUs (Types 7066, 7098, 9352, 9359, 9482, 9487, 9622, 9704, 9785, 9794, 9807, 9859, 9952) 131 Install a new retention module or move the retention module from the new...

Hardware Maintenance Manual
Page 141
Remove the heat sink from the failing system board, release the lever 1 securing the microprocessor 2 then pivot the microprocessor retainer 3 until is fully open. Replacing FRUs (Types 7066, 7098, 9352, 9359, 9482, 9487, 9622, 9704, 9785, 9794, 9807, 9859, 9952) 133 Chapter 10. To remove the microprocessor from the system board by pivoting lever 1 until it is in the vertical position. 4. 3.
Remove the heat sink from the failing system board, release the lever 1 securing the microprocessor 2 then pivot the microprocessor retainer 3 until is fully open. Replacing FRUs (Types 7066, 7098, 9352, 9359, 9482, 9487, 9622, 9704, 9785, 9794, 9807, 9859, 9952) 133 Chapter 10. To remove the microprocessor from the system board by pivoting lever 1 until it is in the vertical position. 4. 3.

Hardware Maintenance Manual
Page 143
Lower the microprocessor straight down into position. 10. Make sure the lever is securely locked into the system board socket. 9. Place the heat sink into the socket. 8. Lower the microprocessor retainer 3 and then lower the lever 1 to secure the heat sink. Replacing FRUs (Types 7066, 7098, 9352, 9359, 9482, 9487, 9622, 9704, 9785, 9794, 9807, 9859, 9952) 135 Important: To avoid damaging the microprocessor contacts, do not tilt the microprocessor when installing it into position and lower the lever 1 to secure the retainer. Chapter 10.
Lower the microprocessor straight down into position. 10. Make sure the lever is securely locked into the system board socket. 9. Place the heat sink into the socket. 8. Lower the microprocessor retainer 3 and then lower the lever 1 to secure the heat sink. Replacing FRUs (Types 7066, 7098, 9352, 9359, 9482, 9487, 9622, 9704, 9785, 9794, 9807, 9859, 9952) 135 Important: To avoid damaging the microprocessor contacts, do not tilt the microprocessor when installing it into position and lower the lever 1 to secure the retainer. Chapter 10.

Hardware Maintenance Manual
Page 145
... the new drive, flex the bracket and align the pins on page 141. Go to the rear of the hard disk drive. 7. Replacing FRUs (Types 7066, 7098, 9352, 9359, 9482, 9487, 9622, 9704, 9785, 9794, 9807, 9859, 9952) 137 Position the hard disk drive and bracket into the rear pivots and...
... the new drive, flex the bracket and align the pins on page 141. Go to the rear of the hard disk drive. 7. Replacing FRUs (Types 7066, 7098, 9352, 9359, 9482, 9487, 9622, 9704, 9785, 9794, 9807, 9859, 9952) 137 Position the hard disk drive and bracket into the rear pivots and...

Hardware Maintenance Manual
Page 147
... failing diskette drive. 6. Install the new diskette drive into the bay and slide it on page 141. Go to the diskette drive. 3. Replacing FRUs (Types 7066, 7098, 9352, 9359, 9482, 9487, 9622, 9704, 9785, 9794, 9807, 9859, 9952) 139 Pivot the drive-bay-assembly upward to gain access to "Completing the...
... failing diskette drive. 6. Install the new diskette drive into the bay and slide it on page 141. Go to the diskette drive. 3. Replacing FRUs (Types 7066, 7098, 9352, 9359, 9482, 9487, 9622, 9704, 9785, 9794, 9807, 9859, 9952) 139 Pivot the drive-bay-assembly upward to gain access to "Completing the...

Hardware Maintenance Manual
Page 149
... page 775. 8. Go to the system board. Keep cables clear of the hinges and sides of various components. 2. Close the computer cover. 5. Replacing FRUs (Types 7066, 7098, 9352, 9359, 9482, 9487, 9622, 9704, 9785, 9794, 9807, 9859, 9952) 141 Pull the rubber mounts loose from a CD-ROM or diskette" on page...
... page 775. 8. Go to the system board. Keep cables clear of the hinges and sides of various components. 2. Close the computer cover. 5. Replacing FRUs (Types 7066, 7098, 9352, 9359, 9482, 9487, 9622, 9704, 9785, 9794, 9807, 9859, 9952) 141 Pull the rubber mounts loose from a CD-ROM or diskette" on page...

Hardware Maintenance Manual
Page 256
...) Turkish (models) Czech (models) Polish (models) Arablic Localized (models) Hebrew (models) Hungarian (models) Slovakian (models) English (models) 7065 Vista Starter 32 Recovery DVDs Machine Type 7066 FRU# 45R9876 46R7338 46R7339 46R7340 45R9880 45R9881 45R9882 46R7341 45R9884 45R9885 45R9886 45R9887 46R7342 45R9890 45R9891 45R9892 CRU 1 1 1 1 1 1 1 1 1 1 1 1 1 1 1 1 FRU# 46R5059 CRU 1 248...
...) Turkish (models) Czech (models) Polish (models) Arablic Localized (models) Hebrew (models) Hungarian (models) Slovakian (models) English (models) 7065 Vista Starter 32 Recovery DVDs Machine Type 7066 FRU# 45R9876 46R7338 46R7339 46R7340 45R9880 45R9881 45R9882 46R7341 45R9884 45R9885 45R9886 45R9887 46R7342 45R9890 45R9891 45R9892 CRU 1 1 1 1 1 1 1 1 1 1 1 1 1 1 1 1 FRU# 46R5059 CRU 1 248...

Hardware Maintenance Manual
Page 258
... 41A9717 CRU N N N N N N N N N N N N 2 2 2 2 2 2 N 2 2 The FRUs listed in the following tables are not illustrated. 7066 FRUs Power switch/LED cable assembly (all models) USB cable assembly (all models) SATA cable, 120mm (all models) SATA cable, 700mm (all models) Speaker/Cable... assembly (all models) FRU# 41R3391 41R3392 41R3328 39K5026 39K5012 CRU 2 2 2 2 2 250 ThinkCentre Hardware Maintenance Manual NON VT/Vpro (models CTO) 2 Microprocessor, Core 2 Quad Q9550 C-1 YORKFIELD 2.83GHz 1333MHZ FSB 12M L2 (models CTO) 2 Microprocessor,...
... 41A9717 CRU N N N N N N N N N N N N 2 2 2 2 2 2 N 2 2 The FRUs listed in the following tables are not illustrated. 7066 FRUs Power switch/LED cable assembly (all models) USB cable assembly (all models) SATA cable, 120mm (all models) SATA cable, 700mm (all models) Speaker/Cable... assembly (all models) FRU# 41R3391 41R3392 41R3328 39K5026 39K5012 CRU 2 2 2 2 2 250 ThinkCentre Hardware Maintenance Manual NON VT/Vpro (models CTO) 2 Microprocessor, Core 2 Quad Q9550 C-1 YORKFIELD 2.83GHz 1333MHZ FSB 12M L2 (models CTO) 2 Microprocessor,...
