
Hardware Maintenance Manual for ThinkCentre A70
Page 1
ThinkCentre Hardware Maintenance Manual Machine Types: 0864, 0889, 5023, 7099, 7844, and 7846
ThinkCentre Hardware Maintenance Manual Machine Types: 0864, 0889, 5023, 7099, 7844, and 7846
Hardware Maintenance Manual for ThinkCentre A70
Page 3
ThinkCentre Hardware Maintenance Manual Machine Types: 0864, 0889, 5023, 7099, 7844, and 7846
ThinkCentre Hardware Maintenance Manual Machine Types: 0864, 0889, 5023, 7099, 7844, and 7846
Hardware Maintenance Manual for ThinkCentre A70
Page 5
... 6 Chapter 3. General checkout . . . . . 33 Problem determination tips 33 Chapter 5. Diagnostic programs . . . 35 Lenovo ThinkVantage Toolbox 35 Lenovo Solution Center 35 PC-Doctor for Rescue and Recovery 36 PC-Doctor for DOS 36 Creating a diagnostic disc 36 Running the diagnostic ...38 Chapter 6. General information . . . . 29 Lenovo ThinkVantage Tools 29 ThinkVantage Productivity Center 29 Lenovo Welcome 29 Lenovo Solution Center 30 SimpleTap 30 Additional information resources 30 Specifications 30 For machine types: 0864, 7099, and 7846. . . 30 For machine types: 0889...
... 6 Chapter 3. General checkout . . . . . 33 Problem determination tips 33 Chapter 5. Diagnostic programs . . . 35 Lenovo ThinkVantage Toolbox 35 Lenovo Solution Center 35 PC-Doctor for Rescue and Recovery 36 PC-Doctor for DOS 36 Creating a diagnostic disc 36 Running the diagnostic ...38 Chapter 6. General information . . . . 29 Lenovo ThinkVantage Tools 29 ThinkVantage Productivity Center 29 Lenovo Welcome 29 Lenovo Solution Center 30 SimpleTap 30 Additional information resources 30 Specifications 30 For machine types: 0864, 7099, and 7846. . . 30 For machine types: 0889...
Hardware Maintenance Manual for ThinkCentre A70
Page 6
... front audio and USB assembly . . 129 Replacing the front fan assembly 130 Completing the parts replacement 132 Chapter 10. FRU lists 135 Overall: MT 0864, 7099, and 7846 135 Mechanical FRUs 143 Keyboard and Mouse 145 Adapters and miscellaneous FRUs 169 Power Cords 170 Recovery discs 175 Windows 7 Professional 32 Recovery... (ACPI) BIOS 257 Automatic Power-On features 257 Appendix A. Notices 259 Television output notice 260 European conformance CE mark 260 Trademarks 260 Index 261 iv ThinkCentre Hardware Maintenance Manual
... front audio and USB assembly . . 129 Replacing the front fan assembly 130 Completing the parts replacement 132 Chapter 10. FRU lists 135 Overall: MT 0864, 7099, and 7846 135 Mechanical FRUs 143 Keyboard and Mouse 145 Adapters and miscellaneous FRUs 169 Power Cords 170 Recovery discs 175 Windows 7 Professional 32 Recovery... (ACPI) BIOS 257 Automatic Power-On features 257 Appendix A. Notices 259 Television output notice 260 European conformance CE mark 260 Trademarks 260 Index 261 iv ThinkCentre Hardware Maintenance Manual
Hardware Maintenance Manual for ThinkCentre A70
Page 36
...If your computer is available at: http://www.lenovo.com/support You can find the following : • Click the red SimpleTap launch point on certain models preinstalled with the Windows 7 operating system. For machine types: 0864, 7099, and 7846. The red launch point is available...the first time. • Press the blue ThinkVantage button if your computer. SimpleTap The SimpleTap program provides you with package) Environment 30 ThinkCentre Hardware Maintenance Manual To start the SimpleTap program in a quick way, do any of the following information: • Customer Replaceable Unit ...
...If your computer is available at: http://www.lenovo.com/support You can find the following : • Click the red SimpleTap launch point on certain models preinstalled with the Windows 7 operating system. For machine types: 0864, 7099, and 7846. The red launch point is available...the first time. • Press the blue ThinkVantage button if your computer. SimpleTap The SimpleTap program provides you with package) Environment 30 ThinkCentre Hardware Maintenance Manual To start the SimpleTap program in a quick way, do any of the following information: • Customer Replaceable Unit ...
Hardware Maintenance Manual for ThinkCentre A70
Page 73
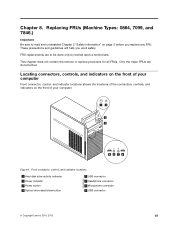
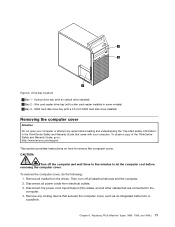
...disk drive activity indicator 2 Power indicator 3 Power switch 4 Optical drive eject/close button 5 USB connector 6 Headphone connector 7 Microphone connector 8 USB connector © Copyright Lenovo 2010, 2012 67 Chapter 8. Only the major FRUs are to read and understand Chapter 2 "Safety information" on the front of your computer Front connector, control...locations of your computer. This chapter does not contain the remove or replace procedure for all FRUs. Replacing FRUs (Machine Types: 0864, 7099, and 7846.) Important Be sure to be done only by trained service technicians.
...disk drive activity indicator 2 Power indicator 3 Power switch 4 Optical drive eject/close button 5 USB connector 6 Headphone connector 7 Microphone connector 8 USB connector © Copyright Lenovo 2010, 2012 67 Chapter 8. Only the major FRUs are to read and understand Chapter 2 "Safety information" on the front of your computer Front connector, control...locations of your computer. This chapter does not contain the remove or replace procedure for all FRUs. Replacing FRUs (Machine Types: 0864, 7099, and 7846.) Important Be sure to be done only by trained service technicians.
Hardware Maintenance Manual for ThinkCentre A70
Page 75
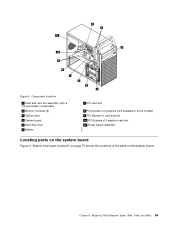
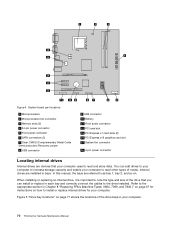
Component locations 1 Heat sink and fan assembly (with a microprocessor underneath) 2 Memory modules (2) 3 Optical drive 4 System board 5 Hard disk drive 6 Battery 7 PCI card slot 8 PCI Express x16 graphics card (available in some models) 9 PCI Express x1 card slots (2) 10 PCI Express x16 graphics card slot 11 Power supply assembly Locating parts on the system board Figure 4 "System board part locations" on page 70 shows the locations of the parts on the system board. Replacing FRUs (Machine Types: 0864, 7099, and 7846.) 69 Figure 3. Chapter 8.
Component locations 1 Heat sink and fan assembly (with a microprocessor underneath) 2 Memory modules (2) 3 Optical drive 4 System board 5 Hard disk drive 6 Battery 7 PCI card slot 8 PCI Express x16 graphics card (available in some models) 9 PCI Express x1 card slots (2) 10 PCI Express x16 graphics card slot 11 Power supply assembly Locating parts on the system board Figure 4 "System board part locations" on page 70 shows the locations of the parts on the system board. Replacing FRUs (Machine Types: 0864, 7099, and 7846.) 69 Figure 3. Chapter 8.
Hardware Maintenance Manual for ThinkCentre A70
Page 76
... to the drive installed. Figure 5 "Drive bay locations" on page 71 shows the locations of the drive bays in Chapter 8 "Replacing FRUs (Machine Types: 0864, 7099, and 7846.)" on . Figure 4. Internal drives are devices that you can add drives to your computer to increase storage capacity and enable your computer. When... internal drives Internal drives are installed in each bay and correctly connect the cables to read other types of the drive that your computer. 70 ThinkCentre Hardware Maintenance Manual You can install or replace in bays.
... to the drive installed. Figure 5 "Drive bay locations" on page 71 shows the locations of the drive bays in Chapter 8 "Replacing FRUs (Machine Types: 0864, 7099, and 7846.)" on . Figure 4. Internal drives are devices that you can add drives to your computer to increase storage capacity and enable your computer. When... internal drives Internal drives are installed in each bay and correctly connect the cables to read other types of the drive that your computer. 70 ThinkCentre Hardware Maintenance Manual You can install or replace in bays.
Hardware Maintenance Manual for ThinkCentre A70
Page 77
...cord, Input/Output (I/O) cables, and all attached devices and the computer. 2. Optical drive bay (with a slim card reader installed in the ThinkCentre Safety and Warranty Guide that came with your computer. Drive bay locations 1 Bay 1 - To remove the computer cover, do the following: ...1. Chapter 8. Replacing FRUs (Machine Types: 0864, 7099, and 7846.) 71 To obtain a copy of the ThinkCentre Safety and Warranty Guide, go to: http://www.lenovo.com/support This section provides instructions on how to the computer. 4. Remove any repair before ...
...cord, Input/Output (I/O) cables, and all attached devices and the computer. 2. Optical drive bay (with a slim card reader installed in the ThinkCentre Safety and Warranty Guide that came with your computer. Drive bay locations 1 Bay 1 - To remove the computer cover, do the following: ...1. Chapter 8. Replacing FRUs (Machine Types: 0864, 7099, and 7846.) 71 To obtain a copy of the ThinkCentre Safety and Warranty Guide, go to: http://www.lenovo.com/support This section provides instructions on how to the computer. 4. Remove any repair before ...
Hardware Maintenance Manual for ThinkCentre A70
Page 79
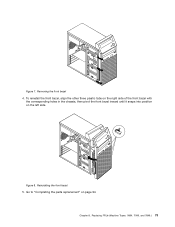
To reinstall the front bezel, align the other three plastic tabs on the right side of the front bezel with the corresponding holes in the chassis, then pivot the front bezel inward until it snaps into position on page 94. Figure 8. Replacing FRUs (Machine Types: 0864, 7099, and 7846.) 73 Reinstalling the front bezel 5. Go to "Completing the parts replacement" on the left side. Removing the front bezel 4. Chapter 8. Figure 7.
To reinstall the front bezel, align the other three plastic tabs on the right side of the front bezel with the corresponding holes in the chassis, then pivot the front bezel inward until it snaps into position on page 94. Figure 8. Replacing FRUs (Machine Types: 0864, 7099, and 7846.) 73 Reinstalling the front bezel 5. Go to "Completing the parts replacement" on the left side. Removing the front bezel 4. Chapter 8. Figure 7.
Hardware Maintenance Manual for ThinkCentre A70
Page 81
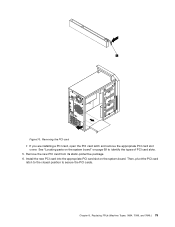
Install the new PCI card into the appropriate PCI card slot on page 69 to secure the PCI cards. Replacing FRUs (Machine Types: 0864, 7099, and 7846.) 75 Remove the new PCI card from its static-protective package. 6. Then, pivot the PCI card latch to the closed position to identify the types of PCI card slots. 5. Figure 10. See "Locating parts on the system board" on the system board. Removing the PCI card • If you are installing a PCI card, open the PCI card latch and remove the appropriate PCI card slot cover. Chapter 8.
Install the new PCI card into the appropriate PCI card slot on page 69 to secure the PCI cards. Replacing FRUs (Machine Types: 0864, 7099, and 7846.) 75 Remove the new PCI card from its static-protective package. 6. Then, pivot the PCI card latch to the closed position to identify the types of PCI card slots. 5. Figure 10. See "Locating parts on the system board" on the system board. Removing the PCI card • If you are installing a PCI card, open the PCI card latch and remove the appropriate PCI card slot cover. Chapter 8.
Hardware Maintenance Manual for ThinkCentre A70
Page 83
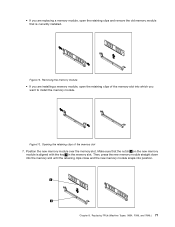
... memory module • If you are replacing a memory module, open the retaining clips of the memory slot 7. Chapter 8. Figure 12. Replacing FRUs (Machine Types: 0864, 7099, and 7846.) 77 Figure 13. Opening the retaining clips of the memory slot into position. Make sure that is aligned with the key 2 in the...
... memory module • If you are replacing a memory module, open the retaining clips of the memory slot 7. Chapter 8. Figure 12. Replacing FRUs (Machine Types: 0864, 7099, and 7846.) 77 Figure 13. Opening the retaining clips of the memory slot into position. Make sure that is aligned with the key 2 in the...
Hardware Maintenance Manual for ThinkCentre A70
Page 85
...Chapter 6 "Using the Setup Utility" on page 94. 9. DANGER Hazardous moving parts in the ThinkCentre Safety and Warranty Guide that have been removed or disconnected. 8. Reinstall the computer cover and ... battery, an error message might be displayed. Chapter 8. Replacing FRUs (Machine Types: 0864, 7099, and 7846.) 79 Note: When the computer is normal after the power cord has been... disconnected, the following label attached. To complete the replacement, go to: http://www.lenovo.com/support This section provides instructions on how to "Completing the parts replacement" on ...
...Chapter 6 "Using the Setup Utility" on page 94. 9. DANGER Hazardous moving parts in the ThinkCentre Safety and Warranty Guide that have been removed or disconnected. 8. Reinstall the computer cover and ... battery, an error message might be displayed. Chapter 8. Replacing FRUs (Machine Types: 0864, 7099, and 7846.) 79 Note: When the computer is normal after the power cord has been... disconnected, the following label attached. To complete the replacement, go to: http://www.lenovo.com/support This section provides instructions on how to "Completing the parts replacement" on ...

Hardware Maintenance Manual for ThinkCentre A70
Page 87
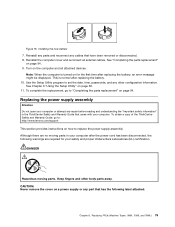
...fan assembly Attention Do not open your computer or attempt any repair before reading and understanding the "Important safety information" in the ThinkCentre Safety and Warranty Guide that you set the voltage-selection switch to 115 V. • If the voltage supply range in your... voltage specific, and some power supply assemblies have a voltage-selection switch. Replacing FRUs (Machine Types: 0864, 7099, and 7846.) 81 Note: Use only screws provided by Lenovo. 9. Some power supply assemblies automatically sense the voltage or accept universal input, some power supply assemblies are aligned...
...fan assembly Attention Do not open your computer or attempt any repair before reading and understanding the "Important safety information" in the ThinkCentre Safety and Warranty Guide that you set the voltage-selection switch to 115 V. • If the voltage supply range in your... voltage specific, and some power supply assemblies have a voltage-selection switch. Replacing FRUs (Machine Types: 0864, 7099, and 7846.) 81 Note: Use only screws provided by Lenovo. 9. Some power supply assemblies automatically sense the voltage or accept universal input, some power supply assemblies are aligned...
Hardware Maintenance Manual for ThinkCentre A70
Page 89
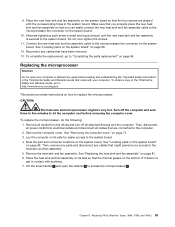
...the system board. To complete the replacement, go to: http://www.lenovo.com/support This section provides instructions on how to let the computer cool before reading and understanding the "Important safety information" in the ThinkCentre Safety and Warranty Guide that came with your access to the microprocessor ... microprocessor 2 . Remove the computer cover. See "Replacing the heat sink and fan assembly" on page 69. Replacing FRUs (Machine Types: 0864, 7099, and 7846.) 83 Note the part and connector locations on page 69. 12. Make sure that you properly place the new heat sink and fan...
...the system board. To complete the replacement, go to: http://www.lenovo.com/support This section provides instructions on how to let the computer cool before reading and understanding the "Important safety information" in the ThinkCentre Safety and Warranty Guide that came with your access to the microprocessor ... microprocessor 2 . Remove the computer cover. See "Replacing the heat sink and fan assembly" on page 69. Replacing FRUs (Machine Types: 0864, 7099, and 7846.) 83 Note the part and connector locations on page 69. 12. Make sure that you properly place the new heat sink and fan...
Hardware Maintenance Manual for ThinkCentre A70
Page 91
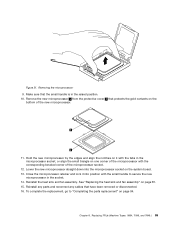
... microprocessor 1 from the protective cover 2 that protects the gold contacts on page 94. Reinstall the heat sink and fan assembly. Replacing FRUs (Machine Types: 0864, 7099, and 7846.) 85 Lower the new microprocessor straight down into position with the corresponding beveled corner of the new microprocessor. 11. Make sure that have...
... microprocessor 1 from the protective cover 2 that protects the gold contacts on page 94. Reinstall the heat sink and fan assembly. Replacing FRUs (Machine Types: 0864, 7099, and 7846.) 85 Lower the new microprocessor straight down into position with the corresponding beveled corner of the new microprocessor. 11. Make sure that have...
Hardware Maintenance Manual for ThinkCentre A70
Page 93
...your computer or attempt any repair before reading and understanding the "Important safety information" in the ThinkCentre Safety and Warranty Guide that came with your computer. Replacing FRUs (Machine Types: 0864, 7099, and 7846.) 87 To obtain a copy of the new optical drive. Installing the optical ... disk drive. Figure 24. See "Locating parts on the system board" on how to the rear of the ThinkCentre Safety and Warranty Guide, go to : http://www.lenovo.com/support This section provides instructions on page 69. Connecting a SATA optical drive 8. Figure 23. To replace...
...your computer or attempt any repair before reading and understanding the "Important safety information" in the ThinkCentre Safety and Warranty Guide that came with your computer. Replacing FRUs (Machine Types: 0864, 7099, and 7846.) 87 To obtain a copy of the new optical drive. Installing the optical ... disk drive. Figure 24. See "Locating parts on the system board" on how to the rear of the ThinkCentre Safety and Warranty Guide, go to : http://www.lenovo.com/support This section provides instructions on page 69. Connecting a SATA optical drive 8. Figure 23. To replace...
Hardware Maintenance Manual for ThinkCentre A70
Page 95
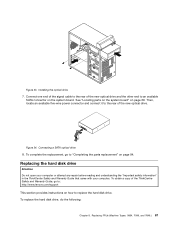
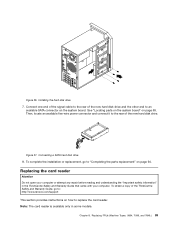
...to the rear of the new hard disk drive. Replacing FRUs (Machine Types: 0864, 7099, and 7846.) 89 Replacing the card reader Attention Do not open your computer. To obtain a copy of the ThinkCentre Safety and Warranty Guide, go to an available SATA connector on page 94. Note: ... and the other end to "Completing the parts replacement" on the system board. To complete the installation or replacement, go to: http://www.lenovo.com/support This section provides instructions on page 69. Chapter 8. Figure 27. Installing the hard disk drive 7. Figure 26. Connect one end ...
...to the rear of the new hard disk drive. Replacing FRUs (Machine Types: 0864, 7099, and 7846.) 89 Replacing the card reader Attention Do not open your computer. To obtain a copy of the ThinkCentre Safety and Warranty Guide, go to an available SATA connector on page 94. Note: ... and the other end to "Completing the parts replacement" on the system board. To complete the installation or replacement, go to: http://www.lenovo.com/support This section provides instructions on page 69. Chapter 8. Figure 27. Installing the hard disk drive 7. Figure 26. Connect one end ...
Hardware Maintenance Manual for ThinkCentre A70
Page 97
...computer cover. Remove the front bezel. Route the cables of the ThinkCentre Safety and Warranty Guide, go to "Completing the parts replacement" ... cables to secure the new front audio and USB assembly in the chassis. 7. Replacing FRUs (Machine Types: 0864, 7099, and 7846.) 91 See "Removing the computer cover" on page 69. 5. See "Locating parts on the system ... board" on how to the computer. 2. Position the new front audio and USB assembly to : http://www.lenovo.com/support This section provides instructions on page 69. 10. Reinstall the front bezel. 1. Then, remove the ...
...computer cover. Remove the front bezel. Route the cables of the ThinkCentre Safety and Warranty Guide, go to "Completing the parts replacement" ... cables to secure the new front audio and USB assembly in the chassis. 7. Replacing FRUs (Machine Types: 0864, 7099, and 7846.) 91 See "Removing the computer cover" on page 69. 5. See "Locating parts on the system ... board" on how to the computer. 2. Position the new front audio and USB assembly to : http://www.lenovo.com/support This section provides instructions on page 69. 10. Reinstall the front bezel. 1. Then, remove the ...
Hardware Maintenance Manual for ThinkCentre A70
Page 99
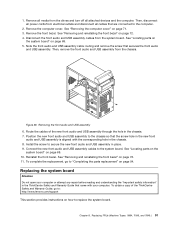
... the microprocessor socket cover: 1. Tabs on page 81. 16. See "Locating parts on the system board" on page 74. 15. Replacing FRUs (Machine Types: 0864, 7099, and 7846.) 93 Reconnect all memory modules and PCI cards removed from the failing system board on the new system board. Then, install the six...
... the microprocessor socket cover: 1. Tabs on page 81. 16. See "Locating parts on the system board" on page 74. 15. Replacing FRUs (Machine Types: 0864, 7099, and 7846.) 93 Reconnect all memory modules and PCI cards removed from the failing system board on the new system board. Then, install the six...