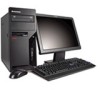

User Manual
Page 13
... to support built-in all countries or regions. Operating systems, certified or tested for compatibility1 (varies by Lenovo as shipped: 8.8 kg (19.4 lbs) 1. For machine types: 6178, 6305, 7066, 7098, 9352, 9359, 9482, 9487, 9622, 9704, 9785, 9794, 9807, 9859, 9952 Dimensions Width: 325 mm (12.8 inches) Height: 107 mm (4.21 inches...
... to support built-in all countries or regions. Operating systems, certified or tested for compatibility1 (varies by Lenovo as shipped: 8.8 kg (19.4 lbs) 1. For machine types: 6178, 6305, 7066, 7098, 9352, 9359, 9482, 9487, 9622, 9704, 9785, 9794, 9807, 9859, 9952 Dimensions Width: 325 mm (12.8 inches) Height: 107 mm (4.21 inches...
Hardware Maintenance Manual
Page 1
ThinkCentre Hardware Maintenance Manual Machine Type:6176, 6177, 6178, 6305, 7064, 7065, 7066, 7094, 7096, 7098, 9349, 9351, 9352, 9356, 9357, 9358, 9359, 9438, 9439, 9481, 9482, 9487, 9488, 9489, 9622, 9702, 9703, 9704, 9708, 9709, 9784, 9785, 9788, 9789, 9792, 9794, 9807, 9851, 9853, 9859, 9948, 9949, and 9952
ThinkCentre Hardware Maintenance Manual Machine Type:6176, 6177, 6178, 6305, 7064, 7065, 7066, 7094, 7096, 7098, 9349, 9351, 9352, 9356, 9357, 9358, 9359, 9438, 9439, 9481, 9482, 9487, 9488, 9489, 9622, 9702, 9703, 9704, 9708, 9709, 9784, 9785, 9788, 9789, 9792, 9794, 9807, 9851, 9853, 9859, 9948, 9949, and 9952

Hardware Maintenance Manual
Page 3
ThinkCentre Hardware Maintenance Manual Machine Type:6176, 6177, 6178, 6305, 7064, 7065, 7066, 7094, 7096, 7098, 9349, 9351, 9352, 9356, 9357, 9358, 9359, 9438, 9439, 9481, 9482, 9487, 9488, 9489, 9622, 9702, 9703, 9704, 9708, 9709, 9784, 9785, 9788, 9789, 9792, 9794, 9807, 9851, 9853, 9859, 9948, 9949, and 9952
ThinkCentre Hardware Maintenance Manual Machine Type:6176, 6177, 6178, 6305, 7064, 7065, 7066, 7094, 7096, 7098, 9349, 9351, 9352, 9356, 9357, 9358, 9359, 9438, 9439, 9481, 9482, 9487, 9488, 9489, 9622, 9702, 9703, 9704, 9708, 9709, 9784, 9785, 9788, 9789, 9792, 9794, 9807, 9851, 9853, 9859, 9948, 9949, and 9952
Hardware Maintenance Manual
Page 5
... information. . . . 29 The ThinkVantage Productivity Center program . . 29 Additional information resources 29 Specifications 29 Types 7066, 7098, 9352, 9359, 9482, 9487, 9622, 9704, 9794, 9859, 9785, 9807, 9952 . . 29 Types 7065, 7096, 9351, 9358, 9438, 9481, 9489, 9703, 9784, 9788, 9792, 9853, 9949 .... 30 Chapter 4. Replacing FRUs (Types 7064, 7094, 9349, 9356, 9357, 9439, 9488, 9702, 9708, 9709, 9789, 9851, 9948 91 © Copyright Lenovo 2005, 2010 v Symptom-to-FRU Index . 45 Hard disk drive boot error 45 Power Supply Problems 45 Diagnostic error codes 46 Beep symptoms 63 POST...
... information. . . . 29 The ThinkVantage Productivity Center program . . 29 Additional information resources 29 Specifications 29 Types 7066, 7098, 9352, 9359, 9482, 9487, 9622, 9704, 9794, 9859, 9785, 9807, 9952 . . 29 Types 7065, 7096, 9351, 9358, 9438, 9481, 9489, 9703, 9784, 9788, 9792, 9853, 9949 .... 30 Chapter 4. Replacing FRUs (Types 7064, 7094, 9349, 9356, 9357, 9439, 9488, 9702, 9708, 9709, 9789, 9851, 9948 91 © Copyright Lenovo 2005, 2010 v Symptom-to-FRU Index . 45 Hard disk drive boot error 45 Power Supply Problems 45 Diagnostic error codes 46 Beep symptoms 63 POST...

Hardware Maintenance Manual
Page 6
... features 776 FRU lists 143 Machine Type 6176 143 Machine Type 6177 158 Machine Type 6178 173 Machine Type 6179 187 vi ThinkCentre Hardware Maintenance Manual Machine Type 6305 202 Machine Type 7064 218 Machine Type 7065 233 Machine Type 7066 248 Machine Type 7094 ...116 Replacing the CMOS battery 116 Completing the FRU replacement 117 Chapter 10. Replacing FRUs (Types 7066, 7098, 9352, 9359, 9482, 9487, 9622, 9704, 9785, 9794, 9807, 9859, 9952 119 Locations 119 Front connectors 119 Rear connectors 119 Computer components 120 System board connectors 121 Opening the cover ...
... features 776 FRU lists 143 Machine Type 6176 143 Machine Type 6177 158 Machine Type 6178 173 Machine Type 6179 187 vi ThinkCentre Hardware Maintenance Manual Machine Type 6305 202 Machine Type 7064 218 Machine Type 7065 233 Machine Type 7066 248 Machine Type 7094 ...116 Replacing the CMOS battery 116 Completing the FRU replacement 117 Chapter 10. Replacing FRUs (Types 7066, 7098, 9352, 9359, 9482, 9487, 9622, 9704, 9785, 9794, 9807, 9859, 9952 119 Locations 119 Front connectors 119 Rear connectors 119 Computer components 120 System board connectors 121 Opening the cover ...
Hardware Maintenance Manual
Page 37
... • Downloads and drivers • Links to http://www.lenovo.com/support/. The ThinkVantage Productivity Center program is available from the World Wide Web. Additional information resources If you have Internet access, the most ThinkCentre products. Types 7066, 7098, 9352, 9359, 9482, 9487, 9622, 9704, 9794, 9859, 9785, 9807, 9952 This section lists...: 7.3 kg (16 lbs) Types 7065, 7096, 9351, 9358, 9438, 9481, 9489, 9703, 9784, 9788, 9792, 9853, 9949 This section lists the physical specifications. © Copyright Lenovo 2005, 2010 29
... • Downloads and drivers • Links to http://www.lenovo.com/support/. The ThinkVantage Productivity Center program is available from the World Wide Web. Additional information resources If you have Internet access, the most ThinkCentre products. Types 7066, 7098, 9352, 9359, 9482, 9487, 9622, 9704, 9794, 9859, 9785, 9807, 9952 This section lists...: 7.3 kg (16 lbs) Types 7065, 7096, 9351, 9358, 9438, 9481, 9489, 9703, 9784, 9788, 9792, 9853, 9949 This section lists the physical specifications. © Copyright Lenovo 2005, 2010 29

Hardware Maintenance Manual
Page 127
Replacing FRUs (Types 7066, 7098, 9352, 9359, 9482, 9487, 9622, 9704, 9785, 9794, 9807, 9859, 9952) Important Before you replace any FRU, read Chapter 2 "Safety information" on your computer. These precautions and guidelines... 7 Microphone connector 8 Headphone connector 9 USB connector Rear connectors This illustration shows the location of connectors on the rear of your computer. © Copyright Lenovo 2005, 2010 119 FRU replacements are documented. Locations This section provides illustrations to help you determine where to be done by trained service technicians only...
Replacing FRUs (Types 7066, 7098, 9352, 9359, 9482, 9487, 9622, 9704, 9785, 9794, 9807, 9859, 9952) Important Before you replace any FRU, read Chapter 2 "Safety information" on your computer. These precautions and guidelines... 7 Microphone connector 8 Headphone connector 9 USB connector Rear connectors This illustration shows the location of connectors on the rear of your computer. © Copyright Lenovo 2005, 2010 119 FRU replacements are documented. Locations This section provides illustrations to help you determine where to be done by trained service technicians only...

Hardware Maintenance Manual
Page 129
Replacing FRUs (Types 7066, 7098, 9352, 9359, 9482, 9487, 9622, 9704, 9785, 9794, 9807, 9859, 9952) 121 1 Hard disk drive 2 Microprocessor and heat sink 3 Optical drive (such as a CD or DVD drive) 4 Diskette drive 5 Memory connectors (2) 6 Battery 7 Power-supply assembly System board connectors This illustration shows the location of parts on the system board. Chapter 10.
Replacing FRUs (Types 7066, 7098, 9352, 9359, 9482, 9487, 9622, 9704, 9785, 9794, 9807, 9859, 9952) 121 1 Hard disk drive 2 Microprocessor and heat sink 3 Optical drive (such as a CD or DVD drive) 4 Diskette drive 5 Memory connectors (2) 6 Battery 7 Power-supply assembly System board connectors This illustration shows the location of parts on the system board. Chapter 10.

Hardware Maintenance Manual
Page 131
... cover upward to the computer. 3. Accessing system board components and drives 1. Open the computer cover. Replacing FRUs (Types 7066, 7098, 9352, 9359, 9482, 9487, 9622, 9704, 9785, 9794, 9807, 9859, 9952) 123
... cover upward to the computer. 3. Accessing system board components and drives 1. Open the computer cover. Replacing FRUs (Types 7066, 7098, 9352, 9359, 9482, 9487, 9622, 9704, 9785, 9794, 9807, 9859, 9952) 123

Hardware Maintenance Manual
Page 133
... connector key 2 on page 141. 3. Go to "Completing the FRU replacement" on the system board. Replacing FRUs (Types 7066, 7098, 9352, 9359, 9482, 9487, 9622, 9704, 9785, 9794, 9807, 9859, 9952) 125 Locate the memory connectors. See "System board connectors" on page 121. 4. Chapter 10.
... connector key 2 on page 141. 3. Go to "Completing the FRU replacement" on the system board. Replacing FRUs (Types 7066, 7098, 9352, 9359, 9482, 9487, 9622, 9704, 9785, 9794, 9807, 9859, 9952) 125 Locate the memory connectors. See "System board connectors" on page 121. 4. Chapter 10.

Hardware Maintenance Manual
Page 135
... the rear of the chassis that are connected to remove and replace the power supply. 1. Replacing FRUs (Types 7066, 7098, 9352, 9359, 9482, 9487, 9622, 9704, 9785, 9794, 9807, 9859, 9952) 127
... the rear of the chassis that are connected to remove and replace the power supply. 1. Replacing FRUs (Types 7066, 7098, 9352, 9359, 9482, 9487, 9622, 9704, 9785, 9794, 9807, 9859, 9952) 127

Hardware Maintenance Manual
Page 137
... power-supply assembly align with those in the chassis. Open the computer cover. Note: Use only the screws provided by Lenovo. 12. Replacing FRUs (Types 7066, 7098, 9352, 9359, 9482, 9487, 9622, 9704, 9785, 9794, 9807, 9859, 9952) 129 Pivot the drive-bay assembly upward to gain access to the drives and...
... power-supply assembly align with those in the chassis. Open the computer cover. Note: Use only the screws provided by Lenovo. 12. Replacing FRUs (Types 7066, 7098, 9352, 9359, 9482, 9487, 9622, 9704, 9785, 9794, 9807, 9859, 9952) 129 Pivot the drive-bay assembly upward to gain access to the drives and...

Hardware Maintenance Manual
Page 139
... then press the other side of the socket cover downward until it is fully seated. Replacing FRUs (Types 7066, 7098, 9352, 9359, 9482, 9487, 9622, 9704, 9785, 9794, 9807, 9859, 9952) 131 Chapter 10. 10. Position the new system board so that it is aligned with the small handle. Make sure...
... then press the other side of the socket cover downward until it is fully seated. Replacing FRUs (Types 7066, 7098, 9352, 9359, 9482, 9487, 9622, 9704, 9785, 9794, 9807, 9859, 9952) 131 Chapter 10. 10. Position the new system board so that it is aligned with the small handle. Make sure...

Hardware Maintenance Manual
Page 141
Replacing FRUs (Types 7066, 7098, 9352, 9359, 9482, 9487, 9622, 9704, 9785, 9794, 9807, 9859, 9952) 133 To remove the microprocessor from the system board by pivoting lever 1 until it is in the vertical position. 4. Remove the heat sink from the failing system board, release the lever 1 securing the microprocessor 2 then pivot the microprocessor retainer 3 until is fully open. Chapter 10. 3.
Replacing FRUs (Types 7066, 7098, 9352, 9359, 9482, 9487, 9622, 9704, 9785, 9794, 9807, 9859, 9952) 133 To remove the microprocessor from the system board by pivoting lever 1 until it is in the vertical position. 4. Remove the heat sink from the failing system board, release the lever 1 securing the microprocessor 2 then pivot the microprocessor retainer 3 until is fully open. Chapter 10. 3.

Hardware Maintenance Manual
Page 143
Make sure the lever is securely locked into position and lower the lever 1 to secure the retainer. Replacing FRUs (Types 7066, 7098, 9352, 9359, 9482, 9487, 9622, 9704, 9785, 9794, 9807, 9859, 9952) 135 Place the heat sink into position. 10. Important: To avoid damaging the microprocessor contacts, do not tilt the microprocessor when installing it into the system board socket. 9. Chapter 10. Lower the microprocessor straight down into the socket. 8. Lower the microprocessor retainer 3 and then lower the lever 1 to secure the heat sink.
Make sure the lever is securely locked into position and lower the lever 1 to secure the retainer. Replacing FRUs (Types 7066, 7098, 9352, 9359, 9482, 9487, 9622, 9704, 9785, 9794, 9807, 9859, 9952) 135 Place the heat sink into position. 10. Important: To avoid damaging the microprocessor contacts, do not tilt the microprocessor when installing it into the system board socket. 9. Chapter 10. Lower the microprocessor straight down into the socket. 8. Lower the microprocessor retainer 3 and then lower the lever 1 to secure the heat sink.

Hardware Maintenance Manual
Page 145
... "Opening the cover" on the bracket with the recesses in the hard disk drive bracket. Replacing FRUs (Types 7066, 7098, 9352, 9359, 9482, 9487, 9622, 9704, 9785, 9794, 9807, 9859, 9952) 137 Open the computer cover. Pivot the drive-bay-assembly upward to gain access to remove and replace the optical...
... "Opening the cover" on the bracket with the recesses in the hard disk drive bracket. Replacing FRUs (Types 7066, 7098, 9352, 9359, 9482, 9487, 9622, 9704, 9785, 9794, 9807, 9859, 9952) 137 Open the computer cover. Pivot the drive-bay-assembly upward to gain access to remove and replace the optical...

Hardware Maintenance Manual
Page 147
... assembly. 5. Install the new diskette drive into the bay and slide it on page 141. Replacing FRUs (Types 7066, 7098, 9352, 9359, 9482, 9487, 9622, 9704, 9785, 9794, 9807, 9859, 9952) 139 Remove the lock bracket from the rear of the failing diskette drive. 6. Connect the flat cable to "Completing the...
... assembly. 5. Install the new diskette drive into the bay and slide it on page 141. Replacing FRUs (Types 7066, 7098, 9352, 9359, 9482, 9487, 9622, 9704, 9785, 9794, 9807, 9859, 9952) 139 Remove the lock bracket from the rear of the failing diskette drive. 6. Connect the flat cable to "Completing the...

Hardware Maintenance Manual
Page 149
... cables, including telephone lines and power cords. See "Updating (flashing) BIOS from the mounting bracket. Replacing FRUs (Types 7066, 7098, 9352, 9359, 9482, 9487, 9622, 9704, 9785, 9794, 9807, 9859, 9952) 141 Pull the rubber mounts loose from a CD-ROM or diskette" on page 41. Reinstall the fan mounting bracket into...
... cables, including telephone lines and power cords. See "Updating (flashing) BIOS from the mounting bracket. Replacing FRUs (Types 7066, 7098, 9352, 9359, 9482, 9487, 9622, 9704, 9785, 9794, 9807, 9859, 9952) 141 Pull the rubber mounts loose from a CD-ROM or diskette" on page 41. Reinstall the fan mounting bracket into...

Hardware Maintenance Manual
Page 596
... (models) Polish (models) Russian English (models) Arablic Localized (models) Hebrew (models) Hungarian (models) Slovakian (models) English (models) 9703 Vista Starter 32 Recovery DVDs Machine Type 9704 FRU# 46R7338 46R7339 46R7340 45R9880 45R9881 45R9882 46R7341 45R9884 45R9885 45R9886 45R9887 46R5089 46R7342 45R9890 45R9891 45R9892 CRU 1 1 1 1 1 1 1 1 1 1 1 1 1 1 1 1 FRU# 46R5059 CRU 1 588...
... (models) Polish (models) Russian English (models) Arablic Localized (models) Hebrew (models) Hungarian (models) Slovakian (models) English (models) 9703 Vista Starter 32 Recovery DVDs Machine Type 9704 FRU# 46R7338 46R7339 46R7340 45R9880 45R9881 45R9882 46R7341 45R9884 45R9885 45R9886 45R9887 46R5089 46R7342 45R9890 45R9891 45R9892 CRU 1 1 1 1 1 1 1 1 1 1 1 1 1 1 1 1 FRU# 46R5059 CRU 1 588...

Hardware Maintenance Manual
Page 599
FRU lists 591 Item # 9704 FRUs 7 System board, Intel G31 nano-BTX GA Level (models 7AG 7AM 7AA 7AQ 7AT 7AJ AFP AGP ABU AEC AHS AHY AJS AJY 7BG ... 8SQ 8ST 8SJ 71G 72G 73G 8GG 8HG) FRU# 53Y5125 41A9701 41A9717 45J9418 45J9427 CRU N 2 2 2 2 The FRUs listed in the following tables are not illustrated. 9704 FRUs Power switch/LED cable assembly (all models) USB cable assembly (all models) SATA cable, 120mm (all models) SATA cable, 700mm (all models) Speaker/Cable...
FRU lists 591 Item # 9704 FRUs 7 System board, Intel G31 nano-BTX GA Level (models 7AG 7AM 7AA 7AQ 7AT 7AJ AFP AGP ABU AEC AHS AHY AJS AJY 7BG ... 8SQ 8ST 8SJ 71G 72G 73G 8GG 8HG) FRU# 53Y5125 41A9701 41A9717 45J9418 45J9427 CRU N 2 2 2 2 The FRUs listed in the following tables are not illustrated. 9704 FRUs Power switch/LED cable assembly (all models) USB cable assembly (all models) SATA cable, 120mm (all models) SATA cable, 700mm (all models) Speaker/Cable...