
Hardware Maintenance Manual
Page 1
Hardware Maintenance Manual Types 8095, 8098, 8141 8142, 8143 Types 8144, 8145, 8146, 8171, 8172 Types 8173, 8420, 8421, 8422, 8423 Types 8424, 8425, 8427
Hardware Maintenance Manual Types 8095, 8098, 8141 8142, 8143 Types 8144, 8145, 8146, 8171, 8172 Types 8173, 8420, 8421, 8422, 8423 Types 8424, 8425, 8427

Hardware Maintenance Manual
Page 3
Hardware Maintenance Manual Types 8095, 8098, 8141 8142, 8143 Types 8144, 8145, 8146, 8171, 8172 Types 8173, 8420, 8421, 8422, 8423 Types 8424, 8425, 8427
Hardware Maintenance Manual Types 8095, 8098, 8141 8142, 8143 Types 8144, 8145, 8146, 8171, 8172 Types 8173, 8420, 8421, 8422, 8423 Types 8424, 8425, 8427
Hardware Maintenance Manual
Page 5
.... 55 Using passwords 55 Password considerations 56 User Password 56 Administrator Password 56 IDE Drive User Password 56 IDE Drive Master Password 56 © Lenovo 2005, 2008. General information . . . . 41 The Access IBM program 41 Additional information resources 41 Physical specifications 41 Types 8095, 8096... . . . 58 Changing the startup device sequence . . . . 58 Advanced settings 58 Chapter 7. Replacing FRUs (Types 8143, 8144, 8146, 8422, 8423, and 8427 115 Locating controls and connectors on the front of the computer 115 Locating connectors on the rear of the computer . . 92...
.... 55 Using passwords 55 Password considerations 56 User Password 56 Administrator Password 56 IDE Drive User Password 56 IDE Drive Master Password 56 © Lenovo 2005, 2008. General information . . . . 41 The Access IBM program 41 Additional information resources 41 Physical specifications 41 Types 8095, 8096... . . . 58 Changing the startup device sequence . . . . 58 Advanced settings 58 Chapter 7. Replacing FRUs (Types 8143, 8144, 8146, 8422, 8423, and 8427 115 Locating controls and connectors on the front of the computer 115 Locating connectors on the rear of the computer . . 92...
Hardware Maintenance Manual
Page 6
... Type 8146 231 Machine Type 8171 237 Machine Type 8172 255 Machine Type 8173 265 Machine Type 8420 272 Machine Type 8421 280 Machine Type 8422 287 Machine Type 8423 298 Machine Type 8424 310 Machine Type 8425 319 Machine Type 8427 328 Chapter 12. Removing and replacing the diskette drive...
... Type 8146 231 Machine Type 8171 237 Machine Type 8172 255 Machine Type 8173 265 Machine Type 8420 272 Machine Type 8421 280 Machine Type 8422 287 Machine Type 8423 298 Machine Type 8424 310 Machine Type 8425 319 Machine Type 8427 328 Chapter 12. Removing and replacing the diskette drive...
Hardware Maintenance Manual
Page 49
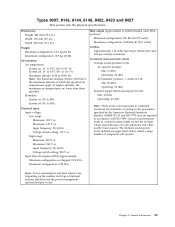
... mm (6.9 in.) Depth: 450 mm (17.7 in a given location might exceed the average values stated because of computers will operate. Types 8097, 8143, 8144, 8146, 8422, 8423 and 8427 This section lists the physical specifications. Chapter 3. General information 43 The declared sound-power levels indicate an upper limit, below which the...
... mm (6.9 in.) Depth: 450 mm (17.7 in a given location might exceed the average values stated because of computers will operate. Types 8097, 8143, 8144, 8146, 8422, 8423 and 8427 This section lists the physical specifications. Chapter 3. General information 43 The declared sound-power levels indicate an upper limit, below which the...

Hardware Maintenance Manual
Page 121
...Only the major FRUs are to which you can attach external devices. 1 3 9 4 1 IEEE 1394 connector 2 USB connector 3 USB connector © Lenovo 2005, 2008. These precautions and guidelines will help you install or remove any FRU, read Chapter 2, "Safety information," on the computer to be done by ... on the front of the computer This section shows the various external connectors on page 5. Replacing FRUs (Types 8143, 8144, 8146, 8422, 8423, and 8427) FRU replacements are documented in this manual. This chapter does not contain a remove and replace procedure for all FRUs. ...
...Only the major FRUs are to which you can attach external devices. 1 3 9 4 1 IEEE 1394 connector 2 USB connector 3 USB connector © Lenovo 2005, 2008. These precautions and guidelines will help you install or remove any FRU, read Chapter 2, "Safety information," on the computer to be done by ... on the front of the computer This section shows the various external connectors on page 5. Replacing FRUs (Types 8143, 8144, 8146, 8422, 8423, and 8427) FRU replacements are documented in this manual. This chapter does not contain a remove and replace procedure for all FRUs. ...
Hardware Maintenance Manual
Page 123
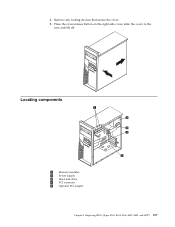
Locating components 1 Memory modules 2 Power supply 3 Hard disk drive 4 PCI connector 5 Optional PCI adapter Chapter 9. 4. Press the cover-release button on the right side cover, slide the cover to the rear, and lift off. Replacing FRUs (Types 8143, 8144, 8146, 8422, 8423, and 8427) 117 Remove any locking devices that secure the cover. 5.
Locating components 1 Memory modules 2 Power supply 3 Hard disk drive 4 PCI connector 5 Optional PCI adapter Chapter 9. 4. Press the cover-release button on the right side cover, slide the cover to the rear, and lift off. Replacing FRUs (Types 8143, 8144, 8146, 8422, 8423, and 8427) 117 Remove any locking devices that secure the cover. 5.
Hardware Maintenance Manual
Page 125
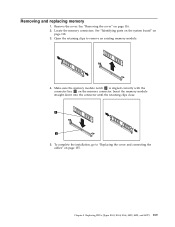
... board" on page 135. Open the retaining clips to "Replacing the cover and connecting the cables" on page 118. 3. Replacing FRUs (Types 8143, 8144, 8146, 8422, 8423, and 8427) 119 Remove the cover. Chapter 9. Removing and replacing memory 1.
... board" on page 135. Open the retaining clips to "Replacing the cover and connecting the cables" on page 118. 3. Replacing FRUs (Types 8143, 8144, 8146, 8422, 8423, and 8427) 119 Remove the cover. Chapter 9. Removing and replacing memory 1.
Hardware Maintenance Manual
Page 127
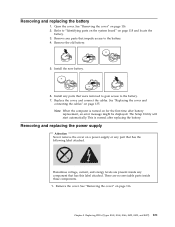
... energy levels are no servicable parts inside any parts that impede access to the battery. 7. Remove the cover. Chapter 9. Replacing FRUs (Types 8143, 8144, 8146, 8422, 8423, and 8427) 121 Install any component that has the following label attached. The Setup Utility will start automatically. Replace the cover, and connect the...
... energy levels are no servicable parts inside any parts that impede access to the battery. 7. Remove the cover. Chapter 9. Replacing FRUs (Types 8143, 8144, 8146, 8422, 8423, and 8427) 121 Install any component that has the following label attached. The Setup Utility will start automatically. Replace the cover, and connect the...
Hardware Maintenance Manual
Page 129
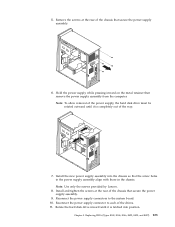
... rotated outward until it is latched into the chassis so that secure the power supply assembly. 9. Note: Use only the screws provided by Lenovo. 8. Chapter 9. Hold the power supply while pressing inward on the metal retainer then remove the power supply assembly from the computer. 5. Replacing... FRUs (Types 8143, 8144, 8146, 8422, 8423, and 8427) 123 Rotate the hard disk drive inward until it is completely out of the chassis that secure the power supply assembly...
... rotated outward until it is latched into the chassis so that secure the power supply assembly. 9. Note: Use only the screws provided by Lenovo. 8. Chapter 9. Hold the power supply while pressing inward on the metal retainer then remove the power supply assembly from the computer. 5. Replacing... FRUs (Types 8143, 8144, 8146, 8422, 8423, and 8427) 123 Rotate the hard disk drive inward until it is completely out of the chassis that secure the power supply assembly...
Hardware Maintenance Manual
Page 131
..., flat surface. 8. Remove the heat sink and microprocessor from the failing system board and install them on page 126. Replacing FRUs (Types 8143, 8144, 8146, 8422, 8423, and 8427) 125 Note the location of the computer and then lift it out. 7. Chapter 9. 6. Place the defective system board next to "Removing and...
..., flat surface. 8. Remove the heat sink and microprocessor from the failing system board and install them on page 126. Replacing FRUs (Types 8143, 8144, 8146, 8422, 8423, and 8427) 125 Note the location of the computer and then lift it out. 7. Chapter 9. 6. Place the defective system board next to "Removing and...
Hardware Maintenance Manual
Page 133
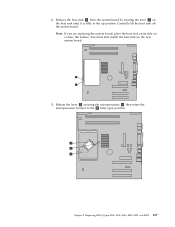
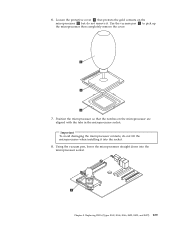
You must later install the heat sink on a clean, flat surface. Release the lever 2 securing the microprocessor 1 then rotate the microprocessor retainer to the 3 fully open position. Replacing FRUs (Types 8143, 8144, 8146, 8422, 8423, and 8427) 127 2. Carefully lift the heat sink off the system board. Chapter 9. Note: If you are replacing the system board, place the heat sink on its side on the new system board. 3. Remove the heat sink 2 from the system board by rotating the lever 1 on the heat sink until it is fully in the up position.
You must later install the heat sink on a clean, flat surface. Release the lever 2 securing the microprocessor 1 then rotate the microprocessor retainer to the 3 fully open position. Replacing FRUs (Types 8143, 8144, 8146, 8422, 8423, and 8427) 127 2. Carefully lift the heat sink off the system board. Chapter 9. Note: If you are replacing the system board, place the heat sink on its side on the new system board. 3. Remove the heat sink 2 from the system board by rotating the lever 1 on the heat sink until it is fully in the up position.
Hardware Maintenance Manual
Page 135
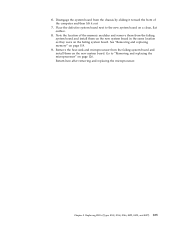
Replacing FRUs (Types 8143, 8144, 8146, 8422, 8423, and 8427) 129 Position the microprocessor so that protects the gold contacts on the microprocessor are aligned with the tabs in the microprocessor socket. ...
Replacing FRUs (Types 8143, 8144, 8146, 8422, 8423, and 8427) 129 Position the microprocessor so that protects the gold contacts on the microprocessor are aligned with the tabs in the microprocessor socket. ...
Hardware Maintenance Manual
Page 137
...: When you receive a new microprocessor, you are replacing a failing microprocessor, continue to the next step. 12. Remove the cover. Replacing FRUs (Types 8143, 8144, 8146, 8422, 8423, and 8427) 131 Lower the lever 1 to "Replacing the cover and connecting the cables" on page 124. If you will also receive a new heat...
...: When you receive a new microprocessor, you are replacing a failing microprocessor, continue to the next step. 12. Remove the cover. Replacing FRUs (Types 8143, 8144, 8146, 8422, 8423, and 8427) 131 Lower the lever 1 to "Replacing the cover and connecting the cables" on page 124. If you will also receive a new heat...
Hardware Maintenance Manual
Page 139
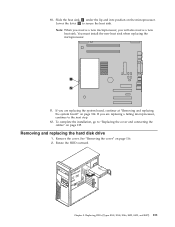
Remove the retainer bracket form the failing drive and install it snaps into position. 6. Disconnect the signal and power cables from the rear of the diskette drive. Install the optical drive into the bay until it on the new drive. 5. Remove the cover. Replacing FRUs (Types 8143, 8144, 8146, 8422, 8423, and 8427) 133 Connect the signal and power cables to "Replacing the cover and connecting the cables" on page 116. 2. Removing and replacing the diskette drive 1. Chapter 9. See "Removing the cover" on page 135. To complete the installation, go to the drive. 7. 4.
Remove the retainer bracket form the failing drive and install it snaps into position. 6. Disconnect the signal and power cables from the rear of the diskette drive. Install the optical drive into the bay until it on the new drive. 5. Remove the cover. Replacing FRUs (Types 8143, 8144, 8146, 8422, 8423, and 8427) 133 Connect the signal and power cables to "Replacing the cover and connecting the cables" on page 116. 2. Removing and replacing the diskette drive 1. Chapter 9. See "Removing the cover" on page 135. To complete the installation, go to the drive. 7. 4.
Hardware Maintenance Manual
Page 141
... pieces, an air baffle and the fan. Reconnect the fan cable to "Replacing the cover and connecting the cables." Replacing FRUs (Types 8143, 8144, 8146, 8422, 8423, and 8427) 135 Reinstall the bezel if it outward. 5. To complete the installation, go to the system board connector. 7. Also, depending on the tab...
... pieces, an air baffle and the fan. Reconnect the fan cable to "Replacing the cover and connecting the cables." Replacing FRUs (Types 8143, 8144, 8146, 8422, 8423, and 8427) 135 Reinstall the bezel if it outward. 5. To complete the installation, go to the system board connector. 7. Also, depending on the tab...

Hardware Maintenance Manual
Page 294
Item # 8422 FRUs 5 HDD 80GB 7200 rpm Serial ATA (models CTO 12M 14U 23B 23H 24U 25M 27M 28V 2AG 2BG 31B 33U 36G 37G 39G 42B ...
Item # 8422 FRUs 5 HDD 80GB 7200 rpm Serial ATA (models CTO 12M 14U 23B 23H 24U 25M 27M 28V 2AG 2BG 31B 33U 36G 37G 39G 42B ...

Hardware Maintenance Manual
Page 296
... E1G F1G) 11 DVD-ROM 16X/48X - Black (models CTO) 11 DVD-ROM 16X/48X - Black (models CTO) 11 DVD-ROM 16X/48X - Item # 8422 FRUs 11 DVD-ROM 16X/48X - Black (models CTO) 11 DVD-ROM 16X/48X - optional to 26K5379 and 26K5381 (models CTO 12M 26C 29G 2BG... 26K5381 26K5429 39M3539 40Y8781 40Y8903 40Y8919 26K5390 26K5377 26K5383 39M3519 26K5441 40Y8799 40Y8909 CRU * * * * * * * * * * * * * * * The FRUs listed in the following table are not illustrated. 8422 FRUs Speaker Asm, internal (All EXCEPT B2K D2C E2C F2C) C2 Cable Asm (All EXCEPT B1G D1G E1G F1G B2K) Shield, 5.25 Blank EMC (all...
... E1G F1G) 11 DVD-ROM 16X/48X - Black (models CTO) 11 DVD-ROM 16X/48X - Black (models CTO) 11 DVD-ROM 16X/48X - Item # 8422 FRUs 11 DVD-ROM 16X/48X - Black (models CTO) 11 DVD-ROM 16X/48X - optional to 26K5379 and 26K5381 (models CTO 12M 26C 29G 2BG... 26K5381 26K5429 39M3539 40Y8781 40Y8903 40Y8919 26K5390 26K5377 26K5383 39M3519 26K5441 40Y8799 40Y8909 CRU * * * * * * * * * * * * * * * The FRUs listed in the following table are not illustrated. 8422 FRUs Speaker Asm, internal (All EXCEPT B2K D2C E2C F2C) C2 Cable Asm (All EXCEPT B1G D1G E1G F1G B2K) Shield, 5.25 Blank EMC (all...

Hardware Maintenance Manual
Page 297
... T1 (Black) (models 26C 28V 29G 2DG 34C 38G 3BG 44G 46G 48G 54G 73G 76G 61G B2K D2C E2C F2C CTO) Speaker Power brick - 8422 FRUs Shield, Blank Diskette drive (all models) Cable, Optical IDE (all models) Cable, Diskette drive (all models) Cable, Front panel USB audio (all models) Fan...
... T1 (Black) (models 26C 28V 29G 2DG 34C 38G 3BG 44G 46G 48G 54G 73G 76G 61G B2K D2C E2C F2C CTO) Speaker Power brick - 8422 FRUs Shield, Blank Diskette drive (all models) Cable, Optical IDE (all models) Cable, Diskette drive (all models) Cable, Front panel USB audio (all models) Fan...

Hardware Maintenance Manual
Page 298
... (Sweden) (all 'G' models) RJ11 Connector adapter (Switzerland) (all 'G' models) FRU# 01R2253 88P7687 60H6043 60H6045 60H6046 60H6047 60H6048 60H6049 60H6050 60H6051 60H6052 60H6053 60H6054 60H6055 CRU 8422 Keyboards (Preferred Pro Fullsize) US English (models CTO 11Q 12M 14U 15G 21A 21Q 22U 22G 23H 24U 25M 29G 34C 38G 44G 46G 54G... B1G D1G E1G F1G) FRU# 89P8300 89P8301 89P8302 89P8303 89P8305 89P8306 89P8307 89P8308 89P8309 89P8310 89P8311 89P8312 89P8313 89P8314 89P8315 CRU * 292 Hardware Maintenance Manual 8422 FRUs Speaker Power brick -
... (Sweden) (all 'G' models) RJ11 Connector adapter (Switzerland) (all 'G' models) FRU# 01R2253 88P7687 60H6043 60H6045 60H6046 60H6047 60H6048 60H6049 60H6050 60H6051 60H6052 60H6053 60H6054 60H6055 CRU 8422 Keyboards (Preferred Pro Fullsize) US English (models CTO 11Q 12M 14U 15G 21A 21Q 22U 22G 23H 24U 25M 29G 34C 38G 44G 46G 54G... B1G D1G E1G F1G) FRU# 89P8300 89P8301 89P8302 89P8303 89P8305 89P8306 89P8307 89P8308 89P8309 89P8310 89P8311 89P8312 89P8313 89P8314 89P8315 CRU * 292 Hardware Maintenance Manual 8422 FRUs Speaker Power brick -