
Hardware Maintenance Manual
Page 1
IdeaCentre Q190 Hardware Maintenance Manual ideaideaideaCentreidea Machine Types: 10115/6281
IdeaCentre Q190 Hardware Maintenance Manual ideaideaideaCentreidea Machine Types: 10115/6281

Hardware Maintenance Manual
Page 5
... the heat-sink 32 Replacing the system fan 33 Replacing the motherboard 34 Replacing the keyboard and mouse 35 FRU lists 36 Chapter 9. About this manual 1 Important Safety Information 1 Chapter 2. Contents Chapter 1. General information . . . . . 9 Specifications 9 Chapter 4. Locations 21 Locating components, controls and connectors . 21 Hardware components 22 Chapter 8. ...Enabling or disabling a device 15 Selecting a startup device 15 Exiting from the Setup Utility program . . . . . 16 Chapter 6. Additional Service Information 43 © Copyright Lenovo 2012 iii
... the heat-sink 32 Replacing the system fan 33 Replacing the motherboard 34 Replacing the keyboard and mouse 35 FRU lists 36 Chapter 9. About this manual 1 Important Safety Information 1 Chapter 2. Contents Chapter 1. General information . . . . . 9 Specifications 9 Chapter 4. Locations 21 Locating components, controls and connectors . 21 Hardware components 22 Chapter 8. ...Enabling or disabling a device 15 Selecting a startup device 15 Exiting from the Setup Utility program . . . . . 16 Chapter 6. Additional Service Information 43 © Copyright Lenovo 2012 iii

Hardware Maintenance Manual
Page 7
... importante que lea todas las declaraciones de precaución y de peligro de este manual antes de seguir las instrucciones. © Copyright Lenovo 2012 1 Chapter 1. It is intended only for those machines which have TV card. About this manual This manual contains service and reference information for the machines which do not have the TV... et ATTENTION du présent document avant d'exécuter les instructions. Lesen Sie unbedingt alle Hinweise vom Typ "ACHTUNG" oder "VORSICHT" in this manual is only used for IdeaCentre Q190 computers listed on the cover.
... importante que lea todas las declaraciones de precaución y de peligro de este manual antes de seguir las instrucciones. © Copyright Lenovo 2012 1 Chapter 1. It is intended only for those machines which have TV card. About this manual This manual contains service and reference information for the machines which do not have the TV... et ATTENTION du présent document avant d'exécuter les instructions. Lesen Sie unbedingt alle Hinweise vom Typ "ACHTUNG" oder "VORSICHT" in this manual is only used for IdeaCentre Q190 computers listed on the cover.

Hardware Maintenance Manual
Page 10
... not insulate you work alone under hazardous conditions or near power supplies - Remember: There must be a complete circuit to switch off power. 4 IdeaCentre Q190Hardware Maintenance Manual First, check that has exposed electrical circuits, observe the following precautions: - Observe the following parts with the power on when they are removed from their...
... not insulate you work alone under hazardous conditions or near power supplies - Remember: There must be a complete circuit to switch off power. 4 IdeaCentre Q190Hardware Maintenance Manual First, check that has exposed electrical circuits, observe the following precautions: - Observe the following parts with the power on when they are removed from their...

Hardware Maintenance Manual
Page 12
..., and modems before you are provided in the following table when installing, moving, or opening covers on this product or attached devices. 6 IdeaCentre Q190Hardware Maintenance Manual The mat is especially useful when handling ESD-sensitive devices. • Select a grounding system, such as described in the language of the computer is hazardous...
..., and modems before you are provided in the following table when installing, moving, or opening covers on this product or attached devices. 6 IdeaCentre Q190Hardware Maintenance Manual The mat is especially useful when handling ESD-sensitive devices. • Select a grounding system, such as described in the language of the computer is hazardous...

Hardware Maintenance Manual
Page 14
To remove all electrical current from the device, ensure that all power cords are disconnected from the power source. 2 1 CAUTION: Do not place any object weighing more than 82 kg (180 lbs.) on the power supply do not turn off the electrical current supplied to the device. ≥18 kg(37 lbs) CAUTION: Use safe practices when lifting. ≥32 kg(70.5 lbs) ≥55 kg(121.2 lbs) CAUTION: The power control button on the device and the power switch on top of rack-mounted devices. 8 IdeaCentre Q190Hardware Maintenance Manual The device also might have more than one power cord.
To remove all electrical current from the device, ensure that all power cords are disconnected from the power source. 2 1 CAUTION: Do not place any object weighing more than 82 kg (180 lbs.) on the power supply do not turn off the electrical current supplied to the device. ≥18 kg(37 lbs) CAUTION: Use safe practices when lifting. ≥32 kg(70.5 lbs) ≥55 kg(121.2 lbs) CAUTION: The power control button on the device and the power switch on top of rack-mounted devices. 8 IdeaCentre Q190Hardware Maintenance Manual The device also might have more than one power cord.

Hardware Maintenance Manual
Page 20
... responsible for a password, you try to 64 characters(a-z, and 0-9). 1. Type the new password, and press Enter. 4. A setup notice will be installed. 14 IdeaCentre Q190Hardware Maintenance Manual Select Exit. 4. Select Save changes and Exit. From the Security menu, selet Set Power-On Password and press Enter. 3. The password dialog box will be...
... responsible for a password, you try to 64 characters(a-z, and 0-9). 1. Type the new password, and press Enter. 4. A setup notice will be installed. 14 IdeaCentre Q190Hardware Maintenance Manual Select Exit. 4. Select Save changes and Exit. From the Security menu, selet Set Power-On Password and press Enter. 3. The password dialog box will be...

Hardware Maintenance Manual
Page 22
... several times). Note: If you exit. 1. Select Disabled or Enabled and press Enter. 5. Turn off your changes will not be saved. 16 IdeaCentre Q190Hardware Maintenance Manual If you might have changed these devices. 4. When the Startup Device Menu appears, release the F12 key. Press ESC to return to save the new...
... several times). Note: If you exit. 1. Select Disabled or Enabled and press Enter. 5. Turn off your changes will not be saved. 16 IdeaCentre Q190Hardware Maintenance Manual If you might have changed these devices. 4. When the Startup Device Menu appears, release the F12 key. Press ESC to return to save the new...

Hardware Maintenance Manual
Page 24
... series of tests is incorrect. To purposely configure the computer without a keyboard, set keyboardless operation in Setup to Enable. Any adapters 18 IdeaCentre Q190Hardware Maintenance Manual Undetermined problems If this computer has a parallel ATA hard disk drive, make sure that check the operation of the system and some basic system-board...
... series of tests is incorrect. To purposely configure the computer without a keyboard, set keyboardless operation in Setup to Enable. Any adapters 18 IdeaCentre Q190Hardware Maintenance Manual Undetermined problems If this computer has a parallel ATA hard disk drive, make sure that check the operation of the system and some basic system-board...
Hardware Maintenance Manual
Page 28
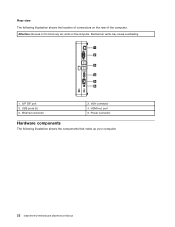
Attention: Be sure not to block any air vents on the rear of the computer. USB ports (5) 5. VGA connector 4. Ethernet connector 2. Power connector Hardware components The following illustration shows the location of connectors on the computer. S/P DIF port 3. Blocked air vents may cause overheating. 1. HDMI-out port 6. Rear view The following illustration shows the components that make up your computer. 22 IdeaCentre Q190Hardware Maintenance Manual
Attention: Be sure not to block any air vents on the rear of the computer. USB ports (5) 5. VGA connector 4. Ethernet connector 2. Power connector Hardware components The following illustration shows the location of connectors on the computer. S/P DIF port 3. Blocked air vents may cause overheating. 1. HDMI-out port 6. Rear view The following illustration shows the components that make up your computer. 22 IdeaCentre Q190Hardware Maintenance Manual

Hardware Maintenance Manual
Page 30
... you can install later. 1 2 3 4 5 6 7 8 1. RTC battery connector 5. Microphone connector 3. Power button 9. Hard disk drive SATA connector 2. USB ports (2) 15. Power connector 24 IdeaCentre Q190Hardware Maintenance Manual Identifying parts on the motherboard The motherboard (sometimes called the planar or system board) is the main circuit board in your computer. Card reader 7. Ethernet...
... you can install later. 1 2 3 4 5 6 7 8 1. RTC battery connector 5. Microphone connector 3. Power button 9. Hard disk drive SATA connector 2. USB ports (2) 15. Power connector 24 IdeaCentre Q190Hardware Maintenance Manual Identifying parts on the motherboard The motherboard (sometimes called the planar or system board) is the main circuit board in your computer. Card reader 7. Ethernet...
Hardware Maintenance Manual
Page 31
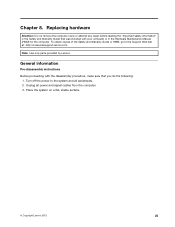
Turn off the power to the Support Web site at: http://consumersupport.lenovo.com. General information Pre-disassembly instructions Before proceeding with the disassembly procedure, make sure that was included with your computer or in the Safety and ... the following: 1. Replacing hardware Attention: Do not remove the computer cover or attempt any repair before reading the "Important safety information" in the Hardware Maintenance Manual (HMM) for the computer. Unplug all peripherals. 2. To obtain copies of the Safety and Warranty Guide or HMM, go to the system and all power...
Turn off the power to the Support Web site at: http://consumersupport.lenovo.com. General information Pre-disassembly instructions Before proceeding with the disassembly procedure, make sure that was included with your computer or in the Safety and ... the following: 1. Replacing hardware Attention: Do not remove the computer cover or attempt any repair before reading the "Important safety information" in the Hardware Maintenance Manual (HMM) for the computer. Unplug all peripherals. 2. To obtain copies of the Safety and Warranty Guide or HMM, go to the system and all power...

Hardware Maintenance Manual
Page 32
Note: It may be helpful to protect the computer screen from scratches or other damage. Lenovo recommends that you use a blanket, towel, or other cables that are connected to the computer. Step 3. Unplug all power cords from the drives, shut down ... and all cables attached to the computer. Step 4. Step 2. Remove the 4 screws and open the optical disk drive box as shown. 26 IdeaCentre Q190Hardware Maintenance Manual To replace the optical drive Step 1. Disconnect all attached devices.
Note: It may be helpful to protect the computer screen from scratches or other damage. Lenovo recommends that you use a blanket, towel, or other cables that are connected to the computer. Step 3. Unplug all power cords from the drives, shut down ... and all cables attached to the computer. Step 4. Step 2. Remove the 4 screws and open the optical disk drive box as shown. 26 IdeaCentre Q190Hardware Maintenance Manual To replace the optical drive Step 1. Disconnect all attached devices.
Hardware Maintenance Manual
Page 34
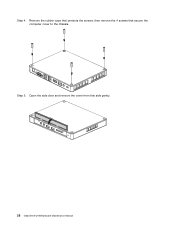
Step 4. Step 5. Remove the rubber caps that protects the screws, then remove the 4 screws that secure the computer cover to the chassis. Open the side door and remove the cover from this side gently. 28 IdeaCentre Q190Hardware Maintenance Manual
Step 4. Step 5. Remove the rubber caps that protects the screws, then remove the 4 screws that secure the computer cover to the chassis. Open the side door and remove the cover from this side gently. 28 IdeaCentre Q190Hardware Maintenance Manual

Hardware Maintenance Manual
Page 36
Lift up the back of the bay to remove it cool down before removing the cover. 30 IdeaCentre Q190Hardware Maintenance Manual Slide the new hard disk drive bay into position and secure it to the chassis with the 4 screws. Slide the new hard disk drive and ...
Lift up the back of the bay to remove it cool down before removing the cover. 30 IdeaCentre Q190Hardware Maintenance Manual Slide the new hard disk drive bay into position and secure it to the chassis with the 4 screws. Slide the new hard disk drive and ...

Hardware Maintenance Manual
Page 38
... are connected to the motherboard with locating the various connectors. Step 2. Refer to "Replacing the system fan". 32 IdeaCentre Q190Hardware Maintenance Manual Connect the 2 antenna cables to the computer. Lenovo recommends that you use a blanket, towel, or other soft cloth to protect the computer screen from scratches or other cables that secures...
... are connected to the motherboard with locating the various connectors. Step 2. Refer to "Replacing the system fan". 32 IdeaCentre Q190Hardware Maintenance Manual Connect the 2 antenna cables to the computer. Lenovo recommends that you use a blanket, towel, or other soft cloth to protect the computer screen from scratches or other cables that secures...

Hardware Maintenance Manual
Page 40
...it cool down before removing the cover. c. Note: It may be helpful to "Replacing the hard disk drive". 34 IdeaCentre Q190Hardware Maintenance Manual Remove any other soft cloth to the connector on the chassis and place it up. Unplug all power cords from the motherboard. Refer ... CDs, or memory cards) from scratches or other damage. Remove the hard disk drive. Line up the new system fan with the 3 screws. Lenovo recommends that you use a blanket, towel, or other cables that secure the system fan to "Removing the computer cover". Step 2. Disconnect all attached...
...it cool down before removing the cover. c. Note: It may be helpful to "Replacing the hard disk drive". 34 IdeaCentre Q190Hardware Maintenance Manual Remove any other soft cloth to the connector on the chassis and place it up. Unplug all power cords from the motherboard. Refer ... CDs, or memory cards) from scratches or other damage. Remove the hard disk drive. Line up the new system fan with the 3 screws. Lenovo recommends that you use a blanket, towel, or other cables that secure the system fan to "Removing the computer cover". Step 2. Disconnect all attached...
Hardware Maintenance Manual
Page 42
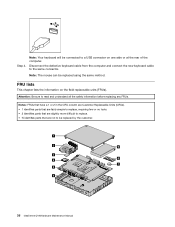
... read and understand all the safety information before replacing any FRUs. Step 4. Note: The mouse can be replaced by the customer. 1 2 9 3 8 4 7 5 6 36 IdeaCentre Q190Hardware Maintenance Manual FRU lists This chapter lists the information on one side or at the rear of the computer. Notes: FRUs that have a 1 or 2 in the CRU...
... read and understand all the safety information before replacing any FRUs. Step 4. Note: The mouse can be replaced by the customer. 1 2 9 3 8 4 7 5 6 36 IdeaCentre Q190Hardware Maintenance Manual FRU lists This chapter lists the information on one side or at the rear of the computer. Notes: FRUs that have a 1 or 2 in the CRU...

Hardware Maintenance Manual
Page 44
...Q190 NON_WIN8 Celeron 887 HM70 MB Q190 WIN8 Celeron 887 HM70 MB Q190 WIN8_PRO Celeron 887 HM70 MB Q190 NON_WIN8 I3_2365M HM76 MB Q190 WIN8 I3_2365M HM76 MB Q190 WIN8_PRO I3_2365M HM76 MB Chasiss Q190 IO COVER Q190 Bottom Case Q190 TOP Case(W/Button) Q190 ODD Bracket Q190 HDD Bracket For HDD Q190 HDD Bracket For SSD Q190 Bottom Stand Q190 ODD Bottom Case Q190... USB KB-LVT8 Sunrex EKB-10YA(RU) B-Silk USB KB-LVT8 38 IdeaCentre Q190Hardware Maintenance Manual 20002505 N 20200218 11200352 90202225 90001754 N 90001755 90001756 90001982 90001983 90001984 90202214 N 90202215 90202216 ...
...Q190 NON_WIN8 Celeron 887 HM70 MB Q190 WIN8 Celeron 887 HM70 MB Q190 WIN8_PRO Celeron 887 HM70 MB Q190 NON_WIN8 I3_2365M HM76 MB Q190 WIN8 I3_2365M HM76 MB Q190 WIN8_PRO I3_2365M HM76 MB Chasiss Q190 IO COVER Q190 Bottom Case Q190 TOP Case(W/Button) Q190 ODD Bracket Q190 HDD Bracket For HDD Q190 HDD Bracket For SSD Q190 Bottom Stand Q190 ODD Bottom Case Q190... USB KB-LVT8 Sunrex EKB-10YA(RU) B-Silk USB KB-LVT8 38 IdeaCentre Q190Hardware Maintenance Manual 20002505 N 20200218 11200352 90202225 90001754 N 90001755 90001756 90001982 90001983 90001984 90202214 N 90202215 90202216 ...
Safety and Warranty guide
Page 38
... For the latest information or any language without additional notice. For the configuration of the manuals included with your computer before you install and use Lenovo's products appropriately. Lenovo is protected by copyright laws and rules. The content of the product, refer to help... configuration described in new editions of the publication.To provide better service, Lenovo reserves the right to contact us about the manuals included with your computer, and the content of Lenovo. Chapter Notices Declaration Thank you for the first time. Carefully read all...
... For the latest information or any language without additional notice. For the configuration of the manuals included with your computer before you install and use Lenovo's products appropriately. Lenovo is protected by copyright laws and rules. The content of the product, refer to help... configuration described in new editions of the publication.To provide better service, Lenovo reserves the right to contact us about the manuals included with your computer, and the content of Lenovo. Chapter Notices Declaration Thank you for the first time. Carefully read all...


