
Hardware Maintenance Manual
Page 5
...to-FRU Index . . 17 Hard disk drive boot error 17 Power Supply Problems 17 POST error codes 18 Undetermined problems 18 Chapter 7. Locations 21 Locating components, controls and connectors . 21 Hardware components 22 Chapter 8. Replacing hardware . . . . 25 General information 25 Replacing the optical drive 26 Removing the computer cover 27 Replacing the hard disk drive 29 Replacing a memory module 30 Replacing the WLAN card 31 Replacing the heat-sink 32 Replacing the system fan 33 Replacing the motherboard 34 Replacing the keyboard and mouse 35 FRU lists 36 Chapter 9. Safety...
...to-FRU Index . . 17 Hard disk drive boot error 17 Power Supply Problems 17 POST error codes 18 Undetermined problems 18 Chapter 7. Locations 21 Locating components, controls and connectors . 21 Hardware components 22 Chapter 8. Replacing hardware . . . . 25 General information 25 Replacing the optical drive 26 Removing the computer cover 27 Replacing the hard disk drive 29 Replacing a memory module 30 Replacing the WLAN card 31 Replacing the heat-sink 32 Replacing the system fan 33 Replacing the motherboard 34 Replacing the keyboard and mouse 35 FRU lists 36 Chapter 9. Safety...

Hardware Maintenance Manual
Page 11
... that the power-supply cover fasteners (screws or rivets) have been certified (ISO 9000) as specified in charge between the external ground pin and frame ground. If any obvious alterations. A third-wire ground connector in identifying potentially unsafe conditions on the frame can continue without first correcting the problem. Use a meter to protect users and service personnel from injury. Use good judgment...
... that the power-supply cover fasteners (screws or rivets) have been certified (ISO 9000) as specified in charge between the external ground pin and frame ground. If any obvious alterations. A third-wire ground connector in identifying potentially unsafe conditions on the frame can continue without first correcting the problem. Use a meter to protect users and service personnel from injury. Use good judgment...

Hardware Maintenance Manual
Page 19
... and changing settings The Setup Utility program menu lists items that cannot be easily compromised. Using passwords By using . However, the operating-system settings might override any similar settings in length • Contain at least one alphabetic character and one numeric character • Setup Utility program and hard disk drive passwords are not case sensitive • Not be any passwords, read the following : 1. Press and hold the F1 key then turn off...
... and changing settings The Setup Utility program menu lists items that cannot be easily compromised. Using passwords By using . However, the operating-system settings might override any similar settings in length • Contain at least one alphabetic character and one numeric character • Setup Utility program and hard disk drive passwords are not case sensitive • Not be any passwords, read the following : 1. Press and hold the F1 key then turn off...

Hardware Maintenance Manual
Page 21
... startup from a device such as the CD-ROM, diskette, or hard disk as expected, use one of the following : 1. From the Setup Utility program menu, select Devices. 3. Selecting a startup device If your computer does not start up (boot) from any boot device. Using the Setup Utility 15 Enabling or disabling a device The Devices options is set to Disabled, all devices connected to the SATA connectors (e.g. SATA Controller When feature is used to enable or disable user access to the following : 1. Select Disabled or Enabled and press the Enter key. 5. Select Save changes...
... startup from a device such as the CD-ROM, diskette, or hard disk as expected, use one of the following : 1. From the Setup Utility program menu, select Devices. 3. Selecting a startup device If your computer does not start up (boot) from any boot device. Using the Setup Utility 15 Enabling or disabling a device The Devices options is set to Disabled, all devices connected to the SATA connectors (e.g. SATA Controller When feature is used to enable or disable user access to the following : 1. Select Disabled or Enabled and press the Enter key. 5. Select Save changes...

Hardware Maintenance Manual
Page 24
...-board operations • Checks the memory operation • Starts the video operation • Verifies that the boot drive is no keys are invalid. POST error codes Each time you power-on the system, it performs a series of tests that no longer functional. POST Error Message CMOS Date/Time Not Set CMOS Battery Low CMOS Checksum Bad Primary Master Hard Disk Error Primary Slave Hard Disk Error Secondary Master Hard Disk Error Secondary Slave Hard Disk Error Keyboard error System Halted Reboot and Select proper Boot device or Insert Boot Media...
...-board operations • Checks the memory operation • Starts the video operation • Verifies that the boot drive is no keys are invalid. POST error codes Each time you power-on the system, it performs a series of tests that no longer functional. POST Error Message CMOS Date/Time Not Set CMOS Battery Low CMOS Checksum Bad Primary Master Hard Disk Error Primary Slave Hard Disk Error Secondary Master Hard Disk Error Secondary Slave Hard Disk Error Keyboard error System Halted Reboot and Select proper Boot device or Insert Boot Media...

Hardware Maintenance Manual
Page 38
... cables attached to "Replacing the system fan". 32 IdeaCentre Q190Hardware Maintenance Manual This includes power cords, input/output (I/O) cables, and any media (disks, CDs, or memory cards) from the drives, shut down on a soft flat surface for help with the screw. Refer to the computer. Remove any other damage. Disconnect the 2 antenna cables from the card port. 21 Step 8. Step 10. Step 4. Refer to "Removing the computer cover...
... cables attached to "Replacing the system fan". 32 IdeaCentre Q190Hardware Maintenance Manual This includes power cords, input/output (I/O) cables, and any media (disks, CDs, or memory cards) from the drives, shut down on a soft flat surface for help with the screw. Refer to the computer. Remove any other damage. Disconnect the 2 antenna cables from the card port. 21 Step 8. Step 10. Step 4. Refer to "Removing the computer cover...
Safety and Warranty guide
Page 17
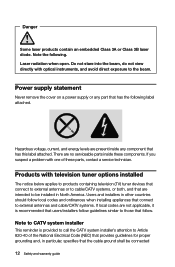
... installer's attention to the beam. Laser radiation when open. There are present inside these parts, contact a service technician. If you suspect a problem with one of the National Electrical Code (NEC) that provides guidelines for proper grounding and, in North America. Products with optical instruments, and avoid direct exposure to Article 820-40 of these components. Power supply statement Never remove the cover...
... installer's attention to the beam. Laser radiation when open. There are present inside these parts, contact a service technician. If you suspect a problem with one of the National Electrical Code (NEC) that provides guidelines for proper grounding and, in North America. Products with optical instruments, and avoid direct exposure to Article 820-40 of these components. Power supply statement Never remove the cover...
Safety and Warranty guide
Page 28
... 8200. Safety and warranty guide 23 Email: lensyd_au@lenovo.com The following replaces the same section in Part 3 - The warranty period for the product starts on your product are set forth below in Part 1: What this Warranty Covers: Lenovo warrants that each hardware product that apply to a covered defect during the warranty period. The warranty period and type of purchase specified on...
... 8200. Safety and warranty guide 23 Email: lensyd_au@lenovo.com The following replaces the same section in Part 3 - The warranty period for the product starts on your product are set forth below in Part 1: What this Warranty Covers: Lenovo warrants that each hardware product that apply to a covered defect during the warranty period. The warranty period and type of purchase specified on...
Safety and Warranty guide
Page 36
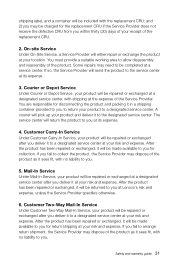
... be repaired or exchanged at a designated service center, with shipping at the expense of the Service Provider. Some repairs may need to allow disassembly and reassembly of the product. Courier or Depot Service Under Courier or Depot Service, your risk and expense. Mail-In Service Under Mail-In Service, your risk and expense. You must provide a suitable working area to be repaired or...
... be repaired or exchanged at a designated service center, with shipping at the expense of the Service Provider. Some repairs may need to allow disassembly and reassembly of the product. Courier or Depot Service Under Courier or Depot Service, your risk and expense. Mail-In Service Under Mail-In Service, your risk and expense. You must provide a suitable working area to be repaired or...

IdeaCentre Q190 User Guide
Page 14
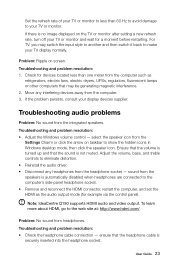
... the change. Please consult with the TV settings. From the Control Panel, select Hardware and Sound → Manage audio devices, from the pop up window choose the Playback tab, choose Digital Audio (S/P DIF) as your playback device, click the Apply button to the S/P DIF port. 2. User Guide 9 After the computer is connected and is operating normally, if a blank screen or no image is unable to guarantee that dose not support S/P DIF...
... the change. Please consult with the TV settings. From the Control Panel, select Hardware and Sound → Manage audio devices, from the pop up window choose the Playback tab, choose Digital Audio (S/P DIF) as your playback device, click the Apply button to the S/P DIF port. 2. User Guide 9 After the computer is connected and is operating normally, if a blank screen or no image is unable to guarantee that dose not support S/P DIF...

IdeaCentre Q190 User Guide
Page 27
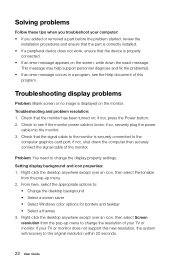
... not support this program. Check that the signal cable to change the resolution of the monitor. Solving problems Follow these tips when you troubleshoot your computer: • If you added or removed a part before the problem started, review the installation procedures and ensure that the part is correctly installed. • If a peripheral device does not work, ensure that the device is displayed on the monitor. Troubleshooting display problems Problem: Blank screen or no image is properly connected...
... not support this program. Check that the signal cable to change the resolution of the monitor. Solving problems Follow these tips when you troubleshoot your computer: • If you added or removed a part before the problem started, review the installation procedures and ensure that the part is correctly installed. • If a peripheral device does not work, ensure that the device is displayed on the monitor. Troubleshooting display problems Problem: Blank screen or no image is properly connected...
IdeaCentre Q190 User Guide
Page 28
... then switch it back to eliminate distortion. • Reinstall the audio driver. • Disconnect any interfering devices away from the computer. 3. Note: IdeaCentre Q190 supports HDMI audio and video output. To learn more about HDMI, go to show the hidden icons in Windows desktop mode, then click the speaker icon. ensure that the sound is automatically disabled when headphones are connected to your TV or monitor. select the speaker...
... then switch it back to eliminate distortion. • Reinstall the audio driver. • Disconnect any interfering devices away from the computer. 3. Note: IdeaCentre Q190 supports HDMI audio and video output. To learn more about HDMI, go to show the hidden icons in Windows desktop mode, then click the speaker icon. ensure that the sound is automatically disabled when headphones are connected to your TV or monitor. select the speaker...
IdeaCentre Q190 User Guide
Page 31
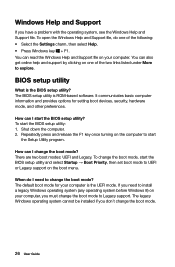
... boot mode, start the Setup Utility program. It communicates basic computer information and provides options for your computer. Repeatedly press and release the F1 key once turning on the boot menu. How can read the Windows Help and Support file on your computer, you have a problem with the operating system, see the Windows Help and Support file. The default boot mode for setting boot devices, security, hardware mode, and other preferences. To change the boot mode. 26 User Guide...
... boot mode, start the Setup Utility program. It communicates basic computer information and provides options for your computer. Repeatedly press and release the F1 key once turning on the boot menu. How can read the Windows Help and Support file on your computer, you have a problem with the operating system, see the Windows Help and Support file. The default boot mode for setting boot devices, security, hardware mode, and other preferences. To change the boot mode. 26 User Guide...

IdeaCentre Q190 User Guide
Page 36
...Lenovo computers, go to sleep: After 25 minutes • Advanced power settings: - Turn off the display: After 10 minutes • Put the computer to : http://www.energystar.gov. To help in this endeavor, Lenovo has preset the following machine types have been designed and tested...of the U.S. Lenovo is a joint program of manufacture. For more information about ENERGY STAR ratings for a specified duration: ENERGY STAR power-management features, by operating system. Microsoft Windows Vista, Windows 7 and Windows 8 Power plan: Balanced • Turn off hard disk drives: After 20 ...
...Lenovo computers, go to sleep: After 25 minutes • Advanced power settings: - Turn off the display: After 10 minutes • Put the computer to : http://www.energystar.gov. To help in this endeavor, Lenovo has preset the following machine types have been designed and tested...of the U.S. Lenovo is a joint program of manufacture. For more information about ENERGY STAR ratings for a specified duration: ENERGY STAR power-management features, by operating system. Microsoft Windows Vista, Windows 7 and Windows 8 Power plan: Balanced • Turn off hard disk drives: After 20 ...
IdeaCentre Q190 User Guide (Linux)
Page 4
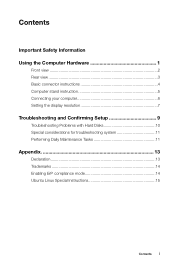
Contents Important Safety Information Using the Computer Hardware 1 Front view 2 Rear view...3 Basic connector instructions 4 Computer stand instruction 5 Connecting your computer 6 Setting the display resolution 7 Troubleshooting and Confirming Setup 9 Troubleshooting Problems with Hard Disks 10 Special considerations for troubleshooting system 11 Performing Daily Maintenance Tasks 11 Appendix 13 Declaration 13 Trademarks 14 Enabling ErP compliance mode 14 Ubuntu Linux Special Instructions 15 Contents i
Contents Important Safety Information Using the Computer Hardware 1 Front view 2 Rear view...3 Basic connector instructions 4 Computer stand instruction 5 Connecting your computer 6 Setting the display resolution 7 Troubleshooting and Confirming Setup 9 Troubleshooting Problems with Hard Disks 10 Special considerations for troubleshooting system 11 Performing Daily Maintenance Tasks 11 Appendix 13 Declaration 13 Trademarks 14 Enabling ErP compliance mode 14 Ubuntu Linux Special Instructions 15 Contents i

Lenovo IdeaCentre Q190 Series User Guide
Page 14
... connected and is operating normally, if a blank screen or no image is displayed on the TV or monitor after setting a new refresh rate, turn off your TV or monitor and wait for a moment before using the VGA or HDMI video connector, but Lenovo is displayed on the TV, this will work effectively. Note: You may be a problem with your playback device, click the Apply button to save the change. User Guide 9 Setting the display resolution • Set...
... connected and is operating normally, if a blank screen or no image is displayed on the TV or monitor after setting a new refresh rate, turn off your TV or monitor and wait for a moment before using the VGA or HDMI video connector, but Lenovo is displayed on the TV, this will work effectively. Note: You may be a problem with your playback device, click the Apply button to save the change. User Guide 9 Setting the display resolution • Set...
Lenovo IdeaCentre Q190 Series User Guide
Page 27
... when you troubleshoot your computer: • If you added or removed a part before the problem started, review the installation procedures and ensure that the part is correctly installed. • If a peripheral device does not work, ensure that the device is properly connected. • If an error message appears on the screen, write down the computer then securely connect the signal cable of your TV or monitor does not support this...
... when you troubleshoot your computer: • If you added or removed a part before the problem started, review the installation procedures and ensure that the part is correctly installed. • If a peripheral device does not work, ensure that the device is properly connected. • If an error message appears on the screen, write down the computer then securely connect the signal cable of your TV or monitor does not support this...

Lenovo IdeaCentre Q190 Series User Guide
Page 28
... the audio driver. • Disconnect any interfering devices away from the headphone socket - Note: IdeaCentre Q190 supports HDMI audio and video output. ensure that the sound is securely inserted into the headphone socket. Move any headphones from the computer. 3. Troubleshooting and problem resolution: • Adjust the Windows volume control - Troubleshooting and problem resolution: 1. Problem: Ripple on taskbar to show the hidden icons in Windows desktop mode, then click the speaker...
... the audio driver. • Disconnect any interfering devices away from the headphone socket - Note: IdeaCentre Q190 supports HDMI audio and video output. ensure that the sound is securely inserted into the headphone socket. Move any headphones from the computer. 3. Troubleshooting and problem resolution: • Adjust the Windows volume control - Troubleshooting and problem resolution: 1. Problem: Ripple on taskbar to show the hidden icons in Windows desktop mode, then click the speaker...
Lenovo IdeaCentre Q190 Series User Guide
Page 31
... Windows Help and Support file. Repeatedly press and release the F1 key once turning on the boot menu. How can read the Windows Help and Support file on your computer is the BIOS setup utility? To change the boot mode, start the BIOS setup utility? Shut down the computer. 2. Windows Help and Support If you don't change the boot mode. 26 User Guide You can I start the BIOS setup utility and select Startup → Boot Priority, then set boot mode to UEFI or Legacy support...
... Windows Help and Support file. Repeatedly press and release the F1 key once turning on the boot menu. How can read the Windows Help and Support file on your computer is the BIOS setup utility? To change the boot mode, start the BIOS setup utility? Shut down the computer. 2. Windows Help and Support If you don't change the boot mode. 26 User Guide You can I start the BIOS setup utility and select Startup → Boot Priority, then set boot mode to UEFI or Legacy support...

Lenovo IdeaCentre Q190 Series User Guide
Page 36
... Standby mode, press any key on your Windows Help and Support information system. To help in this endeavor, Lenovo has preset the following machine types have been designed and tested to conform to the ENERGY STAR program requirement for a specified duration: ENERGY STAR power-management features, by operating system. User Guide 31 Environmental Protection Agency and the U.S. Microsoft Windows Vista, Windows 7, Windows 8 and Windows 8.1 Power plan: Balanced • Turn off hard disk drives...
... Standby mode, press any key on your Windows Help and Support information system. To help in this endeavor, Lenovo has preset the following machine types have been designed and tested to conform to the ENERGY STAR program requirement for a specified duration: ENERGY STAR power-management features, by operating system. User Guide 31 Environmental Protection Agency and the U.S. Microsoft Windows Vista, Windows 7, Windows 8 and Windows 8.1 Power plan: Balanced • Turn off hard disk drives...


