

Q100 User's Guide
Page 90
Explanation on Marks Danger: Watch out for high risks Caution: Watch out for medium risks Attention: Pay attention to low risks Recommendation: Helpful tips Prohibited: Dangerous operations
Explanation on Marks Danger: Watch out for high risks Caution: Watch out for medium risks Attention: Pay attention to low risks Recommendation: Helpful tips Prohibited: Dangerous operations
Q100 User's Guide
Page 91
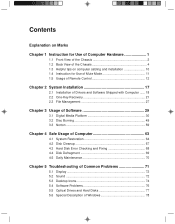
Contents Explanation on Marks Chapter 1 Instruction for Use of Computer Hardware 1 1.1 Front View of the Chassis 2 1.2 Back View of the Chassis 4 1.3 Helpful tips on computer cabling and installation 10 1.4 Instruction for Use of Mute Mode 11 1.5 Usage of Remote Control 12 Chapter 2 System Installation 17 2.1 Installation of Drivers and Software Shipped with Computer ...... 18 2.2 One-Key Recovery 21 2.3 File Management 27 Chapter 3 Usage of Software 29 3.1 Digital Media Platform 30 3.2 Disc Burning 49 3.3 Norton 59 Chapter 4 Safe Usage of Computer 63 4.1 System Restoration 64 ...
Contents Explanation on Marks Chapter 1 Instruction for Use of Computer Hardware 1 1.1 Front View of the Chassis 2 1.2 Back View of the Chassis 4 1.3 Helpful tips on computer cabling and installation 10 1.4 Instruction for Use of Mute Mode 11 1.5 Usage of Remote Control 12 Chapter 2 System Installation 17 2.1 Installation of Drivers and Software Shipped with Computer ...... 18 2.2 One-Key Recovery 21 2.3 File Management 27 Chapter 3 Usage of Software 29 3.1 Digital Media Platform 30 3.2 Disc Burning 49 3.3 Norton 59 Chapter 4 Safe Usage of Computer 63 4.1 System Restoration 64 ...

Q100 User's Guide
Page 92
Lenovo 3000Q User Guide 1 Avoid using The mini CD/DVD with 8cm of diameter should be avoided when the computer is the vertical one which can ...
Lenovo 3000Q User Guide 1 Avoid using The mini CD/DVD with 8cm of diameter should be avoided when the computer is the vertical one which can ...

Q100 User's Guide
Page 93
...: For models with caution. F-7 Preposition Digital Panel: Open the preposition digital panel and the preposition digital connectors such as USB will be shown as below: 2 Lenovo 3000Q User Guide 1.1 Front View of the Chassis (Instruction for use of buttons and functional keys on /off status. F-2 Hard Disk Drive Indicator: Indicates read...
...: For models with caution. F-7 Preposition Digital Panel: Open the preposition digital panel and the preposition digital connectors such as USB will be shown as below: 2 Lenovo 3000Q User Guide 1.1 Front View of the Chassis (Instruction for use of buttons and functional keys on /off status. F-2 Hard Disk Drive Indicator: Indicates read...

Q100 User's Guide
Page 94
... read memory cards such as MS, MS PRO, MS Duo, SD, MMC, SM, CF and MD. (Some models are not equipped with memory card reader) Lenovo 3000Q User Guide 3 D-3 Microphone Connector: Used to connect speakers or headphones. D-2 Speaker/Headphone Connector: Used to connect the microphone and input the sound received by...
... read memory cards such as MS, MS PRO, MS Duo, SD, MMC, SM, CF and MD. (Some models are not equipped with memory card reader) Lenovo 3000Q User Guide 3 D-3 Microphone Connector: Used to connect speakers or headphones. D-2 Speaker/Headphone Connector: Used to connect the microphone and input the sound received by...

Q100 User's Guide
Page 95
1.2 Back View of the Chassis (usage of all I/O connectors on the rear panel of the chassis) The rear panel connectors of some models are as illustrated below, please refer to them according to your actual configuration; 4 Lenovo 3000Q User Guide
1.2 Back View of the Chassis (usage of all I/O connectors on the rear panel of the chassis) The rear panel connectors of some models are as illustrated below, please refer to them according to your actual configuration; 4 Lenovo 3000Q User Guide

Q100 User's Guide
Page 96
Onboard graphics card connector: Used to connect devices with no VGA signal outputs - PS/2 keyboard connector: Used to connect LAN or broadband devices Lenovo 3000Q User Guide 5 Serial port: Used to output monitor signals (VGA signals) through the signal cable connected with the monitor. (On models with external graphics ...
Onboard graphics card connector: Used to connect devices with no VGA signal outputs - PS/2 keyboard connector: Used to connect LAN or broadband devices Lenovo 3000Q User Guide 5 Serial port: Used to output monitor signals (VGA signals) through the signal cable connected with the monitor. (On models with external graphics ...
Q100 User's Guide
Page 97
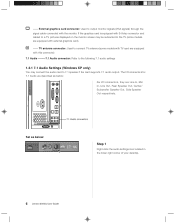
..., Side Speaker Out respectively. Set as below : 7.1 Audio connectors Step 1 Right-click the audio settings icon located in the lower right corner of your desktop. 6 Lenovo 3000Q User Guide External graphics card connector: Used to the TV (some models with TV card are equipped with this connector) 7.1 Audio ---7.1 Audio connector: Refer...
..., Side Speaker Out respectively. Set as below : 7.1 Audio connectors Step 1 Right-click the audio settings icon located in the lower right corner of your desktop. 6 Lenovo 3000Q User Guide External graphics card connector: Used to the TV (some models with TV card are equipped with this connector) 7.1 Audio ---7.1 Audio connector: Refer...

Q100 User's Guide
Page 98
Step 2 Select "Sound Manager" in the audio settings menu as Sound Effect, Mixer and 3D Audio Demo. Lenovo 3000Q User Guide 7 You can open Audio I /O connectors on the rear panel. Step 4 The illustrated audio connectors are simulation of the audio I /O and configure the input and output settings for the audio card. You can set items such as illustrated Step 3 The illustrated screen appears.
Step 2 Select "Sound Manager" in the audio settings menu as Sound Effect, Mixer and 3D Audio Demo. Lenovo 3000Q User Guide 7 You can open Audio I /O connectors on the rear panel. Step 4 The illustrated audio connectors are simulation of the audio I /O and configure the input and output settings for the audio card. You can set items such as illustrated Step 3 The illustrated screen appears.

Q100 User's Guide
Page 99
Select appropriate name according to the green connector. Then connect the Line-in the dialog box popped up as illustrated. 8 Lenovo 3000Q User Guide If you want to connect other audio devices, connect the audio cables respectively to the I/O connectors on the screen as illustrated. Every time a connector is connected, a dialog box pops up as illustrated. Step 2 Check "Line Out" in cable of the speaker to the device connected with the audio cable. Set for speaker pre-configured as 2.0: Step 1 Select 2CH Speaker on the rear panel.
Select appropriate name according to the green connector. Then connect the Line-in the dialog box popped up as illustrated. 8 Lenovo 3000Q User Guide If you want to connect other audio devices, connect the audio cables respectively to the I/O connectors on the screen as illustrated. Every time a connector is connected, a dialog box pops up as illustrated. Step 2 Check "Line Out" in cable of the speaker to the device connected with the audio cable. Set for speaker pre-configured as 2.0: Step 1 Select 2CH Speaker on the rear panel.

Q100 User's Guide
Page 100
If you haven't connected it to the connector as illustrated in the picture on the left. Note: The situation must be avoided when connecting devices - microphone must be connected to the Mic In connector and check "Mic In" as illustrated. You can test whether the connection and setting is correct by clicking the corresponding speaker icon in the pop-up window Lenovo 3000Q User Guide 9
If you haven't connected it to the connector as illustrated in the picture on the left. Note: The situation must be avoided when connecting devices - microphone must be connected to the Mic In connector and check "Mic In" as illustrated. You can test whether the connection and setting is correct by clicking the corresponding speaker icon in the pop-up window Lenovo 3000Q User Guide 9

Q100 User's Guide
Page 101
You will not display if microphone is not equipped with stand-alone graphics card. 10 Lenovo 3000Q User Guide Keep speakers away from monitor to the front Mic In connector. 1.3 Helpful tips on the connector of monitor signal cable are securely ...
You will not display if microphone is not equipped with stand-alone graphics card. 10 Lenovo 3000Q User Guide Keep speakers away from monitor to the front Mic In connector. 1.3 Helpful tips on the connector of monitor signal cable are securely ...

Q100 User's Guide
Page 102
Helpful Tips on Low Noise Mode: Select "LENOVO Power Policy Management " from "Control Panel" _ "Performance and Maintenance" _ "Power Options" _ "Power Schemes". Do not change into blue and the system will reduce to its ... Low Noise Mode indicator will change it after selecting this time, the CPU will enter the Low Noise mode to exit the Low Noise mode. Lenovo 3000Q User Guide 11 This provides you with large consumption of the CPU resource such as Turn off monitor, Turn off .
Helpful Tips on Low Noise Mode: Select "LENOVO Power Policy Management " from "Control Panel" _ "Performance and Maintenance" _ "Power Options" _ "Power Schemes". Do not change into blue and the system will reduce to its ... Low Noise Mode indicator will change it after selecting this time, the CPU will enter the Low Noise mode to exit the Low Noise mode. Lenovo 3000Q User Guide 11 This provides you with large consumption of the CPU resource such as Turn off monitor, Turn off .
Q100 User's Guide
Page 103
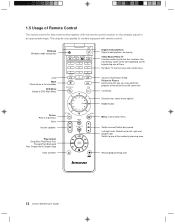
You can directly switch to the corresponding screen by pressing once Record program/Snap shot 12 Lenovo 3000Q User Guide Windows Windows mode startup key Jump Mark Check items in Picture By pressing this model works together with remote control. Numbers TV ...
You can directly switch to the corresponding screen by pressing once Record program/Snap shot 12 Lenovo 3000Q User Guide Windows Windows mode startup key Jump Mark Check items in Picture By pressing this model works together with remote control. Numbers TV ...

Q100 User's Guide
Page 104
... the leftward direction key or rightward direction key. The focus moves leftward or rightward when you press the upward direction key or downward direction key. Lenovo 3000Q User Guide 13 Note: The performance of the remote control is affected by the location of the mainframe. Alignment of Remote Control Note: To...
... the leftward direction key or rightward direction key. The focus moves leftward or rightward when you press the upward direction key or downward direction key. Lenovo 3000Q User Guide 13 Note: The performance of the remote control is affected by the location of the mainframe. Alignment of Remote Control Note: To...

Q100 User's Guide
Page 105
... menu. Menu key For Digital Media Platform, the Setting menu appears when you want to the higher-level menu by pressing the Return key. 14 Lenovo 3000Q User Guide Usage of Remote Control - You can select the option you press the Menu key. Usage of the parameter by pressing the upward...
... menu. Menu key For Digital Media Platform, the Setting menu appears when you want to the higher-level menu by pressing the Return key. 14 Lenovo 3000Q User Guide Usage of Remote Control - You can select the option you press the Menu key. Usage of the parameter by pressing the upward...

Q100 User's Guide
Page 106
Lenovo 3000Q User Guide 15 Press this key again to switch operation focus between the large/small windows. Press the LEFT/ RIGHT direction key to close the small window. Picture in Picture key This opens a small window in Picture feature by pressing the PIP key while watching TV. Picture in Picture key You may activate the Picture in the lower right section of the screen to play the program of another channel.
Lenovo 3000Q User Guide 15 Press this key again to switch operation focus between the large/small windows. Press the LEFT/ RIGHT direction key to close the small window. Picture in Picture key This opens a small window in Picture feature by pressing the PIP key while watching TV. Picture in Picture key You may activate the Picture in the lower right section of the screen to play the program of another channel.

Q100 User's Guide
Page 108
One-Key Recovery 2 You can recover drive C of drivers and software 2. In this chapter: 1. Automatic installation of the computer to factory status or the last system backup status using One-Key Recovery. otherwise you cannot successfully use One-Key Recovery. 4 5 Lenovo 3000Q User Guide 17 2 Chapter 2 System Installation 1 The following topics will remain unchanged. 3 Note: Drive C must be introduced in this operation, all of the existing data in drive C will be lost while content and format of the other partitions in the hard disk will be a FAT32 partition;
One-Key Recovery 2 You can recover drive C of drivers and software 2. In this chapter: 1. Automatic installation of the computer to factory status or the last system backup status using One-Key Recovery. otherwise you cannot successfully use One-Key Recovery. 4 5 Lenovo 3000Q User Guide 17 2 Chapter 2 System Installation 1 The following topics will remain unchanged. 3 Note: Drive C must be introduced in this operation, all of the existing data in drive C will be lost while content and format of the other partitions in the hard disk will be a FAT32 partition;

Q100 User's Guide
Page 109
... when the computer is powered off and select Driver and Software Installation in System Rescue. Install according to the instructions, and then click "Continue ( Y ) ". 18 Lenovo 3000Q User Guide Method 1: Automatic Installation After installing the operating system, press System Rescue button when the computer is powered off and select Driver and...
... when the computer is powered off and select Driver and Software Installation in System Rescue. Install according to the instructions, and then click "Continue ( Y ) ". 18 Lenovo 3000Q User Guide Method 1: Automatic Installation After installing the operating system, press System Rescue button when the computer is powered off and select Driver and...

Q100 User's Guide
Page 110
Restart your system is done, it will automatically install Intelligent Maintenance; Click "Exit". Click "No" to start manual installation. Lenovo 3000Q User Guide 19 When the automatic installation has completed, the illustrated screen displays and indicates successful installation. Please wait while it will prompt whether you want to install drivers and software shipped with computer, click "Yes" to start automatic installation. After your computer. when the installation is restarted, it automatically installs drivers and software.
Restart your system is done, it will automatically install Intelligent Maintenance; Click "Exit". Click "No" to start manual installation. Lenovo 3000Q User Guide 19 When the automatic installation has completed, the illustrated screen displays and indicates successful installation. Please wait while it will prompt whether you want to install drivers and software shipped with computer, click "Yes" to start automatic installation. After your computer. when the installation is restarted, it automatically installs drivers and software.