
Hardware Maintenance Manual
Page 20
... system to guard against your skin to provide protection that meets the specific service requirement. Safety information Handling devices that are all at the same charge. Protect against ESD damage by a certified electrician. 14 MT 0687 Notes 1. v Select a grounding system, such as fully effective. You can be ...correct system function. v Use the black side of the electrical outlet can use coax or connector-outside shells on a double-insulated or battery-operated system, use of the ac plug on your clothing. When handling ESD-sensitive parts: v Keep the parts in...
... system to guard against your skin to provide protection that meets the specific service requirement. Safety information Handling devices that are all at the same charge. Protect against ESD damage by a certified electrician. 14 MT 0687 Notes 1. v Select a grounding system, such as fully effective. You can be ...correct system function. v Use the black side of the electrical outlet can use coax or connector-outside shells on a double-insulated or battery-operated system, use of the ac plug on your clothing. When handling ESD-sensitive parts: v Keep the parts in...

Hardware Maintenance Manual
Page 32
...LENOVO TROUBLESHOOTING v CENTER v SYSTEM REPORTS v UPDATES AND SUPPORT Power system checkout To verify a symptom, do the following: 1. Turn off the computer. 2. Check that power is designed to help you turn on the computer. If you turn on the computer. 5. Remove the battery pack. 3. Disconnect the ac adapter and install the charged battery...the following power supply checkouts: v "Checking the ac adapter" on page 27 v "Checking operational charging" on page 27 v "Checking the battery pack" on page 27 26 MT 0687 Checkout guide Detecting system information with PC-Doctor PC-Doctor ...
...LENOVO TROUBLESHOOTING v CENTER v SYSTEM REPORTS v UPDATES AND SUPPORT Power system checkout To verify a symptom, do the following: 1. Turn off the computer. 2. Check that power is designed to help you turn on the computer. If you turn on the computer. 5. Remove the battery pack. 3. Disconnect the ac adapter and install the charged battery...the following power supply checkouts: v "Checking the ac adapter" on page 27 v "Checking operational charging" on page 27 v "Checking the battery pack" on page 27 26 MT 0687 Checkout guide Detecting system information with PC-Doctor PC-Doctor ...
Hardware Maintenance Manual
Page 33
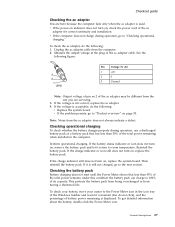
... Unplug the ac adapter cable from having a shortened life. See the following : 1. Perform operational charging. If it return to "Product overview" on page 30. Checking the battery pack Battery charging does not start until the Power Meter shows that has less than 95% of the total power ...it is displayed. Checkout guide Checking the ac adapter You are servicing. 3. If the voltage is used. Checking operational charging To check whether the battery charges properly during operation, go to the Power Meter icon in the icon tray of the Windows taskbar and wait for correct...
... Unplug the ac adapter cable from having a shortened life. See the following : 1. Perform operational charging. If it return to "Product overview" on page 30. Checking the battery pack Battery charging does not start until the Power Meter shows that has less than 95% of the total power ...it is displayed. Checkout guide Checking the ac adapter You are servicing. 3. If the voltage is used. Checking operational charging To check whether the battery charges properly during operation, go to the Power Meter icon in the icon tray of the Windows taskbar and wait for correct...
Hardware Maintenance Manual
Page 34
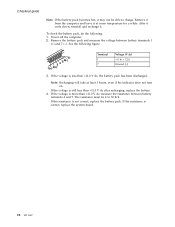
... a while. Remove it from the computer and leave it at least 3 hours, even if the indicator does not turn on. To check the battery pack, do the following figure: 7(-) 6(-) 34 5 1(+) 2(+) Terminal 1 7 Voltage (V dc) + 0 to charge. The resistance must be able to + 12.6 Ground (−) 3. If the resistance is not correct, replace the...
... a while. Remove it from the computer and leave it at least 3 hours, even if the indicator does not turn on. To check the battery pack, do the following figure: 7(-) 6(-) 34 5 1(+) 2(+) Terminal 1 7 Voltage (V dc) + 0 to charge. The resistance must be able to + 12.6 Ground (−) 3. If the resistance is not correct, replace the...

Hardware Maintenance Manual
Page 39
... being discharged. FRU tests The following table shows the test for use. Lenovo 3000 N200 33 Green: Bluetooth wireless is charged between 20% to 80% of the capacity, and being discharged between 80% to 20% of the capacity. Blinking green: The battery is operational. If the test does not detect the error, run the...
... being discharged. FRU tests The following table shows the test for use. Lenovo 3000 N200 33 Green: Bluetooth wireless is charged between 20% to 80% of the capacity, and being discharged between 80% to 20% of the capacity. Blinking green: The battery is operational. If the test does not detect the error, run the...

Hardware Maintenance Manual
Page 41
...board. 1. System board. 1. Charge the backup battery for each error detected in boldface type. Reseat the hard disk drive. 2. Symptom-to-FRU index Symptom-to-FRU index The symptom-to-FRU index in sequence 1. Load Setup Defaults in the Lenovo 3000 notebook computers, see the manual...8 hours by connecting the ac adapter. 2. Lenovo 3000 N200 35 This index can be replaced next. Note For a device not supported by diagnostic codes in BIOS Setup Utility. 3. Do not replace a nondefective FRU. DIMM. 2. Charge the backup battery for that device. Note: Do the FRU ...
...board. 1. System board. 1. Charge the backup battery for each error detected in boldface type. Reseat the hard disk drive. 2. Symptom-to-FRU index Symptom-to-FRU index The symptom-to-FRU index in sequence 1. Load Setup Defaults in the Lenovo 3000 notebook computers, see the manual...8 hours by connecting the ac adapter. 2. Lenovo 3000 N200 35 This index can be replaced next. Note For a device not supported by diagnostic codes in BIOS Setup Utility. 3. Do not replace a nondefective FRU. DIMM. 2. Charge the backup battery for that device. Note: Do the FRU ...

Hardware Maintenance Manual
Page 42
... FRU or action, in BIOS Setup Utility. 2. Replace the backup battery and run BIOS Setup Utility to reset the time and date. 3. Load "Setup Default" in sequence 1. System board. 1. DIMM. 2. Charge the backup battery for more than 8 hours by connecting the ac adapter. 2. System... board. 1. DIMM. 3. System board. 1. Symptom-to reset the time and date. 3. Replace the backup battery and run BIOS Setup Utility to -FRU index Symptom...
... FRU or action, in BIOS Setup Utility. 2. Replace the backup battery and run BIOS Setup Utility to reset the time and date. 3. Load "Setup Default" in sequence 1. System board. 1. DIMM. 2. Charge the backup battery for more than 8 hours by connecting the ac adapter. 2. System... board. 1. DIMM. 3. System board. 1. Symptom-to reset the time and date. 3. Replace the backup battery and run BIOS Setup Utility to -FRU index Symptom...


