
Hardware Maintenance Manual
Page 6
... 151 Machine Type 7258 151 Machine Type 7259 163 Machine Type 7260 174 Machine Type 7267 185 Machine Type 7268 196 Machine Type 7269 207 Machine Type 7270 218 Machine Type 7279 229 Machine Type 7296 240 Machine Type...system password 379 Vital product data 379 BIOS levels 379 Flash update procedures 379 Updating (flashing) BIOS from a disc . . . . . 380 Updating (flashing) BIOS from your operating system 380 Recovering from a POST/BIOS update failure . . 380 Power management 382 Automatic configuration and power interface (ACPI) BIOS 382 Automatic Power-On features 382 Appendix....
... 151 Machine Type 7258 151 Machine Type 7259 163 Machine Type 7260 174 Machine Type 7267 185 Machine Type 7268 196 Machine Type 7269 207 Machine Type 7270 218 Machine Type 7279 229 Machine Type 7296 240 Machine Type...system password 379 Vital product data 379 BIOS levels 379 Flash update procedures 379 Updating (flashing) BIOS from a disc . . . . . 380 Updating (flashing) BIOS from your operating system 380 Recovering from a POST/BIOS update failure . . 380 Power management 382 Automatic configuration and power interface (ACPI) BIOS 382 Automatic Power-On features 382 Appendix....
Hardware Maintenance Manual
Page 60
... 000-027-XXX BIOS Configuration/Setup error 000-034-XXX BIOS Buffer Allocation failure 000-035-XXX BIOS Reset Condition detected 000-036-XXX BIOS Register error 000-038-XXX BIOS Extension failure 000-039-XXX BIOS DMI data error 000-195-XXX BIOS Test aborted by user FRU/Action No action 1. See "Flash update procedures" on page...
... 000-027-XXX BIOS Configuration/Setup error 000-034-XXX BIOS Buffer Allocation failure 000-035-XXX BIOS Reset Condition detected 000-036-XXX BIOS Register error 000-038-XXX BIOS Extension failure 000-039-XXX BIOS DMI data error 000-195-XXX BIOS Test aborted by user FRU/Action No action 1. See "Flash update procedures" on page...
Hardware Maintenance Manual
Page 61
... board System board 1. See "Flash update procedures" on page 379 2. Symptom-to reset the log file 1. Flash the system. Run Setup 2. Diagnostic Error Code 000-196-XXX BIOS test halt, error threshold exceeded 000-197-XXX BIOS test warning 000-198-XXX BIOS test aborted 000-199-XXX BIOS test failed, cause unknown 000-250...
... board System board 1. See "Flash update procedures" on page 379 2. Symptom-to reset the log file 1. Flash the system. Run Setup 2. Diagnostic Error Code 000-196-XXX BIOS test halt, error threshold exceeded 000-197-XXX BIOS test warning 000-198-XXX BIOS test aborted 000-199-XXX BIOS test failed, cause unknown 000-250...
Hardware Maintenance Manual
Page 65
System board 1. System board Information only Re-start the test, if necessary 1. Re-start the test to reset the log file Chapter 7. See "Flash update procedures" on page 49 2. Diskette drive Cable 2. System board Information only Re-start the test, if necessary 1. System board 1. Re-run test 3. Replace ... review the log file 2. Flash the system and re-test. Diagnostic Error Code 005-036-XXX Video Register error 005-038-XXX System BIOS extension failure 005-040-XXX Video IRQ failure 005-195-XXX Video Test aborted by user 005-196-XXX Video test halt, error threshold exceeded...
System board 1. System board Information only Re-start the test, if necessary 1. Re-start the test to reset the log file Chapter 7. See "Flash update procedures" on page 49 2. Diskette drive Cable 2. System board Information only Re-start the test, if necessary 1. System board 1. Re-run test 3. Replace ... review the log file 2. Flash the system and re-test. Diagnostic Error Code 005-036-XXX Video Register error 005-038-XXX System BIOS extension failure 005-040-XXX Video IRQ failure 005-195-XXX Video Test aborted by user 005-196-XXX Video test halt, error threshold exceeded...
Hardware Maintenance Manual
Page 81
...the following actions in order. 1. See Chapter 6, "Using the Setup Utility," on page 380. 3. Symptom-to Save and exit. 3. See "Updating (flashing) BIOS from your operating system" on page 49. 2. Make sure the memory module(s) are tones or a series of tones separated by pauses (intervals ...without sound) during POST. Start the Setup Utility program and press F10 to Save and exit. See "Updating (flashing) BIOS from your operating system" on page 49. 2. Make sure the monitor is properly connected to the computer. 2. Replace the video ...
...the following actions in order. 1. See Chapter 6, "Using the Setup Utility," on page 380. 3. Symptom-to Save and exit. 3. See "Updating (flashing) BIOS from your operating system" on page 49. 2. Make sure the memory module(s) are tones or a series of tones separated by pauses (intervals ...without sound) during POST. Start the Setup Utility program and press F10 to Save and exit. See "Updating (flashing) BIOS from your operating system" on page 49. 2. Make sure the monitor is properly connected to the computer. 2. Replace the video ...
Hardware Maintenance Manual
Page 126
... tools or loose screws are left inside your computer. 2. See Chapter 6, "Using the Setup Utility," on page 82. 4. Ensure that is replaced, you must update (flash) the BIOS. Reconnect the external cables and power cords to install any removed parts, replace the cover, and reconnect any cables, including telephone lines and power...
... tools or loose screws are left inside your computer. 2. See Chapter 6, "Using the Setup Utility," on page 82. 4. Ensure that is replaced, you must update (flash) the BIOS. Reconnect the external cables and power cords to install any removed parts, replace the cover, and reconnect any cables, including telephone lines and power...
Hardware Maintenance Manual
Page 156
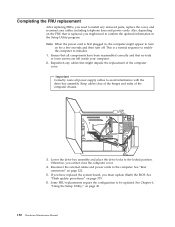
... drive bay assembly. Otherwise, you must update (flash) the BIOS. Some FRU replacements require the configuration to the locked position. See Chapter 6, "Using the Setup Utility," on page 379. 6. This is first plugged in the Setup Utility program. See "Flash update procedures" on page 49. 150 Hardware...cables clear of the hinges and sides of the computer cover. Lower the drive bay assembly and place the drive locks to be updated. Reposition any cables, including telephone lines and power cords. If you have been reassembled correctly and that is replaced, you might ...
... drive bay assembly. Otherwise, you must update (flash) the BIOS. Some FRU replacements require the configuration to the locked position. See Chapter 6, "Using the Setup Utility," on page 379. 6. This is first plugged in the Setup Utility program. See "Flash update procedures" on page 49. 150 Hardware...cables clear of the hinges and sides of the computer cover. Lower the drive bay assembly and place the drive locks to be updated. Reposition any cables, including telephone lines and power cords. If you have been reassembled correctly and that is replaced, you might ...
Hardware Maintenance Manual
Page 385
... (VPD) code stored in this section include the following information to flash (update) the BIOS. © Lenovo 2005, 2008. For more information about passwords, see "Using passwords" on the system board. After you replace the system board, the VPD must be updated. Additional Service Information This chapter provides additional information that the service representative...
... (VPD) code stored in this section include the following information to flash (update) the BIOS. © Lenovo 2005, 2008. For more information about passwords, see "Using passwords" on the system board. After you replace the system board, the VPD must be updated. Additional Service Information This chapter provides additional information that the service representative...

Hardware Maintenance Manual
Page 386
.... When prompted to : http://www.lenovo.com/support 2. Type in the following procedure commonly called Boot-block Recovery. 1. Locate the downloadable files for the flash BIOS update (flash from electrical outlets, and remove...BIOS is being updated (flash update), your computer might not restart correctly. This is very important because they are available at: http://www.lenovo.com/support 1. Unplug all power cords from the operating system version). 3. System BIOS program updates are not on again. Recovering from a POST/BIOS update failure If power to update (flash) the BIOS...
.... When prompted to : http://www.lenovo.com/support 2. Type in the following procedure commonly called Boot-block Recovery. 1. Locate the downloadable files for the flash BIOS update (flash from electrical outlets, and remove...BIOS is being updated (flash update), your computer might not restart correctly. This is very important because they are available at: http://www.lenovo.com/support 1. Unplug all power cords from the operating system version). 3. System BIOS program updates are not on again. Recovering from a POST/BIOS update failure If power to update (flash) the BIOS...
Hardware Maintenance Manual
Page 387
... 5. 14. Note: If the system board has only two pins for clearing the CMOS, add a jumper to pin 2 and pin 3. After the update session is completed, there will take two to its original position (pin 1 and pin 2). 6. Reinstall any cables that were disconnected and reinstall the computer... cover. 17. Reconnect the power cords for the computer and monitor to restart the operating system. Insert the POST/BIOS update (flash) disc into the optical drive. 11. Reconnect any cables that were disconnected and reinstall the computer cover. 9. Additional Service Information 381...
... 5. 14. Note: If the system board has only two pins for clearing the CMOS, add a jumper to pin 2 and pin 3. After the update session is completed, there will take two to its original position (pin 1 and pin 2). 6. Reinstall any cables that were disconnected and reinstall the computer... cover. 17. Reconnect the power cords for the computer and monitor to restart the operating system. Insert the POST/BIOS update (flash) disc into the optical drive. 11. Reconnect any cables that were disconnected and reinstall the computer cover. 9. Additional Service Information 381...


