Lenovo Y470/Y570 Hardware Maintenance Manual
Page 3
... management 25 Screen blank mode 25 Sleep (standby) mode 25 Hibernation mode 26 Lenovo Y470/Y570 27 Specifications 27 Status indicators 29 Fn key combinations 31 FRU replacement notices 32 Screw notices 32 Removing and replacing an FRU 33 1010 Battery pack 34 1020 Dummy card 35 1030 Hard disk drive(HDD)/Memory/ Mini PCI...
... management 25 Screen blank mode 25 Sleep (standby) mode 25 Hibernation mode 26 Lenovo Y470/Y570 27 Specifications 27 Status indicators 29 Fn key combinations 31 FRU replacement notices 32 Screw notices 32 Removing and replacing an FRU 33 1010 Battery pack 34 1020 Dummy card 35 1030 Hard disk drive(HDD)/Memory/ Mini PCI...
Lenovo Y470/Y570 Hardware Maintenance Manual
Page 25
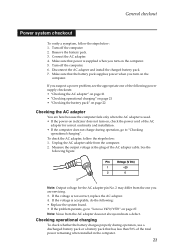
... of the AC adapter for correct continuity and installation. • If the computer does not charge during operation, use a discharged battery pack or a battery pack that power is used. • If the power-on indicator does not turn on page 27. Unplug the AC adapter ... To check the AC adapter, follow the steps below : 1. Note: Noise from the computer. 2. See the following : • Replace the system board. • If the problem persists, go to "Lenovo Y470/Y570" on the computer. If the voltage is acceptable, do the following figure: Pin Voltage (V DC) 1 +20 2 0 2 1...
... of the AC adapter for correct continuity and installation. • If the computer does not charge during operation, use a discharged battery pack or a battery pack that power is used. • If the power-on indicator does not turn on page 27. Unplug the AC adapter ... To check the AC adapter, follow the steps below : 1. Note: Noise from the computer. 2. See the following : • Replace the system board. • If the problem persists, go to "Lenovo Y470/Y570" on the computer. If the voltage is acceptable, do the following figure: Pin Voltage (V DC) 1 +20 2 0 2 1...

Lenovo Y470/Y570 Hardware Maintenance Manual
Page 26
...start until the Power Meter shows that less than +11.0 V DC, the battery pack has been discharged. Remove it from having a shortened life. If the voltage is still off the computer. 2. Lenovo Y470/Y570 Hardware Maintenance Manual Perform operational charging. If the charge indicator or icon is less ...icon tray of the Windows® taskbar and wait for a while. Turn off , replace the battery pack. If the resistance is correct, replace the system board. 22 If it ), and the percentage of battery power remaining is still not charged, go to 100% of the total power remains; ...
...start until the Power Meter shows that less than +11.0 V DC, the battery pack has been discharged. Remove it from having a shortened life. If the voltage is still off the computer. 2. Lenovo Y470/Y570 Hardware Maintenance Manual Perform operational charging. If the charge indicator or icon is less ...icon tray of the Windows® taskbar and wait for a while. Turn off , replace the battery pack. If the resistance is correct, replace the system board. 22 If it ), and the percentage of battery power remaining is still not charged, go to 100% of the total power remains; ...
Lenovo Y470/Y570 Hardware Maintenance Manual
Page 37
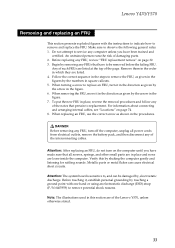
...made sure that all power cords from electrical outlets, remove the battery pack, and then disconnect any FRU, review "FRU replacement notices" on page 74. 8. An untrained person runs the risk of the page. Before replacing any of the notes that have been trained and certified. DANGER... this by removing any FRU, turn on the computer until you have to be damaged by the arrow in the figure. 7. Lenovo Y470/Y570 Removing and replacing an FRU This section presents exploded figures with one hand or using an electrostatic discharge (ESD) strap (P/N 6405959) to remove potential...
...made sure that all power cords from electrical outlets, remove the battery pack, and then disconnect any FRU, review "FRU replacement notices" on page 74. 8. An untrained person runs the risk of the page. Before replacing any of the notes that have been trained and certified. DANGER... this by removing any FRU, turn on the computer until you have to be damaged by the arrow in the figure. 7. Lenovo Y470/Y570 Removing and replacing an FRU This section presents exploded figures with one hand or using an electrostatic discharge (ESD) strap (P/N 6405959) to remove potential...
Lenovo IdeaPad Y470Y570 User Guide V1.0
Page 3
...Troubleshooting 32 Appendix. Getting to the Internet ......27 Wired connection 27 Wireless connection 28 Chapter 4. CRU instructions 36 Replacing the battery 36 Replacing the hard disk drive 37 Replacing memory 41 Removing the optical drive 44 Trademarks 45 i Learning the basics 10 First use 10 Using AC ...adapter and battery 12 Using the touchpad 13 Using the keyboard 14 Connecting external devices 17 Special keys and buttons 19 ...
...Troubleshooting 32 Appendix. Getting to the Internet ......27 Wired connection 27 Wireless connection 28 Chapter 4. CRU instructions 36 Replacing the battery 36 Replacing the hard disk drive 37 Replacing memory 41 Removing the optical drive 44 Trademarks 45 i Learning the basics 10 First use 10 Using AC ...adapter and battery 12 Using the touchpad 13 Using the keyboard 14 Connecting external devices 17 Special keys and buttons 19 ...
Lenovo IdeaPad Y470Y570 User Guide V1.0
Page 16
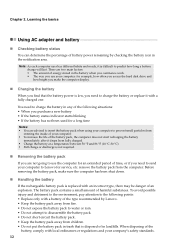
...the type recommended by checking the battery icon in any of the following points: • Replace only with a fully charged one. Learning the basics Using AC adapter and battery „ Checking battery status You can determine the ...percentage of harmful substances. You need to charge the battery in the notification area. The battery pack contains a small amount of battery power remaining by Lenovo. • Keep the battery...
...the type recommended by checking the battery icon in any of the following points: • Replace only with a fully charged one. Learning the basics Using AC adapter and battery „ Checking battery status You can determine the ...percentage of harmful substances. You need to charge the battery in the notification area. The battery pack contains a small amount of battery power remaining by Lenovo. • Keep the battery...
Lenovo IdeaPad Y470Y570 User Guide V1.0
Page 36
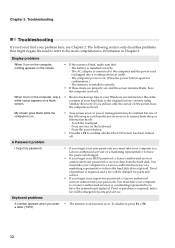
... user password, you still see Chapter 2. Do one of the following section only describes problems that : - Proof of your computer to a Lenovo authorized servicer or a marketing representative to the original factory contents using screen. Proof of purchase is on a blank contents of purchase is required,... and a fee will be enabled. To disable it, press Fn + F8. The battery is installed correctly. • If these items are properly set, and the screen remains blank, have the system board replaced. OneKey Recovery. Press the power button. • Press Fn + F2 to the more...
... user password, you still see Chapter 2. Do one of the following section only describes problems that : - Proof of your computer to a Lenovo authorized servicer or a marketing representative to the original factory contents using screen. Proof of purchase is on a blank contents of purchase is required,... and a fee will be enabled. To disable it, press Fn + F8. The battery is installed correctly. • If these items are properly set, and the screen remains blank, have the system board replaced. OneKey Recovery. Press the power button. • Press Fn + F2 to the more...
Lenovo IdeaPad Y470Y570 User Guide V1.0
Page 37
... • Make sure that : - The screen is still not reset, remove the AC adapter and the battery. If the power indicator is blank. Use and care Information" of Lenovo Safety and General Information Guide. Unsaved data may have the computer serviced. • Make sure that: -...the computer serviced. Note: If the system still does not return from the sleep mode. - Press Fn + F2 to the computer, or replace the battery with a fully charged one. The screen resolution and color quality are selected as the playback device. 33 See "Chapter 2. Speakers are correctly ...
... • Make sure that : - The screen is still not reset, remove the AC adapter and the battery. If the power indicator is blank. Use and care Information" of Lenovo Safety and General Information Guide. Unsaved data may have the computer serviced. • Make sure that: -...the computer serviced. Note: If the system still does not return from the sleep mode. - Press Fn + F2 to the computer, or replace the battery with a fully charged one. The screen resolution and color quality are selected as the playback device. 33 See "Chapter 2. Speakers are correctly ...
Lenovo IdeaPad Y470Y570 User Guide V1.0
Page 40
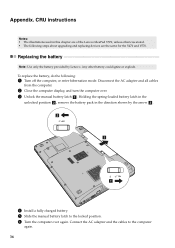
To replace the battery, do the following steps about upgrading and replacing devices are of the Lenovo IdeaPad Y570, unless otherwise stated. • The following : 1 Turn off the computer, or enter hibernation mode. Connect the AC adapter and the cables to the locked position. 6 Turn the computer over . 3 Unlock the manual battery latch a . Holding the spring-loaded battery latch...
To replace the battery, do the following steps about upgrading and replacing devices are of the Lenovo IdeaPad Y570, unless otherwise stated. • The following : 1 Turn off the computer, or enter hibernation mode. Connect the AC adapter and the cables to the locked position. 6 Turn the computer over . 3 Unlock the manual battery latch a . Holding the spring-loaded battery latch...
Lenovo IdeaPad Y470Y570 User Guide V1.0
Page 42
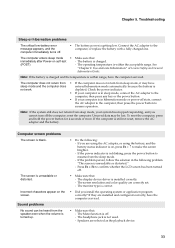
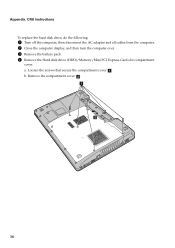
Loosen the screws that secure the compartment cover a . a b 38 Remove the compartment cover b . CRU instructions To replace the hard disk drive, do the following: 1 Turn off the computer; a. then disconnect the AC adapter and all cables from the computer. 2 Close the computer display, and then turn the computer over. 3 Remove the battery pack. 4 Remove the Hard disk drive (HDD)/Memory/Mini PCI Express Card slot compartment cover. Appendix. b.
Loosen the screws that secure the compartment cover a . a b 38 Remove the compartment cover b . CRU instructions To replace the hard disk drive, do the following: 1 Turn off the computer; a. then disconnect the AC adapter and all cables from the computer. 2 Close the computer display, and then turn the computer over. 3 Remove the battery pack. 4 Remove the Hard disk drive (HDD)/Memory/Mini PCI Express Card slot compartment cover. Appendix. b.
Lenovo IdeaPad Y470Y570 User Guide V1.0
Page 45
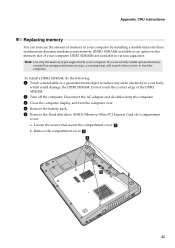
Loosen the screws that secure the compartment cover a . b. CRU instructions Replacing memory You can increase the amount of memory in your computer. To install a DDR3 SDRAM, do the following: 1 Touch a metal table or a grounded metal object ... the compartment cover b . Appendix. Disconnect the AC adapter and all cables from the computer. 3 Close the computer display, and turn the computer over. 4 Remove the battery pack. 5 Remove the Hard disk drive (HDD)/Memory/Mini PCI Express Card slot compartment cover.
Loosen the screws that secure the compartment cover a . b. CRU instructions Replacing memory You can increase the amount of memory in your computer. To install a DDR3 SDRAM, do the following: 1 Touch a metal table or a grounded metal object ... the compartment cover b . Appendix. Disconnect the AC adapter and all cables from the computer. 3 Close the computer display, and turn the computer over. 4 Remove the battery pack. 5 Remove the Hard disk drive (HDD)/Memory/Mini PCI Express Card slot compartment cover.
Lenovo IdeaPad Y470Y570 User Guide V1.0
Page 48
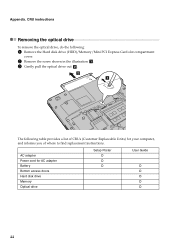
AC adapter Power cord for your computer, and informs you of where to find replacement instructions. CRU instructions Removing the optical drive To remove the optical drive, do the following table provides a list of CRUs (Customer Replaceable Units) for AC adapter Battery Bottom access doors Hard disk drive Memory Optical drive Setup Poster O O O User Guide O O O O O 44 Appendix. b a The following : 1 Remove the Hard disk drive (HDD)/Memory/Mini PCI Express Card slot compartment cover. 2 Remove the screw shown in the illustration a . 3 Gently pull the optical drive out b .
AC adapter Power cord for your computer, and informs you of where to find replacement instructions. CRU instructions Removing the optical drive To remove the optical drive, do the following table provides a list of CRUs (Customer Replaceable Units) for AC adapter Battery Bottom access doors Hard disk drive Memory Optical drive Setup Poster O O O User Guide O O O O O 44 Appendix. b a The following : 1 Remove the Hard disk drive (HDD)/Memory/Mini PCI Express Card slot compartment cover. 2 Remove the screw shown in the illustration a . 3 Gently pull the optical drive out b .


