
Lenovo IdeaPad V360 Setup Poster V1.0
Page 2
... product. Set the switch to Discrete whenever you connect an HDMI device. (discrete graphics models only) 4 Volume buttons / Lenovo Security Suite button Mute/Unmute Volume down Volume up Lenovo Security Suite 5 Integrated wireless device switch Use this manual may occur. • To ensure HDMI output quality, only use HDMI in backlight, the LCD on your computer. 1 External devices connection Ethernet 2 4 Notes: • The above connection illustration is installed. 3 GPU switch (Select models only) Slide and release this switch under Windows operating system...
... product. Set the switch to Discrete whenever you connect an HDMI device. (discrete graphics models only) 4 Volume buttons / Lenovo Security Suite button Mute/Unmute Volume down Volume up Lenovo Security Suite 5 Integrated wireless device switch Use this manual may occur. • To ensure HDMI output quality, only use HDMI in backlight, the LCD on your computer. 1 External devices connection Ethernet 2 4 Notes: • The above connection illustration is installed. 3 GPU switch (Select models only) Slide and release this switch under Windows operating system...
Lenovo IdeaPad V360 User Guide V1.0
Page 3
... D. CRU instructions...28 Replacing the battery 28 Replacing the hard disk drive.... 29 Replacing memory 32 Appendix B. Connecting to know your computer 18 Chapter 3. Lenovo limited warranty 35 Warranty information 41 Appendix C. OneKey Rescue system 26 OneKey Rescue system 26 Appendix A. Contents Chapter 1. Learning the basics..... 6 First use 6 Using AC adapter and battery .....8 Using the touchpad 10 Using the keyboard 11 Connecting external devices.......13 Switching GPU (Select models only 15 Special keys and buttons 16...
... D. CRU instructions...28 Replacing the battery 28 Replacing the hard disk drive.... 29 Replacing memory 32 Appendix B. Connecting to know your computer 18 Chapter 3. Lenovo limited warranty 35 Warranty information 41 Appendix C. OneKey Rescue system 26 OneKey Rescue system 26 Appendix A. Contents Chapter 1. Learning the basics..... 6 First use 6 Using AC adapter and battery .....8 Using the touchpad 10 Using the keyboard 11 Connecting external devices.......13 Switching GPU (Select models only 15 Special keys and buttons 16...
Lenovo IdeaPad V360 User Guide V1.0
Page 8
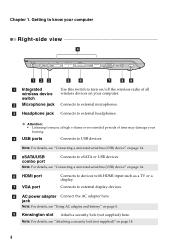
... "Using AC adapter and battery" on page 18. 4 b Microphone jack Connects to external headphones. jack Note: For details, see "Attaching a security lock (not supplied)" on page 8. c Headphone jack Connects to external microphones. e eSATA/USB combo port Connects to devices with HDMI input such as a TV or a display. f HDMI port g VGA port Connects to eSATA or USB devices. Note: For details, see "Connecting a universal serial bus (USB) device" on /off the wireless radio of time may damage your computer. Connects to USB devices. h AC power adapter Connect...
... "Using AC adapter and battery" on page 18. 4 b Microphone jack Connects to external headphones. jack Note: For details, see "Attaching a security lock (not supplied)" on page 8. c Headphone jack Connects to external microphones. e eSATA/USB combo port Connects to devices with HDMI input such as a TV or a display. f HDMI port g VGA port Connects to eSATA or USB devices. Note: For details, see "Connecting a universal serial bus (USB) device" on /off the wireless radio of time may damage your computer. Connects to USB devices. h AC power adapter Connect...
Lenovo IdeaPad V360 User Guide V1.0
Page 13
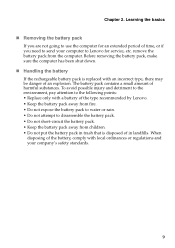
...to use the computer for service, etc. The battery pack contains a small amount of time, or if you are not going to disassemble the battery pack. • Do not short-circuit the battery pack. • Keep the battery pack away from children. • Do not put the battery pack...removing the battery pack, make sure the computer has been shut down. „ Handling the battery If the rechargeable battery pack is disposed of in trash that is replaced with an incorrect type, there may be danger of the battery, comply with a battery of the type recommended by Lenovo. • Keep the battery...
...to use the computer for service, etc. The battery pack contains a small amount of time, or if you are not going to disassemble the battery pack. • Do not short-circuit the battery pack. • Keep the battery pack away from children. • Do not put the battery pack...removing the battery pack, make sure the computer has been shut down. „ Handling the battery If the rechargeable battery pack is disposed of in trash that is replaced with an incorrect type, there may be danger of the battery, comply with a battery of the type recommended by Lenovo. • Keep the battery...
Lenovo IdeaPad V360 User Guide V1.0
Page 15
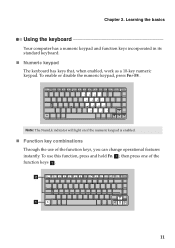
Learning the basics Using the keyboard Your computer has a numeric keypad and function keys incorporated in its standard keyboard. „ Numeric keypad The keyboard has keys that, when enabled, work as a 10-key numeric keypad. then press one of the function keys, you can change operational features instantly. To use of the function keys b . To enable or disable the numeric keypad, press Fn+F8 . Note: The NumLk indicator will light on if the numeric keypad is enabled. „ Function key combinations Through the use this function, press and hold Fn a; b a 11 Chapter 2.
Learning the basics Using the keyboard Your computer has a numeric keypad and function keys incorporated in its standard keyboard. „ Numeric keypad The keyboard has keys that, when enabled, work as a 10-key numeric keypad. then press one of the function keys, you can change operational features instantly. To use of the function keys b . To enable or disable the numeric keypad, press Fn+F8 . Note: The NumLk indicator will light on if the numeric keypad is enabled. „ Function key combinations Through the use this function, press and hold Fn a; b a 11 Chapter 2.
Lenovo IdeaPad V360 User Guide V1.0
Page 22
... right of the screen in any security product, verify that you power on fingerprint reader, see the Help to help prevent it as a password for the location of your computer from being used unless you set the password, see the Help file of the Kensington slot. Note: To enter BIOS setup utility, press F2 when the Lenovo logo appears on page 4 for Windows operating system or...
... right of the screen in any security product, verify that you power on fingerprint reader, see the Help to help prevent it as a password for the location of your computer from being used unless you set the password, see the Help file of the Kensington slot. Note: To enter BIOS setup utility, press F2 when the Lenovo logo appears on page 4 for Windows operating system or...
Lenovo IdeaPad V360 User Guide V1.0
Page 32
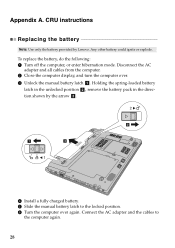
... instructions Replacing the battery Note: Use only the battery provided by the arrow c . b a1 c 4 Install a fully charged battery. 5 Slide the manual battery latch to the computer again. 28 Appendix A. To replace the battery, do the following: 1 Turn off the computer, or enter hibernation mode. Any other battery could ignite or explode. Holding the spring-loaded battery latch in the unlocked position b , remove the battery pack in the direction shown by Lenovo. Connect...
... instructions Replacing the battery Note: Use only the battery provided by the arrow c . b a1 c 4 Install a fully charged battery. 5 Slide the manual battery latch to the computer again. 28 Appendix A. To replace the battery, do the following: 1 Turn off the computer, or enter hibernation mode. Any other battery could ignite or explode. Holding the spring-loaded battery latch in the unlocked position b , remove the battery pack in the direction shown by Lenovo. Connect...
Lenovo IdeaPad V360 User Guide V1.0
Page 33
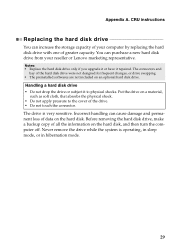
... removing the hard disk drive, make a backup copy of the hard disk drive were not designed for frequent changes, or drive swapping. • The preinstalled softwares are not included on a material, such as soft cloth, that absorbs the physical shock. • Do not apply pressure to physical shocks. CRU instructions Replacing the hard disk drive You can increase the storage capacity of greater capacity. The drive is operating, in sleep mode...
... removing the hard disk drive, make a backup copy of the hard disk drive were not designed for frequent changes, or drive swapping. • The preinstalled softwares are not included on a material, such as soft cloth, that absorbs the physical shock. • Do not apply pressure to physical shocks. CRU instructions Replacing the hard disk drive You can increase the storage capacity of greater capacity. The drive is operating, in sleep mode...
Lenovo IdeaPad V360 User Guide V1.0
Page 38
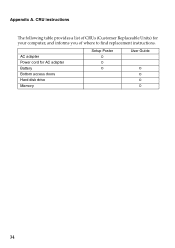
CRU instructions The following table provides a list of CRUs (Customer Replaceable Units) for AC adapter Battery Bottom access doors Hard disk drive Memory Setup Poster O O O User Guide O O O O 34 Appendix A. AC adapter Power cord for your computer, and informs you of where to find replacement instructions.
CRU instructions The following table provides a list of CRUs (Customer Replaceable Units) for AC adapter Battery Bottom access doors Hard disk drive Memory Setup Poster O O O User Guide O O O O 34 Appendix A. AC adapter Power cord for your computer, and informs you of where to find replacement instructions.
Lenovo IdeaPad V360 User Guide V1.0
Page 41
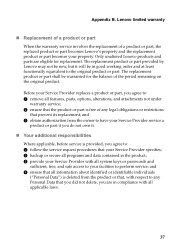
... the owner to perform service; The replacement product or part provided by Lenovo may not be new, but it . „ Your additional responsibilities Where applicable, before service is provided, you agree to: 1 remove all system keys or passwords and sufficient, free, and safe access to : 1 follow the service request procedures that your Service Provider with all applicable laws. 37 Before your Service Provider replaces a product or part, you...
... the owner to perform service; The replacement product or part provided by Lenovo may not be new, but it . „ Your additional responsibilities Where applicable, before service is provided, you agree to: 1 remove all system keys or passwords and sufficient, free, and safe access to : 1 follow the service request procedures that your Service Provider with all applicable laws. 37 Before your Service Provider replaces a product or part, you...
Lenovo IdeaPad V360 Hardware Maintenance Manual V2.0
Page 3
... Restoring the factory contents by using OneKey Recovery 23 Restore of factory default 23 Using recovery discs 23 Passwords 24 Power-on password 24 Supervisor password 24 Power management 25 Screen blank mode 25 Sleep (standby) mode 25 Hibernation mode 26 Lenovo IdeaPad V360 27 Specifications 27 Status indicators 29 Fn key combinations 31 FRU replacement notices 32 Screw notices 32 Removing and replacing an FRU 33 1010 Battery pack 34 1020 Dummy card 35 1030 Hard disk drive(HDD)/Mini PCI Express Card slot compartment cover 36 1040 Hard disk drive...
... Restoring the factory contents by using OneKey Recovery 23 Restore of factory default 23 Using recovery discs 23 Passwords 24 Power-on password 24 Supervisor password 24 Power management 25 Screen blank mode 25 Sleep (standby) mode 25 Hibernation mode 26 Lenovo IdeaPad V360 27 Specifications 27 Status indicators 29 Fn key combinations 31 FRU replacement notices 32 Screw notices 32 Removing and replacing an FRU 33 1010 Battery pack 34 1020 Dummy card 35 1030 Hard disk drive(HDD)/Mini PCI Express Card slot compartment cover 36 1040 Hard disk drive...
Lenovo IdeaPad V360 Hardware Maintenance Manual V2.0
Page 7
... for safe operational condition. •• Do not use such kind of maintenance information. Do not use worn or broken tools and testers. •• Never assume that has hazardous voltages. •• Disconnect all power before: - Performing a mechanical inspection - Attention: An electrical shock can then operate the switch or unplug the power cord quickly. •• Do not work with powered...
... for safe operational condition. •• Do not use such kind of maintenance information. Do not use worn or broken tools and testers. •• Never assume that has hazardous voltages. •• Disconnect all power before: - Performing a mechanical inspection - Attention: An electrical shock can then operate the switch or unplug the power cord quickly. •• Do not work with powered...
Lenovo IdeaPad V360 Hardware Maintenance Manual V2.0
Page 23
When you replace an FRU, make sure to read the entire page on removing and replacing FRUs. • When you replace FRUs, use new nylon-coated screws. • Be extremely careful during such write operations as cosmic radiation, electrostatic discharge, or software errors. If the error does not recur, do not replace the FRU. • Be careful not to replace a nondefective FRU. 19 Single...
When you replace an FRU, make sure to read the entire page on removing and replacing FRUs. • When you replace FRUs, use new nylon-coated screws. • Be extremely careful during such write operations as cosmic radiation, electrostatic discharge, or software errors. If the error does not recur, do not replace the FRU. • Be careful not to replace a nondefective FRU. 19 Single...
Lenovo IdeaPad V360 Hardware Maintenance Manual V2.0
Page 28
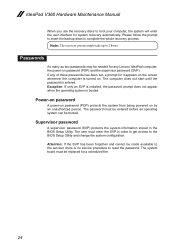
... prompt to insert the backup discs to the BIOS Setup Utility and change the system configuration. If any Lenovo IdeaPad computer: the power-on . The computer does not start until the password is booted. The password must be entered before an operating system can be replaced for system recovery automatically. The system board must enter the SVP in the BIOS Setup Utility. The user must be booted. Passwords As many as two passwords may be made available...
... prompt to insert the backup discs to the BIOS Setup Utility and change the system configuration. If any Lenovo IdeaPad computer: the power-on . The computer does not start until the password is booted. The password must be entered before an operating system can be replaced for system recovery automatically. The system board must enter the SVP in the BIOS Setup Utility. The user must be booted. Passwords As many as two passwords may be made available...
Lenovo IdeaPad V360 Hardware Maintenance Manual V2.0
Page 29
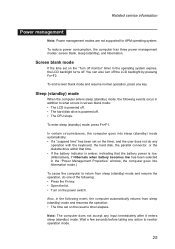
... the operation: •• The time set on the power switch. To end screen blank mode and resume normal operation, press any input immediately after it enters sleep (standby) mode. Wait a few seconds before taking any operation with the keyboard, the hard disk, the parallel connector, or the diskette drive within that time. •• If the battery indicator is amber, indicating that the battery power is powered off the LCD backlight...
... the operation: •• The time set on the power switch. To end screen blank mode and resume normal operation, press any input immediately after it enters sleep (standby) mode. Wait a few seconds before taking any operation with the keyboard, the hard disk, the parallel connector, or the diskette drive within that time. •• If the battery indicator is amber, indicating that the battery power is powered off the LCD backlight...
Lenovo IdeaPad V360 Hardware Maintenance Manual V2.0
Page 35
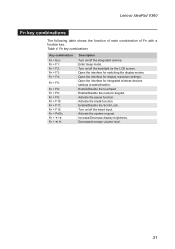
... on/off the insert input. Open the interface for the LCD screen. Activate the pause function. Turn on /off the backlight for display resolution settings. Turn on /off the integrated camera. Enable/Disable the touchpad. Open the interface for switching the display modes. Enable/Disable the numeric keypad. Activate the system request. Open the interface for integrated wireless devices settings (enable/disable). Increase/Decrease display brightness. Table 4. Enter sleep mode. Activate the break function. Lenovo IdeaPad V360 Fn key combinations The following table...
... on/off the insert input. Open the interface for the LCD screen. Activate the pause function. Turn on /off the backlight for display resolution settings. Turn on /off the integrated camera. Enable/Disable the touchpad. Open the interface for switching the display modes. Enable/Disable the numeric keypad. Activate the system request. Open the interface for integrated wireless devices settings (enable/disable). Increase/Decrease display brightness. Table 4. Enter sleep mode. Activate the break function. Lenovo IdeaPad V360 Fn key combinations The following table...
Lenovo IdeaPad V360 Hardware Maintenance Manual V2.0
Page 37
... figure. 7. Remove them in the order in place and none are listed. 4. Before replacing any FRU, turn off the computer, unplug all screws, springs, and other small parts are in which they are loose inside the computer. Attention: The system board is sensitive to observe the following general rules: 1. For information about connecting and arranging internal cables, see "Locations" on page...
... figure. 7. Remove them in the order in place and none are listed. 4. Before replacing any FRU, turn off the computer, unplug all screws, springs, and other small parts are in which they are loose inside the computer. Attention: The system board is sensitive to observe the following general rules: 1. For information about connecting and arranging internal cables, see "Locations" on page...
Lenovo IdeaPad V360 Hardware Maintenance Manual V2.0
Page 41
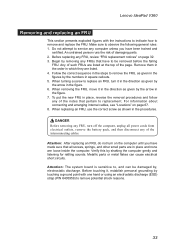
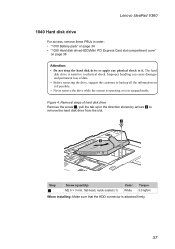
... arrows 2 to remove the hard disk drive from the slot. 1 2 Step 1 Screw (quantity) M2.5 × 3 mm, flat-head, nylok-coated (1) Color White Torque 3.0 kgfcm When installing: Make sure that the HDD connector is sensitive to physical shock. Lenovo IdeaPad V360 1040 Hard disk drive For access, remove these FRUs in order: •• "1010 Battery pack" on page 34 •• "1030 Hard disk drive(HDD)/Mini PCI Express Card slot compartment cover" on it...
... arrows 2 to remove the hard disk drive from the slot. 1 2 Step 1 Screw (quantity) M2.5 × 3 mm, flat-head, nylok-coated (1) Color White Torque 3.0 kgfcm When installing: Make sure that the HDD connector is sensitive to physical shock. Lenovo IdeaPad V360 1040 Hard disk drive For access, remove these FRUs in order: •• "1010 Battery pack" on page 34 •• "1030 Hard disk drive(HDD)/Mini PCI Express Card slot compartment cover" on it...
Lenovo IdeaPad V360 Hardware Maintenance Manual V2.0
Page 58
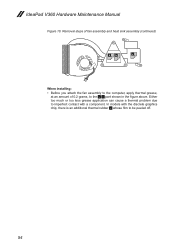
Either too much or too less grease application can cause a thermal problem due to be peeled off. 54 In models with the discrete graphics chip, there is an additional thermal rubber c whose film to imperfect contact with a component. Removal steps of fan assembly and heat sink assembly (continued) ab c When installing: •• Before you attach the fan assembly to the computer, apply thermal grease, at an amount of 0.2 grams, to the a b part shown in the figure above. IdeaPad V360 Hardware Maintenance Manual Figure 10.
Either too much or too less grease application can cause a thermal problem due to be peeled off. 54 In models with the discrete graphics chip, there is an additional thermal rubber c whose film to imperfect contact with a component. Removal steps of fan assembly and heat sink assembly (continued) ab c When installing: •• Before you attach the fan assembly to the computer, apply thermal grease, at an amount of 0.2 grams, to the a b part shown in the figure above. IdeaPad V360 Hardware Maintenance Manual Figure 10.
Lenovo IdeaPad V360 Hardware Maintenance Manual V2.0
Page 72
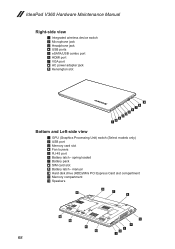
IdeaPad V360 Hardware Maintenance Manual Right-side view 1 Integrated wireless device switch 2 Microphone jack 3 Headphone jack 4 USB ports 5 eSATA/USB combo port 6 HDMI port 7 VGA port 8 AC power adapter jack 9 Kensington slot 9 8 7 4 6 5 4 3 2 1 Bottom and Left-side view 1 GPU (Graphics Processing Unit) switch (Select models only) 2 USB port 3 Memory card slot 4 Fan louvers 5 RJ-45 port 6 Battery latch - spring loaded 7 Battery pack 8 SIM card slot 9 Battery latch - manual J Hard disk drive (HDD)/Mini PCI Express Card slot compartment K Memory compartment L Speakers 8 9 7 6 12 5 ...
IdeaPad V360 Hardware Maintenance Manual Right-side view 1 Integrated wireless device switch 2 Microphone jack 3 Headphone jack 4 USB ports 5 eSATA/USB combo port 6 HDMI port 7 VGA port 8 AC power adapter jack 9 Kensington slot 9 8 7 4 6 5 4 3 2 1 Bottom and Left-side view 1 GPU (Graphics Processing Unit) switch (Select models only) 2 USB port 3 Memory card slot 4 Fan louvers 5 RJ-45 port 6 Battery latch - spring loaded 7 Battery pack 8 SIM card slot 9 Battery latch - manual J Hard disk drive (HDD)/Mini PCI Express Card slot compartment K Memory compartment L Speakers 8 9 7 6 12 5 ...


