User Guide
Page 2
...; Some instructions in this guide may assume that are not described in this user guide. • The illustrations used in this manual may differ from the actual product. If you . • The features described in this guide are for Lenovo IdeaPad U410/U410 Touch unless otherwise stated. • The illustrations in this manual are common to http://support.lenovo.com and click User guides and manuals.
...; Some instructions in this guide may assume that are not described in this user guide. • The illustrations used in this manual may differ from the actual product. If you . • The features described in this guide are for Lenovo IdeaPad U410/U410 Touch unless otherwise stated. • The illustrations in this manual are common to http://support.lenovo.com and click User guides and manuals.
User Guide
Page 3
... Chapter 1. Starting to sleep or shutting it down ...27 Touch screen operation 29 Help and support ...32 Chapter 4. Learning the basics 11 First use Windows 8 24 Configuring the operating system for the first time 24 Operating system interfaces 24 The charms ...25 Putting the computer to use ...11 Using AC adapter and battery 12 Using the touchpad 13 Using the keyboard 14 Connecting external devices 17 Special keys and buttons 20 System status indicators 21...
... Chapter 1. Starting to sleep or shutting it down ...27 Touch screen operation 29 Help and support ...32 Chapter 4. Learning the basics 11 First use Windows 8 24 Configuring the operating system for the first time 24 Operating system interfaces 24 The charms ...25 Putting the computer to use ...11 Using AC adapter and battery 12 Using the touchpad 13 Using the keyboard 14 Connecting external devices 17 Special keys and buttons 20 System status indicators 21...
User Guide
Page 8
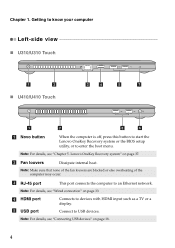
.... Connect to enter the boot menu. Note: For details, see "Connecting USB devices" on page 18. 4 b Fan louvers Dissipate internal heat. Getting to know your computer Left-side view „ U310/U310 Touch a b „ U410/U410 Touch cd e g a b e f a Novo button When the computer is off, press this button to start the Lenovo OneKey Recovery system or the BIOS setup utility, or to USB devices. Note: For details, see "Chapter 5. Chapter 1. d HDMI port e USB port Connects to an Ethernet network...
.... Connect to enter the boot menu. Note: For details, see "Connecting USB devices" on page 18. 4 b Fan louvers Dissipate internal heat. Getting to know your computer Left-side view „ U310/U310 Touch a b „ U410/U410 Touch cd e g a b e f a Novo button When the computer is off, press this button to start the Lenovo OneKey Recovery system or the BIOS setup utility, or to USB devices. Note: For details, see "Chapter 5. Chapter 1. d HDMI port e USB port Connects to an Ethernet network...

User Guide
Page 10
... "Connecting USB devices" on page 12. jack Note: For details, see "Using memory cards (not supplied)" on page 17. 6 The combo audio jack does not support conventional microphones. c USB port Connects to headphones or headsets. d AC power adapter Connect the AC adapter here. Note: Recording may not be used for video conferencing, voice narration, or simple audio recordings. Chapter 1. Connects to USB devices. e Memory card slot Insert memory cards (not supplied) here. Note: For details, see "Using AC adapter and battery" on...
... "Connecting USB devices" on page 12. jack Note: For details, see "Using memory cards (not supplied)" on page 17. 6 The combo audio jack does not support conventional microphones. c USB port Connects to headphones or headsets. d AC power adapter Connect the AC adapter here. Note: Recording may not be used for video conferencing, voice narration, or simple audio recordings. Chapter 1. Connects to USB devices. e Memory card slot Insert memory cards (not supplied) here. Note: For details, see "Using AC adapter and battery" on...

User Guide
Page 16
..., the battery may be increased. The battery pack of battery power remaining by default. Note: The batter pack is not required. „ Battery Protection If the battery pack remains idle for example, how often you access the hard disk drive and how bright you make the computer display. „ Charging the battery If the battery power is difficult to activate the battery pack. After the battery pack enters the sleep mode, you need to avoid...
..., the battery may be increased. The battery pack of battery power remaining by default. Note: The batter pack is not required. „ Battery Protection If the battery pack remains idle for example, how often you access the hard disk drive and how bright you make the computer display. „ Charging the battery If the battery power is difficult to activate the battery pack. After the battery pack enters the sleep mode, you need to avoid...
User Guide
Page 18
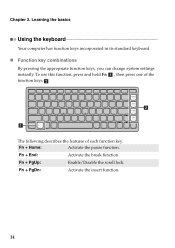
b a The following describes the features of the function keys b . Learning the basics Using the keyboard Your computer has function keys incorporated in its standard keyboard. „ Function key combinations By pressing the appropriate function keys, you can change system settings instantly. Fn + PgDn: Activate the insert function. 14 Fn + Home: Activate the pause function. Fn + End: Activate the break function. Chapter 2. Fn + PgUp: Enable/Disable the scroll lock. To use this function, press and hold Fn a , then press one of each function key.
b a The following describes the features of the function keys b . Learning the basics Using the keyboard Your computer has function keys incorporated in its standard keyboard. „ Function key combinations By pressing the appropriate function keys, you can change system settings instantly. Fn + PgDn: Activate the insert function. 14 Fn + Home: Activate the pause function. Fn + End: Activate the break function. Chapter 2. Fn + PgUp: Enable/Disable the scroll lock. To use this function, press and hold Fn a , then press one of each function key.
User Guide
Page 19
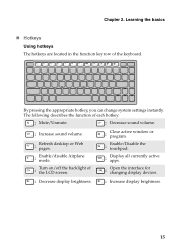
... hotkey, you can change system settings instantly. Learning the basics „ Hotkeys Using hotkeys The hotkeys are located in the function key row of the LCD screen. : Close active window or program. : Enable/Disable the touchpad. : Display all currently active apps. : Open the interface for changing display devices. : Decrease display brightness. : Increase display brightness. 15 The following describes the function of each hotkey. : Mute/Unmute. : Decrease sound volume. : Increase sound volume. : Refresh desktop or Web pages. : Enable/disable Airplane mode. : Turn...
... hotkey, you can change system settings instantly. Learning the basics „ Hotkeys Using hotkeys The hotkeys are located in the function key row of the LCD screen. : Close active window or program. : Enable/Disable the touchpad. : Display all currently active apps. : Open the interface for changing display devices. : Decrease display brightness. : Increase display brightness. 15 The following describes the function of each hotkey. : Mute/Unmute. : Decrease sound volume. : Increase sound volume. : Refresh desktop or Web pages. : Enable/disable Airplane mode. : Turn...
User Guide
Page 20
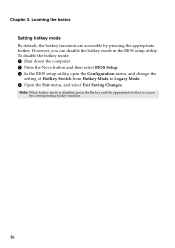
... Setting hotkey mode By default, the hotkey functions are accessible by pressing the appropriate hotkey. Note: When hotkey mode is disabled, press the Fn key and the appropriate hotkey to Legacy Mode. 4 Open the Exit menu, and select Exit Saving Changes. However, you can disable the hotkey mode in the BIOS setup utility. To disable the hotkey mode: 1 Shut down the computer. 2 Press the Novo button and then select BIOS Setup. 3 In the BIOS setup utility, open the Configuration menu, and change the setting of HotKey Switch from Hotkey Mode to access...
... Setting hotkey mode By default, the hotkey functions are accessible by pressing the appropriate hotkey. Note: When hotkey mode is disabled, press the Fn key and the appropriate hotkey to Legacy Mode. 4 Open the Exit menu, and select Exit Saving Changes. However, you can disable the hotkey mode in the BIOS setup utility. To disable the hotkey mode: 1 Shut down the computer. 2 Press the Novo button and then select BIOS Setup. 3 In the BIOS setup utility, open the Configuration menu, and change the setting of HotKey Switch from Hotkey Mode to access...
User Guide
Page 22
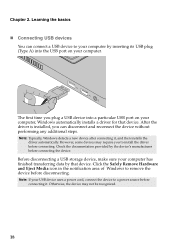
... you can connect a USB device to your computer by inserting its USB plug (Type A) into a particular USB port on your computer has finished transferring data by the device's manufacturer before connecting it , and then installs the driver automatically. Check the documentation provided by that device. After the driver is installed, you to remove the device before connecting. Note: Typically, Windows detects a new device after connecting it . Click the Safely Remove Hardware and Eject Media icon...
... you can connect a USB device to your computer by inserting its USB plug (Type A) into a particular USB port on your computer has finished transferring data by the device's manufacturer before connecting it , and then installs the driver automatically. Check the documentation provided by that device. After the driver is installed, you to remove the device before connecting. Note: Typically, Windows detects a new device after connecting it . Click the Safely Remove Hardware and Eject Media icon...
User Guide
Page 23
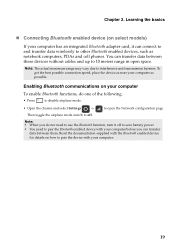
... „ Connecting Bluetooth enabled device (on your computer has an integrated Bluetooth adapter card, it off . Enabling Bluetooth communications on select models) If your computer To enable Bluetooth functions, do not need to other Bluetooth enabled devices, such as notebook computers, PDAs and cell phones. Then toggle the airplane mode switch to off to save battery power. • You need to use the Bluetooth function, turn it can transfer data between these devices without cables and up to open space...
... „ Connecting Bluetooth enabled device (on your computer has an integrated Bluetooth adapter card, it off . Enabling Bluetooth communications on select models) If your computer To enable Bluetooth functions, do not need to other Bluetooth enabled devices, such as notebook computers, PDAs and cell phones. Then toggle the airplane mode switch to off to save battery power. • You need to use the Bluetooth function, turn it can transfer data between these devices without cables and up to open space...
User Guide
Page 26
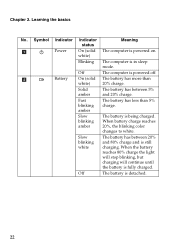
... white) 20% charge. When the battery reaches 80% charge the light will stop blinking, but charging will continue until the battery is detached. 22 Off The battery is fully charged. Chapter 2. Symbol Indicator Indicator status Meaning a Power On (solid The computer is in sleep mode. Slow blinking white The battery has between 5% and 20% charge. white) Blinking The computer is powered on. When battery charge reaches 20%, the blinking color changes to white.
... white) 20% charge. When the battery reaches 80% charge the light will stop blinking, but charging will continue until the battery is detached. 22 Off The battery is fully charged. Chapter 2. Symbol Indicator Indicator status Meaning a Power On (solid The computer is in sleep mode. Slow blinking white The battery has between 5% and 20% charge. white) Blinking The computer is powered on. When battery charge reaches 20%, the blinking color changes to white.
User Guide
Page 28
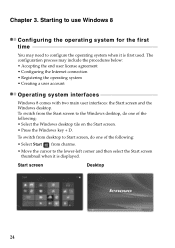
...; Configuring the Internet connection • Registering the operating system • Creating a user account Operating system interfaces Windows 8 comes with two main user interfaces: the Start screen and the Windows desktop. To switch from charms. • Move the cursor to configure the operating system when it is first used. Start screen Desktop 24 The configuration process may need to the lower-left corner and then select the Start screen thumbnail when it is displayed.
...; Configuring the Internet connection • Registering the operating system • Creating a user account Operating system interfaces Windows 8 comes with two main user interfaces: the Start screen and the Windows desktop. To switch from charms. • Move the cursor to configure the operating system when it is first used. Start screen Desktop 24 The configuration process may need to the lower-left corner and then select the Start screen thumbnail when it is displayed.
User Guide
Page 31
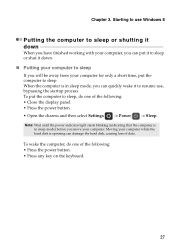
... the display panel. • Press the power button. • Open the charms and then select Settings → Power → Sleep. To wake the computer, do one of the following : • Press the power button. • Press any key on the keyboard. 27 Note: Wait until the power indicator light starts blinking (indicating that the computer is in sleep mode, you can put the computer to sleep. Starting to sleep If you have finished working...
... the display panel. • Press the power button. • Open the charms and then select Settings → Power → Sleep. To wake the computer, do one of the following : • Press the power button. • Press any key on the keyboard. 27 Note: Wait until the power indicator light starts blinking (indicating that the computer is in sleep mode, you can put the computer to sleep. Starting to sleep If you have finished working...
User Guide
Page 41
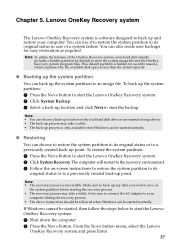
... on -screen instructions to restore the system partition to start the Lenovo OneKey Recovery system. 2 Click System Recovery. If Windows cannot be started normally. So be sure to connect the AC adapter to your computer during the recovery process. • The above instructions should be followed when Windows can be started normally. „ Restoring You can also create user backups for security reasons, which explains why the available disk space is...
... on -screen instructions to restore the system partition to start the Lenovo OneKey Recovery system. 2 Click System Recovery. If Windows cannot be started normally. So be sure to connect the AC adapter to your computer during the recovery process. • The above instructions should be followed when Windows can be started normally. „ Restoring You can also create user backups for security reasons, which explains why the available disk space is...
User Guide
Page 43
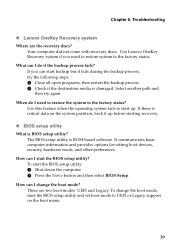
... support on the system partition, back it fails during the backup process, try again. Your computer did not come with recovery discs. It communicates basic computer information and provides options for setting boot devices, security, hardware mode, and other preferences. Use Lenovo OneKey Recovery system if you can I need to restore system to start the BIOS setup utility: 1 Shut down the computer. 2 Press the Novo button and then select BIOS Setup. To change the boot mode...
... support on the system partition, back it fails during the backup process, try again. Your computer did not come with recovery discs. It communicates basic computer information and provides options for setting boot devices, security, hardware mode, and other preferences. Use Lenovo OneKey Recovery system if you can I need to restore system to start the BIOS setup utility: 1 Shut down the computer. 2 Press the Novo button and then select BIOS Setup. To change the boot mode...
User Guide
Page 45
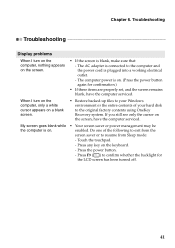
... the power button again for the LCD screen has been turned off. 41 When I turn on the computer, only a white cursor appears on . • Your screen saver or power management may be enabled. The computer power is blank, make sure that: - Touch the touchpad. - The AC adapter is connected to the computer and the power cord is on a blank screen. • Restore backed-up files to your Windows environment or...
... the power button again for the LCD screen has been turned off. 41 When I turn on the computer, only a white cursor appears on . • Your screen saver or power management may be enabled. The computer power is blank, make sure that: - Touch the touchpad. - The AC adapter is connected to the computer and the power cord is on a blank screen. • Restore backed-up files to your Windows environment or...
User Guide
Page 46
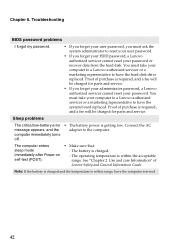
... your HDD password, a Lenovo authorized servicer cannot reset your password or recover data from the hard disk. Connect the AC adapter to have the system board replaced. See "Chapter 2. You must ask the system administrator to have the computer serviced. 42 Sleep problems The critical low-battery error message appears, and the computer immediately turns off. • The battery power is charged. - The computer enters sleep mode immediately after Power-on self-test (POST). • Make sure...
... your HDD password, a Lenovo authorized servicer cannot reset your password or recover data from the hard disk. Connect the AC adapter to have the system board replaced. See "Chapter 2. You must ask the system administrator to have the computer serviced. 42 Sleep problems The critical low-battery error message appears, and the computer immediately turns off. • The battery power is charged. - The computer enters sleep mode immediately after Power-on self-test (POST). • Make sure...

User Guide
Page 47
... responding, and you are using the AC adapter, or using the battery, and the battery status indicator is in blinking, press the power button to the computer, then press any key or the power button. • If the system still does not return from the Sleep mode. - Display panel problems The screen is correct. If the power indicator is on the screen. Press F9 ( ) to make the screen brighter. - The monitor type is blank. •...
... responding, and you are using the AC adapter, or using the battery, and the battery status indicator is in blinking, press the power button to the computer, then press any key or the power button. • If the system still does not return from the Sleep mode. - Display panel problems The screen is correct. If the power indicator is on the screen. Press F9 ( ) to make the screen brighter. - The monitor type is blank. •...
User Guide
Page 48
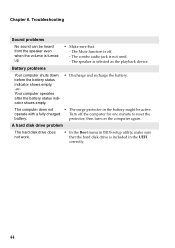
... playback device. operate with a fully charged Turn off . - protector; The speaker is off the computer for one minute to reset the battery. then turn on the computer again. A hard disk drive problem The hard disk drive does not work. • In the Boot menu in the UEFI correctly. 44 Troubleshooting Sound problems No sound can be active. Battery problems Your computer shuts down before the battery status indicator shows empty. -orYour computer operates after the battery status indicator shows...
... playback device. operate with a fully charged Turn off . - protector; The speaker is off the computer for one minute to reset the battery. then turn on the computer again. A hard disk drive problem The hard disk drive does not work. • In the Boot menu in the UEFI correctly. 44 Troubleshooting Sound problems No sound can be active. Battery problems Your computer shuts down before the battery status indicator shows empty. -orYour computer operates after the battery status indicator shows...

User Guide
Page 49
... the Boot menu of the BIOS setup utility. Troubleshooting Other problems Your computer does not respond. The connected external device does not work. • To turn off , press Novo button to select the device you want the computer starts from a device you want . Chapter 6. The computer does not start from . • Do not connect or disconnect any external device cables other than USB while the computer power is included in the BIOS setup utility is set so...
... the Boot menu of the BIOS setup utility. Troubleshooting Other problems Your computer does not respond. The connected external device does not work. • To turn off , press Novo button to select the device you want the computer starts from a device you want . Chapter 6. The computer does not start from . • Do not connect or disconnect any external device cables other than USB while the computer power is included in the BIOS setup utility is set so...


