
(English) User Guide
Page 8
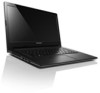
c USB 2.0 port Connects to headphones or headsets. d AC power adapter Connect the AC adapter here. The combo audio jack does not support conventional microphones. Note: For details, see "Using memory cards (not supplied)" on page 16. b Combo audio jack Connects to USB devices. Getting to know your computer Right-side view a b c d a Memory card slot Insert memory cards (not supplied) here. Note: For details, see "Connecting USB devices" on page 9. 4 Chapter 1. jack Note: For details, see "Using AC adapter and battery" on page 17.
c USB 2.0 port Connects to headphones or headsets. d AC power adapter Connect the AC adapter here. The combo audio jack does not support conventional microphones. Note: For details, see "Using memory cards (not supplied)" on page 16. b Combo audio jack Connects to USB devices. Getting to know your computer Right-side view a b c d a Memory card slot Insert memory cards (not supplied) here. Note: For details, see "Connecting USB devices" on page 9. 4 Chapter 1. jack Note: For details, see "Using AC adapter and battery" on page 17.
(English) User Guide
Page 10
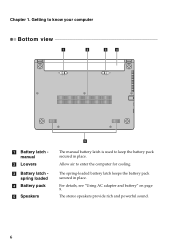
The spring-loaded battery latch keeps the battery pack secured in place. Getting to know your computer Bottom view a b cd a Battery latch manual b Louvers c Battery latch spring loaded d Battery pack e Speakers e The manual battery latch is used to enter the computer for cooling. For details, see "Using AC adapter and battery" on page 9. Allow air to keep the battery pack secured in place. Chapter 1. The stereo speakers provide rich and powerful sound. 6
The spring-loaded battery latch keeps the battery pack secured in place. Getting to know your computer Bottom view a b cd a Battery latch manual b Louvers c Battery latch spring loaded d Battery pack e Speakers e The manual battery latch is used to enter the computer for cooling. For details, see "Using AC adapter and battery" on page 9. Allow air to keep the battery pack secured in place. Chapter 1. The stereo speakers provide rich and powerful sound. 6

(English) User Guide
Page 11
.... The configuration process may need to turn on AC power. Connecting the computer to an electrical outlet 1 Connect the power cord to the AC adapter. 2 Connect the AC adapter to the AC power adapter jack of the computer firmly. 3 Plug the power cord into an electrical outlet. „ Turning on... the computer Press the power button to configure the operating system when ...
.... The configuration process may need to turn on AC power. Connecting the computer to an electrical outlet 1 Connect the power cord to the AC adapter. 2 Connect the AC adapter to the AC power adapter jack of the computer firmly. 3 Plug the power cord into an electrical outlet. „ Turning on... the computer Press the power button to configure the operating system when ...
(English) User Guide
Page 13
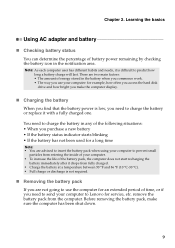
... fully charged one. Before removing the battery pack, make the computer display. „ Charging the battery When you find that the battery power is difficult to Lenovo for a long time Note: • You are advised to insert the battery pack when using your computer to prevent small particles from ...of the battery pack, the computer does not start recharging the battery immediately after it drops from the computer. Learning the basics Using AC adapter and battery „ Checking battery status You can determine the percentage of time, or if you need to charge the battery or replace...
... fully charged one. Before removing the battery pack, make the computer display. „ Charging the battery When you find that the battery power is difficult to Lenovo for a long time Note: • You are advised to insert the battery pack when using your computer to prevent small particles from ...of the battery pack, the computer does not start recharging the battery immediately after it drops from the computer. Learning the basics Using AC adapter and battery „ Checking battery status You can determine the percentage of time, or if you need to charge the battery or replace...
(English) User Guide
Page 22
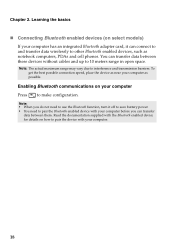
..., PDAs and cell phones. To get the best possible connection speed, place the device as near your computer has an integrated Bluetooth adapter card, it off to save battery power. • You need to make configuration. Note: • When you can transfer data between these devices without cables and up to 10...
..., PDAs and cell phones. To get the best possible connection speed, place the device as near your computer has an integrated Bluetooth adapter card, it off to save battery power. • You need to make configuration. Note: • When you can transfer data between these devices without cables and up to 10...

(English) User Guide
Page 36
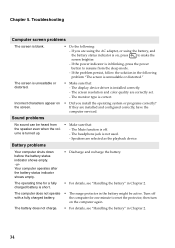
...screen is blank, make sure that might negate the need to refer to the computer and the power cord is on the screen. - Press the power button. 32 The AC adapter is connected to the more comprehensive information in Chapter 2. Touch the touchpad. - Chapter 5. My ...screen goes blank while the • Your screen saver or power management may be enabled. computer is plugged into ...
...screen is blank, make sure that might negate the need to refer to the computer and the power cord is on the screen. - Press the power button. 32 The AC adapter is connected to the more comprehensive information in Chapter 2. Touch the touchpad. - Chapter 5. My ...screen goes blank while the • Your screen saver or power management may be enabled. computer is plugged into ...

(English) User Guide
Page 37
... computer, press and hold the power button for parts and service. • If you cannot turn off . Proof of Lenovo Safety and General Information Guide. Check the power indicator. • If your computer is in sleep mode, connect the AC adapter to the computer, then press any... key or the power button. • If your computer to a Lenovo authorized servicer or a marketing representative...
... computer, press and hold the power button for parts and service. • If you cannot turn off . Proof of Lenovo Safety and General Information Guide. Check the power indicator. • If your computer is in sleep mode, connect the AC adapter to the computer, then press any... key or the power button. • If your computer to a Lenovo authorized servicer or a marketing representative...
(English) User Guide
Page 38
... are selected as the playback device. Speakers are correctly set. - then turn on , press to reset the protector; If the power indicator is unreadable or distorted." Incorrect characters appear on the screen. • Did you are installed and configured correctly, have the computer...The operating time for one minute to make the screen brighter. - The monitor type is installed correctly. - If they are using the AC adapter, or using the battery, and the battery status indicator is blank. • Do the following problem "The screen is in Chapter 2. Turn...
... are selected as the playback device. Speakers are correctly set. - then turn on , press to reset the protector; If the power indicator is unreadable or distorted." Incorrect characters appear on the screen. • Did you are installed and configured correctly, have the computer...The operating time for one minute to make the screen brighter. - The monitor type is installed correctly. - If they are using the AC adapter, or using the battery, and the battery status indicator is blank. • Do the following problem "The screen is in Chapter 2. Turn...
(English) User Guide
Page 40
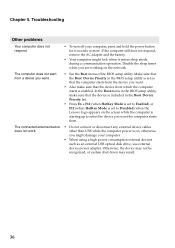
.... • Do not connect or disconnect any external device cables other than USB while the computer power is on the screen while the computer is starting up to Disabled) when the Lenovo logo appears on ; In the Boot menu in the Boot Device Priority list. • Press ...problems Your computer does not respond. • To turn off your computer. • When using a high power consumption external devices such as an external USB optical disk drive, use external device power adapter. Disable the sleep timer when you might lock when it enters sleep mode during a communication operation.
.... • Do not connect or disconnect any external device cables other than USB while the computer power is on the screen while the computer is starting up to Disabled) when the Lenovo logo appears on ; In the Boot menu in the Boot Device Priority list. • Press ...problems Your computer does not respond. • To turn off your computer. • When using a high power consumption external devices such as an external USB optical disk drive, use external device power adapter. Disable the sleep timer when you might lock when it enters sleep mode during a communication operation.
Hardware Maintenance Manual
Page 3
... board 17 Important information about replacing RoHS compliant FRUs 18 General checkout 19 What to do first 20 Power system checkout 21 Checking the AC adapter 21 Checking operational charging 21 Checking the battery pack 22 Related service information 23 Restoring the factory contents ... 23 Supplemental Recovery Disc 23 Passwords 24 Power-on password 24 Hard-disk password 24 Supervisor password 24 Power management 25 Screen blank state 25 Putting your computer into sleep state or shutting it down 25 Lenovo IdeaPad S405 26 Specifications 26 Status indicators 28 Hotkeys 30...
... board 17 Important information about replacing RoHS compliant FRUs 18 General checkout 19 What to do first 20 Power system checkout 21 Checking the AC adapter 21 Checking operational charging 21 Checking the battery pack 22 Related service information 23 Restoring the factory contents ... 23 Supplemental Recovery Disc 23 Passwords 24 Power-on password 24 Hard-disk password 24 Supervisor password 24 Power management 25 Screen blank state 25 Putting your computer into sleep state or shutting it down 25 Lenovo IdeaPad S405 26 Specifications 26 Status indicators 28 Hotkeys 30...
Hardware Maintenance Manual
Page 25
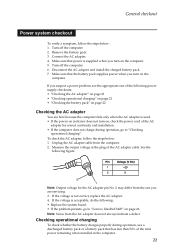
... pack. 3. General checkout Power system checkout To verify a symptom, follow the steps below : 1. Turn off the computer. 2. Disconnect the AC adapter and install the charged battery pack. 7. Measure the output voltage at the plug of the following : • Replace the system board. • If the problem persists, go to "Lenovo IdeaPad S405" on page 22...
... pack. 3. General checkout Power system checkout To verify a symptom, follow the steps below : 1. Turn off the computer. 2. Disconnect the AC adapter and install the charged battery pack. 7. Measure the output voltage at the plug of the following : • Replace the system board. • If the problem persists, go to "Lenovo IdeaPad S405" on page 22...

Hardware Maintenance Manual
Page 60
Lenovo IdeaPad S405 Hardware Maintenance Manual Bottom and Right-side view a AC power adapter jack b USB 2.0 port c Combo audio jack d Memory card slot e Battery latch -manual f Battery latch -spring loaded g Battery pack h Louvers i Speakers f h g e a b b c d i 56
Lenovo IdeaPad S405 Hardware Maintenance Manual Bottom and Right-side view a AC power adapter jack b USB 2.0 port c Combo audio jack d Memory card slot e Battery latch -manual f Battery latch -spring loaded g Battery pack h Louvers i Speakers f h g e a b b c d i 56

Hardware Maintenance Manual
Page 62
Lenovo IdeaPad S405 Hardware Maintenance Manual Parts list This section presents the following service parts: • "Overall" on page 59 • "LCD FRUs" on page 62 • "Keyboard" on page 64 • "Miscellaneous parts" on page 68 • "AC adapters" on page 69 • "Power cords" on page 70 Notes: • Each FRU is available for all types or models, unless specific types or models are specified. 58
Lenovo IdeaPad S405 Hardware Maintenance Manual Parts list This section presents the following service parts: • "Overall" on page 59 • "LCD FRUs" on page 62 • "Keyboard" on page 64 • "Miscellaneous parts" on page 68 • "AC adapters" on page 69 • "Power cords" on page 70 Notes: • Each FRU is available for all types or models, unless specific types or models are specified. 58

