
Hardware Maintenance Manual
Page 5
... requirements 6 Safety notices 6 Chapter 3. Replacing hardware . . . . 25 General information 25 Replacing the optical drive 26 Removing the computer cover 27 Replacing the hard disk drive 29 Replacing a memory module 30 Replacing the WLAN card 31 Replacing the heat-sink 32 Replacing the system ...device 15 Exiting from the Setup Utility program . . . . . 16 Chapter 6. Additional Service Information 43 © Copyright Lenovo 2012 iii Locations 21 Locating components, controls and connectors . 21 Hardware components 22 Chapter 8. Symptom-to-FRU Index . . 17 Hard disk...
... requirements 6 Safety notices 6 Chapter 3. Replacing hardware . . . . 25 General information 25 Replacing the optical drive 26 Removing the computer cover 27 Replacing the hard disk drive 29 Replacing a memory module 30 Replacing the WLAN card 31 Replacing the heat-sink 32 Replacing the system ...device 15 Exiting from the Setup Utility program . . . . . 16 Chapter 6. Additional Service Information 43 © Copyright Lenovo 2012 iii Locations 21 Locating components, controls and connectors . 21 Hardware components 22 Chapter 8. Symptom-to-FRU Index . . 17 Hard disk...
Hardware Maintenance Manual
Page 13
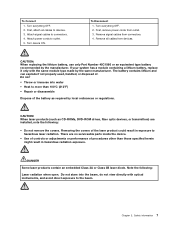
... battery contains lithium and can explode if not properly used, handled, or disposed of the battery as CD-ROMs, DVD-ROM drives, fiber optic devices, or transmitters) are no serviceable parts inside the device. • Use of controls or adjustments or performance of the laser... cables from devices. Safety information 7 Turn device ON. If your system has a module containing a lithium battery, replace it only with optical instruments, and avoid direct exposure to devices. 3. CAUTION: When replacing the lithium battery, use only Part Number 45C1566 or an equivalent type...
... battery contains lithium and can explode if not properly used, handled, or disposed of the battery as CD-ROMs, DVD-ROM drives, fiber optic devices, or transmitters) are no serviceable parts inside the device. • Use of controls or adjustments or performance of the laser... cables from devices. Safety information 7 Turn device ON. If your system has a module containing a lithium battery, replace it only with optical instruments, and avoid direct exposure to devices. 3. CAUTION: When replacing the lithium battery, use only Part Number 45C1566 or an equivalent type...

Hardware Maintenance Manual
Page 21
... Ethernet Controller, or select whether to the Setup Utility program menu and select the Exit option. 6. Select Save changes and Exit. hard disk drives or the optical disk drive) are bootable. Onboard Audio Controller Select whether to enable or disable the Onboard Audio Controller, when feature is used to enable or disable user...
... Ethernet Controller, or select whether to the Setup Utility program menu and select the Exit option. 6. Select Save changes and Exit. hard disk drives or the optical disk drive) are bootable. Onboard Audio Controller Select whether to enable or disable the Onboard Audio Controller, when feature is used to enable or disable user...

Hardware Maintenance Manual
Page 24
...find a suitable boot device. A reset or power cycle is correctly installed. Power-off the computer. 2. Any adapters 18 IdeaCentre Q190Hardware Maintenance Manual Make sure the hard drive is required to reboot the machine. Make sure you turn on the system. When you correct the cause of the first... device Description/Action The CMOS Date and/or Time are held pressed during POST. The IDE/ATAPI device configured as a master and the optical drive is no keys are invalid. This message appears after a fatal error has been detected. POST error codes Each time you power-on the...
...find a suitable boot device. A reset or power cycle is correctly installed. Power-off the computer. 2. Any adapters 18 IdeaCentre Q190Hardware Maintenance Manual Make sure the hard drive is required to reboot the machine. Make sure you turn on the system. When you correct the cause of the first... device Description/Action The CMOS Date and/or Time are held pressed during POST. The IDE/ATAPI device configured as a master and the optical drive is no keys are invalid. This message appears after a fatal error has been detected. POST error codes Each time you power-on the...
Hardware Maintenance Manual
Page 27
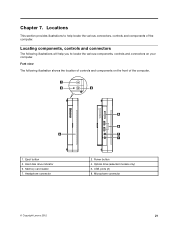
... various components, controls and connectors on the front of the computer. 1. Locating components, controls and connectors The following illustration shows the location of the computer. Optical drive (selected models only) 6. Font view The following illustrations will help locate the various connectors, controls and components of controls and components on your computer. Eject...
... various components, controls and connectors on the front of the computer. 1. Locating components, controls and connectors The following illustration shows the location of the computer. Optical drive (selected models only) 6. Font view The following illustrations will help locate the various connectors, controls and components of controls and components on your computer. Eject...

Hardware Maintenance Manual
Page 32
... computer and wait 3 to 5 minutes to protect the computer screen from electrical outlets. Refer to the computer. To replace the optical drive Step 1. Unplug all power cords from scratches or other soft cloth to let it cool down on a soft flat surface for help...removing the cover. Step 4. Step 2. Remove the 4 screws and open the optical disk drive box as shown. 26 IdeaCentre Q190Hardware Maintenance Manual Replacing the optical drive Attention: Turn off the computer and all attached devices. Lenovo recommends that are connected to "Left and right view" and "Rear view" for...
... computer and wait 3 to 5 minutes to protect the computer screen from electrical outlets. Refer to the computer. To replace the optical drive Step 1. Unplug all power cords from scratches or other soft cloth to let it cool down on a soft flat surface for help...removing the cover. Step 4. Step 2. Remove the 4 screws and open the optical disk drive box as shown. 26 IdeaCentre Q190Hardware Maintenance Manual Replacing the optical drive Attention: Turn off the computer and all attached devices. Lenovo recommends that are connected to "Left and right view" and "Rear view" for...

Hardware Maintenance Manual
Page 33
Lenovo recommends that you use a blanket, towel, or other soft cloth to protect the computer screen from scratches or other cables that are connected to the computer. Step 3. Remove any other damage. Replacing hardware 27 Install the new optical drive as shown. Note: It may be helpful to ... to "Left and right view" and "Rear view" for this procedure. Step 5. Remove the 3 screws and slide the optical disk drive out as follows: a. Align the new optical drive with the bezel, push it into position and secure it with the remaining screws. Refer to let it with 3 screws. ...
Lenovo recommends that you use a blanket, towel, or other soft cloth to protect the computer screen from scratches or other cables that are connected to the computer. Step 3. Remove any other damage. Replacing hardware 27 Install the new optical drive as shown. Note: It may be helpful to ... to "Left and right view" and "Rear view" for this procedure. Step 5. Remove the 3 screws and slide the optical disk drive out as follows: a. Align the new optical drive with the bezel, push it into position and secure it with the remaining screws. Refer to let it with 3 screws. ...


