User Guide
Page 20
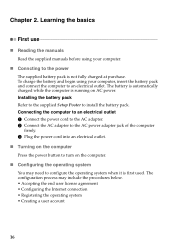
... to the power The supplied battery pack is running on AC power. Installing the battery pack Refer to the supplied Setup Poster to an electrical outlet. The battery is automatically charged while the computer is not fully charged at purchase. Chapter 2. To charge the battery and begin using your computer, insert the battery pack and connect the computer...
... to the power The supplied battery pack is running on AC power. Installing the battery pack Refer to the supplied Setup Poster to an electrical outlet. The battery is automatically charged while the computer is not fully charged at purchase. Chapter 2. To charge the battery and begin using your computer, insert the battery pack and connect the computer...
User Guide
Page 22
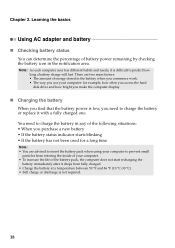
...disk drive and how bright you make the computer display. „ Charging the battery When you find that the battery power is not required. 18 You need to charge the battery in the notification area. Chapter 2. Note: As each computer user ...battery immediately after it drops from fully charged. • Charge the battery at a temperature between 50 °F and 86 °F (10 °C-30 °C). • Full charge or discharge is low, you use your computer: for a long time Note: • You are advised to insert the battery pack when using your computer to predict how long a battery charge...
...disk drive and how bright you make the computer display. „ Charging the battery When you find that the battery power is not required. 18 You need to charge the battery in the notification area. Chapter 2. Note: As each computer user ...battery immediately after it drops from fully charged. • Charge the battery at a temperature between 50 °F and 86 °F (10 °C-30 °C). • Full charge or discharge is low, you use your computer: for a long time Note: • You are advised to insert the battery pack when using your computer to predict how long a battery charge...
User Guide
Page 40
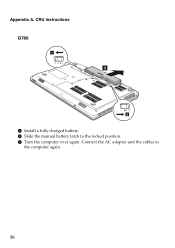
CRU instructions G780 1 3 2 4 Install a fully charged battery. 5 Slide the manual battery latch to the computer again. 36 Appendix A. Connect the AC adapter and the cables to the locked position. 6 Turn the computer over again.
CRU instructions G780 1 3 2 4 Install a fully charged battery. 5 Slide the manual battery latch to the computer again. 36 Appendix A. Connect the AC adapter and the cables to the locked position. 6 Turn the computer over again.
User Guide
Page 57
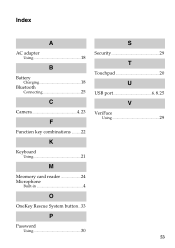
Index A AC adapter Using 18 B Battery Charging 18 Bluetooth Connecting 25 C Camera 4, 23 F Function key combinations ...........22 K Keyboard Using 21 M Meomory card reader 24 Microphone Built-in 4 O OneKey Rescue System button...33 P Password Using 30 S Security 29 T Touchpad 20 U USB port 6, 8, 25 V VeriFace Using 29 53
Index A AC adapter Using 18 B Battery Charging 18 Bluetooth Connecting 25 C Camera 4, 23 F Function key combinations ...........22 K Keyboard Using 21 M Meomory card reader 24 Microphone Built-in 4 O OneKey Rescue System button...33 P Password Using 30 S Security 29 T Touchpad 20 U USB port 6, 8, 25 V VeriFace Using 29 53
Hardware Maintenance Manual
Page 3
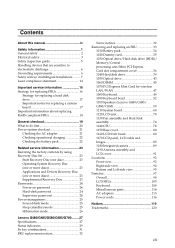
...FRUs 18 General checkout 19 What to do first 20 Power system checkout 21 Checking the AC adapter 21 Checking operational charging 22 Checking the battery pack 22 Related service information 23 Restoring the factory contents by using Recovery Disc Set 23 Start Recovery Disc (one ...disk password 24 Supervisor password 24 Power management 25 Screen blank mode 25 Sleep (standby) mode 25 Hibernation mode 26 Lenovo G480/G485/G580/G585/G780 ........27 Specifications 27 Status indicators 29 Fn key combinations 31 FRU replacement notices 32 Screw notices 32 Removing and replacing ...
...FRUs 18 General checkout 19 What to do first 20 Power system checkout 21 Checking the AC adapter 21 Checking operational charging 22 Checking the battery pack 22 Related service information 23 Restoring the factory contents by using Recovery Disc Set 23 Start Recovery Disc (one ...disk password 24 Supervisor password 24 Power management 25 Screen blank mode 25 Sleep (standby) mode 25 Hibernation mode 26 Lenovo G480/G485/G580/G585/G780 ........27 Specifications 27 Status indicators 29 Fn key combinations 31 FRU replacement notices 32 Screw notices 32 Removing and replacing ...
Hardware Maintenance Manual
Page 10
... of a grounded work mat to guard against ESD damage is insulative and retains a charge even when you use an ESD common ground or reference point. Most clothing is desirable... noted here. 2. Grounding requirements Electrical grounding of the ac plug on a double-insulated or battery-operated system, use have been certified (ISO 9000) as those listed below, to any frame...occur when there is required for operator safety and correct system function. Lenovo G480/G485/G580/G585/G780 Hardware Maintenance Manual Handling devices that are sensitive to electrostatic discharge Any...
... of a grounded work mat to guard against ESD damage is insulative and retains a charge even when you use an ESD common ground or reference point. Most clothing is desirable... noted here. 2. Grounding requirements Electrical grounding of the ac plug on a double-insulated or battery-operated system, use have been certified (ISO 9000) as those listed below, to any frame...occur when there is required for operator safety and correct system function. Lenovo G480/G485/G580/G585/G780 Hardware Maintenance Manual Handling devices that are sensitive to electrostatic discharge Any...
Hardware Maintenance Manual
Page 25
..., do the following power supply checkouts: • "Checking the AC adapter" on page 21 • "Checking operational charging" on page 22 • "Checking the battery pack" on page 22 Checking the AC adapter You are servicing. 3. Make sure that power is not correct, replace the...• If the problem persists, go to "Lenovo G480/G485/G580/G585/G780" on , check the power cord of the AC adapter cable. Make sure that the battery pack supplies power when you turn on the computer. Remove the battery pack. 3. Disconnect the AC adapter and install the charged battery pack. 7.
..., do the following power supply checkouts: • "Checking the AC adapter" on page 21 • "Checking operational charging" on page 22 • "Checking the battery pack" on page 22 Checking the AC adapter You are servicing. 3. Make sure that power is not correct, replace the...• If the problem persists, go to "Lenovo G480/G485/G580/G585/G780" on , check the power cord of the AC adapter cable. Make sure that the battery pack supplies power when you turn on the computer. Remove the battery pack. 3. Disconnect the AC adapter and install the charged battery pack. 7.
Hardware Maintenance Manual
Page 26
... than +9V DC, perhaps the battery has entered into overdischarge protection mode, pre-charge the battery with AC, please replace the battery if battery capacity can charge to 30 KΩ. Lenovo G480/G485/G580/G585/G780 Hardware Maintenance Manual Checking operational charging To check whether the battery charges properly during operation, use a discharged battery pack or a battery pack that less than 95% of...
... than +9V DC, perhaps the battery has entered into overdischarge protection mode, pre-charge the battery with AC, please replace the battery if battery capacity can charge to 30 KΩ. Lenovo G480/G485/G580/G585/G780 Hardware Maintenance Manual Checking operational charging To check whether the battery charges properly during operation, use a discharged battery pack or a battery pack that less than 95% of...
Hardware Maintenance Manual
Page 34
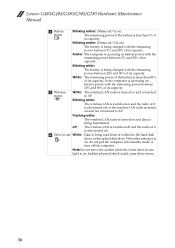
... with the remaining power between 20% and 80% of its capacity. Lenovo G480/G485/G580/G585/G780 Hardware Maintenance Manual d Battery status Blinking amber: (500ms off/1s on) The remaining power of the battery is operating on battery power with the remaining power between 5% and 20% of its capacity. Amber... (100ms off and the radio of its capacity. Sudden physical shock could cause drive errors. 30 Blinking white: e Wireless status The battery is being charged with the remaining power between 20% and 80% of it is turned on and connected to AP. Flashing white: The wireless LAN ...
... with the remaining power between 20% and 80% of its capacity. Lenovo G480/G485/G580/G585/G780 Hardware Maintenance Manual d Battery status Blinking amber: (500ms off/1s on) The remaining power of the battery is operating on battery power with the remaining power between 5% and 20% of its capacity. Amber... (100ms off and the radio of its capacity. Sudden physical shock could cause drive errors. 30 Blinking white: e Wireless status The battery is being charged with the remaining power between 20% and 80% of it is turned on and connected to AP. Flashing white: The wireless LAN ...


