User Guide
Page 2
.... • The illustrations in Contract No. First Edition (December 2011) © Copyright Lenovo 2011. Please refer to the actual product. • To learn more about Lenovo Applications, go to restrictions set forth in this manual may not apply to most models. LIMITED AND RESTRICTED RIGHTS NOTICE: If data or software is delivered pursuant...
.... • The illustrations in Contract No. First Edition (December 2011) © Copyright Lenovo 2011. Please refer to the actual product. • To learn more about Lenovo Applications, go to restrictions set forth in this manual may not apply to most models. LIMITED AND RESTRICTED RIGHTS NOTICE: If data or software is delivered pursuant...
User Guide
Page 3
... 32 Chapter 4. OneKey Rescue system 33 OneKey Rescue system 33 Appendix A. Contents Chapter 1. Connecting to know your computer 29 About NVIDIA® OptimusTM (on select models 30 Chapter 3. CRU instructions 35 Replacing the battery 35 Replacing the hard disk drive 37 Replacing memory ...44 Replacing the wireless LAN card 48 Removing...
... 32 Chapter 4. OneKey Rescue system 33 OneKey Rescue system 33 Appendix A. Contents Chapter 1. Connecting to know your computer 29 About NVIDIA® OptimusTM (on select models 30 Chapter 3. CRU instructions 35 Replacing the battery 35 Replacing the hard disk drive 37 Replacing memory ...44 Replacing the wireless LAN card 48 Removing...
User Guide
Page 8
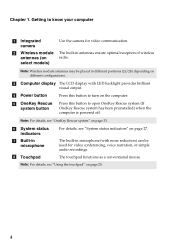
... of wireless radio. Note: Wireless module antennas may be used for video communication. h Touchpad The touchpad functions as a conventional mouse. Getting to turn on select models) Use the camera for video conferencing, voice narration, or simple audio recordings. d Power button Press this button to open OneKey Rescue system (If OneKey Rescue...
... of wireless radio. Note: Wireless module antennas may be used for video communication. h Touchpad The touchpad functions as a conventional mouse. Getting to turn on select models) Use the camera for video conferencing, voice narration, or simple audio recordings. d Power button Press this button to open OneKey Rescue system (If OneKey Rescue...
User Guide
Page 10
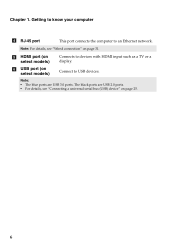
Note: For details, see "Connecting a universal serial bus (USB) device" on page 31. Note: • The blue ports are USB 2.0 ports. • For details, see "Wired connection" on page 25. 6 The black ports are USB 3.0 ports. Chapter 1. e HDMI port (on select models) f USB port (on select models) Connects to USB devices. Connect to devices with HDMI input such as a TV or a display. Getting to know your computer d RJ-45 port This port connects the computer to an Ethernet network.
Note: For details, see "Connecting a universal serial bus (USB) device" on page 31. Note: • The blue ports are USB 2.0 ports. • For details, see "Wired connection" on page 25. 6 The black ports are USB 3.0 ports. Chapter 1. e HDMI port (on select models) f USB port (on select models) Connects to USB devices. Connect to devices with HDMI input such as a TV or a display. Getting to know your computer d RJ-45 port This port connects the computer to an Ethernet network.
User Guide
Page 12
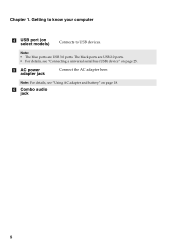
Note: For details, see "Connecting a universal serial bus (USB) device" on page 25. Chapter 1. f Combo audio jack 8 e AC power adapter jack Connect the AC adapter here. The black ports are USB 3.0 ports. Getting to USB devices. Note: • The blue ports are USB 2.0 ports. • For details, see "Using AC adapter and battery" on select models) Connects to know your computer d USB port (on page 18.
Note: For details, see "Connecting a universal serial bus (USB) device" on page 25. Chapter 1. f Combo audio jack 8 e AC power adapter jack Connect the AC adapter here. The black ports are USB 3.0 ports. Getting to USB devices. Note: • The blue ports are USB 2.0 ports. • For details, see "Using AC adapter and battery" on select models) Connects to know your computer d USB port (on page 18.
User Guide
Page 19
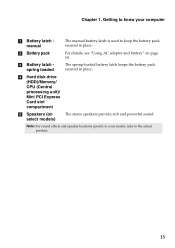
Getting to know your model, refer to keep the battery pack secured in place. The spring-loaded battery latch keeps the battery pack secured in place. Note: For sound effects ... Express Card slot compartment e Speakers (on page 18. Chapter 1. b Battery pack c Battery latch spring loaded For details, see "Using AC adapter and battery" on select models) The stereo speakers provide rich and powerful sound.
Getting to know your model, refer to keep the battery pack secured in place. The spring-loaded battery latch keeps the battery pack secured in place. Note: For sound effects ... Express Card slot compartment e Speakers (on page 18. Chapter 1. b Battery pack c Battery latch spring loaded For details, see "Using AC adapter and battery" on select models) The stereo speakers provide rich and powerful sound.
User Guide
Page 29
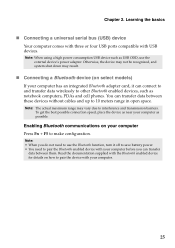
... as near your computer Press Fn + F5 to 10 meters range in open space. You can transfer data between them. Enabling Bluetooth communications on select models) If your computer before you do not need to use the external device's power adapter. Otherwise, the device may not be recognized, and system shut...
... as near your computer Press Fn + F5 to 10 meters range in open space. You can transfer data between them. Enabling Bluetooth communications on select models) If your computer before you do not need to use the external device's power adapter. Otherwise, the device may not be recognized, and system shut...
User Guide
Page 33
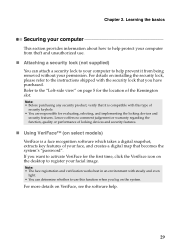
Lenovo offers no comment judgement or warranty regarding the function, quality or performance of security keyhole. • You are responsible for evaluating, selecting, and implementing the ... attach a security lock to your computer from theft and unauthorized use this type of locking devices and security features. „ Using VeriFace™ (on select models) VeriFace is compatible with this function when you have purchased. Note: • Before purchasing any security product, verify that becomes the system's "password". For details...
Lenovo offers no comment judgement or warranty regarding the function, quality or performance of security keyhole. • You are responsible for evaluating, selecting, and implementing the ... attach a security lock to your computer from theft and unauthorized use this type of locking devices and security features. „ Using VeriFace™ (on select models) VeriFace is compatible with this function when you have purchased. Note: • Before purchasing any security product, verify that becomes the system's "password". For details...
User Guide
Page 34
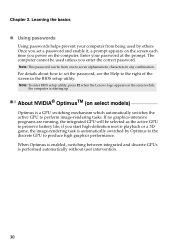
... be used by Optimus to the discrete GPU to perform image-rendering tasks. Note: To enter BIOS setup utility, press F2 when the Lenovo logo appears on select models Optimus is performed automatically without user intervention. 30 Enter your computer from one to seven alphanumeric characters in the BIOS setup utility. If...
... be used by Optimus to the discrete GPU to perform image-rendering tasks. Note: To enter BIOS setup utility, press F2 when the Lenovo logo appears on select models Optimus is performed automatically without user intervention. 30 Enter your computer from one to seven alphanumeric characters in the BIOS setup utility. If...
User Guide
Page 36
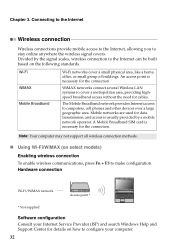
Mobile networks are used for data transmission, and access is necessary for details on select models) Enabling wireless connection To enable wireless communications, press Fn + F5 to cover a metropolitan area, providing highspeed broadband access without the need for the connection. WiMAX ...
Mobile networks are used for data transmission, and access is necessary for details on select models) Enabling wireless connection To enable wireless communications, press Fn + F5 to cover a metropolitan area, providing highspeed broadband access without the need for the connection. WiMAX ...
User Guide
Page 48
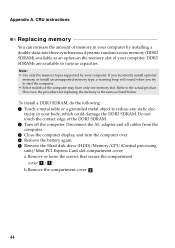
.... If you incorrectly install optional memory, or install an unsupported memory type, a warning beep will sound when you try to start the computer. • Select models of the DDR3 SDRAM. 2 Turn off the computer. b.Remove the compartment cover b. 44 Note: • Use only the memory types supported by installing a double-data...
.... If you incorrectly install optional memory, or install an unsupported memory type, a warning beep will sound when you try to start the computer. • Select models of the DDR3 SDRAM. 2 Turn off the computer. b.Remove the compartment cover b. 44 Note: • Use only the memory types supported by installing a double-data...
User Guide
Page 52
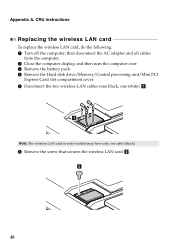
... unit/Mini PCI Express Card slot compartment cover. 5 Disconnect the two wireless LAN cables (one black, one white) a . 1 Note: The wireless LAN card in select models may have only one cable (black). 6 Remove the screw that secures the wireless LAN card b. 2 48
... unit/Mini PCI Express Card slot compartment cover. 5 Disconnect the two wireless LAN cables (one black, one white) a . 1 Note: The wireless LAN card in select models may have only one cable (black). 6 Remove the screw that secures the wireless LAN card b. 2 48

User Guide
Page 53
... (MAIN) into the jack labeled 1. A Reinstall the compartment cover and tighten the screws. Appendix A. Plug the white cable (AUX) into the jack labeled 2. • In models with a wireless LAN card that has only one white). C Turn the computer over again. B Reinstall the battery pack. Connect the AC adapter and the cables...
... (MAIN) into the jack labeled 1. A Reinstall the compartment cover and tighten the screws. Appendix A. Plug the white cable (AUX) into the jack labeled 2. • In models with a wireless LAN card that has only one white). C Turn the computer over again. B Reinstall the battery pack. Connect the AC adapter and the cables...
Hardware Maintenance Manual
Page 18
... de procedimentos diferentes daqueles aqui especificados pode resultar em perigosa exposição à radiação. Werden Steuer- Lenovo G480/G485/G580/G585/G780 Hardware Maintenance Manual Laser compliance statement Some models of Lenovo computer are equipped from the factory with an optical storage device such as options. to conform to the requirements...
... de procedimentos diferentes daqueles aqui especificados pode resultar em perigosa exposição à radiação. Werden Steuer- Lenovo G480/G485/G580/G585/G780 Hardware Maintenance Manual Laser compliance statement Some models of Lenovo computer are equipped from the factory with an optical storage device such as options. to conform to the requirements...
Hardware Maintenance Manual
Page 23
... such write operations as cosmic radiation, electrostatic discharge, or software errors. If you suspect that the machine model and the FRU part number are servicing sequence might be replaced just because of the correct model. If the error does not recur, do not replace the FRU. • Be careful not to replace...
... such write operations as cosmic radiation, electrostatic discharge, or software errors. If you suspect that the machine model and the FRU part number are servicing sequence might be replaced just because of the correct model. If the error does not recur, do not replace the FRU. • Be careful not to replace...

Hardware Maintenance Manual
Page 24
... have been subjected to the following list: The following are not covered under the warranty by the customer. Machine type, model number, and serial number 8. Date of service 3. Lenovo G480/G485/G580/G585/G780 Hardware Maintenance Manual What to do first When you do return an FRU, you must include the following information...
... have been subjected to the following list: The following are not covered under the warranty by the customer. Machine type, model number, and serial number 8. Date of service 3. Lenovo G480/G485/G580/G585/G780 Hardware Maintenance Manual What to do first When you do return an FRU, you must include the following information...
Hardware Maintenance Manual
Page 27
... Next. 4. Insert the Operating System Recovery Disc when prompted and click Yes to begin the applications and drivers recovery process. 6. Start the computer. When the Lenovo logo comes up device. Follow the on the computer. Order the Recovery Disc Set and the drive at the same time so that was preloaded... process. 3. Read the license. Related service information Related service information This chapter presents the following : 1. If you must use the Recovery Disc Set for specific models and updates to the original factory configuration.
... Next. 4. Insert the Operating System Recovery Disc when prompted and click Yes to begin the applications and drivers recovery process. 6. Start the computer. When the Lenovo logo comes up device. Follow the on the computer. Order the Recovery Disc Set and the drive at the same time so that was preloaded... process. 3. Read the license. Related service information Related service information This chapter presents the following : 1. If you must use the Recovery Disc Set for specific models and updates to the original factory configuration.
Hardware Maintenance Manual
Page 42
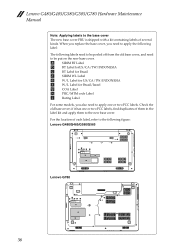
... two FCC labels, find duplicates of them in the label kit and apply them to the new base cover. Check the old base cover; Lenovo G480/G485/G580/G585/G780 Hardware Maintenance Manual Note: Applying labels to the base cover The new base cover FRU is shipped with a kit containing labels of... for Brazil SIRIM WL Label W/L Label for US/CA/TW/INDONESIA W/L Label for Brazil/Israel COA Label PRC/MTM code Label Rating Label For some models, you need to apply the following label: The following figure: Lenovo G480/G485/G580/G585 38 c b de f a g h i Lenovo G780 c b de f a g i h
... two FCC labels, find duplicates of them in the label kit and apply them to the new base cover. Check the old base cover; Lenovo G480/G485/G580/G585/G780 Hardware Maintenance Manual Note: Applying labels to the base cover The new base cover FRU is shipped with a kit containing labels of... for Brazil SIRIM WL Label W/L Label for US/CA/TW/INDONESIA W/L Label for Brazil/Israel COA Label PRC/MTM code Label Rating Label For some models, you need to apply the following label: The following figure: Lenovo G480/G485/G580/G585 38 c b de f a g h i Lenovo G780 c b de f a g i h
Hardware Maintenance Manual
Page 51
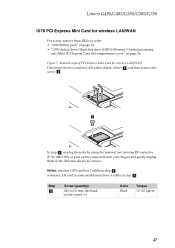
Lenovo G480/G485/G580/G585/G780 1070 PCI Express Mini Card for wireless LAN/WAN Disconnect the two wireless LAN cables (black, white) a, and then remove the screw b. 1 2 In step a, ... cover" on page 36 Figure 7. Step b Screw (quantity) M2.0×3.0 mm, flat-head, nylok-coated (1) Color Black Torque 1.5-2.0 kgfcm 47 wireless LAN card in some models may have 3 cables in step a.
Lenovo G480/G485/G580/G585/G780 1070 PCI Express Mini Card for wireless LAN/WAN Disconnect the two wireless LAN cables (black, white) a, and then remove the screw b. 1 2 In step a, ... cover" on page 36 Figure 7. Step b Screw (quantity) M2.0×3.0 mm, flat-head, nylok-coated (1) Color Black Torque 1.5-2.0 kgfcm 47 wireless LAN card in some models may have 3 cables in step a.
Hardware Maintenance Manual
Page 52
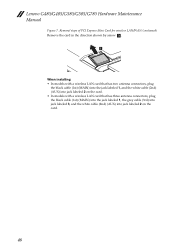
Removal steps of PCI Express Mini Card for wireless LAN/WAN (continued) Remove the card in the direction shown by arrow c . 3 When installing: • In models with a wireless LAN card that has two antenna connectors, plug the black cable (1st) (MAIN) into the jack labeled 1, and the white cable (2nd) (AUX...) into jack labeled 2 on the card. • In models with a wireless LAN card that has three antenna connectors, plug the black cable (1st) (MAIN) into the jack labeled 1, the grey cable (3rd) into jack...
Removal steps of PCI Express Mini Card for wireless LAN/WAN (continued) Remove the card in the direction shown by arrow c . 3 When installing: • In models with a wireless LAN card that has two antenna connectors, plug the black cable (1st) (MAIN) into the jack labeled 1, and the white cable (2nd) (AUX...) into jack labeled 2 on the card. • In models with a wireless LAN card that has three antenna connectors, plug the black cable (1st) (MAIN) into the jack labeled 1, the grey cable (3rd) into jack...

