User Guide
Page 1
Lenovo G480/G485/ G580/G585/G780 User Guide V1.0 Read the safety notices and important tips in the included manuals before using your computer.
Lenovo G480/G485/ G580/G585/G780 User Guide V1.0 Read the safety notices and important tips in the included manuals before using your computer.
User Guide
Page 2
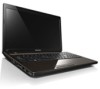
... General Services Administration "GSA" contract, use, reproduction, or disclosure is subject to : http://www.lenovo.com. GS-35F-05925. Some features may not be available on your computer and/or your computer may include features that are not described in this user guide. • The illustrations used in... this manual are for Lenovo G580 unless otherwise stated. • The illustrations in this guide ...
... General Services Administration "GSA" contract, use, reproduction, or disclosure is subject to : http://www.lenovo.com. GS-35F-05925. Some features may not be available on your computer and/or your computer may include features that are not described in this user guide. • The illustrations used in... this manual are for Lenovo G580 unless otherwise stated. • The illustrations in this guide ...
User Guide
Page 3
... battery 18 Using the touchpad 20 Using the keyboard 21 Connecting external devices 24 Special keys and buttons 26 System status indicators 27 Securing your computer 1 Top view ...1 Left-side view ...5 Right-side view...7 Front view ...9 Bottom view ...10 Chapter 2. OneKey Rescue system 33 OneKey Rescue system 33 Appendix A. Contents Chapter...
... battery 18 Using the touchpad 20 Using the keyboard 21 Connecting external devices 24 Special keys and buttons 26 System status indicators 27 Securing your computer 1 Top view ...1 Left-side view ...5 Right-side view...7 Front view ...9 Bottom view ...10 Chapter 2. OneKey Rescue system 33 OneKey Rescue system 33 Appendix A. Contents Chapter...

User Guide
Page 5
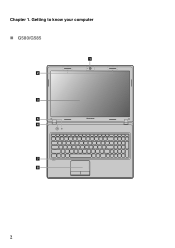
Chapter 1. Getting to know your computer Top view „ G480/G485 1 2 3 5 4 7 8 1
Chapter 1. Getting to know your computer Top view „ G480/G485 1 2 3 5 4 7 8 1
User Guide
Page 6
Getting to know your computer „ G580/G585 1 2 3 5 4 7 8 2 Chapter 1.
Getting to know your computer „ G580/G585 1 2 3 5 4 7 8 2 Chapter 1.
User Guide
Page 7
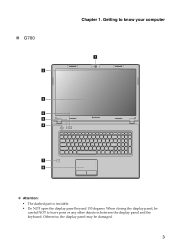
„ G780 2 3 6 5 4 Chapter 1. When closing the display panel, be damaged. 3 Otherwise, the display panel may be careful NOT to know your computer 1 7 8 Attention: • The dashed part is invisible. • Do NOT open the display panel beyond 130 degrees. Getting to leave pens or any other objects in between the display panel and the keyboard.
„ G780 2 3 6 5 4 Chapter 1. When closing the display panel, be damaged. 3 Otherwise, the display panel may be careful NOT to know your computer 1 7 8 Attention: • The dashed part is invisible. • Do NOT open the display panel beyond 130 degrees. Getting to leave pens or any other objects in between the display panel and the keyboard.
User Guide
Page 8
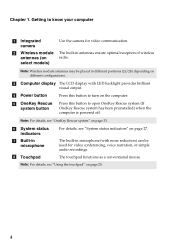
c Computer display The LCD display with noise reduction) can be placed in different positions (2a/2b) depending on page 27. The built-in microphone For details, ...: For details, see "OneKey Rescue system" on page 20. 4 Chapter 1. Getting to open OneKey Rescue system (If OneKey Rescue system has been preinstalled) when the computer is powered off. d Power button Press this button to know your...
c Computer display The LCD display with noise reduction) can be placed in different positions (2a/2b) depending on page 27. The built-in microphone For details, ...: For details, see "OneKey Rescue system" on page 20. 4 Chapter 1. Getting to open OneKey Rescue system (If OneKey Rescue system has been preinstalled) when the computer is powered off. d Power button Press this button to know your...
User Guide
Page 9
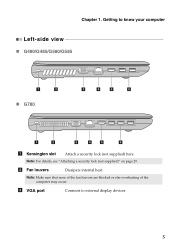
Getting to external display devices. 5 b Fan louvers Dissipate internal heat. Note: Make sure that none of the fan louvers are blocked or else overheating of the computer may occur. Chapter 1. Note: For details, see "Attaching a security lock (not supplied)" on page 29. c VGA port Connects to know your computer Left-side view „ G480/G485/G580/G585 1 2 „ G780 3 4 5 6 1 2 3 4 5 6 a Kensington slot Attach a security lock (not supplied) here.
Getting to external display devices. 5 b Fan louvers Dissipate internal heat. Note: Make sure that none of the fan louvers are blocked or else overheating of the computer may occur. Chapter 1. Note: For details, see "Attaching a security lock (not supplied)" on page 29. c VGA port Connects to know your computer Left-side view „ G480/G485/G580/G585 1 2 „ G780 3 4 5 6 1 2 3 4 5 6 a Kensington slot Attach a security lock (not supplied) here.
User Guide
Page 10
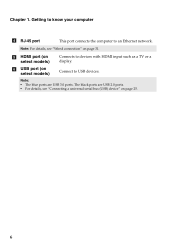
Chapter 1. Connect to an Ethernet network. The black ports are USB 3.0 ports. e HDMI port (on select models) f USB port (on page 31. Note: • The blue ports are USB 2.0 ports. • For details, see "Wired connection" on select models) Connects to devices with HDMI input such as a TV or a display. Note: For details, see "Connecting a universal serial bus (USB) device" on page 25. 6 Getting to know your computer d RJ-45 port This port connects the computer to USB devices.
Chapter 1. Connect to an Ethernet network. The black ports are USB 3.0 ports. e HDMI port (on select models) f USB port (on page 31. Note: • The blue ports are USB 2.0 ports. • For details, see "Wired connection" on select models) Connects to devices with HDMI input such as a TV or a display. Note: For details, see "Connecting a universal serial bus (USB) device" on page 25. 6 Getting to know your computer d RJ-45 port This port connects the computer to USB devices.
User Guide
Page 11
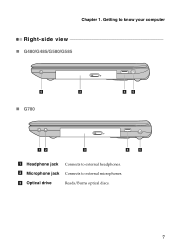
c Optical drive Reads/Burns optical discs. 7 b Microphone jack Connects to external headphones. Chapter 1. Getting to know your computer Right-side view „ G480/G485/G580/G585 6 3 „ G780 45 12 3 4 5 a Headphone jack Connects to external microphones.
c Optical drive Reads/Burns optical discs. 7 b Microphone jack Connects to external headphones. Chapter 1. Getting to know your computer Right-side view „ G480/G485/G580/G585 6 3 „ G780 45 12 3 4 5 a Headphone jack Connects to external microphones.
User Guide
Page 12
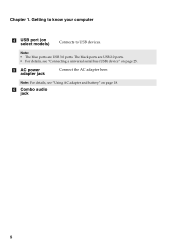
The black ports are USB 3.0 ports. Note: For details, see "Connecting a universal serial bus (USB) device" on page 18. Getting to know your computer d USB port (on select models) Connects to USB devices. f Combo audio jack 8 e AC power adapter jack Connect the AC adapter here. Note: • The blue ports are USB 2.0 ports. • For details, see "Using AC adapter and battery" on page 25. Chapter 1.
The black ports are USB 3.0 ports. Note: For details, see "Connecting a universal serial bus (USB) device" on page 18. Getting to know your computer d USB port (on select models) Connects to USB devices. f Combo audio jack 8 e AC power adapter jack Connect the AC adapter here. Note: • The blue ports are USB 2.0 ports. • For details, see "Using AC adapter and battery" on page 25. Chapter 1.
User Guide
Page 13
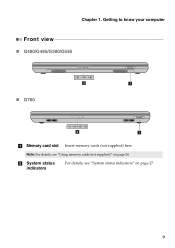
Note: For details, see "System status indicators" on page 24. Getting to know your computer Front view „ G480/G485/G580/G585 „ G780 2 1 2 1 a Memory card slot Insert memory cards (not supplied) here. b System status indicators For details, see "Using memory cards (not supplied)" on page 27. 9 Chapter 1.
Note: For details, see "System status indicators" on page 24. Getting to know your computer Front view „ G480/G485/G580/G585 „ G780 2 1 2 1 a Memory card slot Insert memory cards (not supplied) here. b System status indicators For details, see "Using memory cards (not supplied)" on page 27. 9 Chapter 1.

User Guide
Page 14
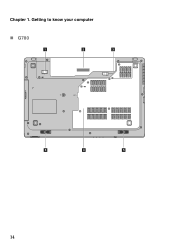
Getting to know your computer Bottom view „ G480/G485 1 2 3 5 4 5 10 Chapter 1.
Getting to know your computer Bottom view „ G480/G485 1 2 3 5 4 5 10 Chapter 1.

User Guide
Page 15
Chapter 1. Getting to know your computer 1 2 3 5 4 5 11
Chapter 1. Getting to know your computer 1 2 3 5 4 5 11

User Guide
Page 16
Getting to know your computer „ G580/G585 1 2 3 5 4 5 12 Chapter 1.
Getting to know your computer „ G580/G585 1 2 3 5 4 5 12 Chapter 1.

User Guide
Page 17
Chapter 1. Getting to know your computer 1 2 3 5 4 5 13
Chapter 1. Getting to know your computer 1 2 3 5 4 5 13
User Guide
Page 18
Getting to know your computer „ G780 1 2 3 5 4 5 14 Chapter 1.
Getting to know your computer „ G780 1 2 3 5 4 5 14 Chapter 1.
User Guide
Page 19
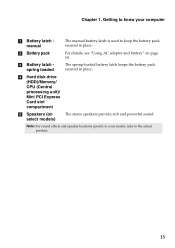
... page 18. The spring-loaded battery latch keeps the battery pack secured in place. Chapter 1. Note: For sound effects and speaker locations specific to your computer a Battery latch manual The manual battery latch is used to the actual product. 15
... page 18. The spring-loaded battery latch keeps the battery pack secured in place. Chapter 1. Note: For sound effects and speaker locations specific to your computer a Battery latch manual The manual battery latch is used to the actual product. 15
User Guide
Page 20
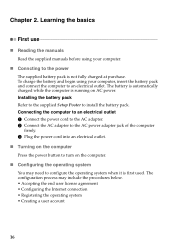
... when it is first used. The battery is automatically charged while the computer is not fully charged at purchase. To charge the battery and begin using your computer, insert the battery pack and connect the computer to an electrical outlet. Learning the basics First use „ Reading ...the manuals Read the supplied manuals before using your computer. „ Conncting to turn on AC power. Connecting the computer to an electrical outlet 1 Connect the power cord to the AC adapter. 2 Connect the AC adapter to ...
... when it is first used. The battery is automatically charged while the computer is not fully charged at purchase. To charge the battery and begin using your computer, insert the battery pack and connect the computer to an electrical outlet. Learning the basics First use „ Reading ...the manuals Read the supplied manuals before using your computer. „ Conncting to turn on AC power. Connecting the computer to an electrical outlet 1 Connect the power cord to the AC adapter. 2 Connect the AC adapter to ...
User Guide
Page 21
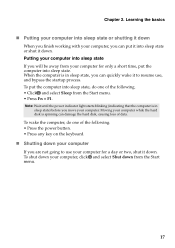
... Press the power button. • Press any key on the keyboard. „ Shutting down your computer If you can quickly wake it to use , and bypass the startup process. To shut down your computer for a day or two, shut it into sleep state. Note: Wait until the power indicator light... starts blinking (indicating that the computer is spinning can put the computer into sleep state or shut it down. Putting your computer into sleep state If you can damage the hard disk, causing loss of the following . •...
... Press the power button. • Press any key on the keyboard. „ Shutting down your computer If you can quickly wake it to use , and bypass the startup process. To shut down your computer for a day or two, shut it into sleep state. Note: Wait until the power indicator light... starts blinking (indicating that the computer is spinning can put the computer into sleep state or shut it down. Putting your computer into sleep state If you can damage the hard disk, causing loss of the following . •...


