Lenovo G470/G475/G570/G575 User Guide V1.0
Page 10
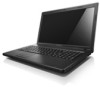
Getting to know your computer. Insert memory cards (not supplied) here. Note: For details, see "Using memory cards (not supplied)" on your computer Front view 1 2 a Integrated wireless device switch (Select models only) b Memory card slot Use this switch to turn on/off the wireless radio of all wireless devices on page 18. 6 Chapter 1.
Getting to know your computer. Insert memory cards (not supplied) here. Note: For details, see "Using memory cards (not supplied)" on your computer Front view 1 2 a Integrated wireless device switch (Select models only) b Memory card slot Use this switch to turn on/off the wireless radio of all wireless devices on page 18. 6 Chapter 1.
Lenovo G470/G475/G570/G575 User Guide V1.0
Page 21
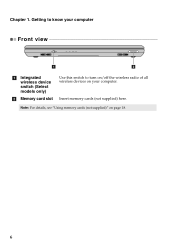
...of Windows Media Player. Fn + F12: Skip to the previous track. Fn + F5: Open the interface for integrated wireless devices settings (on/off the integrated camera. Fn + Insert (G570/G575): Fn + PgUp (G470/G475): Enable/Disable the scroll lock. Fn + End: Activate the break function. Fn +... of the LCD screen. Fn + F3: Open the interface for display resolution settings. Fn + F4: Open the interface for the display device switch to select this notebook or an external display. Fn + F8 (G470/G475): Enable/Disable the numeric keypad. Fn + F2: Turn on /...
...of Windows Media Player. Fn + F12: Skip to the previous track. Fn + F5: Open the interface for integrated wireless devices settings (on/off the integrated camera. Fn + Insert (G570/G575): Fn + PgUp (G470/G475): Enable/Disable the scroll lock. Fn + End: Activate the break function. Fn +... of the LCD screen. Fn + F3: Open the interface for display resolution settings. Fn + F4: Open the interface for the display device switch to select this notebook or an external display. Fn + F8 (G470/G475): Enable/Disable the numeric keypad. Fn + F2: Turn on /...
Lenovo G470/G475/G570/G575 User Guide V1.0
Page 23
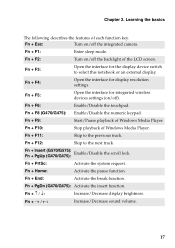
... Bluetooth enabled device for details on your computer as USB ODD, use the Bluetooth function, turn it can connect to and transfer data wirelessly to other Bluetooth enabled devices, such as notebook computers, PDAs and cell phones. Note: When using a high power consumption USB device such... as possible. To get the best possible connection speed, place the device as near your computer 1 Slide the integrated wireless device switch from to . 2 Press Fn + F5 to 10 meters range in open space. You can transfer data between these devices without cables and...
... Bluetooth enabled device for details on your computer as USB ODD, use the Bluetooth function, turn it can connect to and transfer data wirelessly to other Bluetooth enabled devices, such as notebook computers, PDAs and cell phones. Note: When using a high power consumption USB device such... as possible. To get the best possible connection speed, place the device as near your computer 1 Slide the integrated wireless device switch from to . 2 Press Fn + F5 to 10 meters range in open space. You can transfer data between these devices without cables and...
Lenovo G470/G475/G570/G575 User Guide V1.0
Page 32
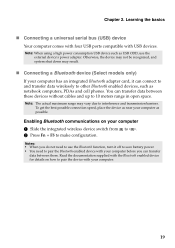
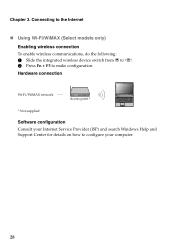
Chapter 3. Hardware connection Wi-Fi/WiMAX network Access point * * Not supplied Software configuration Consult your computer. 28 Connecting to the Internet „ Using Wi-Fi/WiMAX (Select models only) Enabling wireless connection To enable wireless communications, do the following: 1 Slide the integrated wireless device switch from to . 2 Press Fn + F5 to configure your Internet Service Provider (ISP) and search Windows Help and Support Center for details on how to make configuration.
Chapter 3. Hardware connection Wi-Fi/WiMAX network Access point * * Not supplied Software configuration Consult your computer. 28 Connecting to the Internet „ Using Wi-Fi/WiMAX (Select models only) Enabling wireless connection To enable wireless communications, do the following: 1 Slide the integrated wireless device switch from to . 2 Press Fn + F5 to configure your Internet Service Provider (ISP) and search Windows Help and Support Center for details on how to make configuration.
Hardware Maintenance Manual
Page 35
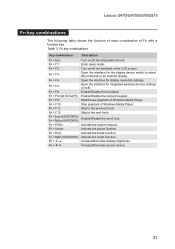
... F1: Enter sleep mode. Fn + / : Increase/Decrease display brightness. Lenovo G470/G475/G570/G575 Fn key combinations The following table shows the function of each combination of Windows...Increase/Decrease sound volume. 31 Fn + F11: Skip to the next track. Fn + Insert (G570/G575): Fn + PgUp (G470/G475): Enable/Disable the scroll lock. Fn + F9: Start/Pause playback of... F6: Enable/Disable the touchpad. Table 3. Fn + F4: Open the interface for integrated wireless devices settings (on/off the integrated camera. Fn + F5: Open the interface for display ...
... F1: Enter sleep mode. Fn + / : Increase/Decrease display brightness. Lenovo G470/G475/G570/G575 Fn key combinations The following table shows the function of each combination of Windows...Increase/Decrease sound volume. 31 Fn + F11: Skip to the next track. Fn + Insert (G570/G575): Fn + PgUp (G470/G475): Enable/Disable the scroll lock. Fn + F9: Start/Pause playback of... F6: Enable/Disable the touchpad. Table 3. Fn + F4: Open the interface for integrated wireless devices settings (on/off the integrated camera. Fn + F5: Open the interface for display ...
Hardware Maintenance Manual
Page 59
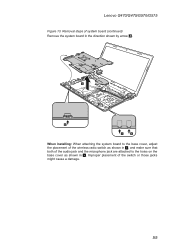
Improper placement of the audio jack and the microphone jack are attached to the holes on the base cover as shown in a . Lenovo G470/G475/G570/G575 Figure 13. Removal steps of system board (continued) Remove the system board in the direction shown by arrow 4. 4 b a a When installing: When attaching the system board to the base cover, adjust the placement of the wireless radio switch as shown in b , and make sure that both of the switch or those jacks might cause a damage. 55
Improper placement of the audio jack and the microphone jack are attached to the holes on the base cover as shown in a . Lenovo G470/G475/G570/G575 Figure 13. Removal steps of system board (continued) Remove the system board in the direction shown by arrow 4. 4 b a a When installing: When attaching the system board to the base cover, adjust the placement of the wireless radio switch as shown in b , and make sure that both of the switch or those jacks might cause a damage. 55
Hardware Maintenance Manual
Page 73
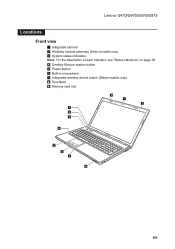
Lenovo G470/G475/G570/G575 Locations Front view 1 Integrated camera 2 Wireless module antennas (Select models only) 3 System status indicators Note: For the description of each indicator, see "Status indicators" on page 29. 4 OneKey Rescue system button 5 Power button 6 Built-in microphone 7 Integrated wireless device switch (Select models only) 8 Touchpad 9 Memory card slot 2 1 2 3 4 5 6 7 3 8 9 69
Lenovo G470/G475/G570/G575 Locations Front view 1 Integrated camera 2 Wireless module antennas (Select models only) 3 System status indicators Note: For the description of each indicator, see "Status indicators" on page 29. 4 OneKey Rescue system button 5 Power button 6 Built-in microphone 7 Integrated wireless device switch (Select models only) 8 Touchpad 9 Memory card slot 2 1 2 3 4 5 6 7 3 8 9 69


