
Lenovo G455/G555 UserGuide V1.0
Page 5
...39 Caring your computer 17 Connecting external devices 18 Chapter 3. Getting help and service......36 Getting help around the world 37 Lenovo warranty service telephone numbers 38 Appendix B. Customer replaceable units (CRUs 52 Appendix E. Features and specifications 103 Trademarks 104 Index... and replacing devices 29 Replacing the battery 29 Replacing the hard disk drive 30 Replacing memory 32 Removing the optical drive 34 Appendix A. Lenovo regulatory notice .... 64 Lenovo regulatory notice 64 Appendix G. Getting to know your hard disk 63 Appendix F. Notices ...
...39 Caring your computer 17 Connecting external devices 18 Chapter 3. Getting help and service......36 Getting help around the world 37 Lenovo warranty service telephone numbers 38 Appendix B. Customer replaceable units (CRUs 52 Appendix E. Features and specifications 103 Trademarks 104 Index... and replacing devices 29 Replacing the battery 29 Replacing the hard disk drive 30 Replacing memory 32 Removing the optical drive 34 Appendix A. Lenovo regulatory notice .... 64 Lenovo regulatory notice 64 Appendix G. Getting to know your hard disk 63 Appendix F. Notices ...
Lenovo G455/G555 UserGuide V1.0
Page 14
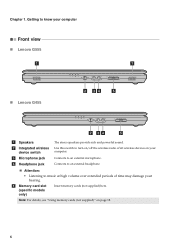
...Microphone jack d Headphone jack Connects to an external headphone. e Memory card slot (specific models only) Insert memory cards (not supplied) here. Note: For details, see "Using memory cards (not supplied)" on /off the wireless radio of time... may damage your computer. Chapter 1. Attention: • Listening to music at high volume over extended periods of all wireless devices on your hearing. Connects to an external microphone. Use this switch to know your computer Front view „ Lenovo G555 „ Lenovo...
...Microphone jack d Headphone jack Connects to an external headphone. e Memory card slot (specific models only) Insert memory cards (not supplied) here. Note: For details, see "Using memory cards (not supplied)" on /off the wireless radio of time... may damage your computer. Chapter 1. Attention: • Listening to music at high volume over extended periods of all wireless devices on your hearing. Connects to an external microphone. Use this switch to know your computer Front view „ Lenovo G555 „ Lenovo...
Lenovo G455/G555 UserGuide V1.0
Page 16
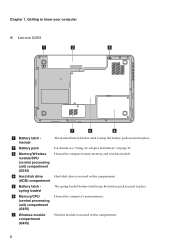
... compartment. 8 Wireless module is secured in this compartment. Getting to know your computer „ Lenovo G455 2 1 a Battery latch manual b Battery pack c Memory/Wireless module/CPU (central processing unit) compartment (G555) d Hard disk drive (HDD) compartment e Battery latch spring loaded f Memory/CPU (central processing unit) compartment (G455) g Wireless module compartment (G455) The manual battery latch...
... compartment. 8 Wireless module is secured in this compartment. Getting to know your computer „ Lenovo G455 2 1 a Battery latch manual b Battery pack c Memory/Wireless module/CPU (central processing unit) compartment (G555) d Hard disk drive (HDD) compartment e Battery latch spring loaded f Memory/CPU (central processing unit) compartment (G455) g Wireless module compartment (G455) The manual battery latch...

Lenovo G455/G555 UserGuide V1.0
Page 26
... devices Your computer has a wide range of built-in features and connection capabilities. „ Using memory cards (not supplied) Your computer supports the following types of the memory card slot. 2 Slide the memory card in the slot at a time. • This card reader does not support SDIO devices ...card for preventing dust and small particles from entering the inside of the memory card slot. Removing a memory card 1 Push the memory card until you hear a click. 2 Gently pull the memory card out of your computer when the memory card slot is not in use . Otherwise, the device may not ...
... devices Your computer has a wide range of built-in features and connection capabilities. „ Using memory cards (not supplied) Your computer supports the following types of the memory card slot. 2 Slide the memory card in the slot at a time. • This card reader does not support SDIO devices ...card for preventing dust and small particles from entering the inside of the memory card slot. Removing a memory card 1 Push the memory card until you hear a click. 2 Gently pull the memory card out of your computer when the memory card slot is not in use . Otherwise, the device may not ...
Lenovo G455/G555 UserGuide V1.0
Page 31
... help and service" on page 39 of the following: the hard disk drive, memory, or the keyboard. See "Appendix D. For the warranty applicable to replace one of this guide. Lenovo limited warranty" on page 52 of each publication included in Chapter 1 and 2. Chapter... questions and tells where you need to your computer. For details about each component in your computer, see Lenovo G455/G555 Setup Poster. See "Appendix B. See http://consumersupport.lenovo.com. I find warranty information? Customer replaceable units (CRUs)" on page 45. See "Appendix A. Where ...
... help and service" on page 39 of the following: the hard disk drive, memory, or the keyboard. See "Appendix D. For the warranty applicable to replace one of this guide. Lenovo limited warranty" on page 52 of each publication included in Chapter 1 and 2. Chapter... questions and tells where you need to your computer. For details about each component in your computer, see Lenovo G455/G555 Setup Poster. See "Appendix B. See http://consumersupport.lenovo.com. I find warranty information? Customer replaceable units (CRUs)" on page 45. See "Appendix A. Where ...
Lenovo G455/G555 UserGuide V1.0
Page 33
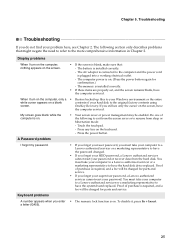
...password changed. • If you must take your hard disk to your password or recover data from sleep or hibernation mode: - The memory is on . Do one of purchase is blank, make sure that might negate the need to refer to resume from the hard disk...., and a fee will be charged for parts and service. Touch the touchpad. - Press the power button. Proof of your computer to a Lenovo authorized servicer or a marketing representative to the computer and the power cord is installed correctly. - OneKey Recovery. Chapter 5. Troubleshooting Troubleshooting If you...
...password changed. • If you must take your hard disk to your password or recover data from sleep or hibernation mode: - The memory is on . Do one of purchase is blank, make sure that might negate the need to refer to resume from the hard disk...., and a fee will be charged for parts and service. Touch the touchpad. - Press the power button. Proof of your computer to a Lenovo authorized servicer or a marketing representative to the computer and the power cord is installed correctly. - OneKey Recovery. Chapter 5. Troubleshooting Troubleshooting If you...
Lenovo G455/G555 UserGuide V1.0
Page 40
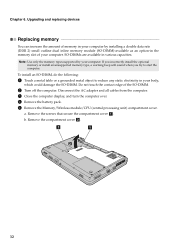
.../CPU (central processing unit) compartment cover. b. Remove the compartment cover b. 11 1 2 32 Chapter 6. Upgrading and replacing devices Replacing memory You can increase the amount of memory in your computer. a. To install an SO-DIMM, do the following: 1 Touch a metal table or a grounded metal object to start... the computer. SO-DIMMs are available in the memory slot of the SO-DIMM. 2 Turn off the computer. Do not touch the contact edge of your body, which could damage the SO-DIMM...
.../CPU (central processing unit) compartment cover. b. Remove the compartment cover b. 11 1 2 32 Chapter 6. Upgrading and replacing devices Replacing memory You can increase the amount of memory in your computer. a. To install an SO-DIMM, do the following: 1 Touch a metal table or a grounded metal object to start... the computer. SO-DIMMs are available in the memory slot of the SO-DIMM. 2 Turn off the computer. Do not touch the contact edge of your body, which could damage the SO-DIMM...
Lenovo G455/G555 UserGuide V1.0
Page 41
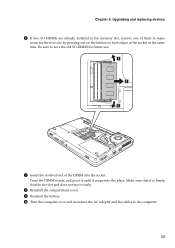
Be sure to the computer. 33 Press the DIMM firmly, and pivot it until it is firmly fixed in the memory slot, remove one by pressing out on the latches on both edges of the DIMM into the place. Make sure that it snaps into the ...
Be sure to the computer. 33 Press the DIMM firmly, and pivot it until it is firmly fixed in the memory slot, remove one by pressing out on the latches on both edges of the DIMM into the place. Make sure that it snaps into the ...
Lenovo G455/G555 UserGuide V1.0
Page 42
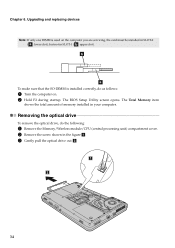
... in SLOT-1 ( b : upper slot). Upgrading and replacing devices Note: If only one DIMM is installed correctly, do the following: 1 Remove the Memory/Wireless module/CPU (central processing unit) compartment cover. 2 Remove the screw shown in the figure a. 3 Gently pull the optical drive out b. 1 2 34 Chapter 6. b a To make ...
... in SLOT-1 ( b : upper slot). Upgrading and replacing devices Note: If only one DIMM is installed correctly, do the following: 1 Remove the Memory/Wireless module/CPU (central processing unit) compartment cover. 2 Remove the screw shown in the figure a. 3 Gently pull the optical drive out b. 1 2 34 Chapter 6. b a To make ...

Lenovo G455/G555 UserGuide V1.0
Page 43
Setup Poster User Guide Self-service CRUs AC adapter O Power cord for your computer and tells where to find the replacement instructions. Chapter 6. Upgrading and replacing devices The following table provides a list of CRUs (Customer Replaceable Units) for AC adapter O Battery O O Bottom access doors O Hard disk drive O Memory O Optical drive O 35
Setup Poster User Guide Self-service CRUs AC adapter O Power cord for your computer and tells where to find the replacement instructions. Chapter 6. Upgrading and replacing devices The following table provides a list of CRUs (Customer Replaceable Units) for AC adapter O Battery O O Bottom access doors O Hard disk drive O Memory O Optical drive O 35
Lenovo G455/G555 UserGuide V1.0
Page 47
... may be discharged through connectors on the computer for an extended time to it may become electrostatically charged. Wherever possible, ground your keyboard. Handle adapters, memory modules, and other parts of static-electricity When you work • Do not eat or smoke over your computer to the computer, it . By following...
... may be discharged through connectors on the computer for an extended time to it may become electrostatically charged. Wherever possible, ground your keyboard. Handle adapters, memory modules, and other parts of static-electricity When you work • Do not eat or smoke over your computer to the computer, it . By following...

Lenovo G455/G555 UserGuide V1.0
Page 49
When disposing of the battery, comply with Lenovo (refer to your computer in . or hot-swappable. • Before you ; Memory module • When transferring data to turn your computer over while the AC adapter is plugged in sleep or hibernation mode before the data transfer..., MultiMediaCard, xD-Picture Card, and Memory Stick Pro card. - To do not put the battery pack in trash that the device is lost or stolen. If you forget a supervisor or hard disk password, Lenovo authorized service providers will not reset it is warm- Use and care information „ Data safety • ...
When disposing of the battery, comply with Lenovo (refer to your computer in . or hot-swappable. • Before you ; Memory module • When transferring data to turn your computer over while the AC adapter is plugged in sleep or hibernation mode before the data transfer..., MultiMediaCard, xD-Picture Card, and Memory Stick Pro card. - To do not put the battery pack in trash that the device is lost or stolen. If you forget a supervisor or hard disk password, Lenovo authorized service providers will not reset it is warm- Use and care information „ Data safety • ...
Lenovo G455/G555 UserGuide V1.0
Page 60
... types of CRUs include the notebook main battery, an optical drive, a hard-disk drive, and an extended battery. Examples of CRUs include memory modules and hard disk drives. • Internal CRUs (located within the computer that are accessible only by either one or two screws. Your... These CRUs are isolated parts within the product): These CRUs are concealed by an access panel that can be upgraded or replaced by a Lenovo service technician during the warranty period. Internal CRUs can be removed and installed by customers or by the customer. Customer replaceable units (CRUs)...
... types of CRUs include the notebook main battery, an optical drive, a hard-disk drive, and an extended battery. Examples of CRUs include memory modules and hard disk drives. • Internal CRUs (located within the computer that are accessible only by either one or two screws. Your... These CRUs are isolated parts within the product): These CRUs are concealed by an access panel that can be upgraded or replaced by a Lenovo service technician during the warranty period. Internal CRUs can be removed and installed by customers or by the customer. Customer replaceable units (CRUs)...
Lenovo G455/G555 UserGuide V1.0
Page 111
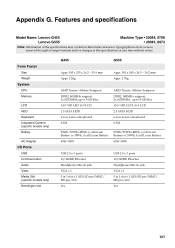
.../MMC/ MS pro/xD) Yes 103 Features and specifications Model Name: Lenovo G455 Lenovo G555 Machine Type • 20044, 0708 • 20045, 0873 Note: Information of the specifications may contain technical inaccuracies or typographical errors. Form Factor Size Weight System CPU Memory LCD HDD Keyboard Integrated Camera (specific models only) Battery AC Adapter I/O Ports...
.../MMC/ MS pro/xD) Yes 103 Features and specifications Model Name: Lenovo G455 Lenovo G555 Machine Type • 20044, 0708 • 20045, 0873 Note: Information of the specifications may contain technical inaccuracies or typographical errors. Form Factor Size Weight System CPU Memory LCD HDD Keyboard Integrated Camera (specific models only) Battery AC Adapter I/O Ports...

Lenovo G555 Hardware Maintenance Manual V2.0
Page 3
...23 Passwords 24 Power-on password 24 Supervisor password 24 Power management 25 Screen blank mode 25 Sleep (standby) mode 25 Hibernation mode 26 Lenovo G555 27 Specifications 27 Status indicators 29 Fn key combinations 31 FRU replacement notices 32 Screw notices 32 Removing and replacing an FRU 33 1010 ...Battery pack 34 1020 Dummy cards 35 1030 Hard disk drive (HDD) slot cover and HDD 36 1040 Memory/Wireless module/CPU (central processing unit) compartment cover 38 1050 Optical drive 39 1060 DIMM 40 1070 Fan assembly and Heat Sink assembly... 41...
...23 Passwords 24 Power-on password 24 Supervisor password 24 Power management 25 Screen blank mode 25 Sleep (standby) mode 25 Hibernation mode 26 Lenovo G555 27 Specifications 27 Status indicators 29 Fn key combinations 31 FRU replacement notices 32 Screw notices 32 Removing and replacing an FRU 33 1010 ...Battery pack 34 1020 Dummy cards 35 1030 Hard disk drive (HDD) slot cover and HDD 36 1040 Memory/Wireless module/CPU (central processing unit) compartment cover 38 1050 Optical drive 39 1060 DIMM 40 1070 Fan assembly and Heat Sink assembly... 41...

Lenovo G555 Hardware Maintenance Manual V2.0
Page 31
...Lenovo G555 : Table 1. Specifications Feature Description Processor • AMD Turion M540/M520 • AMD Athlon M320/M340/M360 • AMD Sempron M140/M120/M100 Core Chipset • RS880M/SB710 Bus architecture • DDR2 SDRAM 800MHZ • HT (HyperTransport™ Interface) • ALINK (A-Link Express II Interface) • PCI Express® Interface Graphic memory...8226; 15.6-Inch, 16M colors, HD(1366 × 768 Resolution), 16:9, CCFL type, TFT color LCD Standard memory • 1x1GB (DDR2 800MHz) • 2x1GB (DDR2 800MHz) • 1x1GB + 1x2GB (DDR2 800MHz) ...
...Lenovo G555 : Table 1. Specifications Feature Description Processor • AMD Turion M540/M520 • AMD Athlon M320/M340/M360 • AMD Sempron M140/M120/M100 Core Chipset • RS880M/SB710 Bus architecture • DDR2 SDRAM 800MHZ • HT (HyperTransport™ Interface) • ALINK (A-Link Express II Interface) • PCI Express® Interface Graphic memory...8226; 15.6-Inch, 16M colors, HD(1366 × 768 Resolution), 16:9, CCFL type, TFT color LCD Standard memory • 1x1GB (DDR2 800MHz) • 2x1GB (DDR2 800MHz) • 1x1GB + 1x2GB (DDR2 800MHz) ...
Lenovo G555 Hardware Maintenance Manual V2.0
Page 42
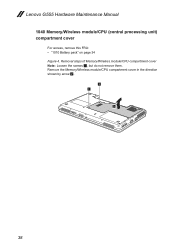
Remove the Memory/Wireless module/CPU compartment cover in the direction shown by arrow 2. 1 1 2 38 Lenovo G555 Hardware Maintenance Manual 1040 Memory/Wireless module/CPU (central processing unit) compartment cover For access, remove this FRU: •• "1010 Battery pack" on page 34 Figure 4. Removal steps of Memory/Wireless module/CPU compartment cover Note: Loosen the screws 1, but do not remove them.
Remove the Memory/Wireless module/CPU compartment cover in the direction shown by arrow 2. 1 1 2 38 Lenovo G555 Hardware Maintenance Manual 1040 Memory/Wireless module/CPU (central processing unit) compartment cover For access, remove this FRU: •• "1010 Battery pack" on page 34 Figure 4. Removal steps of Memory/Wireless module/CPU compartment cover Note: Loosen the screws 1, but do not remove them.
Lenovo G555 Hardware Maintenance Manual V2.0
Page 43
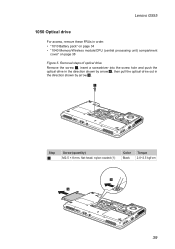
Removal steps of optical drive Remove the screw 1, insert a screwdriver into the screw hole and push the optical drive in the direction shown by arrow 3. 1 Step 1 Screw (quantity) M2.5 × 8 mm, flat-head, nylon-coated (1) Color Black Torque 2.0~2.5 kgf·cm 2 3 39 Lenovo G555 1050 Optical drive For access, remove these FRUs in the direction shown by arrow 2, then pull the optical drive out in order: •• "1010 Battery pack" on page 34 •• "1040 Memory/Wireless module/CPU (central processing unit) compartment cover" on page 38 Figure 5.
Removal steps of optical drive Remove the screw 1, insert a screwdriver into the screw hole and push the optical drive in the direction shown by arrow 3. 1 Step 1 Screw (quantity) M2.5 × 8 mm, flat-head, nylon-coated (1) Color Black Torque 2.0~2.5 kgf·cm 2 3 39 Lenovo G555 1050 Optical drive For access, remove these FRUs in the direction shown by arrow 2, then pull the optical drive out in order: •• "1010 Battery pack" on page 34 •• "1040 Memory/Wireless module/CPU (central processing unit) compartment cover" on page 38 Figure 5.

Lenovo G555 Hardware Maintenance Manual V2.0
Page 44
Lenovo G555 Hardware Maintenance Manual 1060 DIMM For access, remove these FRUs in the slot and difficult to be installed in SLOT-0 ( a : lower slot), but not in ... direction shown by arrow 2. 1 2 1 Note: If only one DIMM is firmly fixed in order: •• "1010 Battery pack" on page 34 •• "1040 Memory/Wireless module/CPU (central processing unit) compartment cover" on page 38 Figure 6.
Lenovo G555 Hardware Maintenance Manual 1060 DIMM For access, remove these FRUs in the slot and difficult to be installed in SLOT-0 ( a : lower slot), but not in ... direction shown by arrow 2. 1 2 1 Note: If only one DIMM is firmly fixed in order: •• "1010 Battery pack" on page 34 •• "1040 Memory/Wireless module/CPU (central processing unit) compartment cover" on page 38 Figure 6.

Lenovo G555 Hardware Maintenance Manual V2.0
Page 45
...; "1010 Battery pack" on page 34 •• "1040 Memory/Wireless module/CPU (central processing unit) compartment cover" on page 38 Figure 7. Removal steps of fan assembly and heat sink assembly Note: Remove three screws 1, one screw 2 and four spring screws 3. Lenovo G555 1070 Fan assembly and Heat Sink assembly For access, remove...
...; "1010 Battery pack" on page 34 •• "1040 Memory/Wireless module/CPU (central processing unit) compartment cover" on page 38 Figure 7. Removal steps of fan assembly and heat sink assembly Note: Remove three screws 1, one screw 2 and four spring screws 3. Lenovo G555 1070 Fan assembly and Heat Sink assembly For access, remove...


