User Guide
Page 3
Reference information 3-1 Monitor specifications 3-1 Troubleshooting 3-2 Manual image setup 3-4 Manually installing the monitor driver 3-4 Installing the monitor driver in Windows XP 3-4 Installing the monitor driver in Windows 2000 3-5 Getting further help 3-6 Service information 3-7 Product numbers 3-7 Customer responsibilities 3-7 Service parts 3-8 Appendix A. Service and Support A-1 Online technical support A-1 Telephone technical support A-1 Appendix B. Notices B-1 Trademarks B-2 © Copyright Lenovo 2006. © ii Adjusting...
Reference information 3-1 Monitor specifications 3-1 Troubleshooting 3-2 Manual image setup 3-4 Manually installing the monitor driver 3-4 Installing the monitor driver in Windows XP 3-4 Installing the monitor driver in Windows 2000 3-5 Getting further help 3-6 Service information 3-7 Product numbers 3-7 Customer responsibilities 3-7 Service parts 3-8 Appendix A. Service and Support A-1 Online technical support A-1 Telephone technical support A-1 Appendix B. Notices B-1 Trademarks B-2 © Copyright Lenovo 2006. © ii Adjusting...
User Guide
Page 10
...required for normal operation. Register your option on the following Web site: http://www.lenovo.com/register Lenovo will send you information and updates on your monitor image, press the Automatic Image Setup key. See "Manual image setup" on -screen instructions. 7. Chapter 1. 1-5 6. To optimize your ...registered product unless you indicate on the Web site questionnaire that will help Lenovo to better serve you in ...
...required for normal operation. Register your option on the following Web site: http://www.lenovo.com/register Lenovo will send you information and updates on your monitor image, press the Automatic Image Setup key. See "Manual image setup" on -screen instructions. 7. Chapter 1. 1-5 6. To optimize your ...registered product unless you indicate on the Web site questionnaire that will help Lenovo to better serve you in ...
User Guide
Page 14
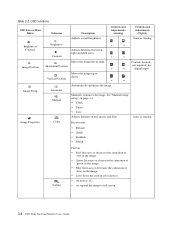
OSD functions OSD Icon on expand the image to full screen 2-4 D221 Wide Flat Panel Monitor User's Guide Preset mode • Default • sRGB • Reddish • Bluish Same as Analog Brightness/ Contrast Image Position Brightness Contrast ... and dark areas Moves the image left or right. Controls Locked not required for digital input Image Setup Image Properties Automatic Manual Color Automatically optimizes the image. Manually optimizes the image. See "Manual image setup" on page 3-4. • Clock • Phase • Save Adjusts intensity of 'blue' in the image. ...
OSD functions OSD Icon on expand the image to full screen 2-4 D221 Wide Flat Panel Monitor User's Guide Preset mode • Default • sRGB • Reddish • Bluish Same as Analog Brightness/ Contrast Image Position Brightness Contrast ... and dark areas Moves the image left or right. Controls Locked not required for digital input Image Setup Image Properties Automatic Manual Color Automatically optimizes the image. Manually optimizes the image. See "Manual image setup" on page 3-4. • Clock • Phase • Save Adjusts intensity of 'blue' in the image. ...
User Guide
Page 19
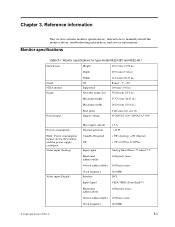
...Image Width Tilt Supported Viewable image size 514.4 mm (20.25 in.) Range: -5°, +20° 100 mm (3.94 in.) 558.68 mm (22.0 in.) Maximum height 473.76 mm (18.65 in.) Maximum width 296.10 mm (11.66 in.) Power input Pixel pitch Supply voltage 0.282 mm... (0.11 in.) (V) 90-264VAC (100~240VAC+/-10%) - Chapter 3. Monitor specifications for the monitor and the power supply combined. Video input (Analog) Standby/Suspend Off Input signal < 2W (Anolog), Reference information This section contains...
...Image Width Tilt Supported Viewable image size 514.4 mm (20.25 in.) Range: -5°, +20° 100 mm (3.94 in.) 558.68 mm (22.0 in.) Maximum height 473.76 mm (18.65 in.) Maximum width 296.10 mm (11.66 in.) Power input Pixel pitch Supply voltage 0.282 mm... (0.11 in.) (V) 90-264VAC (100~240VAC+/-10%) - Chapter 3. Monitor specifications for the monitor and the power supply combined. Video input (Analog) Standby/Suspend Off Input signal < 2W (Anolog), Reference information This section contains...
User Guide
Page 22
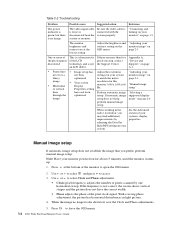
... of the monitor to open the OSD menu. 2. Manual image setup If automatic image setup does not establish the image that you may find additional improvements by one horizontal sweep. Use or to select and press to leave the OSD menu. 3-4 D221 Wide Flat Panel Monitor User's Guide...video signal cable is no longer looks distorted, save the Clock and Phase adjustments. 5. Be sure the video cable is not an LCD defect. "Connecting and turning on your monitor powered on blurry optimized to select Clock and Phase adjustment. • Clock (pixel frequency) adjusts the number of the...
... of the monitor to open the OSD menu. 2. Manual image setup If automatic image setup does not establish the image that you may find additional improvements by one horizontal sweep. Use or to select and press to leave the OSD menu. 3-4 D221 Wide Flat Panel Monitor User's Guide...video signal cable is no longer looks distorted, save the Clock and Phase adjustments. 5. Be sure the video cable is not an LCD defect. "Connecting and turning on your monitor powered on blurry optimized to select Clock and Phase adjustment. • Clock (pixel frequency) adjusts the number of the...
User Guide
Page 23
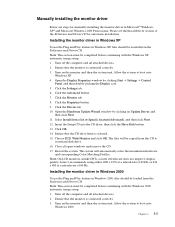
...Lenovo recommends using either 1680 x 1050 at a refresh rate of 60 Hz, or 640 x 480 at a refresh rate of the Reference and Driver CD for manually installing the monitor... Click the Advanced button. 7. Click OK. 14. Choose D221 Wide Monitor and click OK. Allow the system to your hard disk drive...monitor is connected correctly. 3. Manually installing the monitor driver Below are steps for automatic installation. The system will be completed before continuing with the Windows 2000 automatic image setup. 1. Click the Monitor tab. 8. Click the Settings tab. 6. Note: On LCD monitors...
...Lenovo recommends using either 1680 x 1050 at a refresh rate of 60 Hz, or 640 x 480 at a refresh rate of the Reference and Driver CD for manually installing the monitor... Click the Advanced button. 7. Click OK. 14. Choose D221 Wide Monitor and click OK. Allow the system to your hard disk drive...monitor is connected correctly. 3. Manually installing the monitor driver Below are steps for automatic installation. The system will be completed before continuing with the Windows 2000 automatic image setup. 1. Click the Monitor tab. 8. Click the Settings tab. 6. Note: On LCD monitors...
User Guide
Page 27
...8226;Option number •Proof of purchase •Computer manufacturer, model, serial number, and manual •Exact wording of the error message (if any) •Description of Lenovo warranty terms. Online technical support Online technical support is available. Refer to service at your product... as much of the product. Telephone technical support Installation and configuration support through the Personal Computing Support Web site at Lenovo's discretion, 90 days after the option has been withdrawn from marketing. Worldwide telephone list Phone numbers are available for ...
...8226;Option number •Proof of purchase •Computer manufacturer, model, serial number, and manual •Exact wording of the error message (if any) •Description of Lenovo warranty terms. Online technical support Online technical support is available. Refer to service at your product... as much of the product. Telephone technical support Installation and configuration support through the Personal Computing Support Web site at Lenovo's discretion, 90 days after the option has been withdrawn from marketing. Worldwide telephone list Phone numbers are available for ...
