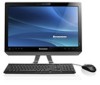
Power cord notice
Page 1
..., a maximum of 15 feet in length and a parallel blade, grounding-type attachment plug rated 10 amperes, 125 volts. Power cords provided by Lenovo for the country in Norway, Sweden, Finland: Use a cord set with a groundingtype attachment plug. For units intended to be operated in which the... specific country or region are usually available only in the United States and Canada are listed by Underwriter's Laboratories (UL) and certified by Lenovo in that country or region. For other countries, the suitable types shall be safety approved. The cord set with a two-prong attachment ...
Lenovo C225\C320\C325 Hardware Maintenance Manual
Page 3
... 53 Replacing the LED panel 54 Chapter 8. General information . . . . 9 Specifications 9 Chapter 4. General Checkout . . . . . 11 Problem determination tips 11 Chapter 5. Additional Service Information 57 © Copyright Lenovo i Using the Setup Utility. . . 13 Starting the Setup Utility program 13 Viewing and changing settings 13 Using passwords 13 Using Device 15 Selecting a startup device...
Lenovo C225\C320\C325 Hardware Maintenance Manual
Page 5
It is intended only for those machines which have TV card. It is only used for Lenovo C220/C225/C320/C325 computers listed on the cover. Important Safety Information Be sure to read all caution and danger statements in this book before performing any of the ...ções Es importante que lea todas las declaraciones de precaución y de peligro de este manual antes de seguir las instrucciones. © Copyright Lenovo 1 Chapter 1. The description of the instructions. Veuillez lire toutes les consignes de type DANGER et ATTENTION du présent document avant d'exécuter...
Lenovo C225\C320\C325 Hardware Maintenance Manual
Page 7
... that makes the equipment unsafe. • Before you are : hammering, drilling soldering, cutting wire, attaching springs, using solvents, or working on electrical equipment. © Copyright Lenovo 3 Never move suddenly or twist when you . • Do not perform any safety device that causes hazards to the customer. Lift by standing or by...
Lenovo C225\C320\C325 Hardware Maintenance Manual
Page 8
... unplug it has been powered-off position. • If you need to work on suitable rubber mats (obtained locally, if necessary) to get medical aid. 4 Lenovo C2/C3 Hardware Maintenance Manual Power supply units - Switch off the power, if necessary. - Working near you work on electrical equipment; The surface is near...
Lenovo C225\C320\C325 Hardware Maintenance Manual
Page 9
Safety inspection guide The intent of features or options not covered by equalizing the charge so that the power-supply cover fasteners (screws or rivets) have been certified (ISO 9000) as fully effective. If any alterations. 6. Checklist: 1. Disconnect the power cord. 3. The power cord should be considered sensitive to electrostatic discharge (ESD). Insulation must determine how serious the apparent hazard could be used to identify potential safety hazards due to attachment of this inspection guide. Notes: 1. This guide addresses only those items. However, good judgment ...
Lenovo C225\C320\C325 Hardware Maintenance Manual
Page 10
...-operated system. Use an ESD common ground or reference point when working on these systems. - You can be attached to this product or attached devices. 6 Lenovo C2/C3 Hardware Maintenance Manual DANGER Electrical current from touching your skin to any cables or perform installation, maintenance, or reconfiguration of the ac plug...
Lenovo C225\C320\C325 Hardware Maintenance Manual
Page 11
Turn everything OFF. 2. Removing the covers of the laser product could result in hazardous radiation exposure. DANGER Some laser products contain an embedded Class 3A or Class 3B laser diode. Attach power cords to connectors. 4. Remove signal cables from devices. The battery contains lithium and can explode if not properly used, handled, or disposed of the battery as CD-ROMs, DVD-ROM drives, fiber optic devices, or transmitters) are no serviceable parts inside the device. • Use of controls or adjustments or performance of procedures other than 100°C (212°...
Lenovo C225\C320\C325 Hardware Maintenance Manual
Page 12
The device also might have more than one power cord. To remove all electrical current from the device, ensure that all power cords are disconnected from the power source. 2 1 CAUTION: Do not place any object weighing more than 82 kg (180 lbs.) on the power supply do not turn off the electrical current supplied to the device. ≥18 kg(37 lbs) CAUTION: Use safe practices when lifting. ≥32 kg(70.5 lbs) ≥55 kg(121.2 lbs) CAUTION: The power control button on the device and the power switch on top of rack-mounted devices. 8 Lenovo C2/C3 Hardware Maintenance Manual
Lenovo C225\C320\C325 Hardware Maintenance Manual
Page 13
... section lists the physical specifications for your computer. Type Lenovo C220/C225/C320/C325 This section lists the physical specifications. General information This chapter provides general information that applies to 106KPa Electrical input: Input voltage: 90V-264V(AC) Input frequency: 47Hz-63Hz © Copyright Lenovo 9 Environment Air temperature: Operating: 10° to 35...
Lenovo C225\C320\C325 Hardware Maintenance Manual
Page 15
... ever worked? Look at step 7. 7. If you are servicing might have this the original reported failure? • Diagnostics version Type and version level © Copyright Lenovo 11 Power-on the display. Check all external devices. 5. If it has been working, what changes were made prior to step 6. General Checkout Attention: The...
Lenovo C225\C320\C325 Hardware Maintenance Manual
Page 16
... exact machine type and models 2. Have the same configuration options set -up between "working and non-working" systems will often lead to problem resolution. 12 Lenovo C2/C3 Hardware Maintenance Manual Have the same BIOS level 3. Have the same address jumpers/terminators/cabling 5. Have the same software versions and levels 6. •...
Lenovo C225\C320\C325 Hardware Maintenance Manual
Page 17
..., do not have at least seven characters in the Setup Utility program. Chapter 5. See "Starting the Setup Utility program." If your user name © Copyright Lenovo 13 However, the operating-system settings might override any passwords to perform various tasks are using this procedure, shut down the operating system and turn...
Lenovo C225\C320\C325 Hardware Maintenance Manual
Page 18
... new password, and press Enter. 4. For more information, see "Starting the Setup Utility program" on page 13. 1. The password dialog box will be installed. 14 Lenovo C2/C3 Hardware Maintenance Manual Press Enter in New Password and confirm New Password dialog. • Not be displayed. If you might want to confirm...
Lenovo C225\C320\C325 Hardware Maintenance Manual
Page 19
Select Exit. 4. Select USB Setup. 4. Selecting a startup device If your computer. 2. Press and hold the F12 key then turn on the right side of the screen. To delete a previously set Power-On Password, do the following: 1. Press Enter in the system configuration. A setup notice will be displayed in New Password and confirm New Password dialog. To set Device, do the following device: USB Setup When this feature is set others such as expected, use one of USB Setup is Disabled and will not be displayed. Turn off your computer does not start up (boot) from the ...
Lenovo C225\C320\C325 Hardware Maintenance Manual
Page 20
... to the Setup Utility program menu (you exit. Press ESC to return to press Esc several times). Otherwise, your changes will not be saved. 16 Lenovo C2/C3 Hardware Maintenance Manual Select Disabled or Enabled and press Enter. 5. If you want to save the new settings, select Save changes and Exit...
Lenovo C225\C320\C325 Hardware Maintenance Manual
Page 21
... your error symptoms in configuration. FRU/Action Reseat connectors Power Cord Power-on page 11. Always begin with Chapter 4, "General Checkout," on Switch © Copyright Lenovo 17 If you suspect a power problem, use the following : 1. The boot sector on the failing hard disk drive. 2. Power Supply Problems If you are unable...
Lenovo C225\C320\C325 Hardware Maintenance Manual
Page 22
... the hard drive is no keys are invalid. A reset or power cycle is required to a weak CMOS battery. Power-off the computer. 2. Any adapters 18 Lenovo C2/C3 Hardware Maintenance Manual A single problem can be found or initialized. Checksum of tests is called the Power-On Self-Test, or POST. The...
Lenovo C225\C320\C325 Hardware Maintenance Manual
Page 23
c. Memory modules d. External Cache RAM g. Diskette drive 3. Chapter 6. If all devices and adapters have been removed, and the problem continues, replace the system board. Extended video memory e. Hard disk drive h. Symptom-to re-test the system. 4. External Cache f. Repeat steps 1 through 3 until you find the failing device or adapter. Power-on the computer to -FRU Index 19
Lenovo C225\C320\C325 Hardware Maintenance Manual
Page 25
... Warranty Guide that was included with the disassembly procedure, make sure that you do the following: 1. Place the system on a flat, stable surface. © Copyright Lenovo 21 Replacing hardware Attention: Do not remove the computer cover or attempt any repair before reading the "Important safety information" in the Hardware Maintenance Manual..., go to the system and all power and signal cables from the computer. 3. Turn off the power to the Support Web site at: http://consumersupport.lenovo.com.