Lenovo B560/V560 Hardware Maintenance Manual V2.0
Page 3
...for replacing a system board ....17 Important information about replacing RoHS compliant FRUs 18 General checkout 19 What to do first 20 Power system checkout 21 Checking the AC adapter 21 Checking operational charging 21 Checking the battery pack 22 Related service information 23 Restoring ...23 Restore of factory default 23 Using recovery discs 23 Passwords 24 Power-on password 24 Supervisor password 24 Power management 25 Screen blank mode 25 Sleep (standby) mode 25 Hibernation mode 26 Lenovo V560/B560 27 Specifications 27 Status indicators 29 Fn key combinations 31 FRU ...
...for replacing a system board ....17 Important information about replacing RoHS compliant FRUs 18 General checkout 19 What to do first 20 Power system checkout 21 Checking the AC adapter 21 Checking operational charging 21 Checking the battery pack 22 Related service information 23 Restoring ...23 Restore of factory default 23 Using recovery discs 23 Passwords 24 Power-on password 24 Supervisor password 24 Power management 25 Screen blank mode 25 Sleep (standby) mode 25 Hibernation mode 26 Lenovo V560/B560 27 Specifications 27 Status indicators 29 Fn key combinations 31 FRU ...

Lenovo B560/V560 Hardware Maintenance Manual V2.0
Page 7
...high voltages; By observing the above rule, you . Stand on electrical equipment; Ensure that has hazardous voltages. •• Disconnect all power before: - keep the other hand in the safety sections of mat to work on a machine that does not insulate you work on...;• If you need to protect yourself from passing through your back. Use only one hand when working on the machine, unplug the power cord. If an electrical accident occurs, you from a circuit. Safety information Electrical safety Observe the following precautions: - Removing or installing main...
...high voltages; By observing the above rule, you . Stand on electrical equipment; Ensure that has hazardous voltages. •• Disconnect all power before: - keep the other hand in the safety sections of mat to work on a machine that does not insulate you work on...;• If you need to protect yourself from passing through your back. Use only one hand when working on the machine, unplug the power cord. If an electrical accident occurs, you from a circuit. Safety information Electrical safety Observe the following precautions: - Removing or installing main...
Lenovo B560/V560 Hardware Maintenance Manual V2.0
Page 8
Lenovo V560/B560 Hardware Maintenance Manual •• Always look carefully for possible hazards in a machine: - Power supply units - such touching can cause personal injury and machine damage. •• Do not service the following parts with ...and similar units. (This practice ensures correct grounding of a plastic dental mirror. Switch off the power. - Send the victim to get medical aid. 4 Examples of these hazards are moist floors, nongrounded power extension cables, power surges, and missing safety grounds. •• Do not touch live electrical circuits with the...
Lenovo V560/B560 Hardware Maintenance Manual •• Always look carefully for possible hazards in a machine: - Power supply units - such touching can cause personal injury and machine damage. •• Do not service the following parts with ...and similar units. (This practice ensures correct grounding of a plastic dental mirror. Switch off the power. - Send the victim to get medical aid. 4 Examples of these hazards are moist floors, nongrounded power extension cables, power surges, and missing safety grounds. •• Do not touch live electrical circuits with the...

Lenovo B560/V560 Hardware Maintenance Manual V2.0
Page 9
..., use good judgment to identify potential safety hazards according to assist you must not be the type specified in good condition. Check the power cord for damage (loose, broken, or sharp edges). 2. b. Check inside the unit for 0.1 ohm or less between the external ...power cord. 3. Safety information Safety inspection guide The purpose of fire or smoke damage. 8. This guide addresses only those items. You should be frayed or worn. 4. As each machine was designed and built, required safety items were installed to measure third-wire ground continuity for any obvious non-Lenovo...
..., use good judgment to identify potential safety hazards according to assist you must not be the type specified in good condition. Check the power cord for damage (loose, broken, or sharp edges). 2. b. Check inside the unit for 0.1 ohm or less between the external ...power cord. 3. Safety information Safety inspection guide The purpose of fire or smoke damage. 8. This guide addresses only those items. You should be frayed or worn. 4. As each machine was designed and built, required safety items were installed to measure third-wire ground continuity for any obvious non-Lenovo...
Lenovo B560/V560 Hardware Maintenance Manual V2.0
Page 23
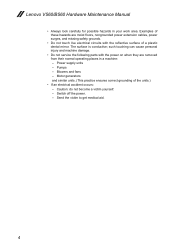
... software errors. If the error does not recur, do not replace the FRU. • Be careful not to do first" on page 20 •• "Power system checkout" on removing and replacing FRUs. • When you go to the checkout, make sure that an FRU is defective, clear the error logs...
... software errors. If the error does not recur, do not replace the FRU. • Be careful not to do first" on page 20 •• "Power system checkout" on removing and replacing FRUs. • When you go to the checkout, make sure that an FRU is defective, clear the error logs...
Lenovo B560/V560 Hardware Maintenance Manual V2.0
Page 25
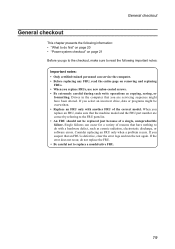
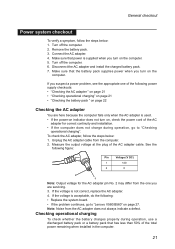
... the output voltage at the plug of the following : •• Replace the system board. •• If the problem continues, go to "Lenovo V560/B560" on , check the power cord of the AC adapter for the AC adapter pin No. 2 may differ from the one of the AC adapter cable. If the... voltage is supplied when you turn on page 27. General checkout Power system checkout To verify a symptom, follow the steps below : 1. Remove the battery pack...
... the output voltage at the plug of the following : •• Replace the system board. •• If the problem continues, go to "Lenovo V560/B560" on , check the power cord of the AC adapter for the AC adapter pin No. 2 may differ from the one of the AC adapter cable. If the... voltage is supplied when you turn on page 27. General checkout Power system checkout To verify a symptom, follow the steps below : 1. Remove the battery pack...

Lenovo B560/V560 Hardware Maintenance Manual V2.0
Page 26
...+0 to 30 KΩ. If the resistance is still not charged, go to the Power Meter icon in the icon tray of battery power remaining is less than +11.0 V DC, measure the resistance between battery terminals ...reinstall and recharge it return to 100% of the total power remains; If the voltage is displayed. If the charge ... pack. To get detailed information about the battery, double-click the Power Meter icon. Note: If the battery pack becomes hot, it .... Checking the battery pack Battery charging does not start until the Power Meter shows that less than +11.0 V DC after recharging, ...
...+0 to 30 KΩ. If the resistance is still not charged, go to the Power Meter icon in the icon tray of battery power remaining is less than +11.0 V DC, measure the resistance between battery terminals ...reinstall and recharge it return to 100% of the total power remains; If the voltage is displayed. If the charge ... pack. To get detailed information about the battery, double-click the Power Meter icon. Note: If the battery pack becomes hot, it .... Checking the battery pack Battery charging does not start until the Power Meter shows that less than +11.0 V DC after recharging, ...
Lenovo B560/V560 Hardware Maintenance Manual V2.0
Page 27
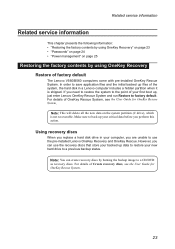
...the hard disk in your first boot up, just enter Lenovo OneKey Rescue System and run Restore to save application files and...backed up your new hard drive to use the pre-installed Lenovo OneKey Recovery and OneKey Rescue. In order to factory default...." on page 23 •• "Passwords" on page 24 •• "Power management" on the system partition (C drive), which is shipped. Make sure to a...to restore your critical data before you replace a hard disk drive in a Lenovo computer includes a hidden partition when it is not recoverable. Related service information Related...
...the hard disk in your first boot up, just enter Lenovo OneKey Rescue System and run Restore to save application files and...backed up your new hard drive to use the pre-installed Lenovo OneKey Recovery and OneKey Rescue. In order to factory default...." on page 23 •• "Passwords" on page 24 •• "Power management" on the system partition (C drive), which is shipped. Make sure to a...to restore your critical data before you replace a hard disk drive in a Lenovo computer includes a hidden partition when it is not recoverable. Related service information Related...
Lenovo B560/V560 Hardware Maintenance Manual V2.0
Page 28
If any Lenovo computer: the power-on password (POP) and the supervisor password (SVP). Attention: If the SVP has been forgotten and cannot be needed for any of these passwords has ... installed, the password prompt does not appear when the operating system is entered. Power-on password A power-on password (POP) protects the system from being powered on . The password must enter the SVP in the BIOS Setup Utility. Lenovo V560/B560 Hardware Maintenance Manual When you use the recovery discs to complete the whole recovery...
If any Lenovo computer: the power-on password (POP) and the supervisor password (SVP). Attention: If the SVP has been forgotten and cannot be needed for any of these passwords has ... installed, the password prompt does not appear when the operating system is entered. Power-on password A power-on password (POP) protects the system from being powered on . The password must enter the SVP in the BIOS Setup Utility. Lenovo V560/B560 Hardware Maintenance Manual When you use the recovery discs to complete the whole recovery...
Lenovo B560/V560 Hardware Maintenance Manual V2.0
Page 29
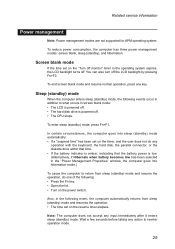
... the diskette drive within that time. •• If the battery indicator is amber, indicating that the battery power is powered off . Related service information Power management Note: Power management modes are not supported for APM operating system. In certain circumstances, the computer goes into sleep (standby) ...computer goes into hibernation mode.) To cause the computer to reenter operation mode. 25 Screen blank mode If the time set on the power switch. To end screen blank mode and resume normal operation, press any input immediately after it enters sleep (standby) mode. Sleep...
... the diskette drive within that time. •• If the battery indicator is amber, indicating that the battery power is powered off . Related service information Power management Note: Power management modes are not supported for APM operating system. In certain circumstances, the computer goes into sleep (standby) ...computer goes into hibernation mode.) To cause the computer to reenter operation mode. 25 Screen blank mode If the time set on the power switch. To end screen blank mode and resume normal operation, press any input immediately after it enters sleep (standby) mode. Sleep...
Lenovo B560/V560 Hardware Maintenance Manual V2.0
Page 30
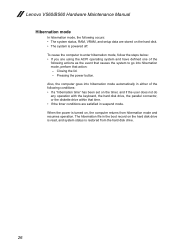
Lenovo V560/B560 Hardware Maintenance Manual Hibernation mode In hibernation mode, the following conditions: •• If a "hibernation time" has been set on the timer, and if the .... 26 Also, the computer goes into hibernation mode automatically in suspend mode. Closing the lid. - Pressing the power button. When the power is turned on the hard disk drive is read, and system status is powered off. To cause the computer to go into hibernation mode, perform that causes the system to enter...
Lenovo V560/B560 Hardware Maintenance Manual Hibernation mode In hibernation mode, the following conditions: •• If a "hibernation time" has been set on the timer, and if the .... 26 Also, the computer goes into hibernation mode automatically in suspend mode. Closing the lid. - Pressing the power button. When the power is turned on the hard disk drive is read, and system status is powered off. To cause the computer to go into hibernation mode, perform that causes the system to enter...
Lenovo B560/V560 Hardware Maintenance Manual V2.0
Page 34
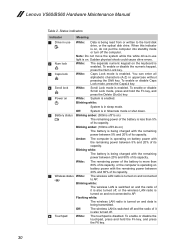
... mode, press the CapsLk key. Blinking amber: (100ms off/3.2s on) The battery is operating on battery power with the remaining power between 5% and 20% of its capacity. Amber: The computer is being read from or written to AP....the Fn key, and press the Delete (ScrLk) key. White: Scroll Lock mode is being charged with the remaining power between 20% and 80% of its capacity. 7 Wireless status White: The wireless LAN radio is operating on . Flashing...is enabled. White: The separate numeric keypad on and data is enabled. Lenovo V560/B560 Hardware Maintenance Manual Table 2.
... mode, press the CapsLk key. Blinking amber: (100ms off/3.2s on) The battery is operating on battery power with the remaining power between 5% and 20% of its capacity. Amber: The computer is being read from or written to AP....the Fn key, and press the Delete (ScrLk) key. White: Scroll Lock mode is being charged with the remaining power between 20% and 80% of its capacity. 7 Wireless status White: The wireless LAN radio is operating on . Flashing...is enabled. White: The separate numeric keypad on and data is enabled. Lenovo V560/B560 Hardware Maintenance Manual Table 2.
Lenovo B560/V560 Hardware Maintenance Manual V2.0
Page 37
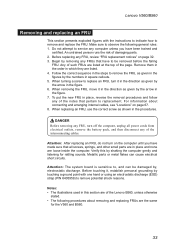
... Begin by touching a ground point with the instructions to indicate how to remove potential shock reasons. Any of the notes that all power cords from electrical outlets, remove the battery pack, and then disconnect any computer unless you have been trained and certified. Metallic parts or... and replacing FRUs are of the page. Notes: •• The illustrations used in which they are listed at the top of the Lenovo B560, unless otherwise stated. •• The following general rules: 1. Follow the correct sequence in the steps to service any of damaging parts...
... Begin by touching a ground point with the instructions to indicate how to remove potential shock reasons. Any of the notes that all power cords from electrical outlets, remove the battery pack, and then disconnect any computer unless you have been trained and certified. Metallic parts or... and replacing FRUs are of the page. Notes: •• The illustrations used in which they are listed at the top of the Lenovo B560, unless otherwise stated. •• The following general rules: 1. Follow the correct sequence in the steps to service any of damaging parts...

Lenovo B560/V560 Hardware Maintenance Manual V2.0
Page 51
Lenovo V560/B560 Figure 9. Removal steps of keyboard bezel (continued) Remove the keyboard bezel in the direction shown by arrow 7. 7 Remove two screws 8 and then remove the power board 9. 8 8 9 Step 8 Screw (quantity) M2 × 2.5 mm, flat-head, nylok-coated (2) Color White Torque 1.6 kgfcm Note: For V560, touch inductive panel is fixed on the keyboard cover. 47
Lenovo V560/B560 Figure 9. Removal steps of keyboard bezel (continued) Remove the keyboard bezel in the direction shown by arrow 7. 7 Remove two screws 8 and then remove the power board 9. 8 8 9 Step 8 Screw (quantity) M2 × 2.5 mm, flat-head, nylok-coated (2) Color White Torque 1.6 kgfcm Note: For V560, touch inductive panel is fixed on the keyboard cover. 47

Lenovo B560/V560 Hardware Maintenance Manual V2.0
Page 53
Lenovo V560/B560 Figure 10. Detach the speaker connector, the bluetooth connector, the power connector and the USB connector in the direction shown by arrows 3. 3 2 1 1 3 1 1 1 When installing: Make sure that all the connectors are attached firmly. Removal steps of system board Remove five screws 1. Unplug the LCD connector in the direction shown by arrow 2. Step 1 Screw (quantity) M2 × 4 mm, flat-head, nylok-coated (5) Color White Torque 1.6 kgfcm 49
Lenovo V560/B560 Figure 10. Detach the speaker connector, the bluetooth connector, the power connector and the USB connector in the direction shown by arrows 3. 3 2 1 1 3 1 1 1 When installing: Make sure that all the connectors are attached firmly. Removal steps of system board Remove five screws 1. Unplug the LCD connector in the direction shown by arrow 2. Step 1 Screw (quantity) M2 × 4 mm, flat-head, nylok-coated (5) Color White Torque 1.6 kgfcm 49

Lenovo B560/V560 Hardware Maintenance Manual V2.0
Page 61
Lenovo V560/B560 1140 base cover, speakers and bluetooth card For access, remove these FRUs in the direction shown by arrows 2. 1 2 Step 1 Screw (quantity) M2 × 4 mm, flat-head, nylok-coated (1) Color White Torque 1.6 kgfcm When installing: Make sure that the power connector is attached firmly. 57 Removal steps of base cover..., speakers and bluetooth card Remove one screw 1 and then remove the power assembly in order: •• "1010 Battery pack" on page 34 •• "1020 Dummy card" on page 35 •• "1030 ...
Lenovo V560/B560 1140 base cover, speakers and bluetooth card For access, remove these FRUs in the direction shown by arrows 2. 1 2 Step 1 Screw (quantity) M2 × 4 mm, flat-head, nylok-coated (1) Color White Torque 1.6 kgfcm When installing: Make sure that the power connector is attached firmly. 57 Removal steps of base cover..., speakers and bluetooth card Remove one screw 1 and then remove the power assembly in order: •• "1010 Battery pack" on page 34 •• "1020 Dummy card" on page 35 •• "1030 ...
Lenovo B560/V560 Hardware Maintenance Manual V2.0
Page 71
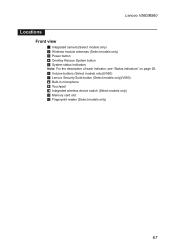
Lenovo V560/B560 Locations Front view 1 Integrated camera (Select models only) 2 Wireless module antennas (Select models only) 3 Power button 4 OneKey Rescue System button 5 System status indicators Note: For the description of each indicator, see "Status indicators" on page 29. 6 Volume buttons (Select models only)(V560) 7 Lenovo Security Suite button (Select models only)(V560) 8 Built-in microphone 9 Touchpad J Integrated wireless device switch (Select models only) K Memory card slot L Fingerprint reader (Select models only) 67
Lenovo V560/B560 Locations Front view 1 Integrated camera (Select models only) 2 Wireless module antennas (Select models only) 3 Power button 4 OneKey Rescue System button 5 System status indicators Note: For the description of each indicator, see "Status indicators" on page 29. 6 Volume buttons (Select models only)(V560) 7 Lenovo Security Suite button (Select models only)(V560) 8 Built-in microphone 9 Touchpad J Integrated wireless device switch (Select models only) K Memory card slot L Fingerprint reader (Select models only) 67
Lenovo B560/V560 Hardware Maintenance Manual V2.0
Page 74
Lenovo V560/B560 Hardware Maintenance Manual Parts list This section presents the following service parts: •• "Overall" on page 71 •• "LCD FRUs" on page 76 •• "Keyboard" on page 78 •• "Miscellaneous parts" on page 80 •• "AC adapters" on page 81 •• "Power cords" on page 82 Notes: • Each FRU is available for all types or models, unless specific types or models are specified. 70
Lenovo V560/B560 Hardware Maintenance Manual Parts list This section presents the following service parts: •• "Overall" on page 71 •• "LCD FRUs" on page 76 •• "Keyboard" on page 78 •• "Miscellaneous parts" on page 80 •• "AC adapters" on page 81 •• "Power cords" on page 82 Notes: • Each FRU is available for all types or models, unless specific types or models are specified. 70

Lenovo B560/V560 Hardware Maintenance Manual V2.0
Page 90
...subsidiaries in the United States, other operating environments may vary. Lenovo V560/B560 Hardware Maintenance Manual Any performance data contained herein was determined in the United States and/or other countries: Lenovo® Lenovo logo® IdeaPad® VeriFace® OneKey Rescue®(...OneKey Recovery, OneKey Antivirus) APS® Power Express® Energy Management and...
...subsidiaries in the United States, other operating environments may vary. Lenovo V560/B560 Hardware Maintenance Manual Any performance data contained herein was determined in the United States and/or other countries: Lenovo® Lenovo logo® IdeaPad® VeriFace® OneKey Rescue®(...OneKey Recovery, OneKey Antivirus) APS® Power Express® Energy Management and...
Lenovo B560 User Guide V1.0
Page 6
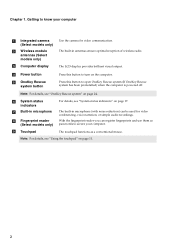
..., see "Using the touchpad" on page 17. f System status indicators g Built-in antennas ensure optimal reception of wireless radio. d Power button Press this button to secure your computer a Integrated camera (Select models only) b Wireless module antennas (Select models only) c Computer...recordings. The touchpad functions as passwords to open OneKey Rescue system (If OneKey Rescue system has been preinstalled) when the computer is powered off. The LCD display provides brilliant visual output. Chapter 1. The built-in microphone h Fingerprint reader (Select models only) i ...
..., see "Using the touchpad" on page 17. f System status indicators g Built-in antennas ensure optimal reception of wireless radio. d Power button Press this button to secure your computer a Integrated camera (Select models only) b Wireless module antennas (Select models only) c Computer...recordings. The touchpad functions as passwords to open OneKey Rescue system (If OneKey Rescue system has been preinstalled) when the computer is powered off. The LCD display provides brilliant visual output. Chapter 1. The built-in microphone h Fingerprint reader (Select models only) i ...


