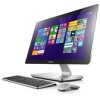
Lenovo A540/A740 Hardware Maintenance Manual
Page 1
Lenovo A540/A740Hardware Maintenance Manual Machine Types: F0AN [A540];F0AM [A740]
Lenovo A540/A740 Hardware Maintenance Manual
Page 3
Lenovo A540/A740 Hardware Maintenance Manual Machine Types: F0AN [A540];F0AM [A740]
Lenovo A540/A740 Hardware Maintenance Manual
Page 7
...manual contains service and reference information for trained servicers who are familiar with a TV-tuner card installed. It is intended only for Lenovo A540/A740 computers listed on the cover. The description of the instructions. Veuillez lire toutes les consignes de type DANGER et ATTENTION du pr...ésent document avant d'exécuter les instructions. Before servicing a Lenovo product, be sure to computers with Lenovo computer products. About this manual before following any of the TV-tuner card in this manual applies only to read...
Lenovo A540/A740 Hardware Maintenance Manual
Page 10
...installing Field Replaceable Units (FRUs) • Before you from their equipment that may prevent a current from a circuit. Use only one hand when working on electrical equipment. Stand on the computer, unplug the power cord. Examples of these instructions are removed from grounds ...electrical circuits, observe the following precautions: - Observe the special safety precautions when you . do not become a victim yourself. 4 Lenovo A540/A740Hardware Maintenance Manual Some hand tools have rubber floor mats near you work area. these hazards are safe to use. • ...
Lenovo A540/A740 Hardware Maintenance Manual
Page 12
... is required for operator safety and correct system function. Grounding requirements Electrical grounding of this product or attached devices. 6 Lenovo A540/A740Hardware Maintenance Manual To avoid a shock hazard: • Do not connect or disconnect any cables or perform installation, ...outlet. • Connect any equipment that meets the specific service requirement. Proper grounding of a grounded work surface. Note: The use one hand only to eliminate static on this product during an electrical storm. • Connect all power cords to any equipment when there ...
Lenovo A540/A740 Hardware Maintenance Manual
Page 14
CAUTION: Do not place any object weighing more than 82 kg (180 lbs.) on the power supply do not turn off the electrical current supplied to the device. To remove all electrical current from the device, ensure that all power cords are disconnected from the power source. The device also might have more than one power cord. CAUTION: The power control button on the device and the power switch on top of rack-mounted devices. 8 Lenovo A540/A740Hardware Maintenance Manual
Lenovo A540/A740 Hardware Maintenance Manual
Page 15
...; to 55°C Humidity: Operating: 35% to 80% Transit: 20% to 90% (40°C) Altitude: 86KPa to all computer models covered by this manual. Type Lenovo A540/A740 This section lists the physical specifications. General information This chapter provides general information that applies to 106KPa Electrical input: Input voltage: 90V-264V(AC...
Lenovo A540/A740 Hardware Maintenance Manual
Page 20
...from changing configuration settings. To change any combination of letters and numbers up to 16 characters (a-z and 0-9). 14 Lenovo A540/A740Hardware Maintenance Manual Start the Lenovo BIOS Setup Utility program (see "Password considerations" on page 13). 2. From the Security menu, select Set Administrator ...press the Enter key. 2. After you set an Administrator Password, a password prompt is displayed every time you cannot start the Lenovo BIOS Setup Utility program until a valid password is set an Administrator Password, do the following : 1. The password dialog box ...
Lenovo A540/A740 Hardware Maintenance Manual
Page 22
... does not boot from a device such as the CD/DVD-ROM drive disk or hard disk as expected, follow one of the screen. 4. Note: If the Startup Device Menu does not display using these steps, repeatedly press and release... Save changes and Exit from the menu. Depending on how the hard disk image was installed, changing this procedure to the Lenovo BIOS Setup Utility program menu and select the Exit option. 6. Selecting a startup device If your computer. 2. Selecting a ...a device up from or include the device in the boot sequence. 5. Notes: 16 Lenovo A540/A740Hardware Maintenance Manual
Lenovo A540/A740 Hardware Maintenance Manual
Page 26
...3. If all devices and components have bootable media in Startup and set . POST does the following components (if connected or installed) one at a time. External Cache d. This series of tests to check that the system is working correctly • Starts video operations ... the system. 4. Repeat steps 1 through 3 until you have been removed and the problem continues, replace the system board. 20 Lenovo A540/A740Hardware Maintenance Manual External devices (modem, printer, or mouse) b. To purposely configure the computer without a keyboard, select Keyboardless operation in...
Lenovo A540/A740 Hardware Maintenance Manual
Page 28
...CDs, DVDs or memory cards) from the drives, shut down the operating system, and turn off the computer and all attached devices. 22 Lenovo A540/A740Hardware Maintenance Manual Step 4. Disconnect the defective keyboard cable from electrical outlets. To replace the power cord and power adapter: Step 1. Step 2....keyboard cable to the computer. Note: The mouse can be connected to the computer. Unplug all cables attached to a USB connector on one side or at the rear of the computer. Step 3. Note: Your keyboard will be replaced using the same method. Replacing the power...
Lenovo A540/A740 Hardware Maintenance Manual
Page 30
... to an upright position, then lift the base cover up the base cover with the 8 screws. Return the computer to "Removing the base cover". 24 Lenovo A540/A740Hardware Maintenance Manual Unplug all cables attached to the computer. Refer to the base with the base, slide it back and snap it cool down...
Lenovo A540/A740 Hardware Maintenance Manual
Page 32
... 5 minutes to the brackets with the screws. Step 3. Step 4. Remove the base cover. c. Connect the data and power cable to "Removing the base cover". 26 Lenovo A540/A740Hardware Maintenance Manual Step 2. Unplug all power cords from the bracket. Refer to the new hard disk drive and motherboard. Install the new hard disk...
Lenovo A540/A740 Hardware Maintenance Manual
Page 34
... screws. Disconnect all power cords from the drives, shut down before removing the cover. To replace the heat-sink: Step 1. Refer to the motherboard. 28 Lenovo A540/A740Hardware Maintenance Manual Remove any other cables that secure the heat-sink to "Removing the base cover". Remove the base cover.
Lenovo A540/A740 Hardware Maintenance Manual
Page 36
... 7. Detach the speaker from electrical outlets. Step 7. Unplug all the cables connected to "Replacing the heat-sink". Remove a memory module. Refer to the motherboard. 30 Lenovo A540/A740Hardware Maintenance Manual Attach the new speaker cable to let it with the screws. Reattach the base cover and secure it with the 4 screws. Refer...
Lenovo A540/A740 Hardware Maintenance Manual
Page 38
... to the chassis: a. Reattach the base cover and secure it with the chassis and slide the hinge into position. c. To remove the rear cover 32 Lenovo A540/A740Hardware Maintenance Manual Line up the hinge with the screws. Secure the hinge to remove it cool down before removing the cover. Step 5. Step 6. Disconnect...
Lenovo A540/A740 Hardware Maintenance Manual
Page 40
Slide the LED panel upward from the bottom (with "Lenovo" logo) of the panel. 34 Lenovo A540/A740Hardware Maintenance Manual Step 7.
Lenovo A540/A740 Hardware Maintenance Manual
Page 42
Step 7. Step 8. b. Connect all the cables from electrical outlets. 36 Lenovo A540/A740Hardware Maintenance Manual Replacing the Wi-Fi card Note: Turn off the computer and all power cords from the transform board. To replace the Wi-...
Lenovo A540/A740 Hardware Maintenance Manual
Page 44
... the touch and LED panel cables to the LED panel. Step 6. Step 9. Reattach the rear cover to the motherboard. To replace the Bluetooth module: 38 Lenovo A540/A740Hardware Maintenance Manual Disconnect all cables attached to the computer. This includes power cords, input/output (I/O) cables, and any other cables that secure the power...
Lenovo A540/A740 Hardware Maintenance Manual
Page 46
... LED panel. Reattach the rear cover to the new camera. Step 5. Disconnect all power cords from the drives, shut down before removing the cover. 40 Lenovo A540/A740Hardware Maintenance Manual Refer to let it with the 3 screws. Remove the rear cover. b. Reattach the hinge to the chassis, and reconnect the touch and...