
User Guide
Page 4
...) © Copyright Lenovo 2009. LENOVO products, data, computer software, and services have been developed exclusively at private expense and are delivered pursuant a General Services Administration ″GSA″ contract, use , reproduction and disclosure. GS-35F-05925. Note Before using this information and the product it supports, be sure to restrictions...as defined by 48 C.F.R. 2.101 with limited and restricted rights to use , reproduction, or disclosure is subject to read and understand the ThinkCentre Safety and Warranty Guide and "Notices," on page 65. All rights reserved.
...) © Copyright Lenovo 2009. LENOVO products, data, computer software, and services have been developed exclusively at private expense and are delivered pursuant a General Services Administration ″GSA″ contract, use , reproduction and disclosure. GS-35F-05925. Note Before using this information and the product it supports, be sure to restrictions...as defined by 48 C.F.R. 2.101 with limited and restricted rights to use , reproduction, or disclosure is subject to read and understand the ThinkCentre Safety and Warranty Guide and "Notices," on page 65. All rights reserved.

User Guide
Page 7
If you no longer have a copy of personal injury and or damage to the ThinkCentre Safety and Warranty Guide that you can obtain a Portable Document Format (PDF) version from the Lenovo® Support Web site at: http://www.lenovo.com/support © Copyright Lenovo 2009 v Refer to your product. Reading and understanding this product. Important safety information...
If you no longer have a copy of personal injury and or damage to the ThinkCentre Safety and Warranty Guide that you can obtain a Portable Document Format (PDF) version from the Lenovo® Support Web site at: http://www.lenovo.com/support © Copyright Lenovo 2009 v Refer to your product. Reading and understanding this product. Important safety information...

User Guide
Page 9
... Technology Attachment (SATA) internal hard disk drive v Optical drive (some models) Video subsystem v Integrated graphics for discrete graphics card © Copyright Lenovo 2009 1 See Chapter 4, "Using the Setup Utility," on the system board for a Video Graphics Array (VGA) connector v Peripheral Component Interconnect... v Intel Core™ 2 Duo processor v Intel Core 2 Quad processor v Internal cache (size varies by model type) Memory v Supports up to two DDR2 DIMMs (double data rate 2 dual inline memory modules) v Flash memory for your computer. Product overview Features This ...
... Technology Attachment (SATA) internal hard disk drive v Optical drive (some models) Video subsystem v Integrated graphics for discrete graphics card © Copyright Lenovo 2009 1 See Chapter 4, "Using the Setup Utility," on the system board for a Video Graphics Array (VGA) connector v Peripheral Component Interconnect... v Intel Core™ 2 Duo processor v Intel Core 2 Quad processor v Internal cache (size varies by model type) Memory v Supports up to two DDR2 DIMMs (double data rate 2 dual inline memory modules) v Flash memory for your computer. Product overview Features This ...

User Guide
Page 10
Audio subsystem v Audio line-in connector, audio line-out connector, and microphone connector on the rear panel v Integrated high-definition (HD) audio with RTL ALC662 Audio Codec v Microphone connector and headphone connector on the front panel v Mono internal speaker (some models) Connectivity v 10/100/1000 Mbps ... v One PCI Express x16 graphics adapter card slot (varies by model type) Power v 280-watt auto-sensing power supply v Advanced Configuration and Power Interface (ACPI) support 2 User Guide
Audio subsystem v Audio line-in connector, audio line-out connector, and microphone connector on the rear panel v Integrated high-definition (HD) audio with RTL ALC662 Audio Codec v Microphone connector and headphone connector on the front panel v Mono internal speaker (some models) Connectivity v 10/100/1000 Mbps ... v One PCI Express x16 graphics adapter card slot (varies by model type) Power v 280-watt auto-sensing power supply v Advanced Configuration and Power Interface (ACPI) support 2 User Guide

User Guide
Page 11
Additional operating systems might be available or supported in features, and other support programs are subject to this booklet. Product overview 3 The operating systems listed here are being certified or tested for compatibility1 (varies by Lenovo as compatible with your computer following the publication of this list are included. Chapter 1. Operating systems, certified or...
Additional operating systems might be available or supported in features, and other support programs are subject to this booklet. Product overview 3 The operating systems listed here are being certified or tested for compatibility1 (varies by Lenovo as compatible with your computer following the publication of this list are included. Chapter 1. Operating systems, certified or...

User Guide
Page 13
... Recovery® (RnR) program is a one button recovery and restore solution that support this option. Chapter 1. See "Lenovo System Toolbox" on your hard disk drive. Lenovo Care: The Lenovo CareSM program guides you to a host of information and tools to help , and... enhance your system to the factory-installed state. Lenovo System Toolbox The Lenovo System Toolbox diagnostic program is preinstalled on password, hard disk drive password, and Windows password. A fingerprint reader keyboard is available with your ThinkCentre® computer. Product overview 5 As a result...
... Recovery® (RnR) program is a one button recovery and restore solution that support this option. Chapter 1. See "Lenovo System Toolbox" on your hard disk drive. Lenovo Care: The Lenovo CareSM program guides you to a host of information and tools to help , and... enhance your system to the factory-installed state. Lenovo System Toolbox The Lenovo System Toolbox diagnostic program is preinstalled on password, hard disk drive password, and Windows password. A fingerprint reader keyboard is available with your ThinkCentre® computer. Product overview 5 As a result...

User Guide
Page 19
...To obtain a copy of your computer by adding memory modules, adapter cards, or drives. For some external options, you , can expand the capabilities of the ThinkCentre Safety and Warranty Guide, go to build up around you. Chapter 2. Static electricity, although harmless to install the new part. When installing an external option... package containing the part to making the physical connection. Installing external options External speakers, a printer, or a scanner can cause static electricity to : http://www.lenovo.com/support Note: Use only computer parts provided by the edges.
...To obtain a copy of your computer by adding memory modules, adapter cards, or drives. For some external options, you , can expand the capabilities of the ThinkCentre Safety and Warranty Guide, go to build up around you. Chapter 2. Static electricity, although harmless to install the new part. When installing an external option... package containing the part to making the physical connection. Installing external options External speakers, a printer, or a scanner can cause static electricity to : http://www.lenovo.com/support Note: Use only computer parts provided by the edges.
User Guide
Page 20
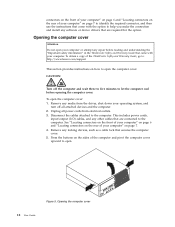
To obtain a copy of the ThinkCentre Safety and Warranty Guide, go to: http://www.lenovo.com/support This section provides instructions on the sides of the computer and pivot the computer cover upward to open . Disconnect the cables attached to the computer. ... turn off the computer and wait three to five minutes to let the computer cool before reading and understanding the "Important safety information" in the ThinkCentre Safety and Warranty Guide that are connected to the computer. connectors on the front of your computer" on page 6 and "Locating connectors on the rear...
To obtain a copy of the ThinkCentre Safety and Warranty Guide, go to: http://www.lenovo.com/support This section provides instructions on the sides of the computer and pivot the computer cover upward to open . Disconnect the cables attached to the computer. ... turn off the computer and wait three to five minutes to let the computer cool before reading and understanding the "Important safety information" in the ThinkCentre Safety and Warranty Guide that are connected to the computer. connectors on the front of your computer" on page 6 and "Locating connectors on the rear...

User Guide
Page 21
... replacing DDR2 DIMMs (double data rate 2 dual inline memory modules) that provide up to a maximum of the ThinkCentre Safety and Warranty Guide, go to: http://www.lenovo.com/support This section provides instructions on how to access the internal components. Open the computer cover. On some models, you... Make sure the hard disk drive assembly is in the latched down position before reading and understanding the "Important safety information" in the ThinkCentre Safety and Warranty Guide that you might need to pivot the drive bay assembly upward and remove the hard disk drive to install or ...
... replacing DDR2 DIMMs (double data rate 2 dual inline memory modules) that provide up to a maximum of the ThinkCentre Safety and Warranty Guide, go to: http://www.lenovo.com/support This section provides instructions on how to access the internal components. Open the computer cover. On some models, you... Make sure the hard disk drive assembly is in the latched down position before reading and understanding the "Important safety information" in the ThinkCentre Safety and Warranty Guide that you might need to pivot the drive bay assembly upward and remove the hard disk drive to install or ...

User Guide
Page 23
...retaining clips close. v To complete the installation, go to: http://www.lenovo.com/support This section provides instructions on how to "Completing the parts replacement" on page 12. 2. To obtain a copy of the ThinkCentre Safety and Warranty Guide, go to install or replace an adapter card. ... memory module What to the open your computer or attempt any repair before reading and understanding the "Important safety information" in the ThinkCentre Safety and Warranty Guide that the notch 1 on the system board. Remove the adapter card from its static-protective package. Installing ...
...retaining clips close. v To complete the installation, go to: http://www.lenovo.com/support This section provides instructions on how to "Completing the parts replacement" on page 12. 2. To obtain a copy of the ThinkCentre Safety and Warranty Guide, go to install or replace an adapter card. ... memory module What to the open your computer or attempt any repair before reading and understanding the "Important safety information" in the ThinkCentre Safety and Warranty Guide that the notch 1 on the system board. Remove the adapter card from its static-protective package. Installing ...
User Guide
Page 27
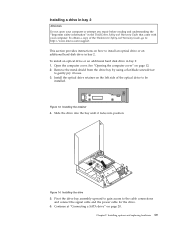
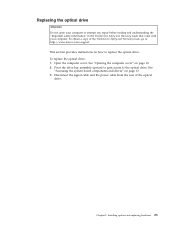
...reading and understanding the "Important safety information" in bay 2: 1. To install an optical drive or an additional hard disk drive in the ThinkCentre Safety and Warranty Guide that came with your computer. Open the computer cover. Installing the retainer 4. Installing the drive 5. See "Opening ...computer cover" on the left side of the ThinkCentre Safety and Warranty Guide, go to install an optical drive or an additional hard disk drive in bay 2. Continue at "Connecting a SATA drive" on how to : http://www.lenovo.com/support This section provides instructions on page 20. ...
...reading and understanding the "Important safety information" in bay 2: 1. To install an optical drive or an additional hard disk drive in the ThinkCentre Safety and Warranty Guide that came with your computer. Open the computer cover. Installing the retainer 4. Installing the drive 5. See "Opening ...computer cover" on the left side of the ThinkCentre Safety and Warranty Guide, go to install an optical drive or an additional hard disk drive in bay 2. Continue at "Connecting a SATA drive" on how to : http://www.lenovo.com/support This section provides instructions on page 20. ...
User Guide
Page 29
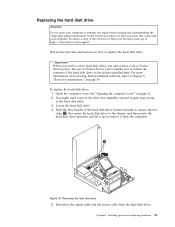
... remove it up to the factory-installed state. The set of Product Recovery discs enables you also receive a set of the ThinkCentre Safety and Warranty Guide, go to: http://www.lenovo.com/support This section provides instructions on page 12. 2. Locate the hard disk drive. 4. Replacing the hard disk drive Attention Do not...
... remove it up to the factory-installed state. The set of Product Recovery discs enables you also receive a set of the ThinkCentre Safety and Warranty Guide, go to: http://www.lenovo.com/support This section provides instructions on page 12. 2. Locate the hard disk drive. 4. Replacing the hard disk drive Attention Do not...
User Guide
Page 31
... the optical drive Attention Do not open your computer or attempt any repair before reading and understanding the "Important safety information" in the ThinkCentre Safety and Warranty Guide that came with your computer. Installing options and replacing hardware 23 To obtain a copy of the optical drive. ...Disconnect the signal cable and the power cable from the rear of the ThinkCentre Safety and Warranty Guide, go to: http://www.lenovo.com/support This section provides instructions on how to the optical drive. Pivot the drive bay assembly upward to ...
... the optical drive Attention Do not open your computer or attempt any repair before reading and understanding the "Important safety information" in the ThinkCentre Safety and Warranty Guide that came with your computer. Installing options and replacing hardware 23 To obtain a copy of the optical drive. ...Disconnect the signal cable and the power cable from the rear of the ThinkCentre Safety and Warranty Guide, go to: http://www.lenovo.com/support This section provides instructions on how to the optical drive. Pivot the drive bay assembly upward to ...
User Guide
Page 33
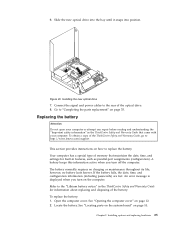
... or attempt any repair before reading and understanding the "Important safety information" in the ThinkCentre Safety and Warranty Guide that maintains the date, time, and settings for built-in the ThinkCentre Safety and Warranty Guide for information about replacing and disposing of the battery. however, ... the computer cover" on page 10. Chapter 2. Connect the signal and power cables to the rear of the ThinkCentre Safety and Warranty Guide, go to: http://www.lenovo.com/support This section provides instructions on how to replace the battery. To obtain a copy of the optical drive. 8. ...
... or attempt any repair before reading and understanding the "Important safety information" in the ThinkCentre Safety and Warranty Guide that maintains the date, time, and settings for built-in the ThinkCentre Safety and Warranty Guide for information about replacing and disposing of the battery. however, ... the computer cover" on page 10. Chapter 2. Connect the signal and power cables to the rear of the ThinkCentre Safety and Warranty Guide, go to: http://www.lenovo.com/support This section provides instructions on how to replace the battery. To obtain a copy of the optical drive. 8. ...
User Guide
Page 35
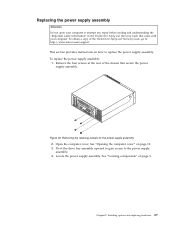
...of the chassis that came with your computer or attempt any repair before reading and understanding the "Important safety information" in the ThinkCentre Safety and Warranty Guide that secure the power supply assembly. Removing the retaining screws for the power supply assembly 2. Replacing the ... your computer. To replace the power supply assembly: 1. Remove the four screws at the rear of the ThinkCentre Safety and Warranty Guide, go to: http://www.lenovo.com/support This section provides instructions on how to the power supply assembly. 4. Locate the power supply assembly. Chapter ...
...of the chassis that came with your computer or attempt any repair before reading and understanding the "Important safety information" in the ThinkCentre Safety and Warranty Guide that secure the power supply assembly. Removing the retaining screws for the power supply assembly 2. Replacing the ... your computer. To replace the power supply assembly: 1. Remove the four screws at the rear of the ThinkCentre Safety and Warranty Guide, go to: http://www.lenovo.com/support This section provides instructions on how to the power supply assembly. 4. Locate the power supply assembly. Chapter ...

User Guide
Page 37
... sink and fan assembly Attention Do not open your computer. Install and tighten the four screws at the rear of the ThinkCentre Safety and Warranty Guide, go to: http://www.lenovo.com/support This section provides instructions on how to "Completing the parts replacement" on page 35. Turn off the computer and wait...
... sink and fan assembly Attention Do not open your computer. Install and tighten the four screws at the rear of the ThinkCentre Safety and Warranty Guide, go to: http://www.lenovo.com/support This section provides instructions on how to "Completing the parts replacement" on page 35. Turn off the computer and wait...
User Guide
Page 39
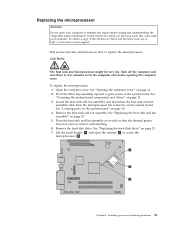
...the heat sink and fan assembly on how to let the computer cool before reading and understanding the "Important safety information" in the ThinkCentre Safety and Warranty Guide that the thermal grease does not come in contact with anything. 6. Chapter 2. Replacing the microprocessor Attention Do not...the computer and wait three to five minutes to replace the microprocessor. To obtain a copy of the ThinkCentre Safety and Warranty Guide, go to: http://www.lenovo.com/support This section provides instructions on its side so that came with your computer or attempt any repair before ...
...the heat sink and fan assembly on how to let the computer cool before reading and understanding the "Important safety information" in the ThinkCentre Safety and Warranty Guide that the thermal grease does not come in contact with anything. 6. Chapter 2. Replacing the microprocessor Attention Do not...the computer and wait three to five minutes to replace the microprocessor. To obtain a copy of the ThinkCentre Safety and Warranty Guide, go to: http://www.lenovo.com/support This section provides instructions on its side so that came with your computer or attempt any repair before ...

User Guide
Page 42
...connected to the appropriate connector on how to replace the mouse. To obtain a copy of the ThinkCentre Safety and Warranty Guide, go to: http://www.lenovo.com/support This section provides instructions on how to "Completing the parts replacement" on the front of your ...understanding the "Important safety information" in the ThinkCentre Safety and Warranty Guide that came with your computer. Go to replace the keyboard. To obtain a copy of the ThinkCentre Safety and Warranty Guide, go to: http://www.lenovo.com/support 34 User Guide This section provides instructions ...
...connected to the appropriate connector on how to replace the mouse. To obtain a copy of the ThinkCentre Safety and Warranty Guide, go to: http://www.lenovo.com/support This section provides instructions on how to "Completing the parts replacement" on the front of your ...understanding the "Important safety information" in the ThinkCentre Safety and Warranty Guide that came with your computer. Go to replace the keyboard. To obtain a copy of the ThinkCentre Safety and Warranty Guide, go to: http://www.lenovo.com/support 34 User Guide This section provides instructions ...

User Guide
Page 44
... are provided in readme files with the corresponding holes on the rear of the computer chassis. Ensure that are not preinstalled at: http://www.lenovo.com/support Installation instructions are routed correctly before lowering the drive bay assembly. Important Correctly route all power supply cables to avoid interference with the CRU or... drive bay assembly and place the drive locks to the computer. If you cannot close the computer cover. 4. Note: In most areas of the world, Lenovo requires the return of the defective CRU.
... are provided in readme files with the corresponding holes on the rear of the computer chassis. Ensure that are not preinstalled at: http://www.lenovo.com/support Installation instructions are routed correctly before lowering the drive bay assembly. Important Correctly route all power supply cables to avoid interference with the CRU or... drive bay assembly and place the drive locks to the computer. If you cannot close the computer cover. 4. Note: In most areas of the world, Lenovo requires the return of the defective CRU.

User Guide
Page 45
... to set a password. Integrated cable lock Password protection To deter unauthorized use . The cable lock attaches to a security slot at : http://www.lenovo.com/support Figure 30. You can be used to secure your computer, you are available. See Figure 30. Refer to Chapter 4, "Using the Setup Utility,"... on page 47 for normal use of your computer can order a security cable directly from Lenovo by searching on your computer, you can be ...
... to set a password. Integrated cable lock Password protection To deter unauthorized use . The cable lock attaches to a security slot at : http://www.lenovo.com/support Figure 30. You can be used to secure your computer, you are available. See Figure 30. Refer to Chapter 4, "Using the Setup Utility,"... on page 47 for normal use of your computer can order a security cable directly from Lenovo by searching on your computer, you can be ...


