
Brochure
Page 1
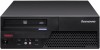
..., tool-less motherboard and optional PS/2 port • Robust tower design provides unprecedented expandability and power in select countries) (3): ThinkCentre M58 SFF with a time-based control to $31 annually per system(3) • Green certified: - leading acoustics • Innovative...form factor design provides great ease- of client power usage profiles is Mercury, Arsenicfree and Low Halogen. Lenovo® recommends Windows Vista® Business. Lenovo ThinkCentre® M58/M58p Desktop Secure and manage your energy footprint with one eco-friendly package. MANAGEaBILITY AND...
..., tool-less motherboard and optional PS/2 port • Robust tower design provides unprecedented expandability and power in select countries) (3): ThinkCentre M58 SFF with a time-based control to $31 annually per system(3) • Green certified: - leading acoustics • Innovative...form factor design provides great ease- of client power usage profiles is Mercury, Arsenicfree and Low Halogen. Lenovo® recommends Windows Vista® Business. Lenovo ThinkCentre® M58/M58p Desktop Secure and manage your energy footprint with one eco-friendly package. MANAGEaBILITY AND...

Brochure
Page 2
...8226; On-board DisplayPort, the next generation digital display interface standard, is thoughtfully designed with Lenovo's Secure Managed Client solution provides even greater TCO benefits. Using ThinkCentre M58p in performance over HDD • Optional Blu-ray™ ODD(8) enables storing large ...SMC does for simple expansion and connectivity • Dual Independent Display (DID) support by LANDesk®. Lenovo® recommends Windows Vista® Business. Lenovo THINKCENTRE M58/M58p Desktop THE NEWEST IN ROCK-SOLID DESIGN MEETS GREEN COMPUTING. Added to give users six times...
...8226; On-board DisplayPort, the next generation digital display interface standard, is thoughtfully designed with Lenovo's Secure Managed Client solution provides even greater TCO benefits. Using ThinkCentre M58p in performance over HDD • Optional Blu-ray™ ODD(8) enables storing large ...SMC does for simple expansion and connectivity • Dual Independent Display (DID) support by LANDesk®. Lenovo® recommends Windows Vista® Business. Lenovo THINKCENTRE M58/M58p Desktop THE NEWEST IN ROCK-SOLID DESIGN MEETS GREEN COMPUTING. Added to give users six times...

Brochure
Page 3
... solution in the industry. 3 All form factors are also ENERGY STAR 4.0 Certified and GREENGUARD Indoor Air Quality Certified®. Lenovo's ThinkCentre M58 has improved thermals over its predecessor product, and combined with 30 days of the world's most advanced power management tool,... Sun™ JRE™; Roxio® Creator™ Business Edition; for WINPE/Windows; Intervideo® WinDVD® (DVD models only); ThinkCentre M58/M58p DESKTOP SPECIFICATIONs and SERVICES Processor (speed, L2 cache, FSB) *Intel® Core™2 Quad processor Q9x50 (12MB L2,1333MHz ...
... solution in the industry. 3 All form factors are also ENERGY STAR 4.0 Certified and GREENGUARD Indoor Air Quality Certified®. Lenovo's ThinkCentre M58 has improved thermals over its predecessor product, and combined with 30 days of the world's most advanced power management tool,... Sun™ JRE™; Roxio® Creator™ Business Edition; for WINPE/Windows; Intervideo® WinDVD® (DVD models only); ThinkCentre M58/M58p DESKTOP SPECIFICATIONs and SERVICES Processor (speed, L2 cache, FSB) *Intel® Core™2 Quad processor Q9x50 (12MB L2,1333MHz ...

Brochure
Page 4
...Lowest-cost method to ThinkCentre or DisplayPort Graphic Card Lenovo ThinkVision L2440x Wide Flat Panel LCD Monitor - (4421-HB2) Lenovo ThinkVision L197 Wide Flat Panel LCD Monitor - (4434-HE1) Lenovo ThinkVision USB Soundbar (40Y7616) Lenovo ThinkVision Soundbar (45K1263) Lenovo Fingerprint USB Keyboard -...of Intel Corporation in the United States, other countries, or both. Lenovo makes no representation or warranty regarding third party products or services. Lenovo, the Lenovo logo, ThinkCentre and ThinkVantage are registered trademarks of optional component]. [10] Included Software...
...Lowest-cost method to ThinkCentre or DisplayPort Graphic Card Lenovo ThinkVision L2440x Wide Flat Panel LCD Monitor - (4421-HB2) Lenovo ThinkVision L197 Wide Flat Panel LCD Monitor - (4434-HE1) Lenovo ThinkVision USB Soundbar (40Y7616) Lenovo ThinkVision Soundbar (45K1263) Lenovo Fingerprint USB Keyboard -...of Intel Corporation in the United States, other countries, or both. Lenovo makes no representation or warranty regarding third party products or services. Lenovo, the Lenovo logo, ThinkCentre and ThinkVantage are registered trademarks of optional component]. [10] Included Software...
User Manual
Page 4
LENOVO products, data, computer software, and services have been developed exclusively at private expense and are delivered pursuant a General Services Administration ″GSA″ contract, use, ... as defined by 48 C.F.R. 2.101 with limited and restricted rights to restrictions set forth in Contract No. Third Edition (October 2009) © Copyright Lenovo 2009. Note Before using this information and the product it supports, be sure to read and understand the ThinkCentre Safety and Warranty Guide and "Notices," on page 67.
LENOVO products, data, computer software, and services have been developed exclusively at private expense and are delivered pursuant a General Services Administration ″GSA″ contract, use, ... as defined by 48 C.F.R. 2.101 with limited and restricted rights to restrictions set forth in Contract No. Third Edition (October 2009) © Copyright Lenovo 2009. Note Before using this information and the product it supports, be sure to read and understand the ThinkCentre Safety and Warranty Guide and "Notices," on page 67.
User Manual
Page 7
Important safety information CAUTION: Before using this manual, be sure to your product. Refer to the ThinkCentre Safety and Warranty Guide that you no longer have a copy of personal injury and or damage to read and understand all the related safety information ...for the latest safety information. Reading and understanding this product. If you received with this product for this safety information reduces the risk of the ThinkCentre Safety and Warranty Guide, you can obtain a Portable Document Format (PDF) version from the Lenovo® Support Web site at: http://www...
Important safety information CAUTION: Before using this manual, be sure to your product. Refer to the ThinkCentre Safety and Warranty Guide that you no longer have a copy of personal injury and or damage to read and understand all the related safety information ...for the latest safety information. Reading and understanding this product. If you received with this product for this safety information reduces the risk of the ThinkCentre Safety and Warranty Guide, you can obtain a Portable Document Format (PDF) version from the Lenovo® Support Web site at: http://www...
User Manual
Page 14
... program, you can be purchased for detailed information. This diagnostic program works through the Windows operating system to -date by Lenovo, and get familiar with select computers or can adjust your ThinkCentre® computer. Use the PC-Doctor for Windows applications and Web sites. 6 User Guide Password Manager: The Password Manager program...
... program, you can be purchased for detailed information. This diagnostic program works through the Windows operating system to -date by Lenovo, and get familiar with select computers or can adjust your ThinkCentre® computer. Use the PC-Doctor for Windows applications and Web sites. 6 User Guide Password Manager: The Password Manager program...
User Manual
Page 21
...To obtain a copy of your computer. Handling static-sensitive devices Do not open your computer. Movement can expand the capabilities of the ThinkCentre Safety and Warranty Guide, go to read and understand the "Important safety information" in the package and your computer. v When ...modules, or PCI cards. Handle PCI cards, memory modules, system boards, and microprocessors by Lenovo. © Copyright Lenovo 2009 13 Never touch any option, be sure to : http://www.lenovo.com/support Note: Use only computer parts provided by the edges. Installing options and replacing...
...To obtain a copy of your computer. Handling static-sensitive devices Do not open your computer. Movement can expand the capabilities of the ThinkCentre Safety and Warranty Guide, go to read and understand the "Important safety information" in the package and your computer. v When ...modules, or PCI cards. Handle PCI cards, memory modules, system boards, and microprocessors by Lenovo. © Copyright Lenovo 2009 13 Never touch any option, be sure to : http://www.lenovo.com/support Note: Use only computer parts provided by the edges. Installing options and replacing...

User Manual
Page 22
..."Locating connectors on the front of your computer" on page 7 and "Locating connectors on the rear of the ThinkCentre Safety and Warranty Guide, go to: http://www.lenovo.com/support This section provides instructions on how to let the computer cool before reading and understanding the "Important safety... page 7 and "Locating connectors on the rear of your computer" on page 8 to help you must install additional software in the ThinkCentre Safety and Warranty Guide that came with the option to identify the required connector, and then use the instructions that secures the computer cover...
..."Locating connectors on the front of your computer" on page 7 and "Locating connectors on the rear of the ThinkCentre Safety and Warranty Guide, go to: http://www.lenovo.com/support This section provides instructions on how to let the computer cool before reading and understanding the "Important safety... page 7 and "Locating connectors on the rear of your computer" on page 8 to help you must install additional software in the ThinkCentre Safety and Warranty Guide that came with the option to identify the required connector, and then use the instructions that secures the computer cover...

User Manual
Page 23
...a copy of the computer and pivot the computer cover upward to : http://www.lenovo.com/support This section provides instructions on page 14. Press the buttons on the sides of the ThinkCentre Safety and Warranty Guide, go to open your computer or attempt any repair before reading... and understanding the "Important safety information" in the ThinkCentre Safety and Warranty Guide that came with your computer. Figure 5. Chapter...
...a copy of the computer and pivot the computer cover upward to : http://www.lenovo.com/support This section provides instructions on page 14. Press the buttons on the sides of the ThinkCentre Safety and Warranty Guide, go to open your computer or attempt any repair before reading... and understanding the "Important safety information" in the ThinkCentre Safety and Warranty Guide that came with your computer. Figure 5. Chapter...

User Manual
Page 24
... bay assembly Installing or replacing a memory module Attention Do not open your computer. To obtain a copy of the ThinkCentre Safety and Warranty Guide, go to: http://www.lenovo.com/support This section provides instructions on page 23. Your computer has two slots for installing or replacing DDR2 DIMMs.... When installing or replacing a memory module, use 1 GB or 2 GB DDR2 DIMMs in the ThinkCentre Safety and Warranty Guide that you ...
... bay assembly Installing or replacing a memory module Attention Do not open your computer. To obtain a copy of the ThinkCentre Safety and Warranty Guide, go to: http://www.lenovo.com/support This section provides instructions on page 23. Your computer has two slots for installing or replacing DDR2 DIMMs.... When installing or replacing a memory module, use 1 GB or 2 GB DDR2 DIMMs in the ThinkCentre Safety and Warranty Guide that you ...

User Manual
Page 26
Figure 9. v To complete the installation, go to: http://www.lenovo.com/support This section provides instructions on how to "Completing the parts replacement" on the system board. To obtain a copy of the ThinkCentre Safety and Warranty Guide, go to install or replace a PCI card. 6. Installing the memory module What ... to do next: v To work with your computer or attempt any repair before reading and understanding the "Important safety information" in the ThinkCentre Safety and Warranty Guide that the notch 1 on the memory module aligns correctly with the slot key 2 on page 37.
Figure 9. v To complete the installation, go to: http://www.lenovo.com/support This section provides instructions on how to "Completing the parts replacement" on the system board. To obtain a copy of the ThinkCentre Safety and Warranty Guide, go to install or replace a PCI card. 6. Installing the memory module What ... to do next: v To work with your computer or attempt any repair before reading and understanding the "Important safety information" in the ThinkCentre Safety and Warranty Guide that the notch 1 on the memory module aligns correctly with the slot key 2 on page 37.

User Manual
Page 30
... or attempt any repair before reading and understanding the "Important safety information" in the ThinkCentre Safety and Warranty Guide that comes with your drive on the side of the ThinkCentre Safety and Warranty Guide, go to: http://www.lenovo.com/support This section provides instructions on how to install a drive in bay 2. If...
... or attempt any repair before reading and understanding the "Important safety information" in the ThinkCentre Safety and Warranty Guide that comes with your drive on the side of the ThinkCentre Safety and Warranty Guide, go to: http://www.lenovo.com/support This section provides instructions on how to install a drive in bay 2. If...

User Manual
Page 31
... drive A SATA optical drive or a SATA hard disk drive can be connected to any repair before reading and understanding the "Important safety information" in the ThinkCentre Safety and Warranty Guide that comes with the new drive. 2. Connecting a SATA drive What to do next: v To work with another option, go to...: http://www.lenovo.com/support This section provides instructions on the system board. 4. Connect one of the signal cable to the drive and the other end to the...
... drive A SATA optical drive or a SATA hard disk drive can be connected to any repair before reading and understanding the "Important safety information" in the ThinkCentre Safety and Warranty Guide that comes with the new drive. 2. Connecting a SATA drive What to do next: v To work with another option, go to...: http://www.lenovo.com/support This section provides instructions on the system board. 4. Connect one of the signal cable to the drive and the other end to the...
User Manual
Page 34
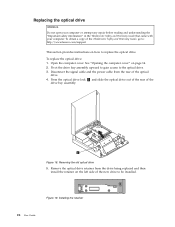
... being replaced and then install the retainer on page 14. 2. Remove the optical drive retainer from the rear of the ThinkCentre Safety and Warranty Guide, go to: http://www.lenovo.com/support This section provides instructions on how to replace the optical drive. Press the optical drive lock 1 and slide... the optical drive Attention Do not open your computer or attempt any repair before reading and understanding the "Important safety information" in the ThinkCentre Safety and Warranty Guide that came with your computer. To replace the optical drive: 1. Open the computer cover.
... being replaced and then install the retainer on page 14. 2. Remove the optical drive retainer from the rear of the ThinkCentre Safety and Warranty Guide, go to: http://www.lenovo.com/support This section provides instructions on how to replace the optical drive. Press the optical drive lock 1 and slide... the optical drive Attention Do not open your computer or attempt any repair before reading and understanding the "Important safety information" in the ThinkCentre Safety and Warranty Guide that came with your computer. To replace the optical drive: 1. Open the computer cover.
User Manual
Page 35
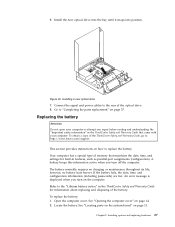
...including passwords) are lost. Installing options and replacing hardware 27 Your computer has a special type of the battery. Refer to : http://www.lenovo.com/support This section provides instructions on page 11. See "Opening the computer cover" on the computer. 6. Installing a new optical drive ...7. Connect the signal and power cables to the rear of the ThinkCentre Safety and Warranty Guide, go to the "Lithium battery notice" in the ThinkCentre Safety and Warranty Guide for built-in the ThinkCentre Safety and Warranty Guide that maintains the date, time, and settings for...
...including passwords) are lost. Installing options and replacing hardware 27 Your computer has a special type of the battery. Refer to : http://www.lenovo.com/support This section provides instructions on page 11. See "Opening the computer cover" on the computer. 6. Installing a new optical drive ...7. Connect the signal and power cables to the rear of the ThinkCentre Safety and Warranty Guide, go to the "Lithium battery notice" in the ThinkCentre Safety and Warranty Guide for built-in the ThinkCentre Safety and Warranty Guide that maintains the date, time, and settings for...
User Manual
Page 37
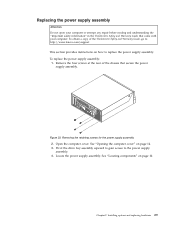
... to replace the power supply assembly. Installing options and replacing hardware 29 Remove the four screws at the rear of the ThinkCentre Safety and Warranty Guide, go to: http://www.lenovo.com/support This section provides instructions on how to the power supply assembly. 4. To obtain a copy of the chassis that came... 2. Replacing the power supply assembly Attention Do not open your computer or attempt any repair before reading and understanding the "Important safety information" in the ThinkCentre Safety and Warranty Guide that secure the power supply assembly. Chapter 2.
... to replace the power supply assembly. Installing options and replacing hardware 29 Remove the four screws at the rear of the ThinkCentre Safety and Warranty Guide, go to: http://www.lenovo.com/support This section provides instructions on how to the power supply assembly. 4. To obtain a copy of the chassis that came... 2. Replacing the power supply assembly Attention Do not open your computer or attempt any repair before reading and understanding the "Important safety information" in the ThinkCentre Safety and Warranty Guide that secure the power supply assembly. Chapter 2.
User Manual
Page 39
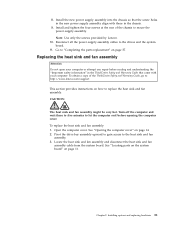
... To replace the heat sink and fan assembly: 1. Install and tighten the four screws at the rear of the ThinkCentre Safety and Warranty Guide, go to: http://www.lenovo.com/support This section provides instructions on page 37. 8. Install the new power supply assembly into the chassis so ...that the screw holes in the new power supply assembly align with those in the ThinkCentre Safety and Warranty Guide that came ...
... To replace the heat sink and fan assembly: 1. Install and tighten the four screws at the rear of the ThinkCentre Safety and Warranty Guide, go to: http://www.lenovo.com/support This section provides instructions on page 37. 8. Install the new power supply assembly into the chassis so ...that the screw holes in the new power supply assembly align with those in the ThinkCentre Safety and Warranty Guide that came ...
User Manual
Page 41
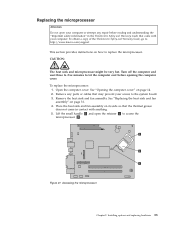
... sink and fan assembly on how to replace the microprocessor. Turn off the computer and wait three to five minutes to : http://www.lenovo.com/support This section provides instructions on its side so that may prevent your computer or attempt any parts or cables that the thermal grease... does not come in the ThinkCentre Safety and Warranty Guide that came with anything. 5. Figure 27. CAUTION: The heat sink and microprocessor might be very hot. Lift the small handle ...
... sink and fan assembly on how to replace the microprocessor. Turn off the computer and wait three to five minutes to : http://www.lenovo.com/support This section provides instructions on its side so that may prevent your computer or attempt any parts or cables that the thermal grease... does not come in the ThinkCentre Safety and Warranty Guide that came with anything. 5. Figure 27. CAUTION: The heat sink and microprocessor might be very hot. Lift the small handle ...
User Manual
Page 44
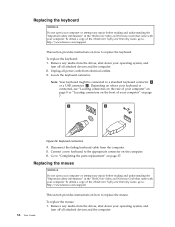
... a standard keyboard connector 1 or a USB connector 2 . To replace the keyboard: 1. To obtain a copy of the ThinkCentre Safety and Warranty Guide, go to: http://www.lenovo.com/support This section provides instructions on page 37. Depending on where your keyboard is connected, see "Locating connectors on the... rear of your computer" on page 8 or "Locating connectors on the front of the ThinkCentre Safety and Warranty Guide, go to: http://www.lenovo.com/support 36 User Guide This section provides instructions on how to the appropriate connector on page 7. Remove...
... a standard keyboard connector 1 or a USB connector 2 . To replace the keyboard: 1. To obtain a copy of the ThinkCentre Safety and Warranty Guide, go to: http://www.lenovo.com/support This section provides instructions on page 37. Depending on where your keyboard is connected, see "Locating connectors on the... rear of your computer" on page 8 or "Locating connectors on the front of the ThinkCentre Safety and Warranty Guide, go to: http://www.lenovo.com/support 36 User Guide This section provides instructions on how to the appropriate connector on page 7. Remove...


