
Brochure
Page 2
... each USB port individually - remove motherboard, HDD without tools • 8 external USB ports • PS/2® port support - ThinkCentre M58 and M58p desktops are delivered weekly across the company on Tower and SFF models Lenovo's Secure Managed Client(6) is the ThinkCentre's low power consumption, ensuring that takes up - Above and beyond what...
... each USB port individually - remove motherboard, HDD without tools • 8 external USB ports • PS/2® port support - ThinkCentre M58 and M58p desktops are delivered weekly across the company on Tower and SFF models Lenovo's Secure Managed Client(6) is the ThinkCentre's low power consumption, ensuring that takes up - Above and beyond what...

Brochure
Page 3
...174; Acrobat Reader®; ThinkVantage System Migration Assistant™; Roxio® Creator™ Business Edition; Intervideo® WinDVD® (DVD models only); Lenovo® recommends Windows Vista® Business. DIMM Eco USFF: 1GB/2GB PC3-8500 (1066MHz) DDR3 SODIMM Optical Drive DVD-ROM, DVD-Recordable. Microsoft... Solution™; All form factors are also ENERGY STAR 4.0 Certified and GREENGUARD Indoor Air Quality Certified®. Companies can only support Q9XXX & E8XXX series processors. ** Note: SMC model, available in Q1, 2009 in AG and Q2, 2009 worldwide.
...174; Acrobat Reader®; ThinkVantage System Migration Assistant™; Roxio® Creator™ Business Edition; Intervideo® WinDVD® (DVD models only); Lenovo® recommends Windows Vista® Business. DIMM Eco USFF: 1GB/2GB PC3-8500 (1066MHz) DDR3 SODIMM Optical Drive DVD-ROM, DVD-Recordable. Microsoft... Solution™; All form factors are also ENERGY STAR 4.0 Certified and GREENGUARD Indoor Air Quality Certified®. Companies can only support Q9XXX & E8XXX series processors. ** Note: SMC model, available in Q1, 2009 in AG and Q2, 2009 worldwide.
User Manual
Page 4
..., or disclosure is subject to read and understand the ThinkCentre Safety and Warranty Guide and "Notices," on page 67. Third Edition (October 2009) © Copyright Lenovo 2009. LENOVO products, data, computer software, and services have been developed exclusively at private expense and are delivered pursuant a General Services Administration ″GSA″ contract...
..., or disclosure is subject to read and understand the ThinkCentre Safety and Warranty Guide and "Notices," on page 67. Third Edition (October 2009) © Copyright Lenovo 2009. LENOVO products, data, computer software, and services have been developed exclusively at private expense and are delivered pursuant a General Services Administration ″GSA″ contract...
User Manual
Page 7
... risk of personal injury and or damage to the ThinkCentre Safety and Warranty Guide that you can obtain a Portable Document Format (PDF) version from the Lenovo® Support Web site at: http://www.lenovo.com/support © Copyright Lenovo 2009 v Refer to your product.
... risk of personal injury and or damage to the ThinkCentre Safety and Warranty Guide that you can obtain a Portable Document Format (PDF) version from the Lenovo® Support Web site at: http://www.lenovo.com/support © Copyright Lenovo 2009 v Refer to your product.

User Manual
Page 9
... Internal speaker (some models) Connectivity v 10/100/1000 Mbps integrated Ethernet controller v PCI V.90 Data/Fax modem (some models) © Copyright Lenovo 2009 1 Microprocessor v Intel® Celeron® processor v Intel Celeron dual-core processor v Intel Pentium® dual-core processor v Intel Core&#...8482; 2 Duo processor v Intel Core 2 Quad processor v Internal cache (size varies by model type) Memory v Supports up to two double data rate 2 dual inline memory modules (DDR2 DIMMs) Internal drives v Card reader (some models) v Optical drive v Serial...
... Internal speaker (some models) Connectivity v 10/100/1000 Mbps integrated Ethernet controller v PCI V.90 Data/Fax modem (some models) © Copyright Lenovo 2009 1 Microprocessor v Intel® Celeron® processor v Intel Celeron dual-core processor v Intel Pentium® dual-core processor v Intel Core&#...8482; 2 Duo processor v Intel Core 2 Quad processor v Internal cache (size varies by model type) Memory v Supports up to two double data rate 2 dual inline memory modules (DDR2 DIMMs) Internal drives v Card reader (some models) v Optical drive v Serial...
User Manual
Page 10
...PCI card slot v One PCI Express x16 graphics card slot Power v 280-watt auto-sensing power supply v Advanced Configuration and Power Interface (ACPI) support Security features v Computrace v Cover presence switch (also called intrusion switch, some models) v Hard disk drive password v Keyboard with fingerprint reader (some...Password for BIOS access v Serial and parallel port I/O control v Startup sequence control v Startup without diskette drive, keyboard, or mouse v Support for the addition of an integrated cable lock (Kensington lock) v Support to enable or disable a device v USB switch on/off
...PCI card slot v One PCI Express x16 graphics card slot Power v 280-watt auto-sensing power supply v Advanced Configuration and Power Interface (ACPI) support Security features v Computrace v Cover presence switch (also called intrusion switch, some models) v Hard disk drive password v Keyboard with fingerprint reader (some...Password for BIOS access v Serial and parallel port I/O control v Startup sequence control v Startup without diskette drive, keyboard, or mouse v Support for the addition of an integrated cable lock (Kensington lock) v Support to enable or disable a device v USB switch on/off

User Manual
Page 11
... an operating system has been certified or tested for compatibility1 (varies by Lenovo as compatible with preinstalled software programs. If it does, an operating system, device drivers to support built-in Windows 7 Professional, Windows 7 Ultimate, Windows Vista Business, ...® 7 v Microsoft Windows Vista® v Microsoft Windows XP Professional (preinstalled through downgrade rights in features, and other support programs are subject to press. Additional operating systems might come with your computer following the publication of the operating system vendor. Product...
... an operating system has been certified or tested for compatibility1 (varies by Lenovo as compatible with preinstalled software programs. If it does, an operating system, device drivers to support built-in Windows 7 Professional, Windows 7 Ultimate, Windows Vista Business, ...® 7 v Microsoft Windows Vista® v Microsoft Windows XP Professional (preinstalled through downgrade rights in features, and other support programs are subject to press. Additional operating systems might come with your computer following the publication of the operating system vendor. Product...
User Manual
Page 14
... Toolbox program is part of software that support this option. See "Lenovo System Toolbox" on page 59 for Windows applications and Web sites. It is only available on computers preinstalled with your power-on password, hard disk...ThinkCentre® computer. PC-Doctor for Rescue and Recovery The PC-Doctor for more information about your fingerprint and associate it with Windows 7 from Lenovo. See "Lenovo ThinkVantage Toolbox" on computers preinstalled with select computers or can cause hardware failures. Use the PC-Doctor for computers that you can replace passwords ...
... Toolbox program is part of software that support this option. See "Lenovo System Toolbox" on page 59 for Windows applications and Web sites. It is only available on computers preinstalled with your power-on password, hard disk...ThinkCentre® computer. PC-Doctor for Rescue and Recovery The PC-Doctor for more information about your fingerprint and associate it with Windows 7 from Lenovo. See "Lenovo ThinkVantage Toolbox" on computers preinstalled with select computers or can cause hardware failures. Use the PC-Doctor for computers that you can replace passwords ...
User Manual
Page 21
...to a metal expansion-slot cover or other metal surface. Handle PCI cards, memory modules, system boards, and microprocessors by Lenovo. © Copyright Lenovo 2009 13 Never touch any repair before reading and understanding the "Important safety information" in the computer without setting the part...instructions along with the instructions that came in the package and your computer. Static electricity, although harmless to : http://www.lenovo.com/support Note: Use only computer parts provided by the edges. This reduces static electricity in on a smooth, level surface and place...
...to a metal expansion-slot cover or other metal surface. Handle PCI cards, memory modules, system boards, and microprocessors by Lenovo. © Copyright Lenovo 2009 13 Never touch any repair before reading and understanding the "Important safety information" in the computer without setting the part...instructions along with the instructions that came in the package and your computer. Static electricity, although harmless to : http://www.lenovo.com/support Note: Use only computer parts provided by the edges. This reduces static electricity in on a smooth, level surface and place...

User Manual
Page 22
To obtain a copy of the ThinkCentre Safety and Warranty Guide, go to: http://www.lenovo.com/support This section provides instructions on the rear of your computer. See "Locating connectors on the front of your computer" on page 7 and "Locating connectors on ...
To obtain a copy of the ThinkCentre Safety and Warranty Guide, go to: http://www.lenovo.com/support This section provides instructions on the rear of your computer. See "Locating connectors on the front of your computer" on page 7 and "Locating connectors on ...

User Manual
Page 23
... not open . Installing options and replacing hardware 15 Press the buttons on the sides of the ThinkCentre Safety and Warranty Guide, go to: http://www.lenovo.com/support This section provides instructions on page 14.
... not open . Installing options and replacing hardware 15 Press the buttons on the sides of the ThinkCentre Safety and Warranty Guide, go to: http://www.lenovo.com/support This section provides instructions on page 14.

User Manual
Page 24
... ThinkCentre Safety and Warranty Guide that you might need to pivot the drive bay assembly upward and remove the hard disk drive to : http://www.lenovo.com/support This section provides instructions on page 23. Pivoting the drive bay assembly Installing or replacing a memory module Attention Do not open your computer. On...
... ThinkCentre Safety and Warranty Guide that you might need to pivot the drive bay assembly upward and remove the hard disk drive to : http://www.lenovo.com/support This section provides instructions on page 23. Pivoting the drive bay assembly Installing or replacing a memory module Attention Do not open your computer. On...

User Manual
Page 26
.... v To complete the installation, go to install or replace a PCI card. Make sure that came with the slot key 2 on how to : http://www.lenovo.com/support This section provides instructions on the system board. To obtain a copy of the ThinkCentre Safety and Warranty Guide, go to the appropriate section. Installing the...
.... v To complete the installation, go to install or replace a PCI card. Make sure that came with the slot key 2 on how to : http://www.lenovo.com/support This section provides instructions on the system board. To obtain a copy of the ThinkCentre Safety and Warranty Guide, go to the appropriate section. Installing the...

User Manual
Page 30
... the ThinkCentre Safety and Warranty Guide that comes with your drive on the side of the ThinkCentre Safety and Warranty Guide, go to: http://www.lenovo.com/support This section provides instructions on how to gently pry it locks into the bay until it loose. 3. See "Opening the computer cover" on page...
... the ThinkCentre Safety and Warranty Guide that comes with your drive on the side of the ThinkCentre Safety and Warranty Guide, go to: http://www.lenovo.com/support This section provides instructions on how to gently pry it locks into the bay until it loose. 3. See "Opening the computer cover" on page...

User Manual
Page 31
... that comes with another option, go to replace the hard disk drive. To connect a SATA drive: 1. v To complete the installation, go to: http://www.lenovo.com/support This section provides instructions on how to the appropriate section. Locate the signal cable that came with your computer or attempt any available SATA connector...
... that comes with another option, go to replace the hard disk drive. To connect a SATA drive: 1. v To complete the installation, go to: http://www.lenovo.com/support This section provides instructions on how to the appropriate section. Locate the signal cable that came with your computer or attempt any available SATA connector...
User Manual
Page 34
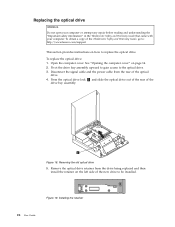
.... Press the optical drive lock 1 and slide the optical drive out of the rear of the ThinkCentre Safety and Warranty Guide, go to: http://www.lenovo.com/support This section provides instructions on page 14. 2. Figure 19. See "Opening the computer cover" on how to replace the optical drive. Figure 18. Remove...
.... Press the optical drive lock 1 and slide the optical drive out of the rear of the ThinkCentre Safety and Warranty Guide, go to: http://www.lenovo.com/support This section provides instructions on page 14. 2. Figure 19. See "Opening the computer cover" on how to replace the optical drive. Figure 18. Remove...
User Manual
Page 35
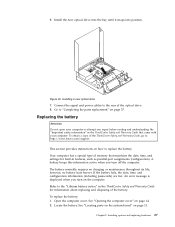
... bay until it snaps into position. Installing a new optical drive 7. To obtain a copy of the ThinkCentre Safety and Warranty Guide, go to: http://www.lenovo.com/support This section provides instructions on page 14. 2. however, no charging or maintenance throughout its life; To replace the battery: 1. Replacing the battery Attention Do not...
... bay until it snaps into position. Installing a new optical drive 7. To obtain a copy of the ThinkCentre Safety and Warranty Guide, go to: http://www.lenovo.com/support This section provides instructions on page 14. 2. however, no charging or maintenance throughout its life; To replace the battery: 1. Replacing the battery Attention Do not...
User Manual
Page 37
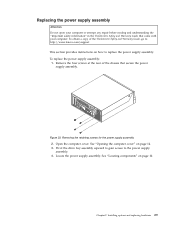
... Guide that secure the power supply assembly. Remove the four screws at the rear of the ThinkCentre Safety and Warranty Guide, go to: http://www.lenovo.com/support This section provides instructions on page 14. 3. Removing the retaining screws for the power supply assembly 2. Pivot the drive bay assembly upward to gain...
... Guide that secure the power supply assembly. Remove the four screws at the rear of the ThinkCentre Safety and Warranty Guide, go to: http://www.lenovo.com/support This section provides instructions on page 14. 3. Removing the retaining screws for the power supply assembly 2. Pivot the drive bay assembly upward to gain...
User Manual
Page 39
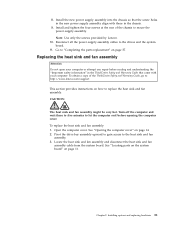
To replace the heat sink and fan assembly: 1. Open the computer cover. Note: Use only the screws provided by Lenovo. 10. Locate the heat sink and fan assembly and disconnect the heat sink and fan assembly cable from the system board. CAUTION: The heat sink ... sink and fan assembly. 3. Install and tighten the four screws at the rear of the ThinkCentre Safety and Warranty Guide, go to: http://www.lenovo.com/support This section provides instructions on how to "Completing the parts replacement" on page 37. Replacing the heat sink and fan assembly Attention Do not open...
To replace the heat sink and fan assembly: 1. Open the computer cover. Note: Use only the screws provided by Lenovo. 10. Locate the heat sink and fan assembly and disconnect the heat sink and fan assembly cable from the system board. CAUTION: The heat sink ... sink and fan assembly. 3. Install and tighten the four screws at the rear of the ThinkCentre Safety and Warranty Guide, go to: http://www.lenovo.com/support This section provides instructions on how to "Completing the parts replacement" on page 37. Replacing the heat sink and fan assembly Attention Do not open...
User Manual
Page 41
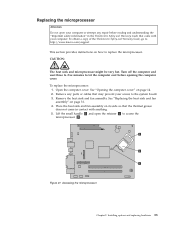
... the "Important safety information" in contact with your computer. Installing options and replacing hardware 33 See "Opening the computer cover" on how to : http://www.lenovo.com/support This section provides instructions on page 14. 2. Figure 27. Open the computer cover. Accessing the microprocessor Chapter 2. Remove any repair before opening the computer...
... the "Important safety information" in contact with your computer. Installing options and replacing hardware 33 See "Opening the computer cover" on how to : http://www.lenovo.com/support This section provides instructions on page 14. 2. Figure 27. Open the computer cover. Accessing the microprocessor Chapter 2. Remove any repair before opening the computer...


