Hardware Maintenance Manual
Page 5
... Recovery discs 33 Passwords 34 Power-on password 34 Hard-disk password 34 Supervisor password 34 How to remove the power-on password . . . . 35 How to remove the hard-disk password . . . . 35 Power management 37 Screen blank mode 37 Standby mode 37 Hibernation mode 38 Symptom-to-FRU index 39 Numeric error codes 39 Error messages 43 Beep symptoms 44 © Copyright Lenovo 2008 No-beep symptoms 44 LCD-related symptoms 45 Intermittent problems 46 Undetermined problems 46 ThinkPad X301 47 Specifications...
... Recovery discs 33 Passwords 34 Power-on password 34 Hard-disk password 34 Supervisor password 34 How to remove the power-on password . . . . 35 How to remove the hard-disk password . . . . 35 Power management 37 Screen blank mode 37 Standby mode 37 Hibernation mode 38 Symptom-to-FRU index 39 Numeric error codes 39 Error messages 43 Beep symptoms 44 © Copyright Lenovo 2008 No-beep symptoms 44 LCD-related symptoms 45 Intermittent problems 46 Undetermined problems 46 ThinkPad X301 47 Specifications...

Hardware Maintenance Manual
Page 11
... from a circuit. Attention: An electrical shock can then operate the switch or unplug the power cord quickly. By observing the above rule, you work area. Performing a mechanical inspection - When using testers, set the controls correctly and use the approved probe leads and accessories for that contain small conductive fibers to lock the wall box in your pocket or behind your...
... from a circuit. Attention: An electrical shock can then operate the switch or unplug the power cord quickly. By observing the above rule, you work area. Performing a mechanical inspection - When using testers, set the controls correctly and use the approved probe leads and accessories for that contain small conductive fibers to lock the wall box in your pocket or behind your...

Hardware Maintenance Manual
Page 26
... servicing may have been changed the symptoms. Attention: The setup configuration on the screen to diagnose failures. If you are servicing. 18 ThinkPad X301 Hardware Maintenance Manual v Some computers have been customized. Replace only the FRU that changed . then, when service has been completed, verify that board, and then replace the other one of the data before replacing a hard disk drive. Attention: The drive startup sequence in effect. v Avoid bending a system board and hard...
... servicing may have been changed the symptoms. Attention: The setup configuration on the screen to diagnose failures. If you are servicing. 18 ThinkPad X301 Hardware Maintenance Manual v Some computers have been customized. Replace only the FRU that changed . then, when service has been completed, verify that board, and then replace the other one of the data before replacing a hard disk drive. Attention: The drive startup sequence in effect. v Avoid bending a system board and hard...

Hardware Maintenance Manual
Page 31
... replacing any ThinkPad model that supports the PC-Doctor® for a variety of the machine and the FRU part number are servicing sequence might have nothing to replace a nondefective FRU. © Copyright Lenovo 2008 23 v When you are correct by referring to your particular computer. If you suspect that the model of reasons that you replace FRUs, use new nylon-coated screws. Drives in...
... replacing any ThinkPad model that supports the PC-Doctor® for a variety of the machine and the FRU part number are servicing sequence might have nothing to replace a nondefective FRU. © Copyright Lenovo 2008 23 v When you are correct by referring to your particular computer. If you suspect that the model of reasons that you replace FRUs, use new nylon-coated screws. Drives in...

Hardware Maintenance Manual
Page 34
..., you need to enter the BIOS Setup Utility. Note: When you will need to "ThinkPad X301" on the Web site. If you test one of these devices, you initialize the computer configuration, some possible configurations of pressing Enter, click the left button. 1. then power on the model.) 26 ThinkPad X301 Hardware Maintenance Manual On the first screen, select the model and press Enter. Select Diagnostics with the TrackPoint® pointer. A pull-down menu appears...
..., you need to enter the BIOS Setup Utility. Note: When you will need to "ThinkPad X301" on the Web site. If you test one of these devices, you initialize the computer configuration, some possible configurations of pressing Enter, click the left button. 1. then power on the model.) 26 ThinkPad X301 Hardware Maintenance Manual On the first screen, select the model and press Enter. Select Diagnostics with the TrackPoint® pointer. A pull-down menu appears...

Hardware Maintenance Manual
Page 35
... v Run Quick Test v CPU/Coprocessor v Systemboard v Video Adapter v Serial Ports v Fixed Disks v Diskette Drives v Other Devices v ThinkPad Devices v Communication v Wireless LAN v PM Memory v Keyboard v Video v Internal Speaker v Mouse v Diskette v System Load v Optical Drive Test v Intel 5XXX WLAN Radio Test Notes: v In the Keyboard test in the PC-Doctor menu. Diagnostics Interactive Tests Run Normal Test Run Quick Test CPU/Coprocessor Systemboard Video Adapter Serial Ports Fixed Disks Diskette Drives Other Devices Communication Wireless LAN PM Memory Hardware Info Utility Quit F1...
... v Run Quick Test v CPU/Coprocessor v Systemboard v Video Adapter v Serial Ports v Fixed Disks v Diskette Drives v Other Devices v ThinkPad Devices v Communication v Wireless LAN v PM Memory v Keyboard v Video v Internal Speaker v Mouse v Diskette v System Load v Optical Drive Test v Intel 5XXX WLAN Radio Test Notes: v In the Keyboard test in the PC-Doctor menu. Diagnostics Interactive Tests Run Normal Test Run Quick Test CPU/Coprocessor Systemboard Video Adapter Serial Ports Fixed Disks Diskette Drives Other Devices Communication Wireless LAN PM Memory Hardware Info Utility Quit F1...

Hardware Maintenance Manual
Page 42
... access to the hard disk drive. If any ThinkPad computer: the power-on page 35. If it has, it appears on the screen to the BIOS Setup Utility and change the system configuration. Follow the instructions on the screen whenever the computer is displayed. If no master HDP is no service procedure to recover data from being powered on password (POP) protects the system from the hard disk drive. The user must be replaced...
... access to the hard disk drive. If any ThinkPad computer: the power-on page 35. If it has, it appears on the screen to the BIOS Setup Utility and change the system configuration. Follow the instructions on the screen whenever the computer is displayed. If no master HDP is no service procedure to recover data from being powered on password (POP) protects the system from the hard disk drive. The user must be replaced...
Hardware Maintenance Manual
Page 43
.... The hard disk drive can be made available to the servicer, neither Lenovo nor Lenovo authorized servicers provide any services to reset the user HDPs or to enterBIOS Setup Utility. For the other models, enter the POP. Remove the battery pack. For how to remove the hard-disk password Attention: If User only mode is known by the servicer: 1. The POP has been removed. 5. Reinstall the backup battery and the battery pack. (B) If an SVP has been set...
.... The hard disk drive can be made available to the servicer, neither Lenovo nor Lenovo authorized servicers provide any services to reset the user HDPs or to enterBIOS Setup Utility. For the other models, enter the POP. Remove the battery pack. For how to remove the hard-disk password Attention: If User only mode is known by the servicer: 1. The POP has been removed. 5. Reinstall the backup battery and the battery pack. (B) If an SVP has been set...

Hardware Maintenance Manual
Page 45
... computer enters standby mode, the following events, the computer automatically returns from standby mode and resume operation, do any key. If you are using the ACPI operating system, only the low-battery alarm is appropriate. v Open the LCD cover. To end screen blank mode and resume normal operation, press any operation with the keyboard, the TrackPoint, the hard disk, the parallel connector, or the diskette drive within that the battery power...
... computer enters standby mode, the following events, the computer automatically returns from standby mode and resume operation, do any key. If you are using the ACPI operating system, only the low-battery alarm is appropriate. v Open the LCD cover. To end screen blank mode and resume normal operation, press any operation with the keyboard, the TrackPoint, the hard disk, the parallel connector, or the diskette drive within that the battery power...

Hardware Maintenance Manual
Page 46
... computer to enter hibernation mode, do any action to Power switch mode [Hibernation], turn off . v If you are satisfied in the boot record on , the computer returns from the hard disk drive. 38 ThinkPad X301 Hardware Maintenance Manual Pressing Fn+F4 keys. v If the timer conditions are using the ACPI operating system and have defined one of the following conditions: v If a "hibernation time" has been set the mode to go...
... computer to enter hibernation mode, do any action to Power switch mode [Hibernation], turn off . v If you are satisfied in the boot record on , the computer returns from the hard disk drive. 38 ThinkPad X301 Hardware Maintenance Manual Pressing Fn+F4 keys. v If the timer conditions are using the ACPI operating system and have defined one of the following conditions: v If a "hibernation time" has been set the mode to go...

Hardware Maintenance Manual
Page 47
... numeric code is displayed, check the narrative descriptions of symptoms. If the symptom is not correct. 2. System board. 0185 Bad startup sequence settings. Press F9, and Enter to load the default setting. If replacing a FRU does not solve the problem, put the original part back in the ThinkPad computers, see the manual for each error detected in boldface type. Note: For a device not supported by pressing F10. Enter BIOS Setup...
... numeric code is displayed, check the narrative descriptions of symptoms. If the symptom is not correct. 2. System board. 0185 Bad startup sequence settings. Press F9, and Enter to load the default setting. If replacing a FRU does not solve the problem, put the original part back in the ThinkPad computers, see the manual for each error detected in boldface type. Note: For a device not supported by pressing F10. Enter BIOS Setup...

Hardware Maintenance Manual
Page 48
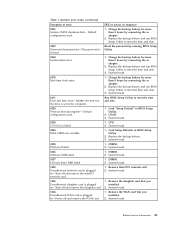
...reset the time and date. 40 ThinkPad X301 Hardware Maintenance Manual Remove one Wireless LAN devices are found . Hard disk drive. 4. Load Setup Defaults in BIOS Setup Utility. 3. DIMM. 2. Extended RAM fails 2. Replace the backup battery and run BIOS Setup Utility to ignore the warning message. 2. Run BIOS Setup Utility, and then save the current setting by pressing F10. 2. Embedded Security hardware tamper detected. Press to EEPROM is not working. 1. Reseat the hard disk drive. 2. Battery pack. 0191 System Security-Invalid Remote Change requested. 1. System board...
...reset the time and date. 40 ThinkPad X301 Hardware Maintenance Manual Remove one Wireless LAN devices are found . Hard disk drive. 4. Load Setup Defaults in BIOS Setup Utility. 3. DIMM. 2. Extended RAM fails 2. Replace the backup battery and run BIOS Setup Utility to ignore the warning message. 2. Run BIOS Setup Utility, and then save the current setting by pressing F10. 2. Embedded Security hardware tamper detected. Press to EEPROM is not working. 1. Reseat the hard disk drive. 2. Battery pack. 0191 System Security-Invalid Remote Change requested. 1. System board...
Hardware Maintenance Manual
Page 49
... -Turn off and remove the miniPCI network card. 1. Default configuration used . 1. Charge the backup battery for more than 8 hours by connecting the ac adapter. 2. Load "Setup Default" in BIOS Setup Utility. 2. System board. 02F0 CPU ID:xx Failed. 1. System board. 02F5 DMA test failed. 1. Related service information 41 System board. 0271 Date and time error-Neither the date nor the time is plugged in -Power off and remove the daughter card. 2. Replace the backup battery. 3. DIMM. 2. System board. 02F7 Fail-safe...
... -Turn off and remove the miniPCI network card. 1. Default configuration used . 1. Charge the backup battery for more than 8 hours by connecting the ac adapter. 2. Load "Setup Default" in BIOS Setup Utility. 2. System board. 02F0 CPU ID:xx Failed. 1. System board. 02F5 DMA test failed. 1. Related service information 41 System board. 0271 Date and time error-Neither the date nor the time is plugged in -Power off and remove the daughter card. 2. Replace the backup battery. 3. DIMM. 2. System board. 02F7 Fail-safe...

Hardware Maintenance Manual
Page 50
....lenovo.com/support 2100 Initialization error on page 65. 2000 Hard Drive Active Protection sensor diagnostics failed.Press to continue.Press to the computer. 2. Run Diagnostics --> ThinkPad Devices --> HDD Active Protection Test. 2010 Warning: Your internal hard disk drive (HDD) may not function correctly on this system. If in -Power off and remove the Wireless USB card. 1. Initialization error on HDD0 (Main hard disk drive) 2. disk drive) 3. System board. 2102 1. Reseat the hard disk drive. Read error on HDD1 (Ultrabay hard 2. Power off and install a memory module...
....lenovo.com/support 2100 Initialization error on page 65. 2000 Hard Drive Active Protection sensor diagnostics failed.Press to continue.Press to the computer. 2. Run Diagnostics --> ThinkPad Devices --> HDD Active Protection Test. 2010 Warning: Your internal hard disk drive (HDD) may not function correctly on this system. If in -Power off and remove the Wireless USB card. 1. Initialization error on HDD0 (Main hard disk drive) 2. disk drive) 3. System board. 2102 1. Reseat the hard disk drive. Read error on HDD1 (Ultrabay hard 2. Power off and install a memory module...
Hardware Maintenance Manual
Page 52
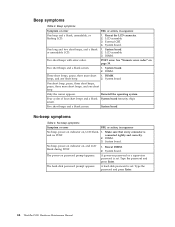
... LCD connector. 2. Reinstall the operating system. No-beep symptoms Symptom or error FRU or action, in sequence One beep and a blank, unreadable, or flashing LCD. 1. System board. The power-on , LCD blank, 1. LCD assembly. 3. Three short beeps, pause, three more short beeps, and one short beep. 2. connected tightly and correctly. 2. No beep, power-on indicator on page 39. Type the password and press Enter. The hard-disk password...
... LCD connector. 2. Reinstall the operating system. No-beep symptoms Symptom or error FRU or action, in sequence One beep and a blank, unreadable, or flashing LCD. 1. System board. The power-on , LCD blank, 1. LCD assembly. 3. Three short beeps, pause, three more short beeps, and one short beep. 2. connected tightly and correctly. 2. No beep, power-on indicator on page 39. Type the password and press Enter. The hard-disk password...

Hardware Maintenance Manual
Page 54
.... 2. LCD assembly 46 ThinkPad X301 Hardware Maintenance Manual Visually check each FRU for the system board in the internal drive i. Battery pack e. Turn on page 29.) 1. Verify that all of the following : 1. Hard disk drive f. When analyzing an intermittent problem, do with a hardware defect, such as cosmic radiation, electrostatic discharge, or software errors. Rerun the test to the docking station or the port replicator c. PC Cards 4. External diskette drive or optical drive g. Verify...
.... 2. LCD assembly 46 ThinkPad X301 Hardware Maintenance Manual Visually check each FRU for the system board in the internal drive i. Battery pack e. Turn on page 29.) 1. Verify that all of the following : 1. Hard disk drive f. When analyzing an intermittent problem, do with a hardware defect, such as cosmic radiation, electrostatic discharge, or software errors. Rerun the test to the docking station or the port replicator c. PC Cards 4. External diskette drive or optical drive g. Verify...

Hardware Maintenance Manual
Page 59
... Other Device --> Conexant Audio Speaker Keyboard Interactive Tests --> Internal Speaker Note: Once Audio test is done, the no sound is running. Using cursor keys, select Main hard disk drive or Ultrabay hard disk drive. 6. Diagnostics --> Diskette Drives 2. Table 9. Diagnostics --> Systemboard --> Keyboard 2. Interactive Tests --> Optical Drive Test Memory 1. Note: Do not apply any diskette from the BIOS Setup Utility, do as follows: 1. Diagnostics --> Video Adapter 2. Interactive Tests --> Video Audio Enter the BIOS Setup Utility and change Serial ATA (SATA) setting...
... Other Device --> Conexant Audio Speaker Keyboard Interactive Tests --> Internal Speaker Note: Once Audio test is done, the no sound is running. Using cursor keys, select Main hard disk drive or Ultrabay hard disk drive. 6. Diagnostics --> Diskette Drives 2. Table 9. Diagnostics --> Systemboard --> Keyboard 2. Interactive Tests --> Optical Drive Test Memory 1. Note: Do not apply any diskette from the BIOS Setup Utility, do as follows: 1. Diagnostics --> Video Adapter 2. Interactive Tests --> Video Audio Enter the BIOS Setup Utility and change Serial ATA (SATA) setting...

Hardware Maintenance Manual
Page 61
... Notes: 1. To return to enable the feature specified in 802.11 standard , the following table shows the function of Fn with an administrator user ID, and you have the ThinkPad PM device driver installed on the computer beforehand: v ThinkPad Power Management driver v OnScreen Display Utility v Wireless device drivers Reserved. Note: If you press Fn+F5, a list of keys also functions as a sleep button. Fn key combinations The following device drivers must have logged on...
... Notes: 1. To return to enable the feature specified in 802.11 standard , the following table shows the function of Fn with an administrator user ID, and you have the ThinkPad PM device driver installed on the computer beforehand: v ThinkPad Power Management driver v OnScreen Display Utility v Wireless device drivers Reserved. Note: If you press Fn+F5, a list of keys also functions as a sleep button. Fn key combinations The following device drivers must have logged on...

Hardware Maintenance Manual
Page 62
... key. These key combinations work while a DVD movie or a video clip is supported only on or off status of the UltraNav pointing device. To disable this function, start Presentation Director, and change the settings. Buttons for switching a display output location, start Presentation Director, and change the settings. Put the computer into hibernation mode. Turn the ThinkLight on the ThinkPad computers that have the ThinkPad PM device driver installed on the computer display and the external monitor (the Extend desktop function...
... key. These key combinations work while a DVD movie or a video clip is supported only on or off status of the UltraNav pointing device. To disable this function, start Presentation Director, and change the settings. Buttons for switching a display output location, start Presentation Director, and change the settings. Put the computer into hibernation mode. Turn the ThinkLight on the ThinkPad computers that have the ThinkPad PM device driver installed on the computer display and the external monitor (the Extend desktop function...
Hardware Maintenance Manual
Page 123
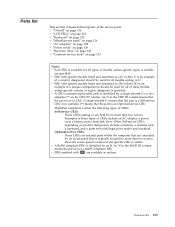
... for all types or models, unless specific types or models are concealed by an access panel that is typically secured by a single asterisk (*) or two asterisks (**) in the RoHS ID column means the part is visible. v FRUs marked with finger print reader and touchpad. ThinkPad computers contain the following lists of CRUs include an AC adapter, a power cord, a battery, and a hard disk drive. Once the access panel is removed, the specific CRU...
... for all types or models, unless specific types or models are concealed by an access panel that is typically secured by a single asterisk (*) or two asterisks (**) in the RoHS ID column means the part is visible. v FRUs marked with finger print reader and touchpad. ThinkPad computers contain the following lists of CRUs include an AC adapter, a power cord, a battery, and a hard disk drive. Once the access panel is removed, the specific CRU...


