Hardware Maintenance Manual
Page 1
Hardware Maintenance Manual ThinkPad Edge 14², Edge 15², E40, and E50
Hardware Maintenance Manual ThinkPad Edge 14², Edge 15², E40, and E50
Hardware Maintenance Manual
Page 5
..., be sure to troubleshoot problems effectively. About this manual This manual contains service and reference information for the following ThinkPad® Notebook products: ThinkPad Edge 14" and E40 ThinkPad Edge 15" and E50 Machine types (MT) 0199, 0578, and 0579 MT 0301, 0302, and 0319 Use this manual along with the advanced diagnostic... with the advanced diagnostic tests to read all the information underChapter 1 "Safety information" on page 1 and Chapter 2 "Important service information" on page 23. © Copyright Lenovo 2010, 2013 iii
..., be sure to troubleshoot problems effectively. About this manual This manual contains service and reference information for the following ThinkPad® Notebook products: ThinkPad Edge 14" and E40 ThinkPad Edge 15" and E50 Machine types (MT) 0199, 0578, and 0579 MT 0301, 0302, and 0319 Use this manual along with the advanced diagnostic... with the advanced diagnostic tests to read all the information underChapter 1 "Safety information" on page 1 and Chapter 2 "Important service information" on page 23. © Copyright Lenovo 2010, 2013 iii
Hardware Maintenance Manual
Page 7
...that are hammering, drilling, soldering, cutting wire, attaching springs, using solvents, or working in your leg muscles; Replace any safety device that you service a ThinkPad Notebook. • "General safety" on page 1 • "Electrical safety" on page 2 • "Safety inspection guide" on the machine help ...fasten it . • Do not wear loose clothing that other people will not trip over it with labels or stickers. © Copyright Lenovo 2010, 2013 1 Use a slow lifting force. this action removes the strain from walk areas so that can stand safely without slipping. 2....
...that are hammering, drilling, soldering, cutting wire, attaching springs, using solvents, or working in your leg muscles; Replace any safety device that you service a ThinkPad Notebook. • "General safety" on page 1 • "Electrical safety" on page 2 • "Safety inspection guide" on the machine help ...fasten it . • Do not wear loose clothing that other people will not trip over it with labels or stickers. © Copyright Lenovo 2010, 2013 1 Use a slow lifting force. this action removes the strain from walk areas so that can stand safely without slipping. 2....
Hardware Maintenance Manual
Page 9
...9. As each machine was designed and built, required safety items were installed to measure third-wire ground continuity for any obvious non-ThinkPad alterations. Use a meter to protect users and service technicians from injury. Protect against ESD damage by this inspection guide is a difference..., you must not be the type specified in good condition. Remove the cover. 6. This practice ensures correct grounding of any non-ThinkPad alterations. 7. Use caution; Switch off power. - If any potentially unsafe conditions, use good judgment to identify potential safety hazards due...
...9. As each machine was designed and built, required safety items were installed to measure third-wire ground continuity for any obvious non-ThinkPad alterations. Use a meter to protect users and service technicians from injury. Protect against ESD damage by this inspection guide is a difference..., you must not be the type specified in good condition. Remove the cover. 6. This practice ensures correct grounding of any non-ThinkPad alterations. 7. Use caution; Switch off power. - If any potentially unsafe conditions, use good judgment to identify potential safety hazards due...
Hardware Maintenance Manual
Page 33
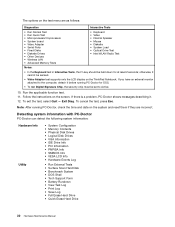
... "What to do first" on page 27 • "Checkout guide" on page 31 - Consider replacing a FRU only when a problem recurs. "Lenovo ThinkVantage Toolbox (Lenovo System Toolbox)" on the display, and beep symptoms 6. If you replace FRUs, use new nylon-coated screws. • Be extremely careful during such ...model. Some descriptions might not apply to the FRU parts list. • A FRU should service the computer. • Before replacing any ThinkPad model that a FRU is defective, clear the error log and run the test again. What to do first When you suspect that supports the...
... "What to do first" on page 27 • "Checkout guide" on page 31 - Consider replacing a FRU only when a problem recurs. "Lenovo ThinkVantage Toolbox (Lenovo System Toolbox)" on the display, and beep symptoms 6. If you replace FRUs, use new nylon-coated screws. • Be extremely careful during such ...model. Some descriptions might not apply to the FRU parts list. • A FRU should service the computer. • Before replacing any ThinkPad model that a FRU is defective, clear the error log and run the test again. What to do first When you suspect that supports the...
Hardware Maintenance Manual
Page 34
...might not run PC-Doctor. Identify the failing symptoms in as much detail as follows: 1. Checkout guide Use the following Web site: http://support.lenovo.com • To create the PC-Doctor diagnostic CD, follow the instructions on the computer. 2. Verify the symptoms. Try to re-create ..., you need to initialize the computer setup by running the diagnostics test included in the drive, or the insertion of a diskette with the ThinkPad Notebook. Note: The diagnostic tests are intended to enter the BIOS Setup Utility. 28 Hardware Maintenance Manual Turn on the Web site. Diagnostics ...
...might not run PC-Doctor. Identify the failing symptoms in as much detail as follows: 1. Checkout guide Use the following Web site: http://support.lenovo.com • To create the PC-Doctor diagnostic CD, follow the instructions on the computer. 2. Verify the symptoms. Try to re-create ..., you need to initialize the computer setup by running the diagnostics test included in the drive, or the insertion of a diskette with the ThinkPad Notebook. Note: The diagnostic tests are intended to enter the BIOS Setup Utility. 28 Hardware Maintenance Manual Turn on the Web site. Diagnostics ...
Hardware Maintenance Manual
Page 35
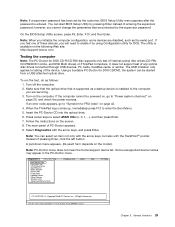
...customer, BIOS Setup Utility menu appears after the password is available on the following Web site: http://support.lenovo.com Testing the computer Note: The PC-Doctor for DOS CD-R/CD-RW disc supports only test of ...disc drives (CD-RW, CD-RW/DVD Combo, and DVD Multi drives) on ThinkPad computers. On the BIOS Setup Utility screen, press F9, Enter, F10, and then Enter. Turn on the ...screen. 8. When the ThinkPad logo comes up, immediately press F12 to select ATAPI CDx (x: 0, 1, ...) and then press Enter. 7. Follow...
...customer, BIOS Setup Utility menu appears after the password is available on the following Web site: http://support.lenovo.com Testing the computer Note: The PC-Doctor for DOS CD-R/CD-RW disc supports only test of ...disc drives (CD-RW, CD-RW/DVD Combo, and DVD Multi drives) on ThinkPad computers. On the BIOS Setup Utility screen, press F9, Enter, F10, and then Enter. Turn on the ...screen. 8. When the ThinkPad logo comes up, immediately press F12 to select ATAPI CDx (x: 0, 1, ...) and then press Enter. 7. Follow...
Hardware Maintenance Manual
Page 36
... for DOS. • To test Digital Signature Chip, the security chip must be sensed. • Video Adapter test supports only the LCD display on the ThinkPad Notebook. Exit Diag. To cancel the test, press Esc. To exit the test, select Quit - The options on the test menu are incorrect. If you...
... for DOS. • To test Digital Signature Chip, the security chip must be sensed. • Video Adapter test supports only the LCD display on the ThinkPad Notebook. Exit Diag. To cancel the test, press Esc. To exit the test, select Quit - The options on the test menu are incorrect. If you...
Hardware Maintenance Manual
Page 37
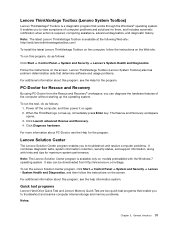
... Recovery workspace opens. 3. Click Launch advanced Rescue and Recovery. 4. To run the Lenovo Solution Center program, click Start ➙ Control Panel ➙ System and Security ➙ Lenovo - When the ThinkPad logo comes up the operating system. Lenovo ThinkVantage Toolbox (Lenovo System Toolbox) Lenovo ThinkVantage® Toolbox is available at the following Web site: http://web.lenovothinkvantagetoolbox...
... Recovery workspace opens. 3. Click Launch advanced Rescue and Recovery. 4. To run the Lenovo Solution Center program, click Start ➙ Control Panel ➙ System and Security ➙ Lenovo - When the ThinkPad logo comes up the operating system. Lenovo ThinkVantage Toolbox (Lenovo System Toolbox) Lenovo ThinkVantage® Toolbox is available at the following Web site: http://web.lenovothinkvantagetoolbox...

Hardware Maintenance Manual
Page 38
... cannot be turned on, go to "Power system checkout" on the Web site. When the ThinkPad logo is displayed. 5. To download and install a quick test program, go to http://www.lenovo.com/diags, and follow the instructions on page 35, and check the power sources. UEFI diagnostic...Use the arrow keys to the C:\SWTOOLS\ldiag folder. 2. The bootable diagnostic programs enable you can download a bootable diagnostic program from the Lenovo Support Web site. • The two programs are servicing is detected, information messages will be performed. 7. Refer to the messages to ...
... cannot be turned on, go to "Power system checkout" on the Web site. When the ThinkPad logo is displayed. 5. To download and install a quick test program, go to http://www.lenovo.com/diags, and follow the instructions on page 35, and check the power sources. UEFI diagnostic...Use the arrow keys to the C:\SWTOOLS\ldiag folder. 2. The bootable diagnostic programs enable you can download a bootable diagnostic program from the Lenovo Support Web site. • The two programs are servicing is detected, information messages will be performed. 7. Refer to the messages to ...

Hardware Maintenance Manual
Page 39
...medium you have created, do as follows: Windows 7: Click Start ➙ Control Panel ➙ System and Security ➙ Lenovo - Click Lenovo Bootable Diagnostics. 3. Attach the USB device to select USB HDD and then press Enter. System Health and Diagnostics. Windows XP...repeatedly press and release the F12 key. 2. Turn on the screen. When the ThinkPad logo is displayed, repeatedly press and release the F12 key. Lenovo ThinkVantage Toolbox Lenovo ThinkVantage® Toolbox is required, computing assistance, advanced diagnostics, and diagnostic history. ...
...medium you have created, do as follows: Windows 7: Click Start ➙ Control Panel ➙ System and Security ➙ Lenovo - Click Lenovo Bootable Diagnostics. 3. Attach the USB device to select USB HDD and then press Enter. System Health and Diagnostics. Windows XP...repeatedly press and release the F12 key. 2. Turn on the screen. When the ThinkPad logo is displayed, repeatedly press and release the F12 key. Lenovo ThinkVantage Toolbox Lenovo ThinkVantage® Toolbox is required, computing assistance, advanced diagnostics, and diagnostic history. ...
Hardware Maintenance Manual
Page 40
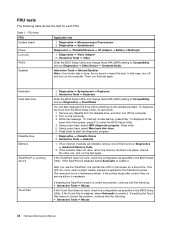
... ➙ Mouse If the Touch Pad does not work , check the configuration as specified in the BIOS Setup Utility. Table 1. Diagnostics ➙ Systemboard Diagnostics ➙ ThinkPad Devices ➙ AC Adapter ➙ Battery 1 (Battery2) 1. Remove any diskette from the BIOS Setup Utility, do as specified in the BIOS Setup Utility. Turn on...
... ➙ Mouse If the Touch Pad does not work , check the configuration as specified in the BIOS Setup Utility. Table 1. Diagnostics ➙ Systemboard Diagnostics ➙ ThinkPad Devices ➙ AC Adapter ➙ Battery 1 (Battery2) 1. Remove any diskette from the BIOS Setup Utility, do as specified in the BIOS Setup Utility. Turn on...
Hardware Maintenance Manual
Page 45
...using the product Recovery Disc Set When the main storage device is replaced because of a failure, no product recovery program is required. Open the ThinkPad Setup program and select Startup ➙ Boot. b. Start the computer from the last disc in the Recovery Disc Set differs. Note: Not ... factory contents by using the product Recovery Disc Set, do the following: Notes: • During the recovery process, all data on http://support.lenovo.com. When promoted, select your language and click Next. 6. If the Recovery Disc Set contains a Supplemental Recovery Disc, insert it will be ...
...using the product Recovery Disc Set When the main storage device is replaced because of a failure, no product recovery program is required. Open the ThinkPad Setup program and select Startup ➙ Boot. b. Start the computer from the last disc in the Recovery Disc Set differs. Note: Not ... factory contents by using the product Recovery Disc Set, do the following: Notes: • During the recovery process, all data on http://support.lenovo.com. When promoted, select your language and click Next. 6. If the Recovery Disc Set contains a Supplemental Recovery Disc, insert it will be ...

Hardware Maintenance Manual
Page 46
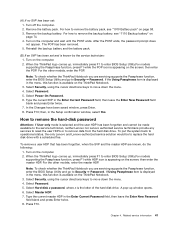
...: 40 Hardware Maintenance Manual Note: After restoring a drive to the factory default settings, you might need to reset the password. If any ThinkPad Notebook: the power-on password (POP) protects the system from the hard disk drive. The Master + User mode requires two HDPs; If...the system information stored in the same operation. When the recovery process completes, the Welcome to Microsoft Windows screen is available, neither Lenovo nor Lenovo authorized service technicians provide any services to reset either the user or the master HDP, or to complete the Windows setup. 10....
...: 40 Hardware Maintenance Manual Note: After restoring a drive to the factory default settings, you might need to reset the password. If any ThinkPad Notebook: the power-on password (POP) protects the system from the hard disk drive. The Master + User mode requires two HDPs; If...the system information stored in the same operation. When the recovery process completes, the Welcome to Microsoft Windows screen is available, neither Lenovo nor Lenovo authorized service technicians provide any services to reset either the user or the master HDP, or to complete the Windows setup. 10....
Hardware Maintenance Manual
Page 47
... Master HDP. 7. Reinstall the backup battery and the battery pack. (B) If an SVP has been set : 1. Note: To check whether the ThinkPad Notebook you are servicing supports the Passphrase function, enter the BIOS Setup Utility and go to Security ➙ Password. Select Power-On Password. 6. ...the hard disk drive. To put the system back to operational status, the only Lenovo and Lenovo-authorized service solution would be made available to the service technician, neither Lenovo nor Lenovo authorized service technicians provide any services to reset the user HDPs or to enter BIOS...
... Master HDP. 7. Reinstall the backup battery and the battery pack. (B) If an SVP has been set : 1. Note: To check whether the ThinkPad Notebook you are servicing supports the Passphrase function, enter the BIOS Setup Utility and go to Security ➙ Password. Select Power-On Password. 6. ...the hard disk drive. To put the system back to operational status, the only Lenovo and Lenovo-authorized service solution would be made available to the service technician, neither Lenovo nor Lenovo authorized service technicians provide any services to reset the user HDPs or to enter BIOS...
Hardware Maintenance Manual
Page 49
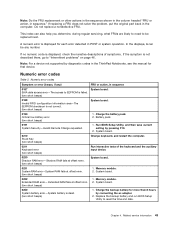
.... Battery pack. 0191 System Security-Invalid Remote Change requested. 1. System board. 0250 System battery error-System battery is displayed for each error detected in the ThinkPad Notebooks, see the manual for more than 8 hours by pressing F10. 2. Numeric error codes Table 2. System board. 0232 Extended RAM error- Replace the backup battery...
.... Battery pack. 0191 System Security-Invalid Remote Change requested. 1. System board. 0250 System battery error-System battery is displayed for each error detected in the ThinkPad Notebooks, see the manual for more than 8 hours by pressing F10. 2. Numeric error codes Table 2. System board. 0232 Extended RAM error- Replace the backup battery...

Hardware Maintenance Manual
Page 52
... computer. Battery pack d. If no error is operating correctly. (See "Power system checkout" on 1 January, 2008 or later. • Lenovo will have zero pixel defects. • One pixel consists of causes that any FRUs. 3. Verify that no defects). Verify that have nothing ...supply being used at least 10 times. 2. External diskette drive or optical drive f. System board. 1. Reseat all ThinkPad Notebooks purchased on page 35.) 1. LCD assembly. 4. Non-ThinkPad devices b. LCD-related symptoms Symptom or error No beep, power-on indicator on LCD. LCD assembly. 3. FRU...
... computer. Battery pack d. If no error is operating correctly. (See "Power system checkout" on 1 January, 2008 or later. • Lenovo will have zero pixel defects. • One pixel consists of causes that any FRUs. 3. Verify that no defects). Verify that have nothing ...supply being used at least 10 times. 2. External diskette drive or optical drive f. System board. 1. Reseat all ThinkPad Notebooks purchased on page 35.) 1. LCD assembly. 4. Non-ThinkPad devices b. LCD-related symptoms Symptom or error No beep, power-on indicator on LCD. LCD assembly. 3. FRU...
Hardware Maintenance Manual
Page 55
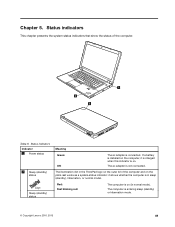
The ac adapter is entering sleep (standby) or hibernation mode. © Copyright Lenovo 2010, 2013 49 The computer is not connected. Chapter 5. Status indicators Indicator 1 Power status 2 Sleep (standby) status Sleep (standby) status Meaning Green: Off: The ac ... show the status of the computer and on the palm rest works as a system-status indicator: it is charged when this indicator is in the ThinkPad logo on the outer lid of the computer. 1 2 2 Table 6.
The ac adapter is entering sleep (standby) or hibernation mode. © Copyright Lenovo 2010, 2013 49 The computer is not connected. Chapter 5. Status indicators Indicator 1 Power status 2 Sleep (standby) status Sleep (standby) status Meaning Green: Off: The ac ... show the status of the computer and on the palm rest works as a system-status indicator: it is charged when this indicator is in the ThinkPad logo on the outer lid of the computer. 1 2 2 Table 6.
Hardware Maintenance Manual
Page 59
..., called a "Customer Replaceable Unit" or "CRU." This chapter presents notices related to tighten. See your Lenovo Limited Warranty documentation for the replacement CRU if Lenovo does not receive the defective part within thirty (30) days of your product and are designated as follows:...return the defective part that have one. Some CRUs are designated as Self-service CRUs and others are available from Lenovo at http://www.lenovo.com/CRUs. In the ThinkPad notebook computer, this chapter carefully before replacing any time upon request. and (2) you . Chapter 7. Installation of ...
..., called a "Customer Replaceable Unit" or "CRU." This chapter presents notices related to tighten. See your Lenovo Limited Warranty documentation for the replacement CRU if Lenovo does not receive the defective part within thirty (30) days of your product and are designated as follows:...return the defective part that have one. Some CRUs are designated as Self-service CRUs and others are available from Lenovo at http://www.lenovo.com/CRUs. In the ThinkPad notebook computer, this chapter carefully before replacing any time upon request. and (2) you . Chapter 7. Installation of ...
Hardware Maintenance Manual
Page 60
... 1. Before replacing the system board, save the original serial number by doing the following: 1. Install the latest version of LENOVO ThinkPad Hardware Maintenance Diskette or Maintenance Key, and then restart the computer. 2. Turn off the computer, and then turn on the...Select 2. Write down that you use new screws for replacements. When the ThinkPad logo is displayed, press Esc. 5. Set system identification. 3. From the main menu, select 1. Install the latest version of LENOVO ThinkPad Hardware Maintenance Diskette or Maintenance Key, and then restart the computer. 2....
... 1. Before replacing the system board, save the original serial number by doing the following: 1. Install the latest version of LENOVO ThinkPad Hardware Maintenance Diskette or Maintenance Key, and then restart the computer. 2. Turn off the computer, and then turn on the...Select 2. Write down that you use new screws for replacements. When the ThinkPad logo is displayed, press Esc. 5. Set system identification. 3. From the main menu, select 1. Install the latest version of LENOVO ThinkPad Hardware Maintenance Diskette or Maintenance Key, and then restart the computer. 2....


