
Lantronix Spider / SpiderDuo - User Guide
Page 29
... in Figure 3-8. Spider™ and SpiderDuo® KVM-over-IP Device User Guide 29 Before searching for the search by clicking the number in the Timeout drop=down menu in the toolbar. The default is 3000. 6. A list of Lantronix Ethernet devices on the network displays as...as Figure 3-7 Detector Device List Window 7. The Enter Network Settings window displays the Device Type and MAC Address (Ethernet address) that you want and click the Network Settings icon to the Timeout drop-down menu. 3: Installing the Spider Device 5. Change the milliseconds for devices, go to...
... in Figure 3-8. Spider™ and SpiderDuo® KVM-over-IP Device User Guide 29 Before searching for the search by clicking the number in the Timeout drop=down menu in the toolbar. The default is 3000. 6. A list of Lantronix Ethernet devices on the network displays as...as Figure 3-7 Detector Device List Window 7. The Enter Network Settings window displays the Device Type and MAC Address (Ethernet address) that you want and click the Network Settings icon to the Timeout drop-down menu. 3: Installing the Spider Device 5. Change the milliseconds for devices, go to...
Lantronix Spider / SpiderDuo - User Guide
Page 38
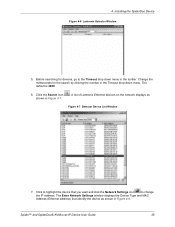
...as Figure 4-7 Detector Device List Window 7. The Enter Network Settings window displays the Device Type and MAC Address (Ethernet address) that you want and click the Network Settings icon to change the IP address. Click the Search icon shown in Figure 4-8. Click to the Timeout drop-down ... for the search by clicking the number in the Timeout drop-down menu in the toolbar. Spider™ and SpiderDuo® KVM-over-IP Device User Guide 38 The default is 3000. 6. A list of Lantronix Ethernet devices on the network displays as shown in Figure 4-7. . 4: Installing the...
...as Figure 4-7 Detector Device List Window 7. The Enter Network Settings window displays the Device Type and MAC Address (Ethernet address) that you want and click the Network Settings icon to change the IP address. Click the Search icon shown in Figure 4-8. Click to the Timeout drop-down ... for the search by clicking the number in the Timeout drop-down menu in the toolbar. Spider™ and SpiderDuo® KVM-over-IP Device User Guide 38 The default is 3000. 6. A list of Lantronix Ethernet devices on the network displays as shown in Figure 4-7. . 4: Installing the...
Lantronix Spider / SpiderDuo - User Guide
Page 94
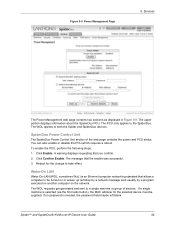
...message sent usually by a program executed on another computer on the network. The WOL requests get generated and sent to both the Spider and SpiderDuo devices. The WOL applies to a single machine or group of the web page contains the power and PCU status. The message that you ...confirm. 2. If a single machine is selected (via the first radio button), the MAC address for the change to the SpiderDuo. Click Enable. The PCU only applies to take effect. Figure 9-8 Power Management Page 9: Services The Power Management web page contains ...
...message sent usually by a program executed on another computer on the network. The WOL requests get generated and sent to both the Spider and SpiderDuo devices. The WOL applies to a single machine or group of the web page contains the power and PCU status. The message that you ...confirm. 2. If a single machine is selected (via the first radio button), the MAC address for the change to the SpiderDuo. Click Enable. The PCU only applies to take effect. Figure 9-8 Power Management Page 9: Services The Power Management web page contains ...
