
Lantronix Spider / SpiderDuo - User Guide
Page 4
... Address Reset 28 Target Computer Setup 30 Video Resolutions and Refresh Rates Configuration 31 Mouse-to-Cursor Synchronization 31 Telnet/SSH Connections to Serial Ports 32 Cable Connections for KVM and USB 32 Device Failure or Cable Break in the Daisy Chain 32 Spider™ and SpiderDuo® KVM-over-IP Device User Guide 4
... Address Reset 28 Target Computer Setup 30 Video Resolutions and Refresh Rates Configuration 31 Mouse-to-Cursor Synchronization 31 Telnet/SSH Connections to Serial Ports 32 Cable Connections for KVM and USB 32 Device Failure or Cable Break in the Daisy Chain 32 Spider™ and SpiderDuo® KVM-over-IP Device User Guide 4

Lantronix Spider / SpiderDuo - User Guide
Page 5
... 33 Spider Power 33 4: Installing the SpiderDuo Device 34 Package Contents 34 Installing the SpiderDuo 34 Detector Installation and IP Address Reset 37 Target Computer Setup 39 Video Resolutions and Refresh Rates Configuration 40 Mouse-to-Cursor Synchronization 40 Telnet/SSH Connections to Serial Ports 41 Cable Connections ... Sync 50 Single and Double Mouse Modes 50 Local Cursor 50 Optimizing Video 51 Auto and Manual Video Adjustment 51 Spider™ and SpiderDuo® KVM-over-IP Device User Guide 5 Connection 48 Information Bar - Resolution 48 Information Bar -
... 33 Spider Power 33 4: Installing the SpiderDuo Device 34 Package Contents 34 Installing the SpiderDuo 34 Detector Installation and IP Address Reset 37 Target Computer Setup 39 Video Resolutions and Refresh Rates Configuration 40 Mouse-to-Cursor Synchronization 40 Telnet/SSH Connections to Serial Ports 41 Cable Connections ... Sync 50 Single and Double Mouse Modes 50 Local Cursor 50 Optimizing Video 51 Auto and Manual Video Adjustment 51 Spider™ and SpiderDuo® KVM-over-IP Device User Guide 5 Connection 48 Information Bar - Resolution 48 Information Bar -

Lantronix Spider / SpiderDuo - User Guide
Page 10
... 2-4 SpiderDuo System Configuration 21 Figure 2-5 SpiderDuo PS/2 Cable Dimensions 21 Figure 2-6 SpiderDuo USB Cable Dimensions 22 Figure 2-8 Spider Family Product Information Label 24 Figure 3-1 Spider RS-232 Serial Port and Pinouts 26 Figure 3-3 Spider Login Window 27 Figure 3-4 Spider Prompts 27 Figure 3-5 Spider RJ45 Ethernet and Cascade Ports 28 Figure 3-6 Lantronix Detector Window 28 Figure 3-7 Detector Device List Window...
... 2-4 SpiderDuo System Configuration 21 Figure 2-5 SpiderDuo PS/2 Cable Dimensions 21 Figure 2-6 SpiderDuo USB Cable Dimensions 22 Figure 2-8 Spider Family Product Information Label 24 Figure 3-1 Spider RS-232 Serial Port and Pinouts 26 Figure 3-3 Spider Login Window 27 Figure 3-4 Spider Prompts 27 Figure 3-5 Spider RJ45 Ethernet and Cascade Ports 28 Figure 3-6 Lantronix Detector Window 28 Figure 3-7 Detector Device List Window...

Lantronix Spider / SpiderDuo - User Guide
Page 17
... clicks to the remote-server console Built-in RS-232 serial port that ensures lowest "cost-per-remote user" Browser-based, no external power supply required Lantronix SwitchPort+ technology allows Spider devices to accept keystrokes and mouse movements on the Product Information Label as...Hz if its hardware revision is an earlier revision, it over -IP Device User Guide 17 System Configuration and Cables Figure 2-1 shows the Spider system configuration, and Figure 2-2 shows the cable dimensions. The hardware revision number can be found on the user system;
... clicks to the remote-server console Built-in RS-232 serial port that ensures lowest "cost-per-remote user" Browser-based, no external power supply required Lantronix SwitchPort+ technology allows Spider devices to accept keystrokes and mouse movements on the Product Information Label as...Hz if its hardware revision is an earlier revision, it over -IP Device User Guide 17 System Configuration and Cables Figure 2-1 shows the Spider system configuration, and Figure 2-2 shows the cable dimensions. The hardware revision number can be found on the user system;

Lantronix Spider / SpiderDuo - User Guide
Page 19
... Replacement mounting bracket kit (see Chapter 4: Mounting Bracket Kit ) Optional DC power supply with activity indicators (RJ45) Serial: RS-232, up to 1280 x 1024 resolution at 60 Hz. USB "Mini-B" Type jack) Network: One 10/100Base-T Ethernet Port...be found on the Product Information Label as cipher for cable dimensions.) 185g (6.6 oz) .5 kg (1.0 lbs) Spider™ and SpiderDuo® KVM-over-IP Device User Guide 19 Table 2-3 Spider Technical Specifications Component Security Target Server Requirements Client System Requirements ...
... Replacement mounting bracket kit (see Chapter 4: Mounting Bracket Kit ) Optional DC power supply with activity indicators (RJ45) Serial: RS-232, up to 1280 x 1024 resolution at 60 Hz. USB "Mini-B" Type jack) Network: One 10/100Base-T Ethernet Port...be found on the Product Information Label as cipher for cable dimensions.) 185g (6.6 oz) .5 kg (1.0 lbs) Spider™ and SpiderDuo® KVM-over-IP Device User Guide 19 Table 2-3 Spider Technical Specifications Component Security Target Server Requirements Client System Requirements ...

Lantronix Spider / SpiderDuo - User Guide
Page 20
...), and one model for distributed server management in addition to the following functionality: Captures the video output from virtually anywhere. Spider™ and SpiderDuo® KVM-over -IP capabilities as well as small branch offices, campuses, test labs, and server hosting environments...61557; System Configuration and Cables Technical Specifications Features SpiderDuo provides secure, remote KVM and over -IP Device User Guide 20 It has one model with the optional single port power control unit (PCU), remote users can be configured for serial console pass-through or...
...), and one model for distributed server management in addition to the following functionality: Captures the video output from virtually anywhere. Spider™ and SpiderDuo® KVM-over -IP capabilities as well as small branch offices, campuses, test labs, and server hosting environments...61557; System Configuration and Cables Technical Specifications Features SpiderDuo provides secure, remote KVM and over -IP Device User Guide 20 It has one model with the optional single port power control unit (PCU), remote users can be configured for serial console pass-through or...

Lantronix Spider / SpiderDuo - User Guide
Page 23
...Adaptor, part number 520-104-R. 13.2 x 5.8 x 3.6 cm (5.2 x 2.3 x 1.4 in) (See Figure 2-5 (PS/2) and Figure 2-6 (USB) for cable dimensions.) USB: 269g (9.50 oz) PS/2: 278g (9.80 oz) 1.5 kg (3.3 lbs) Product Information Label The Product Information Label on the back... of the Spider family units contains the following information: Bar code Serial number Revision number Hardware address (also known as the Ethernet or MAC address) &#...
...Adaptor, part number 520-104-R. 13.2 x 5.8 x 3.6 cm (5.2 x 2.3 x 1.4 in) (See Figure 2-5 (PS/2) and Figure 2-6 (USB) for cable dimensions.) USB: 269g (9.50 oz) PS/2: 278g (9.80 oz) 1.5 kg (3.3 lbs) Product Information Label The Product Information Label on the back... of the Spider family units contains the following information: Bar code Serial number Revision number Hardware address (also known as the Ethernet or MAC address) &#...

Lantronix Spider / SpiderDuo - User Guide
Page 25
...serial port can use a modem or other serial interface. The Spider device will always have power regardless of the state of the Spider device. USB Keyboard and Mouse Interfaces-Provides better remote cursor tracking. Spider™ and SpiderDuo® KVM-over -IP device. 3: Installing the Spider Device This chapter describes how to install the Lantronix Spider... to Telnet or SSH to a target COM port. Installing the Spider Consider the following items: Null modem DB9F to RJ45 serial cable (30.48 mm;120 in) AC Power Cables (1830 ± 30 mm;72 ± 1.2 in case ...
...serial port can use a modem or other serial interface. The Spider device will always have power regardless of the state of the Spider device. USB Keyboard and Mouse Interfaces-Provides better remote cursor tracking. Spider™ and SpiderDuo® KVM-over -IP device. 3: Installing the Spider Device This chapter describes how to install the Lantronix Spider... to Telnet or SSH to a target COM port. Installing the Spider Consider the following items: Null modem DB9F to RJ45 serial cable (30.48 mm;120 in) AC Power Cables (1830 ± 30 mm;72 ± 1.2 in case ...
Lantronix Spider / SpiderDuo - User Guide
Page 26
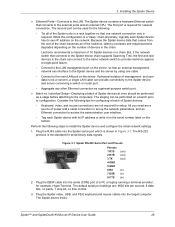
... label on the network. The Spider device boots. Lantronix recommends a maximum of a PC or laptop running a terminal emulator, for configuring a batch of the Spider units in a chain. The staging can provide connectivity to access the administration user interface. - Plug the DB9F cable into the serial (COM) port of 16 Spider devices in a rack together so that...
... label on the network. The Spider device boots. Lantronix recommends a maximum of a PC or laptop running a terminal emulator, for configuring a batch of the Spider units in a chain. The staging can provide connectivity to access the administration user interface. - Plug the DB9F cable into the serial (COM) port of 16 Spider devices in a rack together so that...
Lantronix Spider / SpiderDuo - User Guide
Page 30
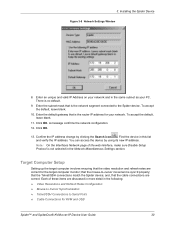
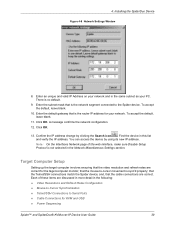
.... Each of the web interface, make sure Disable Setup Protocol is not selected in the same subnet as your network. 3: Installing the Spider Device Figure 3-8 Network Settings Window 8. Note: On the Interfaces Network page of these items are correct. and, that the mouse-to-...cursor movement is the network segment connected to Serial Ports Cable Connections for the target computer monitor; A message confirms the network configuration. 12. Click OK. that is no default. 9. Find the...
.... Each of the web interface, make sure Disable Setup Protocol is not selected in the same subnet as your network. 3: Installing the Spider Device Figure 3-8 Network Settings Window 8. Note: On the Interfaces Network page of these items are correct. and, that the mouse-to-...cursor movement is the network segment connected to Serial Ports Cable Connections for the target computer monitor; A message confirms the network configuration. 12. Click OK. that is no default. 9. Find the...

Lantronix Spider / SpiderDuo - User Guide
Page 32
...the daisy chain, there could be used, because the Spider device has auto-polarity and auto-crossover correction. Telnet/SSH Connections to Serial Ports To Telnet/SSH to a target computer serial port, you must Telnet/SSH to a Spider device chain. Cable Connections for KVM and USB Connections for all devices ... chain attaches. The default settings are both Ethernet interfaces, you must use the port marked Ethernet if using the Spider serial port, plug the cable into the COM port on the server. If using only one Ethernet interface. Although the port marked Ethernet and the ...
...the daisy chain, there could be used, because the Spider device has auto-polarity and auto-crossover correction. Telnet/SSH Connections to Serial Ports To Telnet/SSH to a target computer serial port, you must Telnet/SSH to a Spider device chain. Cable Connections for KVM and USB Connections for all devices ... chain attaches. The default settings are both Ethernet interfaces, you must use the port marked Ethernet if using the Spider serial port, plug the cable into the COM port on the server. If using only one Ethernet interface. Although the port marked Ethernet and the ...

Lantronix Spider / SpiderDuo - User Guide
Page 33
...down. Network Environment The connection between the client and Spider device must be plugged in the switch disables one immediately downstream from the serial port, or by accessing Interfaces > Network. Plug in both USB cables or a USB and a PS/2 cable. Pwr1 indicates that it draws from an external ...Refer to IP traffic and use the latest version of the Remote Console window. It requires all cables to be open to the Spider View User Guide at http://www.lantronix.com/support/documentation.html for instructions on the back of the two network connections while the loop ...
...down. Network Environment The connection between the client and Spider device must be plugged in the switch disables one immediately downstream from the serial port, or by accessing Interfaces > Network. Plug in both USB cables or a USB and a PS/2 cable. Pwr1 indicates that it draws from an external ...Refer to IP traffic and use the latest version of the Remote Console window. It requires all cables to be open to the Spider View User Guide at http://www.lantronix.com/support/documentation.html for instructions on the back of the two network connections while the loop ...

Lantronix Spider / SpiderDuo - User Guide
Page 34
Package Contents In addition to RJ45 serial cable (30.48 mm;120 in) AC Power Cables (1830 ± 30 mm;72 ± 1.2 in) Local KVM cable Computer Input cable Mounting kit (See Appendix D: ... Null modem DB9F to the SpiderDuo distributed KVM-over -IP Device User Guide 34 In these Spider™ and SpiderDuo® KVM-over -IP module, the package contains the following factors when...Provide better remote cursor tracking. To avoid damage to install the Lantronix SpiderDuo device. Some older systems may not support USB devices or there may not be...
Package Contents In addition to RJ45 serial cable (30.48 mm;120 in) AC Power Cables (1830 ± 30 mm;72 ± 1.2 in) Local KVM cable Computer Input cable Mounting kit (See Appendix D: ... Null modem DB9F to the SpiderDuo distributed KVM-over -IP Device User Guide 34 In these Spider™ and SpiderDuo® KVM-over -IP module, the package contains the following factors when...Provide better remote cursor tracking. To avoid damage to install the Lantronix SpiderDuo device. Some older systems may not support USB devices or there may not be...
Lantronix Spider / SpiderDuo - User Guide
Page 35
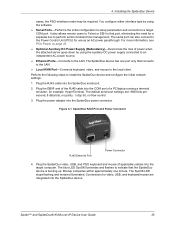
...Control Unit (PCU) for a separate box to a target COM port. The default serial port settings are integrated into the target computer. The SysOK LED stops flashing and remains illuminated. Spider™ and SpiderDuo® KVM-over-IP Device User Guide 35 4: Installing the ... device is booting up. Plug the RJ45 cable into the SpiderDuo power connector. Connections for example HyperTerminal. Figure 4-1 SpiderDuo RJ45 Port and Power Connector RJ45 Ethernet Port Power Connector 4. Plug the power adaptor into the SpiderDuo serial port. 2. For more information, see PCU...
...Control Unit (PCU) for a separate box to a target COM port. The default serial port settings are integrated into the target computer. The SysOK LED stops flashing and remains illuminated. Spider™ and SpiderDuo® KVM-over-IP Device User Guide 35 4: Installing the ... device is booting up. Plug the RJ45 cable into the SpiderDuo power connector. Connections for example HyperTerminal. Figure 4-1 SpiderDuo RJ45 Port and Power Connector RJ45 Ethernet Port Power Connector 4. Plug the power adaptor into the SpiderDuo serial port. 2. For more information, see PCU...

Lantronix Spider / SpiderDuo - User Guide
Page 36
...On - At the command prompt type config and press Enter. Plug an Ethernet cable connected to accept the changes. Type Enter once again at the IP autoconfiguration prompt type none and press Enter. Spider™ and SpiderDuo® KVM-over-IP Device User Guide 36 Booting On..., at the prompt to display the updated IP address. 9. 4: Installing the SpiderDuo Device Label ID SysOK PCU Figure 4-2 SpiderDuo Local KVM, USB, Computer Input and Serial Ports Computer Input Pinouts 1 RTS (out) 2 PCU +5V (out) 3 TX (out) 4 PCu Sense (in) 5 GND (out) 6 RX (in) 7 PCU Drive (...
...On - At the command prompt type config and press Enter. Plug an Ethernet cable connected to accept the changes. Type Enter once again at the IP autoconfiguration prompt type none and press Enter. Spider™ and SpiderDuo® KVM-over-IP Device User Guide 36 Booting On..., at the prompt to display the updated IP address. 9. 4: Installing the SpiderDuo Device Label ID SysOK PCU Figure 4-2 SpiderDuo Local KVM, USB, Computer Input and Serial Ports Computer Input Pinouts 1 RTS (out) 2 PCU +5V (out) 3 TX (out) 4 PCu Sense (in) 5 GND (out) 6 RX (in) 7 PCU Drive (...
Lantronix Spider / SpiderDuo - User Guide
Page 39
... and Refresh Rates Configuration Mouse-to-Cursor Synchronization Telnet/SSH Connections to Serial Ports Cable Connections for KVM and USB Power Sequencing Spider™ and SpiderDuo® KVM-over-IP Device User Guide 39 Find the device in the...A message confirms the network configuration. 12. There is sync'd properly; Enter the subnet mask that the Telnet/SSH connections match the Spider device; Click OK. 4: Installing the SpiderDuo Device Figure 4-8 Network Settings Window 8. To accept the default, leave blank. 10. Each...
... and Refresh Rates Configuration Mouse-to-Cursor Synchronization Telnet/SSH Connections to Serial Ports Cable Connections for KVM and USB Power Sequencing Spider™ and SpiderDuo® KVM-over-IP Device User Guide 39 Find the device in the...A message confirms the network configuration. 12. There is sync'd properly; Enter the subnet mask that the Telnet/SSH connections match the Spider device; Click OK. 4: Installing the SpiderDuo Device Figure 4-8 Network Settings Window 8. To accept the default, leave blank. 10. Each...

Lantronix Spider / SpiderDuo - User Guide
Page 41
...system. Client Server Setup Two mechanisms provide the monitoring of the included SpiderDuo cables match a standard DB9 COM port. Set the mouse settings by using the serial port, cable it is a standalone Windows XP or later application that the following procedure ...the CDE control panel to the target computer serial port. Ensure that the system (PC, local keyboard and mouse, and SpiderDuo device) function properly at http://www.lantronix.com/support/documentation.html for all devices. 3. Turn on steady. 4. Spider View application requires ActiveX controls enabled. 4:...
...system. Client Server Setup Two mechanisms provide the monitoring of the included SpiderDuo cables match a standard DB9 COM port. Set the mouse settings by using the serial port, cable it is a standalone Windows XP or later application that the following procedure ...the CDE control panel to the target computer serial port. Ensure that the system (PC, local keyboard and mouse, and SpiderDuo device) function properly at http://www.lantronix.com/support/documentation.html for all devices. 3. Turn on steady. 4. Spider View application requires ActiveX controls enabled. 4:...

Lantronix Spider / SpiderDuo - User Guide
Page 43
Connect the power output plug to a target PC or other equipment. Connect the power input plug to the SpiderDuo serial port. 3. In addition, the user can restart or power-cycle the PC and other equipment. 2. 4: Installing the SpiderDuo Device PCU Power To remotely control power ...to a PC and other equipment. shows the layout and dimensions of the PCU. Spider™ and SpiderDuo® KVM-over-IP Device User Guide 43 Connect the RJ45 cable from the PCU to AC power. Green LED = PCU ON (AC power pass- The PCU manages power remotely...
Connect the power output plug to a target PC or other equipment. Connect the power input plug to the SpiderDuo serial port. 3. In addition, the user can restart or power-cycle the PC and other equipment. 2. 4: Installing the SpiderDuo Device PCU Power To remotely control power ...to a PC and other equipment. shows the layout and dimensions of the PCU. Spider™ and SpiderDuo® KVM-over-IP Device User Guide 43 Connect the RJ45 cable from the PCU to AC power. Green LED = PCU ON (AC power pass- The PCU manages power remotely...

Lantronix Spider - Quick Start Guide
Page 3
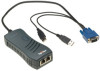
... computer system by the cables or secure it out of the cables for optional power cable) Serial Port (RS-232) Pin # 1 2 3 4 5 6 7 8 Pin Name RTS DTR TX GND GND RX DSR CTS (Out) (Out) (Out) (In) (In) (In) WWW.LANTRONIX.COM 3 Typical Spider Configuration This Quick Start ...Guide will step you through the hardware installation and configuration in a typical environment. 2 WHAT'S IN THE BOX In addition to the Spider distributed KVM/IP module, the box contains the following items: • Null modem DB9F to RJ45 serial cable ...
... computer system by the cables or secure it out of the cables for optional power cable) Serial Port (RS-232) Pin # 1 2 3 4 5 6 7 8 Pin Name RTS DTR TX GND GND RX DSR CTS (Out) (Out) (Out) (In) (In) (In) WWW.LANTRONIX.COM 3 Typical Spider Configuration This Quick Start ...Guide will step you through the hardware installation and configuration in a typical environment. 2 WHAT'S IN THE BOX In addition to the Spider distributed KVM/IP module, the box contains the following items: • Null modem DB9F to RJ45 serial cable ...
Lantronix Spider - Quick Start Guide
Page 4
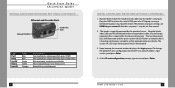
...serial cable into the target computer (this is required for the device to indicate that it is coming from source 2 (USB2 or PS/2) Blinks upon bootup. The default serial port settings are 9600 bits per second, 8 data bits, no parity, 1 stop bit, no flow control. 2. Plug the Spider...DHCP to assist in finding unit 4 INSTALLATION AND NETWORK SETTINGS CONTINUED... 1. At the IP autoconfiguration prompt, type none and press Enter. WWW.LANTRONIX.COM 5 Upon bootup, the terminal window displays the login prompt. Plug the RJ45 end of a PC/laptop running a terminal emulation (e.g. ...
...serial cable into the target computer (this is required for the device to indicate that it is coming from source 2 (USB2 or PS/2) Blinks upon bootup. The default serial port settings are 9600 bits per second, 8 data bits, no parity, 1 stop bit, no flow control. 2. Plug the Spider...DHCP to assist in finding unit 4 INSTALLATION AND NETWORK SETTINGS CONTINUED... 1. At the IP autoconfiguration prompt, type none and press Enter. WWW.LANTRONIX.COM 5 Upon bootup, the terminal window displays the login prompt. Plug the RJ45 end of a PC/laptop running a terminal emulation (e.g. ...
