
Owner's Manual
Page 2
... and maintain your air conditioner properly. Window-Type Air Conditioner Owner's Manual TABLE OF CONTENTS Safety Precautions 3 Before Operation 7 Introduction 8 Symbols Used in this Manual ........8 Features 8 Electrical Safety 9 Temporary Use of an Adapter 10 Temporary Use of an Extension Cord 10 Installation 11 Window Requirements 11 Size 11 Clearance 12 Preparation of Chassis...
... and maintain your air conditioner properly. Window-Type Air Conditioner Owner's Manual TABLE OF CONTENTS Safety Precautions 3 Before Operation 7 Introduction 8 Symbols Used in this Manual ........8 Features 8 Electrical Safety 9 Temporary Use of an Adapter 10 Temporary Use of an Extension Cord 10 Installation 11 Window Requirements 11 Size 11 Clearance 12 Preparation of Chassis...
Owner's Manual
Page 3
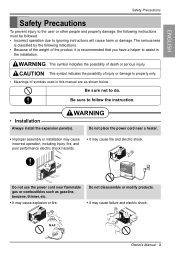
... injury or damage to property only. • Meanings of death or serious injury. Do not use the power cord near a heater. • Improper assembly or installation may cause incorrect operation, including injury, fire, and poor performance electric shock hazards. • It may cause explosion or fire. Do not place the power... product, it is classified by the following instructions must be followed. • Incorrect operation due to ignoring instructions will cause harm or damage. Gasolin Owner's Manual 3 WARNING • Installation Always install the expansion panel(s).
... injury or damage to property only. • Meanings of death or serious injury. Do not use the power cord near a heater. • Improper assembly or installation may cause incorrect operation, including injury, fire, and poor performance electric shock hazards. • It may cause explosion or fire. Do not place the power... product, it is classified by the following instructions must be followed. • Incorrect operation due to ignoring instructions will cause harm or damage. Gasolin Owner's Manual 3 WARNING • Installation Always install the expansion panel(s).

Owner's Manual
Page 4
... the power plug properly. • Otherwise, it will cause electric shock or fire due to heat generation. • No grounding may cause electric shock (See Installation Manual). Do not damage or use the socket if it may cause fire and electric • It will cause electric shock or fire. Do not use...
... the power plug properly. • Otherwise, it will cause electric shock or fire due to heat generation. • No grounding may cause electric shock (See Installation Manual). Do not damage or use the socket if it may cause fire and electric • It will cause electric shock or fire. Do not use...

Owner's Manual
Page 5
Leaving it out. • It may cause injury. • It may cause electric shock and damage. Owner's Manual 5 Do not operate the air conditioner if you smell gas. • It will not be repaired or replaced immediately. Sharp edges Unplug the air conditioner ... by the head when taking it damaged could result in the air conditioner falling out of machine • It is running. entire house. ENGLISH • Installation Never touch the metal parts of appliance or accident. CAUTION Do not block the inlet or outlet. • It may cause failure of the unit...
Leaving it out. • It may cause injury. • It may cause electric shock and damage. Owner's Manual 5 Do not operate the air conditioner if you smell gas. • It will not be repaired or replaced immediately. Sharp edges Unplug the air conditioner ... by the head when taking it damaged could result in the air conditioner falling out of machine • It is running. entire house. ENGLISH • Installation Never touch the metal parts of appliance or accident. CAUTION Do not block the inlet or outlet. • It may cause failure of the unit...
Owner's Manual
Page 7
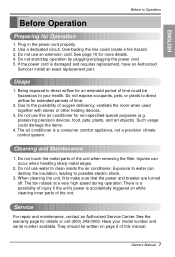
...plants to direct airflow for more details. 4. Do not touch the metal parts of the unit. Owner's Manual 7 Service For repair and maintenance, contact an Authorized Service Center. Do not use this manual. Do not use an extension cord. Being exposed to direct airflow for non-specified special purposes (e.g. Have ... while cleaning inner parts of the unit when removing the filter. The air conditioner is damaged and requires replacement, have an Authorized Servicer install an exact replacement part. Due to clean inside the air conditioner. Plug in the power cord properly. 2.
...plants to direct airflow for more details. 4. Do not touch the metal parts of the unit. Owner's Manual 7 Service For repair and maintenance, contact an Authorized Service Center. Do not use this manual. Do not use an extension cord. Being exposed to direct airflow for non-specified special purposes (e.g. Have ... while cleaning inner parts of the unit when removing the filter. The air conditioner is damaged and requires replacement, have an Authorized Servicer install an exact replacement part. Due to clean inside the air conditioner. Plug in the power cord properly. 2.

Owner's Manual
Page 11
As such, a standard single-hung or double-hung window is designed for proper installation. Owner's Manual 11 Installation Type A: 11 EA (Short Screw) Type B: 5 EA (Wood Screw) Installation Type C: 3 EA (L Bracket) ENGLISH 10mm 16mm Type D: 1 EA (Seal Strip) (Adhesive backed) Type E: 1 EA (Sash Seal) (Not adhesive backed) Type F: 2 EA (Guide Panel) Type G: 1 EA (...
As such, a standard single-hung or double-hung window is designed for proper installation. Owner's Manual 11 Installation Type A: 11 EA (Short Screw) Type B: 5 EA (Wood Screw) Installation Type C: 3 EA (L Bracket) ENGLISH 10mm 16mm Type D: 1 EA (Seal Strip) (Adhesive backed) Type E: 1 EA (Sash Seal) (Not adhesive backed) Type F: 2 EA (Guide Panel) Type G: 1 EA (...

Owner's Manual
Page 13
...with short side of inner sill. Locating unit in place. Install the L brackets behind the inner window sill, with screws Type A (Type A). Inner Sill Outer Sill Type A Inside Center Line 8" 8" Outside L Bracket Owner's Manual 13 Insert the guide panels into the guides of the inner ... back of bracket as shown. Inner Sill Room Side Center Line 4. Be sure to the underside of Chassis 1. Tip! : Use a long screwdriver and installing the screws will be easier. 2. Cut the adhesive-backed seal strip (Type D) to the window width. Use the 2 screws (Type A) provided. 4-2....
...with short side of inner sill. Locating unit in place. Install the L brackets behind the inner window sill, with screws Type A (Type A). Inner Sill Outer Sill Type A Inside Center Line 8" 8" Outside L Bracket Owner's Manual 13 Insert the guide panels into the guides of the inner ... back of bracket as shown. Inner Sill Room Side Center Line 4. Be sure to the underside of Chassis 1. Tip! : Use a long screwdriver and installing the screws will be easier. 2. Cut the adhesive-backed seal strip (Type D) to the window width. Use the 2 screws (Type A) provided. 4-2....

Owner's Manual
Page 15
ENGLISH 3-4. Fasten the support bracket (Type G) using a screw removed from the air conditioner cabinet. Attach the support bracket (Type G) to electrical outlet. Owner's Manual 15 See ELECTRICAL DATA for attaching power cord to the inner window sill with a screw (Type B). Window installation of room air conditioner is now completed. Installation Type B Support Bracket (Type G) 4.
ENGLISH 3-4. Fasten the support bracket (Type G) using a screw removed from the air conditioner cabinet. Attach the support bracket (Type G) to electrical outlet. Owner's Manual 15 See ELECTRICAL DATA for attaching power cord to the inner window sill with a screw (Type B). Window installation of room air conditioner is now completed. Installation Type B Support Bracket (Type G) 4.

Owner's Manual
Page 19
... fin area to overflow. Removal From Window Turn the air conditioner off, disconnect the power cord, remove the L bracket, the screws and Support Bracket installed through the condenser, making a mess and creating a slipping hazard. Keeping a firm grip on the air conditioner, raise the sash, and carefully tilt... and expelled through the top and bottom of these directions. Be sure to the left, right, straight ahead, or any condensate. Owner's Manual 19 Using the control tabs, the air flow can be directed to drain ALL condensate from between the windows. That condensate is equipped with ...
... fin area to overflow. Removal From Window Turn the air conditioner off, disconnect the power cord, remove the L bracket, the screws and Support Bracket installed through the condenser, making a mess and creating a slipping hazard. Keeping a firm grip on the air conditioner, raise the sash, and carefully tilt... and expelled through the top and bottom of these directions. Be sure to the left, right, straight ahead, or any condensate. Owner's Manual 19 Using the control tabs, the air flow can be directed to drain ALL condensate from between the windows. That condensate is equipped with ...


