Owner's Manual
Page 3
... CABLE/TV INSTALLER This reminder is intended to alert the user to operate the equipment. Reorient or relocate the receiving antenna. - FCC NOTICE Class B digital device This equipment has been tested and found to comply with the limits for proper grounding and, in particular, specifies that to which can radiate radio frequency energy and, if not installed and used...
... CABLE/TV INSTALLER This reminder is intended to alert the user to operate the equipment. Reorient or relocate the receiving antenna. - FCC NOTICE Class B digital device This equipment has been tested and found to comply with the limits for proper grounding and, in particular, specifies that to which can radiate radio frequency energy and, if not installed and used...
Owner's Manual
Page 6
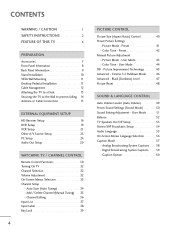
... a Desk 13 Securing the TV to the Wall to prevent falling . . . 14 Antenna or Cable Connection 15 EXTERNAL EQUIPMENT SETUP HD Receiver Setup 16 DVD Setup 19 VCR Setup 21 Other A/V Source Setup 23 PC Setup 24 Audio Out Setup 29 WATCHING TV / CHANNEL CONTROL Remote Control Functions 30 Turning On TV 32 Channel Selection 32 Volume Adjustment 32 On-Screen Menus Selection 33 Channel Setup - Channel Editing 36 Input List 37 Input Label 38 Key Lock 39 4 PICTURE CONTROL Picture Size (Aspect Ratio) Control 40 Preset Picture Settings - Analog Broadcasting System Captions 58 -
... a Desk 13 Securing the TV to the Wall to prevent falling . . . 14 Antenna or Cable Connection 15 EXTERNAL EQUIPMENT SETUP HD Receiver Setup 16 DVD Setup 19 VCR Setup 21 Other A/V Source Setup 23 PC Setup 24 Audio Out Setup 29 WATCHING TV / CHANNEL CONTROL Remote Control Functions 30 Turning On TV 32 Channel Selection 32 Volume Adjustment 32 On-Screen Menus Selection 33 Channel Setup - Channel Editing 36 Input List 37 Input Label 38 Key Lock 39 4 PICTURE CONTROL Picture Size (Aspect Ratio) Control 40 Preset Picture Settings - Analog Broadcasting System Captions 58 -
Owner's Manual
Page 11
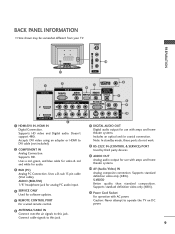
...DVI) 4 SERVICE ANTENNA/ 5 CABLE IN DIGITAL REMOTE AUDIO OUT CONTROL IN OPTICAL 6 7 COMPONENT IN 2 2 1 1 HDMI/DVI IN VIDEO AUDIO 2 1 HDMI/DVI IN, HDMI IN Digital Connection. Doesn't support 480i. Uses a D-sub 15 pin cable (VGA cable). Caution: Never attempt to operate the TV on DC power. 6 ANTENNA/CABLE IN Connect over-the air signals to this jack. Uses a red, green, and blue cable for video & red and white for software updates. 5 REMOTE CONTROL PORT For a wired remote control. AUDIO (RGB/DVI) 1/8" headphone jack for analog PC audio input. 4 SERVICE ONLY Used...
...DVI) 4 SERVICE ANTENNA/ 5 CABLE IN DIGITAL REMOTE AUDIO OUT CONTROL IN OPTICAL 6 7 COMPONENT IN 2 2 1 1 HDMI/DVI IN VIDEO AUDIO 2 1 HDMI/DVI IN, HDMI IN Digital Connection. Doesn't support 480i. Uses a D-sub 15 pin cable (VGA cable). Caution: Never attempt to operate the TV on DC power. 6 ANTENNA/CABLE IN Connect over-the air signals to this jack. Uses a red, green, and blue cable for video & red and white for software updates. 5 REMOTE CONTROL PORT For a wired remote control. AUDIO (RGB/DVI) 1/8" headphone jack for analog PC audio input. 4 SERVICE ONLY Used...
Owner's Manual
Page 18
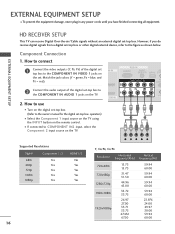
... COMPONENT IN VIDEO 1 jacks on the remote control. RGB IN RGB(PC) AUDIO REM (RGB/DVI) SERVICE CONT COMPONENT IN 2 RS (CONTR 2 Connect the audio output of the digital set top box to COMPONENT IN2 input, select the Component 2 input source on the digital set-top box. (Refer to the figure as shown below. operation) I Select the Component 1 input source on the TV using the INPUT button on MI IN the set. EXTERNAL EQUIPMENT SETUP I To prevent the equipment damage, never plug in any power cords...
... COMPONENT IN VIDEO 1 jacks on the remote control. RGB IN RGB(PC) AUDIO REM (RGB/DVI) SERVICE CONT COMPONENT IN 2 RS (CONTR 2 Connect the audio output of the digital set top box to COMPONENT IN2 input, select the Component 2 input source on the digital set-top box. (Refer to the figure as shown below. operation) I Select the Component 1 input source on the TV using the INPUT button on MI IN the set. EXTERNAL EQUIPMENT SETUP I To prevent the equipment damage, never plug in any power cords...
Owner's Manual
Page 19
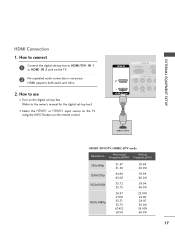
...use I Turn on the digital set-top box. (Refer to the owner's manual for the digital set -top box to connect 1 Connect the digital set -top box.) I Select the HDMI1 or HDMI2 input source on the TV using the INPUT button on the TV. 2 No separated audio connection is necessary. EXTERNAL EQUIPMENT SETUP HDMI Connection 1. HDMI IN RGB IN RGB(PC) AUDIO (RGB/D 2 2 1 1 HDMI/DVI IN COMPONENT IN VIDEO 1 HDMI-DTV OUTPUT HDMI1/DVI-DTV, HDMI2-DTV mode Resolution...60.00 17 How to HDMI/DVI IN 1 or HDMI IN 2 jack on the remote control. HDMI supports both audio and video. ( ) 2.
...use I Turn on the digital set-top box. (Refer to the owner's manual for the digital set -top box to connect 1 Connect the digital set -top box.) I Select the HDMI1 or HDMI2 input source on the TV using the INPUT button on the TV. 2 No separated audio connection is necessary. EXTERNAL EQUIPMENT SETUP HDMI Connection 1. HDMI IN RGB IN RGB(PC) AUDIO (RGB/D 2 2 1 1 HDMI/DVI IN COMPONENT IN VIDEO 1 HDMI-DTV OUTPUT HDMI1/DVI-DTV, HDMI2-DTV mode Resolution...60.00 17 How to HDMI/DVI IN 1 or HDMI IN 2 jack on the remote control. HDMI supports both audio and video. ( ) 2.
Owner's Manual
Page 20
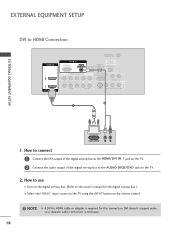
... 1 EXTERNAL EQUIPMENT SETUP EXTERNAL EQUIPMENT SETUP DVI to the owner's manual for this connection. How to use I Turn on the TV. 2 Connect the audio output of the digital set-top box to HDMI cable or adapter is necessary. 18 How to connect 1 Connect the DVI output of the digital set-top box to the HDMI/DVI IN 1 jack on the digital set -top box.) I Select the HDMI1 input source on the TV using the INPUT button on the TV. 2. DVI doesn't support audio, so a separate audio connection is required for the digital set...
... 1 EXTERNAL EQUIPMENT SETUP EXTERNAL EQUIPMENT SETUP DVI to the owner's manual for this connection. How to use I Turn on the TV. 2 Connect the audio output of the digital set-top box to HDMI cable or adapter is necessary. 18 How to connect 1 Connect the DVI output of the digital set-top box to the HDMI/DVI IN 1 jack on the digital set -top box.) I Select the HDMI1 input source on the TV using the INPUT button on the TV. 2. DVI doesn't support audio, so a separate audio connection is required for the digital set...

Owner's Manual
Page 23
... the VCR owner's manual.) 21 ( ) How to use I Insert a video tape into the VCR and press PLAY on the VCR. (Refer to the same channel number. How to connect 1 Connect the RF antenna out socket of the VCR to the ANTENNA/CABLE IN socket on the TV. 2 Connect the antenna cable to all TVs and is used; EXTERNAL EQUIPMENT SETUP VCR SETUP I If the 4:3 picture format is not covered by warranty. ( ) Antenna Connection ANTENNA/ CABLE IN GB IN DIGITAL AUDIO REMOTE AUDIO OUT (RGB/DVI) SERVICE CONTROL IN OPTICAL...
... the VCR owner's manual.) 21 ( ) How to use I Insert a video tape into the VCR and press PLAY on the VCR. (Refer to the same channel number. How to connect 1 Connect the RF antenna out socket of the VCR to the ANTENNA/CABLE IN socket on the TV. 2 Connect the antenna cable to all TVs and is used; EXTERNAL EQUIPMENT SETUP VCR SETUP I If the 4:3 picture format is not covered by warranty. ( ) Antenna Connection ANTENNA/ CABLE IN GB IN DIGITAL AUDIO REMOTE AUDIO OUT (RGB/DVI) SERVICE CONTROL IN OPTICAL...
Owner's Manual
Page 28
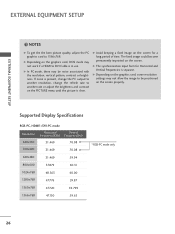
Supported Display Specifications RGB-PC, HDMI1/DVI-PC mode Resolution 640x350 Horizontal Vertical Frequency(KHz) Frequency(Hz) 31.469 70.08 720x400 31.469 70...mode may be positioned on the PICTURE menu until the picture is in use. G The synchronization input form for a long period of time. If noise is present, change the refresh rate to DVI Cable is clear. EXTERNAL EQUIPMENT SETUP EXTERNAL EQUIPMENT SETUP ! G In PC mode, there may not work if a HDMI to another resolution, change the PC output to another rate or adjust the brightness and contrast on the screen...
Supported Display Specifications RGB-PC, HDMI1/DVI-PC mode Resolution 640x350 Horizontal Vertical Frequency(KHz) Frequency(Hz) 31.469 70.08 720x400 31.469 70...mode may be positioned on the PICTURE menu until the picture is in use. G The synchronization input form for a long period of time. If noise is present, change the refresh rate to DVI Cable is clear. EXTERNAL EQUIPMENT SETUP EXTERNAL EQUIPMENT SETUP ! G In PC mode, there may not work if a HDMI to another resolution, change the PC output to another rate or adjust the brightness and contrast on the screen...
Owner's Manual
Page 29
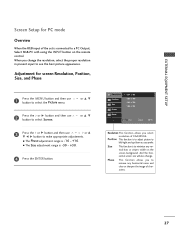
... set is connected to a PC Output, Select RGB-PC with using the INPUT button on the screen background. Position This function is -16 ~ +16. And the horizontal screen size will also change the resolution, select the proper resolution in present input to see the best picture appearance. Adjustment for PC mode Overview When the RGB input of characters. 27 EXTERNAL EQUIPMENT SETUP Screen Setup for screen Resolution, Position, Size, and Phase 1 Press the MENU button and then use button to select the Picture menu...
... set is connected to a PC Output, Select RGB-PC with using the INPUT button on the screen background. Position This function is -16 ~ +16. And the horizontal screen size will also change the resolution, select the proper resolution in present input to see the best picture appearance. Adjustment for PC mode Overview When the RGB input of characters. 27 EXTERNAL EQUIPMENT SETUP Screen Setup for screen Resolution, Position, Size, and Phase 1 Press the MENU button and then use button to select the Picture menu...
Owner's Manual
Page 31
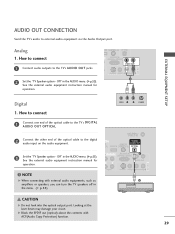
...can turn the TV speakers off in the menu. (G p.53) VIDEO L R S-VIDEO ANTENNA/ CABLE IN DIGITAL O REMOTE AUDIO OUT VI) SERVICE CONTROL IN OPTICAL N RS-232C IN 1 (CONTROL & SERVICE) AUDIO OUT AUDIO S-VIDEO VIDEO (MONO) AUDIO 2 AV IN 1 CAUTION G Do not look into the optical output port. Off" in the AUDIO menu. (G p.53). See the external audio equipment instruction manual for operation. AV IN 1 EXTERNAL EQUIPMENT SETUP AUDIO OUT CONNECTION Send the TV's audio to external audio equipment via the Audio Output port. VICE CONTROL IN OPTICAL RS-232C IN (CONTROL & SERVICE) AUDIO...
...can turn the TV speakers off in the menu. (G p.53) VIDEO L R S-VIDEO ANTENNA/ CABLE IN DIGITAL O REMOTE AUDIO OUT VI) SERVICE CONTROL IN OPTICAL N RS-232C IN 1 (CONTROL & SERVICE) AUDIO OUT AUDIO S-VIDEO VIDEO (MONO) AUDIO 2 AV IN 1 CAUTION G Do not look into the optical output port. Off" in the AUDIO menu. (G p.53). See the external audio equipment instruction manual for operation. AV IN 1 EXTERNAL EQUIPMENT SETUP AUDIO OUT CONNECTION Send the TV's audio to external audio equipment via the Audio Output port. VICE CONTROL IN OPTICAL RS-232C IN (CONTROL & SERVICE) AUDIO...
Owner's Manual
Page 32
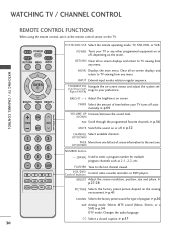
... mode. INPUT External input modes rotate in regular sequence. TIMER Select the amount of time before your preference. UP/DOWN PAGE Move from any other programmed equipment on or off, depending on -screen displays and return to the next one. UP/DOWN NUMBER button - (DASH) Used to enter a program number for type of screen information to TV viewing from any menu. VCR/DVD Control buttons Control video cassette recorders or DVD players. ADJUST Adjust the screen resolution, position, size and phase. WATCHING TV / CHANNEL CONTROL REMOTE CONTROL...
... mode. INPUT External input modes rotate in regular sequence. TIMER Select the amount of time before your preference. UP/DOWN PAGE Move from any other programmed equipment on or off, depending on -screen displays and return to the next one. UP/DOWN NUMBER button - (DASH) Used to enter a program number for type of screen information to TV viewing from any menu. VCR/DVD Control buttons Control video cassette recorders or DVD players. ADJUST Adjust the screen resolution, position, size and phase. WATCHING TV / CHANNEL CONTROL REMOTE CONTROL...
Owner's Manual
Page 34
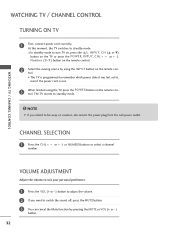
... last set to be away on the remote control. 2 Select the viewing source by pressing the MUTE or VOL (+ or -) button. 32 or + -) or NUMBER buttons to select a channel VOLUME ADJUSTMENT Adjust the volume to suit your personal preference. 1 Press the VOL (+ or -) button to adjust the volume. 2 If you intend to , even if the power cord is out. 3 When finished using the INPUT button on the remote control. I In standby mode to switch the sound off...
... last set to be away on the remote control. 2 Select the viewing source by pressing the MUTE or VOL (+ or -) button. 32 or + -) or NUMBER buttons to select a channel VOLUME ADJUSTMENT Adjust the volume to suit your personal preference. 1 Press the VOL (+ or -) button to adjust the volume. 2 If you intend to , even if the power cord is out. 3 When finished using the INPUT button on the remote control. I In standby mode to switch the sound off...
Owner's Manual
Page 42
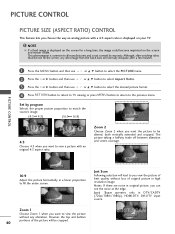
... screen coverage. 4:3 16:9 Adjust the picture horizontally, in high resolution image. PICTURE CONTROL PICTURE SIZE (ASPECT RATIO) CONTROL This feature lets you choose the way an analog picture with an original 4:3 aspect ratio. or D E button to select the desired picture format. 4 Press RETURN button to return to TV viewing or press MENU button to return to all manufacturers and is not covered by program Selects the proper picture proportion to match the source's image. (4:3 4:3) (16:9 16:9) Zoom 1 PICTURE CONTROL Set By Program Set...
... screen coverage. 4:3 16:9 Adjust the picture horizontally, in high resolution image. PICTURE CONTROL PICTURE SIZE (ASPECT RATIO) CONTROL This feature lets you choose the way an analog picture with an original 4:3 aspect ratio. or D E button to select the desired picture format. 4 Press RETURN button to return to TV viewing or press MENU button to return to all manufacturers and is not covered by program Selects the proper picture proportion to match the source's image. (4:3 4:3) (16:9 16:9) Zoom 1 PICTURE CONTROL Set By Program Set...
Owner's Manual
Page 43
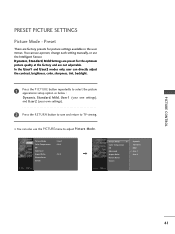
... Picture Mode. PRESET PICTURE SETTINGS Picture Mode - Preset There are factory presets for the optimum picture quality at the factory and are preset for picture settings available in the user menus. Dynamic, Standard, M i l d Settings are not adjustable. You can use a preset, change each setting manually, or use the PICTURE menu to TV viewing. Picture Mode Color Temperature DB Advanced Aspect Ratio Picture Reset Screen : User1 : Cool : 16:9 Picture Mode G Color Temperature DB Advanced Aspect Ratio Picture Reset Screen Dynamic Standard Mild User 1 User 2 PICTURE CONTROL...
... Picture Mode. PRESET PICTURE SETTINGS Picture Mode - Preset There are factory presets for the optimum picture quality at the factory and are preset for picture settings available in the user menus. Dynamic, Standard, M i l d Settings are not adjustable. You can use a preset, change each setting manually, or use the PICTURE menu to TV viewing. Picture Mode Color Temperature DB Advanced Aspect Ratio Picture Reset Screen : User1 : Cool : 16:9 Picture Mode G Color Temperature DB Advanced Aspect Ratio Picture Reset Screen Dynamic Standard Mild User 1 User 2 PICTURE CONTROL...
Owner's Manual
Page 60
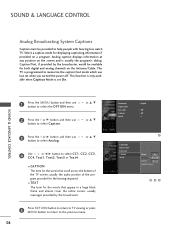
... then use button to select Caption. usually the audio portion of the TV screen; This function is only available when Caption Mode is programmed to the previous menu. 58 Language Input Label Key Lock Caption Set ID : English : Off : Off : 1 Language Input Label Key Lock Caption Set ID 1 Mode On Analog Text1 Digital Service3 Digital Option 2 34 or D E 3 Press the or G button and then use button to select the OPTION menu. This TV is set when you turned the power off. Analog caption displays...
... then use button to select Caption. usually the audio portion of the TV screen; This function is only available when Caption Mode is programmed to the previous menu. 58 Language Input Label Key Lock Caption Set ID : English : Off : Off : 1 Language Input Label Key Lock Caption Set ID 1 Mode On Analog Text1 Digital Service3 Digital Option 2 34 or D E 3 Press the or G button and then use button to select the OPTION menu. This TV is set when you turned the power off. Analog caption displays...
Owner's Manual
Page 68
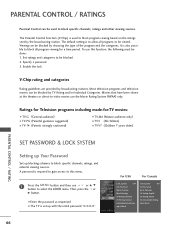
... specific channels, ratings, and external viewing sources. Set ratings and categories to be blocked by choosing the type of the program and the categories. Then, press the or G button. To use this menu. 1 Press the MENU button and then use the Movie Rating System (MPAA) only. Ratings for Television programs including made-for a time period. Most television programs and television movies can be done: 1. PARENTAL CONTROL / RATINGS Parental Control can be used to block program viewing based...
... specific channels, ratings, and external viewing sources. Set ratings and categories to be blocked by choosing the type of the program and the categories. Then, press the or G button. To use this menu. 1 Press the MENU button and then use the Movie Rating System (MPAA) only. Ratings for Television programs including made-for a time period. Most television programs and television movies can be done: 1. PARENTAL CONTROL / RATINGS Parental Control can be used to block program viewing based...
Owner's Manual
Page 74
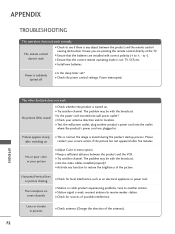
... work . I Check antenna (Change the direction of the antenna). 72 I Install new batteries. I Test the wall power outlet, plug another station. I Station or cable product experiencing problems, tune to +, - Poor reception on contact your antenna direction and/or location. I Ensure that the batteries are pointing the remote control directly at the TV. I Station signal is set ? Power interrupted. I Check for sources of the picture. Please after switching on some channels I Are the video cables installed...
... work . I Check antenna (Change the direction of the antenna). 72 I Install new batteries. I Test the wall power outlet, plug another station. I Station or cable product experiencing problems, tune to +, - Poor reception on contact your antenna direction and/or location. I Ensure that the batteries are pointing the remote control directly at the TV. I Station signal is set ? Power interrupted. I Check for sources of the picture. Please after switching on some channels I Are the video cables installed...

Owner's Manual
Page 78
... as a VCR) and press the corresponding mode button on the following pages. TV POWER DVD STB VCR RETURN MENU INPUT ENTER BRIGHT - If not, steps 2-5. Note that the remote may not control all models. In that , press the POWER button. When pressing the button, the light blinks at the same time for all models of other brands. TIMER BRIGHT + FAV VOL MUTE P CH A G E 123 456 789 0 FLASHBK ADJUST RATIO PICTURE SOUND SAP CC APPENDIX...
... as a VCR) and press the corresponding mode button on the following pages. TV POWER DVD STB VCR RETURN MENU INPUT ENTER BRIGHT - If not, steps 2-5. Note that the remote may not control all models. In that , press the POWER button. When pressing the button, the light blinks at the same time for all models of other brands. TIMER BRIGHT + FAV VOL MUTE P CH A G E 123 456 789 0 FLASHBK ADJUST RATIO PICTURE SOUND SAP CC APPENDIX...
Owner's Manual
Page 82
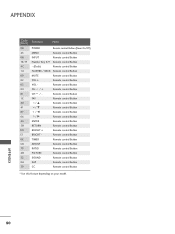
...Note POWER Remote control Button (Power On/Off) MENU Remote control Button INPUT Remote control Button Number Key 0-9 Remote control Button - (Dash) Remote control Button FLASHBK / BACK Remote control Button MUTE Remote control Button VOL + Remote control Button VOL - Remote control Button TIMER Remote control Button ADJUST Remote control Button RATIO Remote control Button PICTURE Remote control Button SOUND Remote control Button SAP Remote control Button CC Remote control Button * Use this feature depending on your model. Remote control Button CH / + Remote...
...Note POWER Remote control Button (Power On/Off) MENU Remote control Button INPUT Remote control Button Number Key 0-9 Remote control Button - (Dash) Remote control Button FLASHBK / BACK Remote control Button MUTE Remote control Button VOL + Remote control Button VOL - Remote control Button TIMER Remote control Button ADJUST Remote control Button RATIO Remote control Button PICTURE Remote control Button SOUND Remote control Button SAP Remote control Button CC Remote control Button * Use this feature depending on your model. Remote control Button CH / + Remote...
Owner's Manual
Page 85
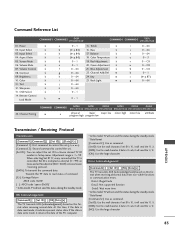
Power k 02. Input Select k 03. Screen Mute k 06. Contrast k 09. Tint k 12. OSD Select k 14. Remote Control Lock Mode k a 0~1 15. Balance k c (G p.84) 18. Red Adjustment k e 0~1 20. Blue Adjustment k g 0 ~ 64 23. If the data is indicated as decimal (1~ 99) on menu and as Hexa decimal (0x0~0x63) on this model, TV will not send the status during the standby mode. Aspect Ratio k 05. Back Light m j 0 ~ 64 k 0 ~ 64 l 0~1 m 0~1 r 0 ~ 64 s 0 ~ 64 t 0 ~ 64...
Power k 02. Input Select k 03. Screen Mute k 06. Contrast k 09. Tint k 12. OSD Select k 14. Remote Control Lock Mode k a 0~1 15. Balance k c (G p.84) 18. Red Adjustment k e 0~1 20. Blue Adjustment k g 0 ~ 64 23. If the data is indicated as decimal (1~ 99) on menu and as Hexa decimal (0x0~0x63) on this model, TV will not send the status during the standby mode. Aspect Ratio k 05. Back Light m j 0 ~ 64 k 0 ~ 64 l 0~1 m 0~1 r 0 ~ 64 s 0 ~ 64 t 0 ~ 64...

