
Owner's Manual
Page 5
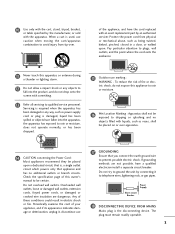
... prevent possible electric shock. Pay particular attention to plugs, wall outlets, and the point where the cord exits the appliance. 11 Never touch this owner's manual to be placed upon . If grounding methods are dangerous. 10 Use only with the cart, stand, tripod, bracket, or table specified by connecting it , discontinue...
... prevent possible electric shock. Pay particular attention to plugs, wall outlets, and the point where the cord exits the appliance. 11 Never touch this owner's manual to be placed upon . If grounding methods are dangerous. 10 Use only with the cart, stand, tripod, bracket, or table specified by connecting it , discontinue...
Owner's Manual
Page 6
...System Captions 59 - Analog Broadcasting System Captions 58 - Color Tone - Picture Improvement Technology 45 Advanced - Caption Option 60 Preset 42 Manual Picture Adjustment - Black (Darkness) Level 47 Picture Reset 48 SOUND & LANGUAGE CONTROL Auto Volume Leveler (Auto Volume 49 Preset Sound ... Selection 32 Volume Adjustment 32 On-Screen Menus Selection 33 Channel Setup - Auto Scan (Auto Tuning 34 - Add / Delete Channel (Manual Tuning 35 - Preset 41 Color Tone - Cinema 3:2 Pulldown Mode 46 Advanced - Picture Mode - Channel Editing 36 Input List 37 ...
...System Captions 59 - Analog Broadcasting System Captions 58 - Color Tone - Picture Improvement Technology 45 Advanced - Caption Option 60 Preset 42 Manual Picture Adjustment - Black (Darkness) Level 47 Picture Reset 48 SOUND & LANGUAGE CONTROL Auto Volume Leveler (Auto Volume 49 Preset Sound ... Selection 32 Volume Adjustment 32 On-Screen Menus Selection 33 Channel Setup - Auto Scan (Auto Tuning 34 - Add / Delete Channel (Manual Tuning 35 - Preset 41 Color Tone - Cinema 3:2 Pulldown Mode 46 Advanced - Picture Mode - Channel Editing 36 Input List 37 ...
Owner's Manual
Page 7
Auto Clock Setup 61 Manual Clock Setup 62 Auto On/Off Timer Setting 63 Sleep Timer Setting 64 Auto Shut-off Setting 65 PARENTAL CONTROL / RATINGS Set Password & Lock System 66 Channel Blocking 68 External Input Blocking 68 Movie & TV Rating 69 APPENDIX Troubleshooting 72 Maintenance 74 Product Specifications 75 Programming the Remote Control 76 IR Codes 79 External Control Through RS-232C 81 Open Source License 88 5 TIME SETTING Clock Setting -
Auto Clock Setup 61 Manual Clock Setup 62 Auto On/Off Timer Setting 63 Sleep Timer Setting 64 Auto Shut-off Setting 65 PARENTAL CONTROL / RATINGS Set Password & Lock System 66 Channel Blocking 68 External Input Blocking 68 Movie & TV Rating 69 APPENDIX Troubleshooting 72 Maintenance 74 Product Specifications 75 Programming the Remote Control 76 IR Codes 79 External Control Through RS-232C 81 Open Source License 88 5 TIME SETTING Clock Setting -
Owner's Manual
Page 9
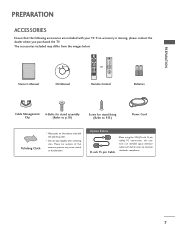
... included may cause scratch or discoloration. PICTURE SOUND BRIGHT + 1 2 3 4 56 789 - 0 BACK FAV VOL MUTE CH SAP RETURN MENU TIMER ENTER 1.5V 1.5V Owner's Manual CD Manual Remote Control Batteries Cable Management 4-Bolts for stand assembly Clip (Refer to p.10) Screw for stand fixing (Refer to P.13) Power Cord Polishing Cloth * Wipe...
... included may cause scratch or discoloration. PICTURE SOUND BRIGHT + 1 2 3 4 56 789 - 0 BACK FAV VOL MUTE CH SAP RETURN MENU TIMER ENTER 1.5V 1.5V Owner's Manual CD Manual Remote Control Batteries Cable Management 4-Bolts for stand assembly Clip (Refer to p.10) Screw for stand fixing (Refer to P.13) Power Cord Polishing Cloth * Wipe...
Owner's Manual
Page 18
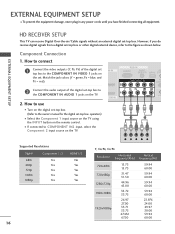
....00 29.97 30.00 59.94 60.00 Component Connection 1. EXTERNAL EQUIPMENT SETUP I Turn on the digital set-top box. (Refer to the owner's manual for the digital set -top box. Match the jack colors (Y = green, PB = blue, and PR = red). VIDEO AUDIO S-V ( /DVI IN 2. EXTERNAL EQUIPMENT SETUP HD RECEIVER...
....00 29.97 30.00 59.94 60.00 Component Connection 1. EXTERNAL EQUIPMENT SETUP I Turn on the digital set-top box. (Refer to the owner's manual for the digital set -top box. Match the jack colors (Y = green, PB = blue, and PR = red). VIDEO AUDIO S-V ( /DVI IN 2. EXTERNAL EQUIPMENT SETUP HD RECEIVER...
Owner's Manual
Page 19
How to connect 1 Connect the digital set -top box.) I Turn on the digital set-top box. (Refer to the owner's manual for the digital set -top box to use I Select the HDMI1 or HDMI2 input source on the TV using the INPUT button on the TV. 2 ...
How to connect 1 Connect the digital set -top box.) I Turn on the digital set-top box. (Refer to the owner's manual for the digital set -top box to use I Select the HDMI1 or HDMI2 input source on the TV using the INPUT button on the TV. 2 ...
Owner's Manual
Page 20
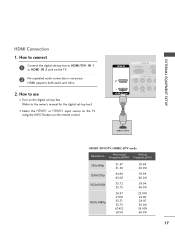
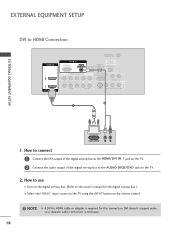
... set-top box. (Refer to use I Select the HDMI1 input source on the TV using the INPUT button on the TV. 2. How to the owner's manual for this connection. DVI doesn't support audio, so a separate audio connection is required for the digital set -top box to HDMI Connection HDMI IN ANTENNA...
... set-top box. (Refer to use I Select the HDMI1 input source on the TV using the INPUT button on the TV. 2. How to the owner's manual for this connection. DVI doesn't support audio, so a separate audio connection is required for the digital set -top box to HDMI Connection HDMI IN ANTENNA...
Owner's Manual
Page 21
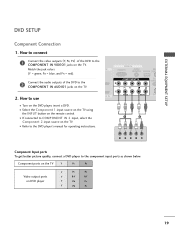
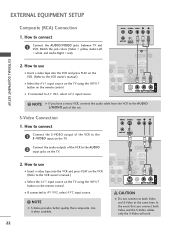
...) AUDIO REM (RGB/DVI) SERVICE CONT 2 Connect the audio outputs of the DVD to use 1 VI IN VIDEO AUDIO S-VI ( ) I Refer to the DVD player's manual for operating instructions. 1 2 Y PB PR L R Component Input ports To get better picture quality, connect a DVD player to the COMPONENT IN AUDIO1 jacks on the TV...
...) AUDIO REM (RGB/DVI) SERVICE CONT 2 Connect the audio outputs of the DVD to use 1 VI IN VIDEO AUDIO S-VI ( ) I Refer to the DVD player's manual for operating instructions. 1 2 Y PB PR L R Component Input ports To get better picture quality, connect a DVD player to the COMPONENT IN AUDIO1 jacks on the TV...

Owner's Manual
Page 22
... on the TV using the INPUT button on the remote control. How to connect 1 Connect the HDMI output of the DVD to the DVD player's manual for operating instructions. How to use I Refer to the HDMI/DVI IN 1 or HDMI IN 2 jack on the TV. 2. I Select the HDMI1 or ... 1 Connect the S-VIDEO output of the DVD to the S -VIDEO input on the TV. 2 Connect the audio outputs of the DVD to the DVD player's manual for operating instructions. S-VIDEO AUDIO L R ANTENNA/ CABLE IN 1 2 DIGITAL IO REMOTE AUDIO OUT DVI) SERVICE CONTROL IN OPTICAL N RS-232C IN (CONTROL & SERVICE) ...
... on the TV using the INPUT button on the remote control. How to connect 1 Connect the HDMI output of the DVD to the DVD player's manual for operating instructions. How to use I Refer to the HDMI/DVI IN 1 or HDMI IN 2 jack on the TV. 2. I Select the HDMI1 or ... 1 Connect the S-VIDEO output of the DVD to the S -VIDEO input on the TV. 2 Connect the audio outputs of the DVD to the DVD player's manual for operating instructions. S-VIDEO AUDIO L R ANTENNA/ CABLE IN 1 2 DIGITAL IO REMOTE AUDIO OUT DVI) SERVICE CONTROL IN OPTICAL N RS-232C IN (CONTROL & SERVICE) ...

Owner's Manual
Page 23
... in socket of the screen may remain visible on the screen. I Set VCR output switch to 3 or 4 and then tune TV to the VCR owner's manual.) 21 ( ) How to use I Insert a video tape into the VCR and press PLAY on the sides of the VCR. 2. How to connect 1 Connect the RF...
... in socket of the screen may remain visible on the screen. I Set VCR output switch to 3 or 4 and then tune TV to the VCR owner's manual.) 21 ( ) How to use I Insert a video tape into the VCR and press PLAY on the sides of the VCR. 2. How to connect 1 Connect the RF...
Owner's Manual
Page 24
... use I Insert a video tape into the VCR and press PLAY on the VCR. (Refer to the VCR owner's manual.) I If connected to the AUDIO input jacks on the VCR. (Refer to the VCR owner's manual.) I If connected to connect 1 Connect the AUDIO/VIDEO jacks between TV and VCR. S-Video Connection 1. How to...
... use I Insert a video tape into the VCR and press PLAY on the VCR. (Refer to the VCR owner's manual.) I If connected to the AUDIO input jacks on the VCR. (Refer to the VCR owner's manual.) I If connected to connect 1 Connect the AUDIO/VIDEO jacks between TV and VCR. S-Video Connection 1. How to...
Owner's Manual
Page 31
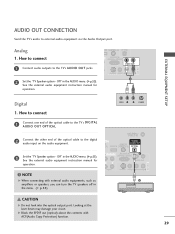
NOTE G When connecting with ACP(Audio Copy Protection) function. 29 Analog 1. See the external audio equipment instruction manual for operation. ! G Block the SPDIF out (optical) about the contents with external audio equipments, such as amplifiers or speakers, you can turn the... OUT OPTICAL. 2 Connect the other end of the optical cable to external audio equipment via the Audio Output port. See the external audio equipment instruction manual for operation. Off" in the AUDIO menu. (G p.53). AV IN 1 EXTERNAL EQUIPMENT SETUP AUDIO OUT CONNECTION Send the TV's audio to the ...
NOTE G When connecting with ACP(Audio Copy Protection) function. 29 Analog 1. See the external audio equipment instruction manual for operation. ! G Block the SPDIF out (optical) about the contents with external audio equipments, such as amplifiers or speakers, you can turn the... OUT OPTICAL. 2 Connect the other end of the optical cable to external audio equipment via the Audio Output port. See the external audio equipment instruction manual for operation. Off" in the AUDIO menu. (G p.53). AV IN 1 EXTERNAL EQUIPMENT SETUP AUDIO OUT CONNECTION Send the TV's audio to the ...
Owner's Manual
Page 35
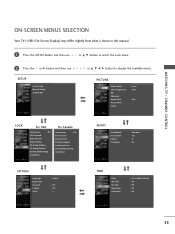
... : Off 33 WATCHING TV / CHANNEL CONTROL ON-SCREEN MENUS SELECTION Your TV's OSD (On Screen Display) may differ slightly from what is shown in this manual. 1 Press the MENU button and then use or D E button to select the each menu. 2 Press the or G button and then use SETUP Auto Tuning...
... : Off 33 WATCHING TV / CHANNEL CONTROL ON-SCREEN MENUS SELECTION Your TV's OSD (On Screen Display) may differ slightly from what is shown in this manual. 1 Press the MENU button and then use or D E button to select the each menu. 2 Press the or G button and then use SETUP Auto Tuning...
Owner's Manual
Page 36
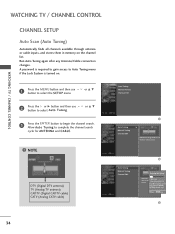
...Tuning. NOTE DTV (Digital DTV antenna) TV (Analog TV antenna) CADTV (Digital CADTV cable) CATV (Analog CATV cable) Auto Tuning Manual Tuning Channel Edit 1 Auto Tuning Manual Tuning Channel Edit G Selection ( G or ) leads you to the Auto Tuning screen. Press to begin the channel search. Next MENU... Prev 3 34 Auto Tuning Manual Tuning Channel Edit 2 Processing Auto Tuning... Run Auto Tuning again after any Antenna/Cable connection changes. or D E 3 Press the ENTER button to...
...Tuning. NOTE DTV (Digital DTV antenna) TV (Analog TV antenna) CADTV (Digital CADTV cable) CATV (Analog CATV cable) Auto Tuning Manual Tuning Channel Edit 1 Auto Tuning Manual Tuning Channel Edit G Selection ( G or ) leads you to the Auto Tuning screen. Press to begin the channel search. Next MENU... Prev 3 34 Auto Tuning Manual Tuning Channel Edit 2 Processing Auto Tuning... Run Auto Tuning again after any Antenna/Cable connection changes. or D E 3 Press the ENTER button to...
Owner's Manual
Page 37
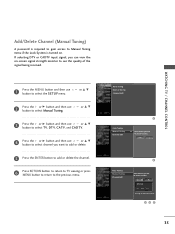
... Channel Edit Select channel type and RF-channel number. Auto Tuning Manual Tuning Channel Edit 1 Auto Tuning Manual Tuning Channel Edit G Select channel type and RF-channel number. Add/Delete Channel (Manual Tuning) A password is turned on -screen signal strength monitor to see the quality of the signal being received. 1 Press the MENU... menu. or D E 3 Press the or G button and then use or D E button to select T V, D T V, CATV, and CADTV. 4 Press the or G button and then use button to Manual Tuning menu if the Lock System is required to gain access to select...
... Channel Edit Select channel type and RF-channel number. Auto Tuning Manual Tuning Channel Edit 1 Auto Tuning Manual Tuning Channel Edit G Select channel type and RF-channel number. Add/Delete Channel (Manual Tuning) A password is turned on -screen signal strength monitor to see the quality of the signal being received. 1 Press the MENU... menu. or D E 3 Press the or G button and then use or D E button to select T V, D T V, CATV, and CADTV. 4 Press the or G button and then use button to Manual Tuning menu if the Lock System is required to gain access to select...
Owner's Manual
Page 38
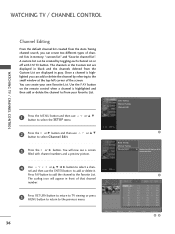
... channel number. 5 Press RETURN button to return to TV viewing or press MENU button to return to the previous menu. 36 Auto Tuning Manual Tuning Channel Edit 1 Auto Tuning Manual Tuning Channel Edit G Selection ( G or ) leads you can create your Favorite List. or D E 3 Press the or G button. or D E 2 Press the or G button...
... channel number. 5 Press RETURN button to return to TV viewing or press MENU button to return to the previous menu. 36 Auto Tuning Manual Tuning Channel Edit 1 Auto Tuning Manual Tuning Channel Edit G Selection ( G or ) leads you can create your Favorite List. or D E 3 Press the or G button. or D E 2 Press the or G button...
Owner's Manual
Page 43
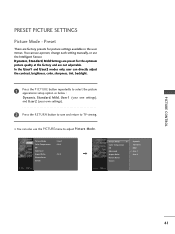
... are factory presets for picture settings available in the user menus. In the User1 and User2 modes only, user can use a preset, change each setting manually, or use the PICTURE menu to TV viewing. I You can also use the Intelligent Sensor. You can directly adjust the contrast, brightness, color, sharpness, tint...
... are factory presets for picture settings available in the user menus. In the User1 and User2 modes only, user can use a preset, change each setting manually, or use the PICTURE menu to TV viewing. I You can also use the Intelligent Sensor. You can directly adjust the contrast, brightness, color, sharpness, tint...
Owner's Manual
Page 45
MANUAL PICTURE ADJUSTMENT Picture Mode - or D E 3 Press the or G button and then use button to select Picture Mode. or D E 2 Press the or G button and then use ...
MANUAL PICTURE ADJUSTMENT Picture Mode - or D E 3 Press the or G button and then use button to select Picture Mode. or D E 2 Press the or G button and then use ...

Owner's Manual
Page 47
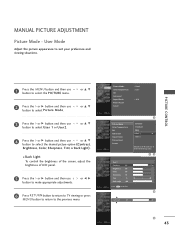
... of the reflection automatically to reproduce as closely as possible to Auto. When selecting Picture Mode options (User 1 and User 2), you can choose the Auto / Manual. or D E 3 Press the or G button and then use or D E button to the previous menu. 45 or F G button to select O... n or Picture Mode Color Temperature DB Advanced Aspect Ratio Picture Reset Screen : User1 : Cool : 16:9 1 Picture Mode Color Temperature DB G Manual Advanced Aspect Ratio DB Contrast On Picture Reset DB Color On Screen DB Noise On 23 4 Press RETURN button to return to TV viewing or...
... of the reflection automatically to reproduce as closely as possible to Auto. When selecting Picture Mode options (User 1 and User 2), you can choose the Auto / Manual. or D E 3 Press the or G button and then use or D E button to the previous menu. 45 or F G button to select O... n or Picture Mode Color Temperature DB Advanced Aspect Ratio Picture Reset Screen : User1 : Cool : 16:9 1 Picture Mode Color Temperature DB G Manual Advanced Aspect Ratio DB Contrast On Picture Reset DB Color On Screen DB Noise On 23 4 Press RETURN button to return to TV viewing or...
Owner's Manual
Page 63
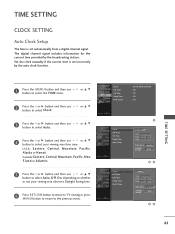
... Daylight Saving D E Eastern G Auto 45 61 TIME SETTING CLOCK SETTING Auto Clock Setup The time is set automatically from a digital channel signal. Set the clock manually if the current time is set incorrectly by the broadcasting station. Date - - / - The digital channel signal includes information for the current time provided by the...
... Daylight Saving D E Eastern G Auto 45 61 TIME SETTING CLOCK SETTING Auto Clock Setup The time is set automatically from a digital channel signal. Set the clock manually if the current time is set incorrectly by the broadcasting station. Date - - / - The digital channel signal includes information for the current time provided by the...


