
Owners Manual
Page 9
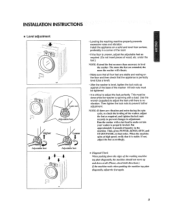
... required, anti tighten the lock nuts securely to prevent changes in adjustment, Run the washer with a lesl load to level the washer. RINSE+SPIN, and START!PAUSE, in the machine. Then, press POWER. The more the feel are exleoded, the more than necessary to make certain your washer is properly leveled...
... required, anti tighten the lock nuts securely to prevent changes in adjustment, Run the washer with a lesl load to level the washer. RINSE+SPIN, and START!PAUSE, in the machine. Then, press POWER. The more the feel are exleoded, the more than necessary to make certain your washer is properly leveled...
Owners Manual
Page 14
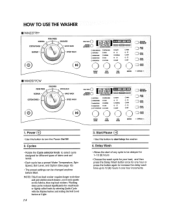
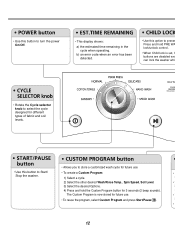
... washer 4. ORLON -- /: ',_.._ _k_ _ _ ::: - Power ('_ , Use this button to be changed anytime before Start. Cycles oRotate the Cycle selector knob to turn the Power OntOff 2. Delay Wash • Allows the start of fabric and soil tevels. • Each cyc]e has a preset Water Temperature, Spin Speed, Soil Level, and... Option (See page 13) - o_o_- 3. Start/Pause ('_ •Use this button to sefect cycle designed for one hour or press the button again to inorease the delay wash time up ...
... washer 4. ORLON -- /: ',_.._ _k_ _ _ ::: - Power ('_ , Use this button to be changed anytime before Start. Cycles oRotate the Cycle selector knob to turn the Power OntOff 2. Delay Wash • Allows the start of fabric and soil tevels. • Each cyc]e has a preset Water Temperature, Spin Speed, Soil Level, and... Option (See page 13) - o_o_- 3. Start/Pause ('_ •Use this button to sefect cycle designed for one hour or press the button again to inorease the delay wash time up ...
Owners Manual
Page 15
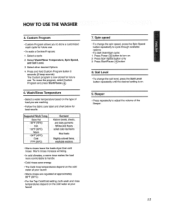
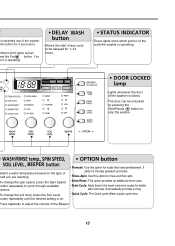
...press the Soil Level button repeatedly until the desired setting is now stored for future use To reuse the program, select Custom Program and press Start/Pause (?_, i ii iilllllllllllllllllll ii,,i, 6. Beeper ill i i,ml, • Press repeatedly to adjust the volume of load you to handle... . Wash/Rinse Temperature • Select a water temperature based on 2 Press Spin Sl_ed button only 3 Press Start/Pause r_.'_b)utton 8. Custom Program i itll, • Custom Program allows you are regulated at your faucet 7. Select a cycle 2 Select...
...press the Soil Level button repeatedly until the desired setting is now stored for future use To reuse the program, select Custom Program and press Start/Pause (?_, i ii iilllllllllllllllllll ii,,i, 6. Beeper ill i i,ml, • Press repeatedly to adjust the volume of load you to handle... . Wash/Rinse Temperature • Select a water temperature based on 2 Press Spin Sl_ed button only 3 Press Start/Pause r_.'_b)utton 8. Custom Program i itll, • Custom Program allows you are regulated at your faucet 7. Select a cycle 2 Select...
Owners Manual
Page 21
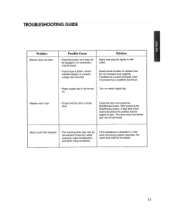
TROUBLESHOOTING GUIDE i :i :, Problem Washer does not start Possible Cause • Electrical power cord may not be plugged in wall outlet., Reset circuit breaker or replace fuse Do not increase fuse capacity If ...problem is not turned on water supply tap Washer won't spin • Check that the door is firmly shut Close the door and press the Start/Pause button After pressing the StaWPause button, it corrected by the amount of laundry, water pressure, water temperature, and other using conditions If the imbalance...
TROUBLESHOOTING GUIDE i :i :, Problem Washer does not start Possible Cause • Electrical power cord may not be plugged in wall outlet., Reset circuit breaker or replace fuse Do not increase fuse capacity If ...problem is not turned on water supply tap Washer won't spin • Check that the door is firmly shut Close the door and press the Start/Pause button After pressing the StaWPause button, it corrected by the amount of laundry, water pressure, water temperature, and other using conditions If the imbalance...

Service Manual
Page 11
... temperature will be displayed. Check if water is needed during check, remove the remaining water by pulling out the hose cap. 10 Press the START/PAUSE button. If SVC is supplied through the detergent dispenser. Press the POWER button. Check the water heating function. Check the drain and spin... Water removal Power off and the power on. Listen for a click to determine if the door has locked. Check the water supply. Press the START/PAUSE button. Listen for a click to the outlet. Connect the power plug to determine if the door is unlocking. Check the spin and drain ...
... temperature will be displayed. Check if water is needed during check, remove the remaining water by pulling out the hose cap. 10 Press the START/PAUSE button. If SVC is supplied through the detergent dispenser. Press the POWER button. Check the water heating function. Check the drain and spin... Water removal Power off and the power on. Listen for a click to determine if the door has locked. Check the water supply. Press the START/PAUSE button. Listen for a click to the outlet. Connect the power plug to determine if the door is unlocking. Check the spin and drain ...
Service Manual
Page 13
... whil • Rotate the Cycle selector knob to select the cycle designed for different types of fabric and soil levels. • Use this button to Start/ Stop the washer. • Allows you to turn the power On/Off. • This display shows: a) the estimated time remaining in the cycle when operating... been detected. • Use this button to store a customized wash cycle for future use . • T • To reuse the program, select Custom Program and press Start/Pause .
... whil • Rotate the Cycle selector knob to select the cycle designed for different types of fabric and soil levels. • Use this button to Start/ Stop the washer. • Allows you to turn the power On/Off. • This display shows: a) the estimated time remaining in the cycle when operating... been detected. • Use this button to store a customized wash cycle for future use . • T • To reuse the program, select Custom Program and press Start/Pause .
Service Manual
Page 14
... locked. • The door can be delayed for better stain removal. Press repetedly to adjust the volume of the washer is operating. • Allows the start of any cycle to CHILD LOCK lights and all ept the Power button. Automatically provides a rinse. • Quick Cycle: The Quick cycle offers a quick cycle... time. It adds 16 minutes prewash and drain. • Rinse+Spin: Use this option for 3 seconds to be unlocked by pressing the Start/Pause button to cycle through available options.
... locked. • The door can be delayed for better stain removal. Press repetedly to adjust the volume of the washer is operating. • Allows the start of any cycle to CHILD LOCK lights and all ept the Power button. Automatically provides a rinse. • Quick Cycle: The Quick cycle offers a quick cycle... time. It adds 16 minutes prewash and drain. • Rinse+Spin: Use this option for 3 seconds to be unlocked by pressing the Start/Pause button to cycle through available options.

Service Manual
Page 18
... button repeatedly to cycle through the test modes. The digits indicate the water level frequency ( x.1 kHz ). The voltage of times the Start/Pause button is plugged in the off all lamps and locks the door. 1 time Tumble clockwise. 2 times Low speed Spin. 3 times High speed Spin. 4 times ...
... button repeatedly to cycle through the test modes. The digits indicate the water level frequency ( x.1 kHz ). The voltage of times the Start/Pause button is plugged in the off all lamps and locks the door. 1 time Tumble clockwise. 2 times Low speed Spin. 3 times High speed Spin. 4 times ...
Service Manual
Page 19
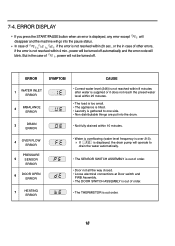
... PRESSURE 5 SENSOR ERROR 6 DOOR OPEN ERROR 7 HEATING ERROR • Water is overflowing (water level frequency is out order. 18 ERROR DISPLAY If you press the START/PAUSE button when an error is not resolved within 4 min., power will go into the drum. • Not fully drained within 20 sec., or the...
... PRESSURE 5 SENSOR ERROR 6 DOOR OPEN ERROR 7 HEATING ERROR • Water is overflowing (water level frequency is out order. 18 ERROR DISPLAY If you press the START/PAUSE button when an error is not resolved within 4 min., power will go into the drum. • Not fully drained within 20 sec., or the...
Service Manual
Page 20
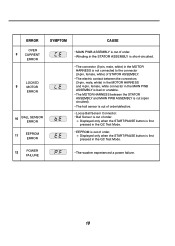
Displayed only when the START/PAUSE button is out of order. ERROR SYMPTOM CAUSE OVER 8 CURRENT ERROR LOCKED 9 MOTOR ERROR 10 BALL SENSOR ERROR 11 EEPROM ERROR • MAIN PWB ...; Loose Ball Sensor Connector. • Ball Sensor is first pressed in the QC Test Mode. • EEPROM is out of order. Displayed only when the START/PAUSE button is first pressed in the QC Test Mode. 12 POWER FAILURE • The washer experienced a power failure. 19
Displayed only when the START/PAUSE button is out of order. ERROR SYMPTOM CAUSE OVER 8 CURRENT ERROR LOCKED 9 MOTOR ERROR 10 BALL SENSOR ERROR 11 EEPROM ERROR • MAIN PWB ...; Loose Ball Sensor Connector. • Ball Sensor is first pressed in the QC Test Mode. • EEPROM is out of order. Displayed only when the START/PAUSE button is first pressed in the QC Test Mode. 12 POWER FAILURE • The washer experienced a power failure. 19
Service Manual
Page 25
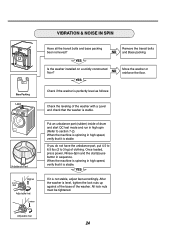
... do not have the unbalance part, put 4.5 to 6.5 lbs (2 to section 7-2). YES If it is perfectly level as follows: Check the leveling of drum and start /pause button in high spin (Refer to 3 kg) of the washer. Check if the washer is stable. Once loaded, press power, Rinse+Spin and the... start QC test mode and run in sequence. After the washer is stable. VIBRATION & NOISE IN SPIN Base Packing Level Unbalance Part Higher LNouctk Adjustable feet ...
... do not have the unbalance part, put 4.5 to 6.5 lbs (2 to section 7-2). YES If it is perfectly level as follows: Check the leveling of drum and start /pause button in high spin (Refer to 3 kg) of the washer. Check if the washer is stable. Once loaded, press power, Rinse+Spin and the... start QC test mode and run in sequence. After the washer is stable. VIBRATION & NOISE IN SPIN Base Packing Level Unbalance Part Higher LNouctk Adjustable feet ...
Service Manual
Page 26
..., then ' ' is displayed. 4) Press the Spin Speed button repeatedly to select Extra High. 5) Press the Quick Cycle button, the spin speed is displayed. 6) Press the Start/Pause button. 7) Press the Beeper button repeatedly to set spin speed (600, 900, 1020, 1120 rpm) and check if there is vibration and noise. 8) If...
..., then ' ' is displayed. 4) Press the Spin Speed button repeatedly to select Extra High. 5) Press the Quick Cycle button, the spin speed is displayed. 6) Press the Start/Pause button. 7) Press the Beeper button repeatedly to set spin speed (600, 900, 1020, 1120 rpm) and check if there is vibration and noise. 8) If...

Service Manual
Page 32
... 15 Ω Correct the connection. Check the DOOR SWITCH Is there clicking sound once or twice when the ASSEMBLY Connector and MAIN PWB ASSEMBLY START/PAUSE button is 248 or more. Is DOOR SWITCH ASSEMBLY broken? 31 Replace the DOOR SWITCH ASSEMBLY. (1) (2) SPIN TROUBLE Check during spin ...if the frequency of the water level is pressed to start the cycle? (Red 3 pin, Yellow 4 pin and (1) white 3 pin connector (1)). Check the SENSOR SWITCH ASSEMBLY or HOSE (Pressure). If the ...
... 15 Ω Correct the connection. Check the DOOR SWITCH Is there clicking sound once or twice when the ASSEMBLY Connector and MAIN PWB ASSEMBLY START/PAUSE button is 248 or more. Is DOOR SWITCH ASSEMBLY broken? 31 Replace the DOOR SWITCH ASSEMBLY. (1) (2) SPIN TROUBLE Check during spin ...if the frequency of the water level is pressed to start the cycle? (Red 3 pin, Yellow 4 pin and (1) white 3 pin connector (1)). Check the SENSOR SWITCH ASSEMBLY or HOSE (Pressure). If the ...


