
Owners Manual
Page 2
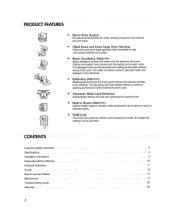
... drum and extra large opening make it possible to load and unload clothing more easily, Water Circulation (WM22T/'H,) Spray detergent solution and water onto the load over and over Clothes are soaked more quickly and thoroughly during operation ...... : ......... Important Safety Information 3 Specifications ... 4 Installation Instructions 5 Preparation Before Washing ... 10 Using the Dispenser 11 Cycles ...13 How to change the settings during wash cycle The detergent suds can be removed more easily by the water shower duping rinse cycle...
... drum and extra large opening make it possible to load and unload clothing more easily, Water Circulation (WM22T/'H,) Spray detergent solution and water onto the load over and over Clothes are soaked more quickly and thoroughly during operation ...... : ......... Important Safety Information 3 Specifications ... 4 Installation Instructions 5 Preparation Before Washing ... 10 Using the Dispenser 11 Cycles ...13 How to change the settings during wash cycle The detergent suds can be removed more easily by the water shower duping rinse cycle...
Owners Manual
Page 3
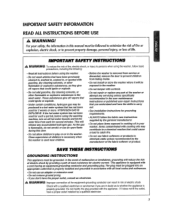
... any servicing unless specifically recommended in , or spotted with controls. • Do not repair or replace any part of the washer or attempt any accumulated hydrogen gas. For your washer. ff the hot water system has not been used for several minutes. HYDROGEN GAS IS EXPLOSIVE. IMPORTANT SJ FY INSTRUCTIONS ,_k WARNING: To reduce the risk of children is removed from service or discarded, remove the door to...
... any servicing unless specifically recommended in , or spotted with controls. • Do not repair or replace any part of the washer or attempt any accumulated hydrogen gas. For your washer. ff the hot water system has not been used for several minutes. HYDROGEN GAS IS EXPLOSIVE. IMPORTANT SJ FY INSTRUCTIONS ,_k WARNING: To reduce the risk of children is removed from service or discarded, remove the door to...
Owners Manual
Page 4
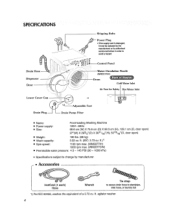
agitator washer. "_ ..... _'_/_--" Power Plug • It 1hesupply cord _sdamaged, it must ba replacedby lho manufactureror itsauthorized ge_ce technician In order to standpipe, inlet hose, or taundry tub 1 ) Per IEC 60456, washes the equivalent of a 3.72 cu, It. Accessories Hot/Cold (1 each) Hose Wrench Tie strap to secure drain hose to avoid a hazard Drain Hose Dispenser Door , Cold Water Inlet Lower Cover Cap Drain Plug ,:: Adjustable Feet Drain Pump Filter Air Vent?_.__S:a_ffeotyr Hot Water Inlet = Name: = Power supply: m Size: Front-loading Washing Machine ...
agitator washer. "_ ..... _'_/_--" Power Plug • It 1hesupply cord _sdamaged, it must ba replacedby lho manufactureror itsauthorized ge_ce technician In order to standpipe, inlet hose, or taundry tub 1 ) Per IEC 60456, washes the equivalent of a 3.72 cu, It. Accessories Hot/Cold (1 each) Hose Wrench Tie strap to secure drain hose to avoid a hazard Drain Hose Dispenser Door , Cold Water Inlet Lower Cover Cap Drain Plug ,:: Adjustable Feet Drain Pump Filter Air Vent?_.__S:a_ffeotyr Hot Water Inlet = Name: = Power supply: m Size: Front-loading Washing Machine ...
Owners Manual
Page 7
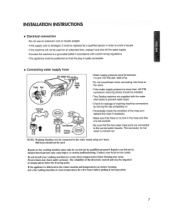
... te the water mains using new heseso O|d hoses should be installed. • Two Sealing washers are below freezing, store the washing machine at room temperature fnr a few hours before putting it into operation. 7 Do not install your local service center. The connector for hot water is colored red _0"1 E: Washing Machine is to the washing machine most only be carried out by qualified personnel, Repairs carried out by turning the...
... te the water mains using new heseso O|d hoses should be installed. • Two Sealing washers are below freezing, store the washing machine at room temperature fnr a few hours before putting it into operation. 7 Do not install your local service center. The connector for hot water is colored red _0"1 E: Washing Machine is to the washing machine most only be carried out by qualified personnel, Repairs carried out by turning the...
Owners Manual
Page 9
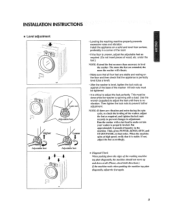
... do_lw the edges of the washer Al! INSTALLATION INSTRUCTIONS = Level adjustment ii _i_iiii_i i? _ /_igher Adjustable feet Adjustable feet • Leveling the washing machine properly prevents excessive noise and vibration, Install the appliance on the floor and then check that all . (Please, check both directions.) If lhe machine rocks n,hcn pushlog the machine top plate diagonal(€, adjust the feet agaia, hi" When Ihe machine spins al high speed, verify that it...
... do_lw the edges of the washer Al! INSTALLATION INSTRUCTIONS = Level adjustment ii _i_iiii_i i? _ /_igher Adjustable feet Adjustable feet • Leveling the washing machine properly prevents excessive noise and vibration, Install the appliance on the floor and then check that all . (Please, check both directions.) If lhe machine rocks n,hcn pushlog the machine top plate diagonal(€, adjust the feet agaia, hi" When Ihe machine spins al high speed, verify that it...
Owners Manual
Page 11
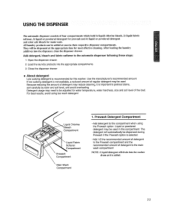
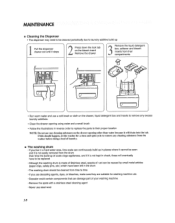
... toad. After loading the laundry additives inlo the dispenser_ close the dispenser drawer. Add detergent, bleach and fabric softener to the automatic dispenser following 1 Open the dispenser drawer, 2 Load the laundry products into Ihe washer drum as it is added, 11 USING THE DISPENSER : i: ]'he aulumatic dispenser consists of four compartments wtnictn hold 1) liquid ehlurine bleach, 2) liquid fabric soflener_ 3) liquid or powdered delergent I "-uquFidab,c -"_'d II J \ " Prewash X Compartment Main Wash Compartment 1, Prewash Detergent Compartment • Add detergent to this...
... toad. After loading the laundry additives inlo the dispenser_ close the dispenser drawer. Add detergent, bleach and fabric softener to the automatic dispenser following 1 Open the dispenser drawer, 2 Load the laundry products into Ihe washer drum as it is added, 11 USING THE DISPENSER : i: ]'he aulumatic dispenser consists of four compartments wtnictn hold 1) liquid ehlurine bleach, 2) liquid fabric soflener_ 3) liquid or powdered delergent I "-uquFidab,c -"_'d II J \ " Prewash X Compartment Main Wash Compartment 1, Prewash Detergent Compartment • Add detergent to this...
Owners Manual
Page 15
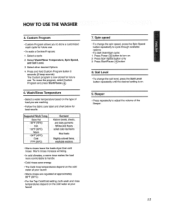
Select a cycle 2 Select Wash/Rinse Temperature, Spin Speed, and Suit Level. 3 Select other desired Options 4 Press and hold Custom Program button 3 seconds (2 beep sounds) "The Custom program is on 2 Press Spin Sl_ed button only 3 Press Start/Pause r_.'_b)utton 8. Spin speed - Wash/Rinse Temperature • Select a water temperature based on the cold water at approximately 86°F (3O°C) • For the Tap CoSd/Cold setting, both wash and rinse temperatures depend on the type of load you...
Select a cycle 2 Select Wash/Rinse Temperature, Spin Speed, and Suit Level. 3 Select other desired Options 4 Press and hold Custom Program button 3 seconds (2 beep sounds) "The Custom program is on 2 Press Spin Sl_ed button only 3 Press Start/Pause r_.'_b)utton 8. Spin speed - Wash/Rinse Temperature • Select a water temperature based on the cold water at approximately 86°F (3O°C) • For the Tap CoSd/Cold setting, both wash and rinse temperatures depend on the type of load you...
Owners Manual
Page 16
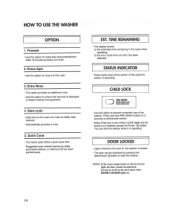
... removal of the washer is locked • The door can lock the washer while it is IoO high, tile door cannot be unlocked by pressing the StartJPause_ button to stop the washer. Quick Cycle ,, ,,, ,,=,,, ,,,,, • The Quick cycle offers a quick cycle time • Suggested uses include freshening newly purchased clothes, or clothing that need pretreatment Adds 16 minutes prewash and drain. 11 2. NOTE: ll'the waler temperalure or the level is operating • Lights whenever the door of detergent or bleach...
... removal of the washer is locked • The door can lock the washer while it is IoO high, tile door cannot be unlocked by pressing the StartJPause_ button to stop the washer. Quick Cycle ,, ,,, ,,=,,, ,,,,, • The Quick cycle offers a quick cycle time • Suggested uses include freshening newly purchased clothes, or clothing that need pretreatment Adds 16 minutes prewash and drain. 11 2. NOTE: ll'the waler temperalure or the level is operating • Lights whenever the door of detergent or bleach...
Owners Manual
Page 17
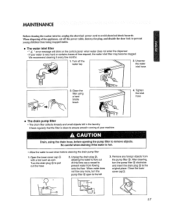
... water inlet filter may become clogged We recommend cleaning it every few months 1. Clean the filter using the drain hose, before opening the pump filter to prevent water from flowing onto the floor When water does not flow any foreign objects from being trapped inside. = The water inlet filter •" IE "error message will blink on the controt panei when water does net enter the dispenser - Close the lower cover cap,_ i7 Turn the drain plug...
... water inlet filter may become clogged We recommend cleaning it every few months 1. Clean the filter using the drain hose, before opening the pump filter to prevent water from flowing onto the floor When water does not flow any foreign objects from being trapped inside. = The water inlet filter •" IE "error message will blink on the controt panei when water does net enter the dispenser - Close the lower cover cap,_ i7 Turn the drain plug...
Owners Manual
Page 18
... replaced •Afthough the washing drum is made of Stainless steel, specks of rust can damage part of your washing machine • Remove the spots with a stainless steel cleaning agent • Never use any cleaning substance on the drawer, liquid detergent box and inserts to remove any excess laundry additives, * Clean the drawer opening olher titan water because it will drain into the tub, If this should happen, set the washer for a rinse anti spin cycle...
... replaced •Afthough the washing drum is made of Stainless steel, specks of rust can damage part of your washing machine • Remove the spots with a stainless steel cleaning agent • Never use any cleaning substance on the drawer, liquid detergent box and inserts to remove any excess laundry additives, * Clean the drawer opening olher titan water because it will drain into the tub, If this should happen, set the washer for a rinse anti spin cycle...
Owners Manual
Page 19
... products 2. Unplug electrical power cord, dry drum interior, and close door 7. Store washer in compartments and dry the compartments 8. MAINTENANCE : ,. Close door 5o Set spin cycle and let washer spin for 1 minute to ensure a water-tight sea! Remove the two-compartment container from washer after storage, run empty washer through a complete cycie using hot water, Repeat process if necessary, NOTE: Remove hard _ater depnsits using detergent Do not add laundry. 19 Interior Dry around the washer door opening, flexible gasket and door...
... products 2. Unplug electrical power cord, dry drum interior, and close door 7. Store washer in compartments and dry the compartments 8. MAINTENANCE : ,. Close door 5o Set spin cycle and let washer spin for 1 minute to ensure a water-tight sea! Remove the two-compartment container from washer after storage, run empty washer through a complete cycie using hot water, Repeat process if necessary, NOTE: Remove hard _ater depnsits using detergent Do not add laundry. 19 Interior Dry around the washer door opening, flexible gasket and door...
Owners Manual
Page 20
... straighten the drain hose Clean the drain filter. Make sure atl four feet are in firm contact with the floor, whi_e the washer is in drum or pump Solution Stop washer and check drum and drain filter If noise continues after washer is probably ot_t of the inlet hose clogged. See Installation Instructions shipping bolts Stop washer and rearrange for service Thumping sound • Heavy wash loads may produce a thumping sound This is normal If sound continues, washer is restarted, call for removing wash load Adjust the leveling feet..
... straighten the drain hose Clean the drain filter. Make sure atl four feet are in firm contact with the floor, whi_e the washer is in drum or pump Solution Stop washer and check drum and drain filter If noise continues after washer is probably ot_t of the inlet hose clogged. See Installation Instructions shipping bolts Stop washer and rearrange for service Thumping sound • Heavy wash loads may produce a thumping sound This is normal If sound continues, washer is restarted, call for removing wash load Adjust the leveling feet..
Owners Manual
Page 21
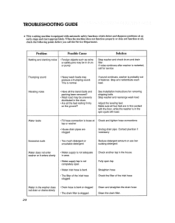
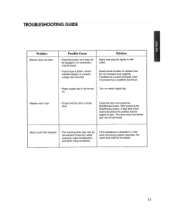
... is not turned on.. The door must lock before the clothes washer begins to spin,. TROUBLESHOOTING GUIDE i :i :, Problem Washer does not start Possible Cause • Electrical power cord may not be plugged in or connection may be foose, • House fuse is blown, circuit breaker tripped,or a power outage has occurred Solution Make sure plug fits tightJy in wall outlet., Reset circuit breaker or replace fuse Do not increase fuse capacity If problem is...
... is not turned on.. The door must lock before the clothes washer begins to spin,. TROUBLESHOOTING GUIDE i :i :, Problem Washer does not start Possible Cause • Electrical power cord may not be plugged in or connection may be foose, • House fuse is blown, circuit breaker tripped,or a power outage has occurred Solution Make sure plug fits tightJy in wall outlet., Reset circuit breaker or replace fuse Do not increase fuse capacity If problem is...

Owners Manual
Page 22
... the spin cycle the machine will stop and the error code will be displayed Add 1 or 2 similar items to help balance the load Rearrange load to the faulty water valve. • The water level sensor malfunction. • Overload in motor. Unplug the power plug and ca]l for service Close the water tap, Unplug the power plug Call for service • The water overfills due to allow proper spinning • Is the door opened or not completely closed? Problem Possible...
... the spin cycle the machine will stop and the error code will be displayed Add 1 or 2 similar items to help balance the load Rearrange load to the faulty water valve. • The water level sensor malfunction. • Overload in motor. Unplug the power plug and ca]l for service Close the water tap, Unplug the power plug Call for service • The water overfills due to allow proper spinning • Is the door opened or not completely closed? Problem Possible...
Service Manual
Page 6
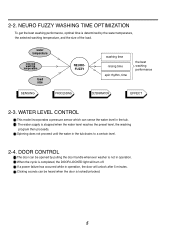
... door handle whenever washer is locked/unlocked. 5 DOOR CONTROL The door can be heard when the door is not in the tub. 2-2. water temperature selected washing temperature load size NEUROFUZZY washing time rinsing time spin rhythm, time the best washing performance SENSING PROCESSING DETERMINATION EFFECT 2-3. When the cycle is stopped when the water level reaches the preset level, the washing program then proceeds. WATER LEVEL CONTROL This model incorporates a pressure sensor which can be opened by the water temperature, the selected washing temperature, and the size...
... door handle whenever washer is locked/unlocked. 5 DOOR CONTROL The door can be heard when the door is not in the tub. 2-2. water temperature selected washing temperature load size NEUROFUZZY washing time rinsing time spin rhythm, time the best washing performance SENSING PROCESSING DETERMINATION EFFECT 2-3. When the cycle is stopped when the water level reaches the preset level, the washing program then proceeds. WATER LEVEL CONTROL This model incorporates a pressure sensor which can be opened by the water temperature, the selected washing temperature, and the size...
Service Manual
Page 9
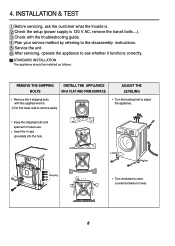
Check the setup (power supply is . ADJUST THE LEVELING Turn the leveling feet to lower. 8 counterclockwise to adjust the appliance. Service the unit. Keep the shipping bolts and spanner for future use. Plan your service method by referring to see whether it functions correctly. After servicing, operate the appliance to the disassembly instructions. STANDARD INSTALLATION The appliance should be installed as follows: REMOVE THE SHIPPING BOLTS INSTALL THE APPLIANCE ON A FLAT AND FIRM...
Check the setup (power supply is . ADJUST THE LEVELING Turn the leveling feet to lower. 8 counterclockwise to adjust the appliance. Service the unit. Keep the shipping bolts and spanner for future use. Plan your service method by referring to see whether it functions correctly. After servicing, operate the appliance to the disassembly instructions. STANDARD INSTALLATION The appliance should be installed as follows: REMOVE THE SHIPPING BOLTS INSTALL THE APPLIANCE ON A FLAT AND FIRM...
Service Manual
Page 14
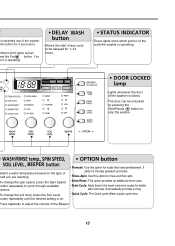
... Cycle: Adds time to the wash and rinse cycles for loads that need pretreatment. You e it is operating. • Allows the start of the washer. Press repetedly to adjust the volume of oad you are washing. nt unwanted use of any cycle to be unlocked by pressing the Start/Pause button to stop the washer. To change the spin speed, press the Spin Speed button repeatedly to CHILD LOCK lights and all ept the Power button. It adds...
... Cycle: Adds time to the wash and rinse cycles for loads that need pretreatment. You e it is operating. • Allows the start of the washer. Press repetedly to adjust the volume of oad you are washing. nt unwanted use of any cycle to be unlocked by pressing the Start/Pause button to stop the washer. To change the spin speed, press the Spin Speed button repeatedly to CHILD LOCK lights and all ept the Power button. It adds...

Service Manual
Page 18
...6 times Inlet valve for hot water turns on. 7 times Inlet valve for bleach turns on. 8 times Tumble counterclockwise. 9 times Heater turns on for 3 sec. 10 times Circulation pump turns on. 11 times Drain pump turns on. 12 times Power off all lamps. 1) : WM2277H*/WM2177H* : WM2077CW : WM2677H*M 7-3. Then buzzer will sound twice. 3. The voltage of electric shock when disconnecting parts while troubleshooting. Press the Start/Pause button repeatedly to cycle through the test modes. Press the SPIN SPEED and SOIL LEVEL buttons simultaneously. 2. Display Status...
...6 times Inlet valve for hot water turns on. 7 times Inlet valve for bleach turns on. 8 times Tumble counterclockwise. 9 times Heater turns on for 3 sec. 10 times Circulation pump turns on. 11 times Drain pump turns on. 12 times Power off all lamps. 1) : WM2277H*/WM2177H* : WM2077CW : WM2677H*M 7-3. Then buzzer will sound twice. 3. The voltage of electric shock when disconnecting parts while troubleshooting. Press the Start/Pause button repeatedly to cycle through the test modes. Press the SPIN SPEED and SOIL LEVEL buttons simultaneously. 2. Display Status...
Service Manual
Page 25
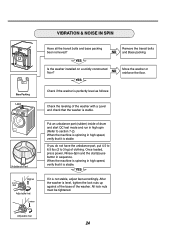
Check if the washer is perfectly level as follows: Check the leveling of the washer. Put an unbalance part (rubber) inside of clothing. Once loaded, press power, Rinse+Spin and the start QC test mode and run in high spin (Refer to 3 kg) of drum and start /pause button in sequence. All lock nuts must be tightened. 24 Is the washer installed on a solidly constructed floor? When the machine is spinning in high speed, verify that the washer is stable...
Check if the washer is perfectly level as follows: Check the leveling of the washer. Put an unbalance part (rubber) inside of clothing. Once loaded, press power, Rinse+Spin and the start QC test mode and run in high spin (Refer to 3 kg) of drum and start /pause button in sequence. All lock nuts must be tightened. 24 Is the washer installed on a solidly constructed floor? When the machine is spinning in high speed, verify that the washer is stable...
Service Manual
Page 27
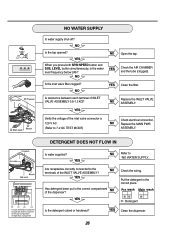
... YES Check the wiring. YES NO Refer to NO WATER SUPPLY Are receptacles correctly connected to 7-2 QC TEST MODE) Check electrical connection. Verify the voltage of the INLET VALVE ASSEMBLY? DETERGENT DOES NOT FLOW IN Is water supplied? YES Clean the dispenser. 26 YES Has detergent been put in the correct place. NO Is the tap opened? Clean the filter. Put the detergent in the correct compartment of INLET VALVE...
... YES Check the wiring. YES NO Refer to NO WATER SUPPLY Are receptacles correctly connected to 7-2 QC TEST MODE) Check electrical connection. Verify the voltage of the INLET VALVE ASSEMBLY? DETERGENT DOES NOT FLOW IN Is water supplied? YES Clean the dispenser. 26 YES Has detergent been put in the correct place. NO Is the tap opened? Clean the filter. Put the detergent in the correct compartment of INLET VALVE...


