Owner's Manual
Page 3
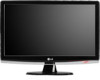
...display near water such as Red, Green or Blue spots on the screen for repair. Some dot defects may cause damage to use the recommended resolution to move. If possible, use a screen saver on the display performance. Avoid high temperatures and humidity. Make sure to the screen and ... or over the power cord, and do not place the display where the power cord is provided. If used under any mode except the recommended resolution, some afterimages. Leaving a fixed image on the screen. Contact an authorized the service center for a long time may appear as near a bathtub, ...
...display near water such as Red, Green or Blue spots on the screen for repair. Some dot defects may cause damage to use the recommended resolution to move. If possible, use a screen saver on the display performance. Avoid high temperatures and humidity. Make sure to the screen and ... or over the power cord, and do not place the display where the power cord is provided. If used under any mode except the recommended resolution, some afterimages. Leaving a fixed image on the screen. Contact an authorized the service center for a long time may appear as near a bathtub, ...
Owner's Manual
Page 7
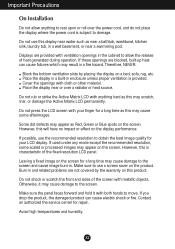
your display may differ from the view as blurry screen, blurred letters, screen flicker or tilted screen while using the device or after changing screen resolution, touch the AUTO/SET function button to maintain standard compliance for the product. Mac adapter For Apple Macintosh use shielded signal interface cables (D-sub 15 ...; When you encounter problems such as shown. Touch the power button on . This function provides the user with D Connect HDMI Cable ferrite cores to improve resolution.
your display may differ from the view as blurry screen, blurred letters, screen flicker or tilted screen while using the device or after changing screen resolution, touch the AUTO/SET function button to maintain standard compliance for the product. Mac adapter For Apple Macintosh use shielded signal interface cables (D-sub 15 ...; When you encounter problems such as shown. Touch the power button on . This function provides the user with D Connect HDMI Cable ferrite cores to improve resolution.
Owner's Manual
Page 10
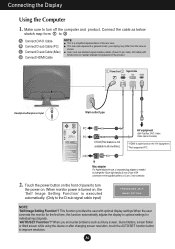
... active. This feature is operating normally(On Mode). The default setting is lens for the current screen resolution size (display mode). The best display mode is in the On Screen Display. If the display is : W2753VC : 1920 x 1080 Power Button Use this button to turn the display on or off. Light Sensor...
... active. This feature is operating normally(On Mode). The default setting is lens for the current screen resolution size (display mode). The best display mode is in the On Screen Display. If the display is : W2753VC : 1920 x 1080 Power Button Use this button to turn the display on or off. Light Sensor...
Owner's Manual
Page 12
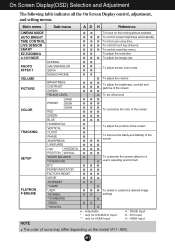
... LIVE SENSOR SMART To control screen brightness automatically. To control touch key distance. To control smart key menu. EZ ZOOMING 4:3 IN WIDE To adjust the resolution To adjust the image size NORMAL PHOTO EFFECT GAUSSIAN BLUR SEPIA To adjust screen color mode VOLUME PICTURE MONOCHROME BRIGHTNESS CONTRAST GAMMA To adjust the...
... LIVE SENSOR SMART To control screen brightness automatically. To control touch key distance. To control smart key menu. EZ ZOOMING 4:3 IN WIDE To adjust the resolution To adjust the image size NORMAL PHOTO EFFECT GAUSSIAN BLUR SEPIA To adjust screen color mode VOLUME PICTURE MONOCHROME BRIGHTNESS CONTRAST GAMMA To adjust the...
Owner's Manual
Page 18
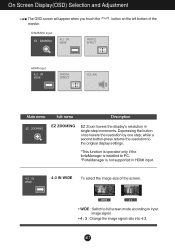
On Screen Display(OSD) Selection and Adjustment The OSD screen will appear when you touch the monitor. while a second button-press returns the resolution to the original display settings. *This function is operated only if the forteManager is installed to input image signal. • 4 : 3 : Change the image signal ratio ... HDMI input. 4:3 IN WIDE To select the image size of the HDMI input Main menu Sub menu Description EZ ZOOMING EZ Zoom lowers the display's resolution in single-step increments. Depressing the button once lowers the...
On Screen Display(OSD) Selection and Adjustment The OSD screen will appear when you touch the monitor. while a second button-press returns the resolution to the original display settings. *This function is operated only if the forteManager is installed to input image signal. • 4 : 3 : Change the image signal ratio ... HDMI input. 4:3 IN WIDE To select the image size of the HDMI input Main menu Sub menu Description EZ ZOOMING EZ Zoom lowers the display's resolution in single-step increments. Depressing the button once lowers the...

Owner's Manual
Page 23
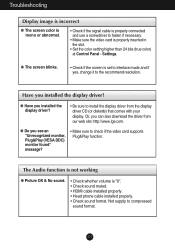
... using the PHASE icon in the on screen display. • Check Control Panel --> Display --> Settings and adjust the display to the recommended resolution or adjust the display image to the ideal setting. Important Check Control Panel --> Display --> Settings and see if the frequency or the... resolution were changed. Make sure to the ideal setting. Troubleshooting Display image is incorrect G Display Position is not selected, letters may be blurred ...
... using the PHASE icon in the on screen display. • Check Control Panel --> Display --> Settings and adjust the display to the recommended resolution or adjust the display image to the ideal setting. Important Check Control Panel --> Display --> Settings and see if the frequency or the... resolution were changed. Make sure to the ideal setting. Troubleshooting Display image is incorrect G Display Position is not selected, letters may be blurred ...
Owner's Manual
Page 24
... to install the display driver from our web site: http://www.lge.com. Or, you installed the display driver? • Be sure to the recommend resolution. Not supply to fasten if necessary. • Make sure the video card is properly inserted in the slot. • Set the color setting higher than...
... to install the display driver from our web site: http://www.lge.com. Or, you installed the display driver? • Be sure to the recommend resolution. Not supply to fasten if necessary. • Make sure the video card is properly inserted in the slot. • Set the color setting higher than...
Owner's Manual
Page 25
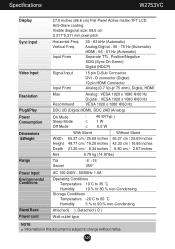
...) Separate TTL, Positive/Negative SOG (Sync On Green) Digital (HDCP) Signal Input Input Form 15 pin D-Sub Connector DVI - Vertical Freq. Specifications W2753VC Display Sync Input Video Input Resolution Plug&Play Power Consumption Dimensions &Weight Range Power Input Environmental Conditions Stand Base Power cord 27.0 inches (68.6 cm) Flat Panel Active matrix...
...) Separate TTL, Positive/Negative SOG (Sync On Green) Digital (HDCP) Signal Input Input Form 15 pin D-Sub Connector DVI - Vertical Freq. Specifications W2753VC Display Sync Input Video Input Resolution Plug&Play Power Consumption Dimensions &Weight Range Power Input Environmental Conditions Stand Base Power cord 27.0 inches (68.6 cm) Flat Panel Active matrix...
Owner's Manual
Page 26
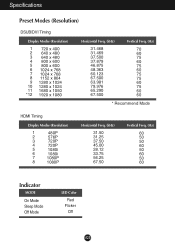
Specifications Preset Modes (Resolution) DSUB/DVI Timing Display Modes (Resolution) 1 720 x 400 2 640 x 480 3 640 x 480 4 800 x 600 5 800 x 600 6 1024 x 768 7 1024 x 768 8 1152 x 864 9 1280 x 1024 10 1280 x 1024 11 1680 x 1050 *12 ... 65.290 67.500 Vertical Freq. (Hz) 70 60 75 60 75 60 75 75 60 75 60 60 * Recommend Mode HDMI Timing Display Modes (Resolution) 1 480P 2 576P 3 720P 4 720P 5 1080i 6 1080i 7 1080P 8 1080P Horizontal Freq. (kHz) 31.50 31.25 37.50 45.00 28.12 33.75 56.25...
Specifications Preset Modes (Resolution) DSUB/DVI Timing Display Modes (Resolution) 1 720 x 400 2 640 x 480 3 640 x 480 4 800 x 600 5 800 x 600 6 1024 x 768 7 1024 x 768 8 1152 x 864 9 1280 x 1024 10 1280 x 1024 11 1680 x 1050 *12 ... 65.290 67.500 Vertical Freq. (Hz) 70 60 75 60 75 60 75 75 60 75 60 60 * Recommend Mode HDMI Timing Display Modes (Resolution) 1 480P 2 576P 3 720P 4 720P 5 1080i 6 1080i 7 1080P 8 1080P Horizontal Freq. (kHz) 31.50 31.25 37.50 45.00 28.12 33.75 56.25...


