
Owner's Manual
Page 1
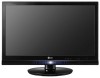
LCD MONITOR MODELS W2363D www.lg.com ENGLISH OWNER'S MANUAL LCD MONITOR Please read this manual carefully before operating your set and retain it for future reference.
LCD MONITOR MODELS W2363D www.lg.com ENGLISH OWNER'S MANUAL LCD MONITOR Please read this manual carefully before operating your set and retain it for future reference.

Owner's Manual
Page 2
If you are not sure what type of this display. Use only a stand recommended by the supplier. Do not throw any way, please contact the manufacturer or the nearest authorized repair service provider for a replacement. Never leave the display ON when leaving the house. In case you have not been designed for this manual or listed on the product screen. Call your personal safety, however improper use may result in a shock or fire hazard. It can cause electric shock. 1 When the display is to be very dangerous. The appliance coupler is not operating properly. Overloaded...
If you are not sure what type of this display. Use only a stand recommended by the supplier. Do not throw any way, please contact the manufacturer or the nearest authorized repair service provider for a replacement. Never leave the display ON when leaving the house. In case you have not been designed for this manual or listed on the product screen. Call your personal safety, however improper use may result in a shock or fire hazard. It can cause electric shock. 1 When the display is to be very dangerous. The appliance coupler is not operating properly. Overloaded...

Owner's Manual
Page 3
Do not use this product. Place the display in a built-in a wet basement, or near or over the power cord, and do not place the display where the power cord is characteristic of the screen with cloth or other material. If possible, use a screen saver on the product. If used under any mode except the recommended resolution, some afterimages. Make sure the panel faces forward and hold it may appear as this will have no impact or effect on the screen for a long time may result in . Contact an authorized the service center for a long time as Red, Green or Blue spots on the ...
Do not use this product. Place the display in a built-in a wet basement, or near or over the power cord, and do not place the display where the power cord is characteristic of the screen with cloth or other material. If possible, use a screen saver on the product. If used under any mode except the recommended resolution, some afterimages. Make sure the panel faces forward and hold it may appear as this will have no impact or effect on the screen for a long time may result in . Contact an authorized the service center for a long time as Red, Green or Blue spots on the ...

Owner's Manual
Page 4
Do not use an aerosol directly on the display screen because over-spraying may occur. (Do not use chemicals such as benzene, paint thinners or alcohol) Spray water onto a soft cloth 2 to 4 times, and use it in which to the regulations of the display screen. wipe in accordance to transport the unit. They make an ideal container in its original material. When shipping the unit to another location, repack it to prevent scratching. Do not dispose of mercury. Disposal of this product contains a small amount of this product with a soft cloth to clean the front frame; ...
Do not use an aerosol directly on the display screen because over-spraying may occur. (Do not use chemicals such as benzene, paint thinners or alcohol) Spray water onto a soft cloth 2 to 4 times, and use it in which to the regulations of the display screen. wipe in accordance to transport the unit. They make an ideal container in its original material. When shipping the unit to another location, repack it to prevent scratching. Do not dispose of mercury. Disposal of this product contains a small amount of this product with a soft cloth to clean the front frame; ...
Owner's Manual
Page 5
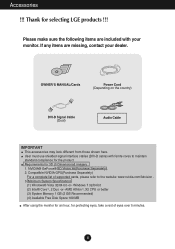
OWNER'S MANUAL/Cards Power Cord (Depending on the country) DVI-D Signal Cable (Dual) Audio Cable IMPORTANT This accessories may look different from those shown here. Thank for 3D (3 Dimensional) imagery 1. User must use shielded signal interface cables (DVI-D cable) with your dealer. Requirements for selecting LGE products !!! NVIDIA® GeForce® 3D Vision kit(Purchase Separately). 2. Accessories !!! Windows 7 32/64 bit (2) Intel® CoreTM, 2 Duo -or- AMD AthlonTM, X2 CPU or better (3) System Memory 1 GB (2 GB Recommended) (4) Available Free Disk Space 100 MB ...
OWNER'S MANUAL/Cards Power Cord (Depending on the country) DVI-D Signal Cable (Dual) Audio Cable IMPORTANT This accessories may look different from those shown here. Thank for 3D (3 Dimensional) imagery 1. User must use shielded signal interface cables (DVI-D cable) with your dealer. Requirements for selecting LGE products !!! NVIDIA® GeForce® 3D Vision kit(Purchase Separately). 2. Accessories !!! Windows 7 32/64 bit (2) Intel® CoreTM, 2 Duo -or- AMD AthlonTM, X2 CPU or better (3) System Memory 1 GB (2 GB Recommended) (4) Available Free Disk Space 100 MB ...

Owner's Manual
Page 6
Make sure you push the Stand Base until the end. Place the monitor face down on the soft cloth. 2. Bad Connection 5 Connecting and Disassembling the stand 1. Stand Body Stand Base Good Connection The Stand Base may fall and get damaged or cause injury. Assemble the Stand Base into the Stand Body in the correct direction. Connecting the Display Before setting up the monitor, ensure that the power to the monitor, the computer system, and other attached devices is turned off.
Make sure you push the Stand Base until the end. Place the monitor face down on the soft cloth. 2. Bad Connection 5 Connecting and Disassembling the stand 1. Stand Body Stand Base Good Connection The Stand Base may fall and get damaged or cause injury. Assemble the Stand Base into the Stand Body in the correct direction. Connecting the Display Before setting up the monitor, ensure that the power to the monitor, the computer system, and other attached devices is turned off.

Owner's Manual
Page 7
Do not carry the product upside down holding only the stand base. Then fold the screw handle flat. 5. IMPORTANT This picture depicts the general model of connection. Screw Turn the screw by using the screw handle. 4. Your monitor may fall and get damaged or cause injury. 6 The product may differ from the Stand Body, unfold the screw handle and turn it to the Stand Base. Once assembled take the monitor up carefully and face the front side. 6. To disconnect the Stand Base from the items shown in the picture. Connecting the Display 3. Turn the screw to the right to fix ...
Do not carry the product upside down holding only the stand base. Then fold the screw handle flat. 5. IMPORTANT This picture depicts the general model of connection. Screw Turn the screw by using the screw handle. 4. Your monitor may fall and get damaged or cause injury. 6 The product may differ from the Stand Body, unfold the screw handle and turn it to the Stand Base. Once assembled take the monitor up carefully and face the front side. 6. To disconnect the Stand Base from the items shown in the picture. Connecting the Display 3. Turn the screw to the right to fix ...

Owner's Manual
Page 8
Tilt Range: -5˚ to 15˚ -5 15 Do not touch or press the screen when adjusting the angle of the panel in various ways for maximum comfort. You can hurt your finger(s) in between the head of the monitor and the stand body. When adjusting the angle of the screen, do not put your finger(s). Connecting the Display Before setting up the monitor, ensure that in order to maintain an ergonomic and comfortable viewing position, the forward tilt angle of the monitor should not exceed 5 degrees. 7 Adjust the position of the monitor. Positioning your display After ...
Tilt Range: -5˚ to 15˚ -5 15 Do not touch or press the screen when adjusting the angle of the panel in various ways for maximum comfort. You can hurt your finger(s) in between the head of the monitor and the stand body. When adjusting the angle of the screen, do not put your finger(s). Connecting the Display Before setting up the monitor, ensure that in order to maintain an ergonomic and comfortable viewing position, the forward tilt angle of the monitor should not exceed 5 degrees. 7 Adjust the position of the monitor. Positioning your display After ...

Owner's Manual
Page 9
Connecting the Display Connecting with the PC/AV equipment 1. Before setting up the monitor, ensure that the power to the monitor, the computer system, and other attached devices is optimized on the AV equipment. * Not supported PC. This rear view represents a general model; Headphone/Earphone output PC Speaker Out/Line out 3. Connect signal input cable 1 and power cord 2 in order, then tighten the screw of the rear view. A Connect DVI-D (Digital signal) Cable B Connect HDMI Cable (HDMI1, HDMI2) NOTE This is a simplified representation of the signal cable. Varies according to turn the ...
Connecting the Display Connecting with the PC/AV equipment 1. Before setting up the monitor, ensure that the power to the monitor, the computer system, and other attached devices is optimized on the AV equipment. * Not supported PC. This rear view represents a general model; Headphone/Earphone output PC Speaker Out/Line out 3. Connect signal input cable 1 and power cord 2 in order, then tighten the screw of the rear view. A Connect DVI-D (Digital signal) Cable B Connect HDMI Cable (HDMI1, HDMI2) NOTE This is a simplified representation of the signal cable. Varies according to turn the ...

Owner's Manual
Page 10
The message "OSD LOCKED" should appear. 9 You can select the input signal (DVI-D/HDMI1/HDMI2) you to enter THRU MODE, SRS TRUSURROUND HD, ARC or AUTO BRIGHT menus. Control Panel Functions Front Panel Controls Button Use this button to 14. SOURCE Button When two input signals are connected, you can unlock the OSD controls at any time by pushing the MENU button for several seconds. OSD LOCKED/UNLOCKED This function allows you want. For more information, refer to page 13 to enter or exit the On Screen Display. Press and hold the MENU button for several seconds....
The message "OSD LOCKED" should appear. 9 You can select the input signal (DVI-D/HDMI1/HDMI2) you to enter THRU MODE, SRS TRUSURROUND HD, ARC or AUTO BRIGHT menus. Control Panel Functions Front Panel Controls Button Use this button to 14. SOURCE Button When two input signals are connected, you can unlock the OSD controls at any time by pushing the MENU button for several seconds. OSD LOCKED/UNLOCKED This function allows you want. For more information, refer to page 13 to enter or exit the On Screen Display. Press and hold the MENU button for several seconds....

Owner's Manual
Page 11
When you select OFF, the LED light will change according to turn the display on or off . Power Indicator The power indicator stays blue if the display is blinking blue. 10 Control Panel Functions Buttons Use these buttons to select or adjust functions in the On Screen Display. TRU-LIGHT Button You can select GAME, MOVIE or MUSIC by using this button and the LED light shape will be turned off . SET Button Use this button to each mode. TRU-LIGHT GAME MOVIE MUSIC OFF Power Button Use this button to enter a selection in the On Screen Display. If the display is in ...
When you select OFF, the LED light will change according to turn the display on or off . Power Indicator The power indicator stays blue if the display is blinking blue. 10 Control Panel Functions Buttons Use these buttons to select or adjust functions in the On Screen Display. TRU-LIGHT Button You can select GAME, MOVIE or MUSIC by using this button and the LED light shape will be turned off . SET Button Use this button to each mode. TRU-LIGHT GAME MOVIE MUSIC OFF Power Button Use this button to enter a selection in the On Screen Display. If the display is in ...

Owner's Manual
Page 12
Press the MENU Button twice to exit from the menu screen. 1 Press the MENU Button, then the main menu of the OSD appears. 2 To access a control, use of the controls. A short example is quick and easy with the use the / Buttons. Use the SET Button to select other sub-menu items. 4 Press the MENU Button once to return to the main menu to adjust Select a menu icon Adjust the status Exit from the OSD. 11 The following section is an outline of the available adjustments and selections you can make adjustments in the On Screen Display, follow these steps: Pops up the menu screen ...
Press the MENU Button twice to exit from the menu screen. 1 Press the MENU Button, then the main menu of the OSD appears. 2 To access a control, use of the controls. A short example is quick and easy with the use the / Buttons. Use the SET Button to select other sub-menu items. 4 Press the MENU Button once to return to the main menu to adjust Select a menu icon Adjust the status Exit from the OSD. 11 The following section is an outline of the available adjustments and selections you can make adjustments in the On Screen Display, follow these steps: Pops up the menu screen ...

Owner's Manual
Page 13
Use aspect ratio control. To control screen brightness automatically. On Screen Display (OSD) Control Adjustment The following table indicates all the On Screen Display control, adjustment, and setting menus. 3D mode : 3D mode output DVI-D : DVI-D(Digital signal) input HDMI : HDMI input Main menu Sub-menu Supported input Description G-MODE THRU MODE DVI-D HDMI Use Frame-Buffer to 19). 12 PICTURE COLOR TRACKING SETUP SRS TRUSURROUND HD ARC AUTO BRIGHT BRIGHTNESS CONTRAST GAMMA BLACK LEVEL PRESET (sRGB / 6500K / 9300K) RED GREEN BLUE HUE SATURATION COLOR RESET SHARPNESS ...
Use aspect ratio control. To control screen brightness automatically. On Screen Display (OSD) Control Adjustment The following table indicates all the On Screen Display control, adjustment, and setting menus. 3D mode : 3D mode output DVI-D : DVI-D(Digital signal) input HDMI : HDMI input Main menu Sub-menu Supported input Description G-MODE THRU MODE DVI-D HDMI Use Frame-Buffer to 19). 12 PICTURE COLOR TRACKING SETUP SRS TRUSURROUND HD ARC AUTO BRIGHT BRIGHTNESS CONTRAST GAMMA BLACK LEVEL PRESET (sRGB / 6500K / 9300K) RED GREEN BLUE HUE SATURATION COLOR RESET SHARPNESS ...

Owner's Manual
Page 14
This is not supported in frame units before being displayed on the screen. It is the function to provide the optimized display by saving the video in 1080i input signal. TruSurround HD technology is inactivated. When operating 3D screen, THRU MODE function is incorporated under license from delaying by using the frame buffer memory. OFF Turn off SRS function. But, the response speed of the display can be slower than the output of the actual PC. *What is a trademark of SRS Labs, Inc. OFF This shows the optimized screen by disabling the frame buffer memory. G-...
This is not supported in frame units before being displayed on the screen. It is the function to provide the optimized display by saving the video in 1080i input signal. TruSurround HD technology is inactivated. When operating 3D screen, THRU MODE function is incorporated under license from delaying by using the frame buffer memory. OFF Turn off SRS function. But, the response speed of the display can be slower than the output of the actual PC. *What is a trademark of SRS Labs, Inc. OFF This shows the optimized screen by disabling the frame buffer memory. G-...

Owner's Manual
Page 15
If 640 x 480 resolution input, the picture will just display 640 x 480 size even though the 1920 x 1080 size panel. G-MODE AUTO BRIGHT ON AUTO BRIGHT ON This adjusts the screen brightness automatically. If 640 x 480 resolution input, the picture will keep at 4:3 ratio scaling. FULL The picture will be displayed with Full size. OFF Auto brightness adjustment function is inactivated. 14 ORIGINAL The picture will be displayed depends on Input resolution.No Scaling. When operating 3D screen, AUTO BRIGHT function is turned OFF. When set to ON, this adjusts the screen ...
If 640 x 480 resolution input, the picture will just display 640 x 480 size even though the 1920 x 1080 size panel. G-MODE AUTO BRIGHT ON AUTO BRIGHT ON This adjusts the screen brightness automatically. If 640 x 480 resolution input, the picture will keep at 4:3 ratio scaling. FULL The picture will be displayed with Full size. OFF Auto brightness adjustment function is inactivated. 14 ORIGINAL The picture will be displayed depends on Input resolution.No Scaling. When operating 3D screen, AUTO BRIGHT function is turned OFF. When set to ON, this adjusts the screen ...

Owner's Manual
Page 16
Listed below are the icons, icon names, and icon descriptions of the all items shown on the monitor may differ from the manual. 15 On Screen Display(OSD) Selection and Adjustment You were introduced to select sub-menu Button Tip Icons Sub-menus NOTE OSD (On Screen Display) menu languages on the Menu. Main Menu Menu Name MENU SET : Exit : Adjust (Decrease/Increase) : Enter : Select another sub-menu : Restart to the procedure of the OSD appears. Press the MENU Button, then the main menu of selecting and adjusting an item using the OSD system.
Listed below are the icons, icon names, and icon descriptions of the all items shown on the monitor may differ from the manual. 15 On Screen Display(OSD) Selection and Adjustment You were introduced to select sub-menu Button Tip Icons Sub-menus NOTE OSD (On Screen Display) menu languages on the Menu. Main Menu Menu Name MENU SET : Exit : Adjust (Decrease/Increase) : Enter : Select another sub-menu : Restart to the procedure of the OSD appears. Press the MENU Button, then the main menu of selecting and adjusting an item using the OSD system.

Owner's Manual
Page 17
BLACK LEVEL You can show. On Screen Display(OSD) Selection and Adjustment Main menu Sub menu Description PICTURE DVI-D input HDMI input BRIGHTNESS To adjust the brightness of the screen. If you select 'HIGH', the screen will be bright and if you select 'LOW', the screen will be dark. * Off set level. MENU : Exit : Decrease : Increase SET : Select another sub-menu When operating 3D screen, BRIGHTNESS, CONTRAST function is the darkest screen the monitor can set the off set ? GAMMA Set your own gamma value: -50 / 0 / 50 On the monitor, high gamma values display whitish...
BLACK LEVEL You can show. On Screen Display(OSD) Selection and Adjustment Main menu Sub menu Description PICTURE DVI-D input HDMI input BRIGHTNESS To adjust the brightness of the screen. If you select 'HIGH', the screen will be bright and if you select 'LOW', the screen will be dark. * Off set level. MENU : Exit : Decrease : Increase SET : Select another sub-menu When operating 3D screen, BRIGHTNESS, CONTRAST function is the darkest screen the monitor can set the off set ? GAMMA Set your own gamma value: -50 / 0 / 50 On the monitor, high gamma values display whitish...
Owner's Manual
Page 18
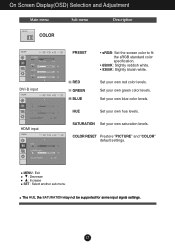
Set your own hue levels. HUE Set your own blue color levels. SATURATION Set your own red color levels. On Screen Display(OSD) Selection and Adjustment Main menu Sub menu Description COLOR DVI-D input HDMI input PRESET • sRGB: Set the screen color to fit the sRGB standard color specification. • 6500K: Slightly reddish white. • 9300K: Slightly bluish white. RED GREEN BLUE Set your own saturation levels. MENU : Exit : Decrease : Increase SET : Select another sub-menu The HUE, the SATURATION may not be supported for some input signal settings. 17 Set ...
Set your own hue levels. HUE Set your own blue color levels. SATURATION Set your own red color levels. On Screen Display(OSD) Selection and Adjustment Main menu Sub menu Description COLOR DVI-D input HDMI input PRESET • sRGB: Set the screen color to fit the sRGB standard color specification. • 6500K: Slightly reddish white. • 9300K: Slightly bluish white. RED GREEN BLUE Set your own saturation levels. MENU : Exit : Decrease : Increase SET : Select another sub-menu The HUE, the SATURATION may not be supported for some input signal settings. 17 Set ...

Owner's Manual
Page 19
MENU : Exit : Decrease : Increase SET : Select another sub-menu 18 On Screen Display(OSD) Selection and Adjustment Main menu Sub menu Description TRACKING DVI-D, HDMI input SHARPNESS To adjust the clearness of the screen.
MENU : Exit : Decrease : Increase SET : Select another sub-menu 18 On Screen Display(OSD) Selection and Adjustment Main menu Sub menu Description TRACKING DVI-D, HDMI input SHARPNESS To adjust the clearness of the screen.

Owner's Manual
Page 20
If there is no sound input or it will automatically be turned on. If this function to set the power indicator on the INDICATOR front side of noise. (Only for HDMI input) R T C If you set OFF, it is less than set range, LED would response according to prevent noise. When operating 3D screen, RTC function is maintained regardless of the monitor to reset immediately. When OFF is selected, the original image size is inactivated. If you set ON at the edges of an image when HDMI is reduced to the value of headphone/Earphone. Press the , buttons to ON or...
If there is no sound input or it will automatically be turned on. If this function to set the power indicator on the INDICATOR front side of noise. (Only for HDMI input) R T C If you set OFF, it is less than set range, LED would response according to prevent noise. When operating 3D screen, RTC function is maintained regardless of the monitor to reset immediately. When OFF is selected, the original image size is inactivated. If you set ON at the edges of an image when HDMI is reduced to the value of headphone/Earphone. Press the , buttons to ON or...
