
Owner's Manual
Page 7
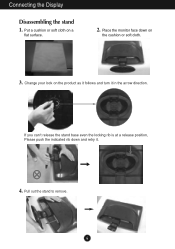
Put a cushion or soft cloth on the product as it follows and turn it . 4. Pull out the stand to remove. 6 If you can't release the stand base even the locking rib is at a release position, Please push the indicated rib down on the cushion or soft cloth. 3. Connecting the Display Disassembling the stand 1. Change your lock on a flat surface. 2. Place the monitor face down and retry it in the arrow direction.
Put a cushion or soft cloth on the product as it follows and turn it . 4. Pull out the stand to remove. 6 If you can't release the stand base even the locking rib is at a release position, Please push the indicated rib down on the cushion or soft cloth. 3. Connecting the Display Disassembling the stand 1. Change your lock on a flat surface. 2. Place the monitor face down and retry it in the arrow direction.
Owner's Manual
Page 9
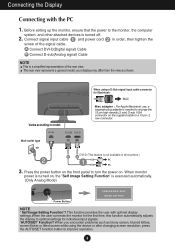
This rear view represents a general model; When using the device or after changing screen resolution, press the AUTO/SET function button to improve resolution. 8 your display may differ from the view as blurry screen, blurred letters, screen flicker ... first time, this function automatically adjusts the display to optimal settings for Macintosh Mac adapter : For Apple Macintosh use, a separate plug adapter is needed to change the 15 pin high density (3 row) D-sub VGA connector on the supplied cable to a 15 pin 2 row connector. Press the power button on . Before setting...
This rear view represents a general model; When using the device or after changing screen resolution, press the AUTO/SET function button to improve resolution. 8 your display may differ from the view as blurry screen, blurred letters, screen flicker ... first time, this function automatically adjusts the display to optimal settings for Macintosh Mac adapter : For Apple Macintosh use, a separate plug adapter is needed to change the 15 pin high density (3 row) D-sub VGA connector on the supplied cable to a 15 pin 2 row connector. Press the power button on . Before setting...
Owner's Manual
Page 10
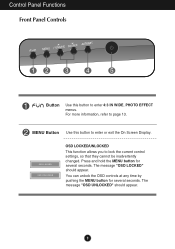
... for several seconds. Control Panel Functions Front Panel Controls Button Use this button to lock the current control settings, so that they cannot be inadvertently changed.
... for several seconds. Control Panel Functions Front Panel Controls Button Use this button to lock the current control settings, so that they cannot be inadvertently changed.
Owner's Manual
Page 14
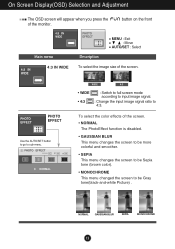
WIDE 4:3 • WIDE • 4:3 : Switch to full screen mode according to input image signal. : Change the input image signal ratio to sub-menu. NORMAL GAUSSIAN BLUR SEPIA MONOCHROME 13 button on the front Main menu 4:3 IN WIDE MENU : Exit : Move ... screen. • NORMAL The PhotoEffect function is disabled. • GAUSSIAN BLUR This menu changes the screen to be more colorful and smoother. • SEPIA This menu changes the screen to be Sepia tone (brown color). • MONOCHROME This menu changed the screen to be Gray tone(black-and-white Picture) . To select the...
WIDE 4:3 • WIDE • 4:3 : Switch to full screen mode according to input image signal. : Change the input image signal ratio to sub-menu. NORMAL GAUSSIAN BLUR SEPIA MONOCHROME 13 button on the front Main menu 4:3 IN WIDE MENU : Exit : Move ... screen. • NORMAL The PhotoEffect function is disabled. • GAUSSIAN BLUR This menu changes the screen to be more colorful and smoother. • SEPIA This menu changes the screen to be Sepia tone (brown color). • MONOCHROME This menu changed the screen to be Gray tone(black-and-white Picture) . To select the...
Owner's Manual
Page 18
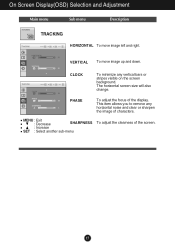
VERTICAL To move image left and right. CLOCK To minimize any horizontal noise and clear or sharpen the image of characters. MENU : Exit : Decrease SHARPNESS : Increase SET : Select another sub-menu To adjust the clearness of the display. PHASE To adjust the focus of the screen. 17 The horizontal screen size will also change. This item allows you to remove any vertical bars or stripes visible on the screen background. On Screen Display(OSD) Selection and Adjustment Main menu Sub menu Description TRACKING HORIZONTAL To move image up and down.
VERTICAL To move image left and right. CLOCK To minimize any horizontal noise and clear or sharpen the image of characters. MENU : Exit : Decrease SHARPNESS : Increase SET : Select another sub-menu To adjust the clearness of the display. PHASE To adjust the focus of the screen. 17 The horizontal screen size will also change. This item allows you to remove any vertical bars or stripes visible on the screen background. On Screen Display(OSD) Selection and Adjustment Main menu Sub menu Description TRACKING HORIZONTAL To move image up and down.
Owner's Manual
Page 20
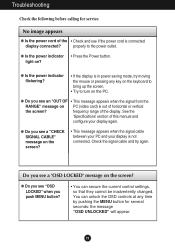
... the power indicator flickering? • If the display is connected display connected? You can secure the current control settings, so that they cannot be inadvertently changed. Troubleshooting Check the following before calling for several seconds: the message "OSD UNLOCKED" will appear. 19 frequency range of this manual and configure your display...
... the power indicator flickering? • If the display is connected display connected? You can secure the current control settings, so that they cannot be inadvertently changed. Troubleshooting Check the following before calling for several seconds: the message "OSD UNLOCKED" will appear. 19 frequency range of this manual and configure your display...
Owner's Manual
Page 21
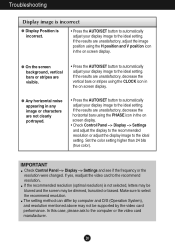
... 24 bits (true color). Make sure to the ideal setting. IMPORTANT Check Control Panel --> Display --> Settings and see if the frequency or the resolution were changed. If yes, readjust the video card to the ideal setting. G On the screen background, vertical bars or stripes are unsatisfactory, decrease the horizontal bars using...
... 24 bits (true color). Make sure to the ideal setting. IMPORTANT Check Control Panel --> Display --> Settings and see if the frequency or the resolution were changed. If yes, readjust the video card to the ideal setting. G On the screen background, vertical bars or stripes are unsatisfactory, decrease the horizontal bars using...
Owner's Manual
Page 22
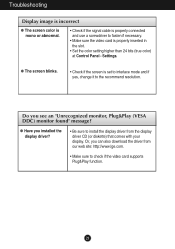
... "Unrecognized monitor, Plug&Play (VESA DDC) monitor found" message? G The screen blinks. • Check if the screen is set to interlace mode and if yes, change it to fasten if necessary. • Make sure the video card is properly connected and use a screwdriver to the recommend resolution. Troubleshooting Display image is...
... "Unrecognized monitor, Plug&Play (VESA DDC) monitor found" message? G The screen blinks. • Check if the screen is set to interlace mode and if yes, change it to fasten if necessary. • Make sure the video card is properly connected and use a screwdriver to the recommend resolution. Troubleshooting Display image is...

Owner's Manual
Page 23
...;C to 60 ˚C Humidity 5 % to 90 % non-Condensing Stand Base Attached ( ), Detached ( O ) Power cord Wall-outlet type NOTE Information in this document is subject to change without notice. 22
...;C to 60 ˚C Humidity 5 % to 90 % non-Condensing Stand Base Attached ( ), Detached ( O ) Power cord Wall-outlet type NOTE Information in this document is subject to change without notice. 22
Owner's Manual
Page 24
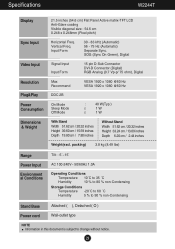
...;C to 60 ˚C Humidity 5 % to 90 % non-Condensing Stand Base Attached ( ), Detached ( O ) Power cord Wall-outlet type NOTE Information in this document is subject to change without notice. 23 Input Form 30 - 83 kHz (Automatic) 56 - 75 Hz (Automatic) Separate Sync. Specifications W2244T Display Sync Input Video Input 21.5 inches (54...
...;C to 60 ˚C Humidity 5 % to 90 % non-Condensing Stand Base Attached ( ), Detached ( O ) Power cord Wall-outlet type NOTE Information in this document is subject to change without notice. 23 Input Form 30 - 83 kHz (Automatic) 56 - 75 Hz (Automatic) Separate Sync. Specifications W2244T Display Sync Input Video Input 21.5 inches (54...
Owner's Manual
Page 25
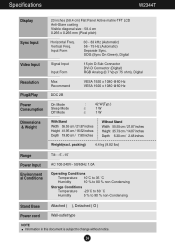
Input Form 30 - 83 kHz (Automatic) 56 - 75 Hz (Automatic) Separate Sync. Specifications W2344T Display Sync Input Video Input 23 inches (58.4 cm) Flat Panel Active matrix-TFT LCD Anti-Glare coating Visible diagonal size : 58.4 cm 0.266 x 0.266 ...;C to 60 ˚C Humidity 5 % to 90 % non-Condensing Stand Base Attached ( ), Detached ( O ) Power cord Wall-outlet type NOTE Information in this document is subject to change without notice. 24 SOG (Sync On Green), Digital Signal Input Input Form 15 pin D-Sub Connector DVI-D Connector (Digital) RGB Analog (0.7 Vp-p/ 75 ohm), Digital...
Input Form 30 - 83 kHz (Automatic) 56 - 75 Hz (Automatic) Separate Sync. Specifications W2344T Display Sync Input Video Input 23 inches (58.4 cm) Flat Panel Active matrix-TFT LCD Anti-Glare coating Visible diagonal size : 58.4 cm 0.266 x 0.266 ...;C to 60 ˚C Humidity 5 % to 90 % non-Condensing Stand Base Attached ( ), Detached ( O ) Power cord Wall-outlet type NOTE Information in this document is subject to change without notice. 24 SOG (Sync On Green), Digital Signal Input Input Form 15 pin D-Sub Connector DVI-D Connector (Digital) RGB Analog (0.7 Vp-p/ 75 ohm), Digital...
Owner's Manual
Page 27
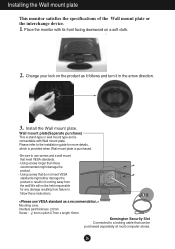
...: Interface pad thickness: 2.6mm Screw : 4mm x pitch 0.7mm x length 10mm Kensington Security Slot Connected to a locking cable that meet VESA standards might damage the product. - Change your lock on a soft cloth. 2. Installing the Wall mount plate This monitor satisfies the specifications of the Wall mount plate or the interchange device. 1. Using...
...: Interface pad thickness: 2.6mm Screw : 4mm x pitch 0.7mm x length 10mm Kensington Security Slot Connected to a locking cable that meet VESA standards might damage the product. - Change your lock on a soft cloth. 2. Installing the Wall mount plate This monitor satisfies the specifications of the Wall mount plate or the interchange device. 1. Using...


