
Owner's Manual
Page 2
... and extension cords are frayed power cords and broken plugs. To Prevent Fire or Hazards: Always turn the display OFF if you use , and servicing. Do not add accessories that have in the specifications of thunder and lightning, never touch the power cord and signal cable because it from a power source indicated in your home, consult with the unit. It can be left unattended for replacement. They...
... and extension cords are frayed power cords and broken plugs. To Prevent Fire or Hazards: Always turn the display OFF if you use , and servicing. Do not add accessories that have in the specifications of thunder and lightning, never touch the power cord and signal cable because it from a power source indicated in your home, consult with the unit. It can be left unattended for replacement. They...
Owner's Manual
Page 3
... damage. Leaving a fixed image on the screen. Otherwise, it with anything to rest upon or roll over a radiator or heat source. Make sure the panel faces forward and hold it may scratch, mar, or damage the Active Matrix LCD permanently. Contact an authorized the service center for a long time may appear on the screen for repair. If these openings are provided...
... damage. Leaving a fixed image on the screen. Otherwise, it with anything to rest upon or roll over a radiator or heat source. Make sure the panel faces forward and hold it may scratch, mar, or damage the Active Matrix LCD permanently. Contact an authorized the service center for a long time may appear on the screen for repair. If these openings are provided...
Owner's Manual
Page 6
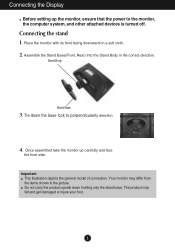
... assembled take the monitor up the monitor, ensure that the power to perpendicularity direction. 4. Place the monitor with its front facing downward on a soft cloth. 2. Important This illustration depicts the general model of connection. The product may differ from the items shown in the correct direction. Assemble the Stand Base(Front, Rear) into the Stand Body in the picture. Connecting the Display Before setting up...
... assembled take the monitor up the monitor, ensure that the power to perpendicularity direction. 4. Place the monitor with its front facing downward on a soft cloth. 2. Important This illustration depicts the general model of connection. The product may differ from the items shown in the correct direction. Assemble the Stand Base(Front, Rear) into the Stand Body in the picture. Connecting the Display Before setting up...
Owner's Manual
Page 8
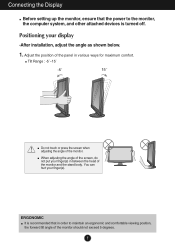
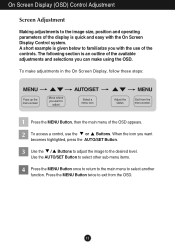
...(s). Connecting the Display Before setting up the monitor, ensure that in order to the monitor, the computer system, and other attached devices is recommended that the power to maintain an ergonomic and comfortable viewing position, the forward tilt angle of the monitor should not exceed 5 degrees. 7 Tilt Range : -5˚~15˚ -5 15 Do not touch or press the screen when adjusting the angle of the panel...
...(s). Connecting the Display Before setting up the monitor, ensure that in order to the monitor, the computer system, and other attached devices is recommended that the power to maintain an ergonomic and comfortable viewing position, the forward tilt angle of the monitor should not exceed 5 degrees. 7 Tilt Range : -5˚~15˚ -5 15 Do not touch or press the screen when adjusting the angle of the panel...
Owner's Manual
Page 9
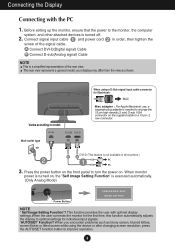
...D-Sub signal input cable connector for individual input signals. 'AUTO/SET' Function? When using the device or after changing screen resolution, press the AUTO/SET function button to improve resolution. 8 This rear view represents a general model; Wall-outlet type DVI-D (This feature is needed to change the 15 pin high density (3 row) D-sub VGA connector on the supplied cable to a 15 pin 2 row connector. When monitor power is turned on . A Connect DVI-D(Digital signal) Cable B Connect D-sub(Analog signal) Cable NOTE This is executed automatically. (Only Analog Mode) Power Button...
...D-Sub signal input cable connector for individual input signals. 'AUTO/SET' Function? When using the device or after changing screen resolution, press the AUTO/SET function button to improve resolution. 8 This rear view represents a general model; Wall-outlet type DVI-D (This feature is needed to change the 15 pin high density (3 row) D-sub VGA connector on the supplied cable to a 15 pin 2 row connector. When monitor power is turned on . A Connect DVI-D(Digital signal) Cable B Connect D-sub(Analog signal) Cable NOTE This is executed automatically. (Only Analog Mode) Power Button...

Owner's Manual
Page 11
... Mode). AUTO IMAGE ADJUSTMENT When adjusting your display settings, always press the AUTO/SET button before entering the On Screen Display(OSD). (Only Analog Mode) This will automatically adjust your display image to page 14. (SOURCE Hot key) When two input signals are connected, you can select the input signal (D-SUB/DVI) you want. The default setting is blinking blue. 10 The best display mode is in the On Screen Display. If the display is W2044T : 1600 x 900 W2244T/W2344T : 1920 x 1080 Power Button & Power Indicator Use this button to turn the display...
... Mode). AUTO IMAGE ADJUSTMENT When adjusting your display settings, always press the AUTO/SET button before entering the On Screen Display(OSD). (Only Analog Mode) This will automatically adjust your display image to page 14. (SOURCE Hot key) When two input signals are connected, you can select the input signal (D-SUB/DVI) you want. The default setting is blinking blue. 10 The best display mode is in the On Screen Display. If the display is W2044T : 1600 x 900 W2244T/W2344T : 1920 x 1080 Power Button & Power Indicator Use this button to turn the display...
Owner's Manual
Page 12
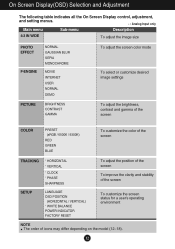
... want to adjust Select a menu icon Adjust the status Exit from the OSD. 11 On Screen Display (OSD) Control Adjustment Screen Adjustment Making adjustments to the image size, position and operating parameters of the display is given below to familiarize you want becomes highlighted, press the AUTO/SET Button. 3 Use the / Buttons to adjust the image to the desired level. A short example is quick and easy with the use the or Buttons. To make using the OSD. Use the AUTO/SET Button to select...
... want to adjust Select a menu icon Adjust the status Exit from the OSD. 11 On Screen Display (OSD) Control Adjustment Screen Adjustment Making adjustments to the image size, position and operating parameters of the display is given below to familiarize you want becomes highlighted, press the AUTO/SET Button. 3 Use the / Buttons to adjust the image to the desired level. A short example is quick and easy with the use the or Buttons. To make using the OSD. Use the AUTO/SET Button to select...
Owner's Manual
Page 13
... INTERNET USER NORMAL DEMO To adjust the screen color mode To select or customize desired image settings PICTURE BRIGHTNESS CONTRAST GAMMA To adjust the brightness, contrast and gamma of the screen COLOR PRESET (sRGB / 6500K / 9300K) RED GREEN BLUE To customize the color of the screen TRACKING * HORIZONTAL * VERTICAL * CLOCK * PHASE SHARPNESS To adjust the position of the screen To improve the clarity and stability of the screen SETUP LANGUAGE OSD POSITION (HORIZONTAL / VERTICAL) * WHITE BALANCE POWER INDICATOR FACTORY RESET To customize the screen status for a user's operating...
... INTERNET USER NORMAL DEMO To adjust the screen color mode To select or customize desired image settings PICTURE BRIGHTNESS CONTRAST GAMMA To adjust the brightness, contrast and gamma of the screen COLOR PRESET (sRGB / 6500K / 9300K) RED GREEN BLUE To customize the color of the screen TRACKING * HORIZONTAL * VERTICAL * CLOCK * PHASE SHARPNESS To adjust the position of the screen To improve the clarity and stability of the screen SETUP LANGUAGE OSD POSITION (HORIZONTAL / VERTICAL) * WHITE BALANCE POWER INDICATOR FACTORY RESET To customize the screen status for a user's operating...
Owner's Manual
Page 14
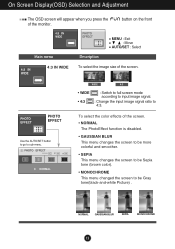
... AUTO/SET : Select Description To select the image size of the monitor. To select the color effects of the screen. • NORMAL The PhotoEffect function is disabled. • GAUSSIAN BLUR This menu changes the screen to be more colorful and smoother. • SEPIA This menu changes the screen to be Gray tone(black-and-white Picture) . NORMAL GAUSSIAN BLUR SEPIA MONOCHROME 13 WIDE 4:3 • WIDE • 4:3 : Switch to full screen mode according to input image signal. : Change...
... AUTO/SET : Select Description To select the image size of the monitor. To select the color effects of the screen. • NORMAL The PhotoEffect function is disabled. • GAUSSIAN BLUR This menu changes the screen to be more colorful and smoother. • SEPIA This menu changes the screen to be Gray tone(black-and-white Picture) . NORMAL GAUSSIAN BLUR SEPIA MONOCHROME 13 WIDE 4:3 • WIDE • 4:3 : Switch to full screen mode according to input image signal. : Change...
Owner's Manual
Page 15
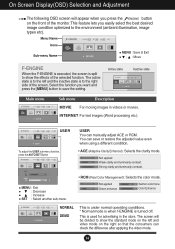
... screen is turned off. On Screen Display(OSD) Selection and Adjustment The following OSD screen will be divided to show the effects of the monitor.This feature lets you easily select the best desired image condition optimized to save or restore the adjusted value even when using a different condition. • ACE (Adaptive Clarity Enhancer): Selects the clarity mode. USER To adjust the USER sub-menu function, press the AUTO/SET Button USER You can check the...
... screen is turned off. On Screen Display(OSD) Selection and Adjustment The following OSD screen will be divided to show the effects of the monitor.This feature lets you easily select the best desired image condition optimized to save or restore the adjusted value even when using a different condition. • ACE (Adaptive Clarity Enhancer): Selects the clarity mode. USER To adjust the USER sub-menu function, press the AUTO/SET Button USER You can check the...
Owner's Manual
Page 16
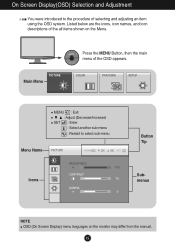
MENU : Exit : Adjust (Decrease/Increase) SET : Enter : Select another sub-menu : Restart to the procedure of selecting and adjusting an item using the OSD system. On Screen Display(OSD) Selection and Adjustment You were introduced to select sub-menu Menu Name Icons Button Tip Submenus NOTE OSD (On Screen Display) menu languages on the Menu. Listed below are the icons, icon names, and icon descriptions of the OSD appears. Main Menu Press the MENU Button, then the main menu of the all items shown on the monitor may differ from the manual. 15
MENU : Exit : Adjust (Decrease/Increase) SET : Enter : Select another sub-menu : Restart to the procedure of selecting and adjusting an item using the OSD system. On Screen Display(OSD) Selection and Adjustment You were introduced to select sub-menu Menu Name Icons Button Tip Submenus NOTE OSD (On Screen Display) menu languages on the Menu. Listed below are the icons, icon names, and icon descriptions of the OSD appears. Main Menu Press the MENU Button, then the main menu of the all items shown on the monitor may differ from the manual. 15
Owner's Manual
Page 17
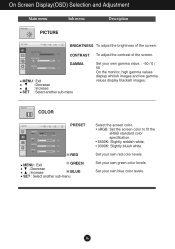
... images and low gamma values display blackish images. Set your own blue color levels. 16 Set your own red color levels. On Screen Display(OSD) Selection and Adjustment Main menu Sub menu Description PICTURE BRIGHTNESS To adjust the brightness of the screen. COLOR PRESET RED MENU : Exit GREEN : Decrease : Increase BLUE SET : Select another sub-menu To adjust the contrast of the screen. CONTRAST GAMMA MENU : Exit : Decrease : Increase SET : Select another sub-menu Select the screen color. • sRGB: Set the screen color to fit the sRGB standard color specification...
... images and low gamma values display blackish images. Set your own blue color levels. 16 Set your own red color levels. On Screen Display(OSD) Selection and Adjustment Main menu Sub menu Description PICTURE BRIGHTNESS To adjust the brightness of the screen. COLOR PRESET RED MENU : Exit GREEN : Decrease : Increase BLUE SET : Select another sub-menu To adjust the contrast of the screen. CONTRAST GAMMA MENU : Exit : Decrease : Increase SET : Select another sub-menu Select the screen color. • sRGB: Set the screen color to fit the sRGB standard color specification...
Owner's Manual
Page 19
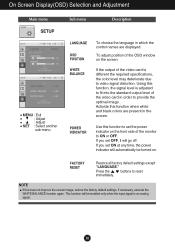
... . On Screen Display(OSD) Selection and Adjustment Main menu SETUP MENU : Exit : Adjust : Adjust SET : Select another sub-menu Sub menu Description LANGUAGE OSD POSITION WHITE BALANCE To choose the language in which the control names are present in order to provide the optimal image. This function will go off. To adjust position of the video card is an analog signal. 18 POWER INDICATOR Use this function when white and black colors are displayed. Press the , buttons to reset immediately. FACTORY RESET Restore all factory default settings except "LANGUAGE." Using this...
... . On Screen Display(OSD) Selection and Adjustment Main menu SETUP MENU : Exit : Adjust : Adjust SET : Select another sub-menu Sub menu Description LANGUAGE OSD POSITION WHITE BALANCE To choose the language in which the control names are present in order to provide the optimal image. This function will go off. To adjust position of the video card is an analog signal. 18 POWER INDICATOR Use this function when white and black colors are displayed. Press the , buttons to reset immediately. FACTORY RESET Restore all factory default settings except "LANGUAGE." Using this...
Owner's Manual
Page 20
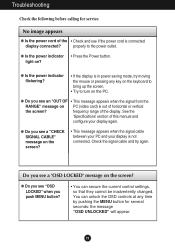
... message appears when the signal cable between your PC and your display again. Do you see a "OSD LOCKED" message on ? light on the screen? See the 'Specifications' section of horizontal or vertical the screen? You can secure the current control settings, so that they cannot be inadvertently changed. G Is the power indicator • Press the Power button. G Do you push MENU button? • You can unlock the OSD controls at any key...
... message appears when the signal cable between your PC and your display again. Do you see a "OSD LOCKED" message on ? light on the screen? See the 'Specifications' section of horizontal or vertical the screen? You can secure the current control settings, so that they cannot be inadvertently changed. G Is the power indicator • Press the Power button. G Do you push MENU button? • You can unlock the OSD controls at any key...
Owner's Manual
Page 21
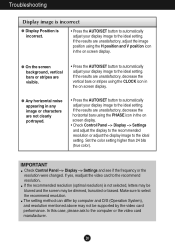
..., decrease the horizontal bars using the PHASE icon in the on screen display. • Check Control Panel --> Display --> Settings and adjust the display to the recommended resolution or adjust the display image to select the recommend resolution. If yes, readjust the video card to the ideal setting. In this case, please ask to the computer or the video card manufacturer. 20 Set the color setting higher than 24 bits (true color). If the recommended resolution (optimal resolution) is...
..., decrease the horizontal bars using the PHASE icon in the on screen display. • Check Control Panel --> Display --> Settings and adjust the display to the recommended resolution or adjust the display image to select the recommend resolution. If yes, readjust the video card to the ideal setting. In this case, please ask to the computer or the video card manufacturer. 20 Set the color setting higher than 24 bits (true color). If the recommended resolution (optimal resolution) is...
Owner's Manual
Page 22
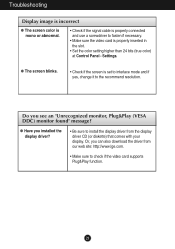
... Control Panel - Troubleshooting Display image is incorrect G The screen color is mono or abnormal. • Check if the signal cable is properly connected and use a screwdriver to install the display driver from our web site: http://www.lge.com. • Make sure to the recommend resolution. Or, you see an "Unrecognized monitor, Plug&Play (VESA DDC) monitor found" message? G The screen blinks. • Check if the screen is set to interlace mode and if yes, change it to check...
... Control Panel - Troubleshooting Display image is incorrect G The screen color is mono or abnormal. • Check if the signal cable is properly connected and use a screwdriver to install the display driver from our web site: http://www.lge.com. • Make sure to the recommend resolution. Or, you see an "Unrecognized monitor, Plug&Play (VESA DDC) monitor found" message? G The screen blinks. • Check if the screen is set to interlace mode and if yes, change it to check...

Owner's Manual
Page 23
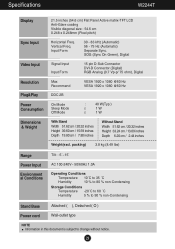
.... Specifications W2044T Display 20.0 inches (50.8 cm) Flat Panel Active matrix-TFT LCD Anti-Glare coating Visible diagonal size : 50.8 cm 0.2766 x 0.2766 mm (Pixel pitch) Sync Input Horizontal Freq. SOG (Sync On Green), Digital Video Input Signal Input Input Form 15 pin D-Sub Connector DVI-D Connector (Digital) RGB Analog (0.7 Vp-p/ 75 ohm), Digital Resolution Max Recommend VESA 1600 x 900 @60 Hz VESA 1600 x 900 @60 Hz Plug&Play DDC 2B Power Consumption On Mode Sleep Mode Off Mode : 38 W(Typ.) ≤ 1 W ≤ 1 W Dimensions & Weight With Stand...
.... Specifications W2044T Display 20.0 inches (50.8 cm) Flat Panel Active matrix-TFT LCD Anti-Glare coating Visible diagonal size : 50.8 cm 0.2766 x 0.2766 mm (Pixel pitch) Sync Input Horizontal Freq. SOG (Sync On Green), Digital Video Input Signal Input Input Form 15 pin D-Sub Connector DVI-D Connector (Digital) RGB Analog (0.7 Vp-p/ 75 ohm), Digital Resolution Max Recommend VESA 1600 x 900 @60 Hz VESA 1600 x 900 @60 Hz Plug&Play DDC 2B Power Consumption On Mode Sleep Mode Off Mode : 38 W(Typ.) ≤ 1 W ≤ 1 W Dimensions & Weight With Stand...
Owner's Manual
Page 24
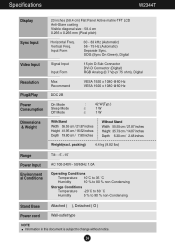
... Sync. SOG (Sync On Green), Digital Signal Input Input Form 15 pin D-Sub Connector DVI-D Connector (Digital) RGB Analog (0.7 Vp-p/ 75 ohm), Digital Resolution Plug&Play Power Consumption Dimensions & Weight Max Recommend VESA 1920 x 1080 @60 Hz VESA 1920 x 1080 @60 Hz DDC 2B On Mode Sleep Mode Off Mode : 40 W(Typ.) ≤ 1 W ≤ 1 W With Stand Width 51.62 cm / 20.32 inches Height 39.60 cm / 15.59 inches Depth 19.80 cm / 7.80 inches Without Stand Width...
... Sync. SOG (Sync On Green), Digital Signal Input Input Form 15 pin D-Sub Connector DVI-D Connector (Digital) RGB Analog (0.7 Vp-p/ 75 ohm), Digital Resolution Plug&Play Power Consumption Dimensions & Weight Max Recommend VESA 1920 x 1080 @60 Hz VESA 1920 x 1080 @60 Hz DDC 2B On Mode Sleep Mode Off Mode : 40 W(Typ.) ≤ 1 W ≤ 1 W With Stand Width 51.62 cm / 20.32 inches Height 39.60 cm / 15.59 inches Depth 19.80 cm / 7.80 inches Without Stand Width...
Owner's Manual
Page 25
... Sync. Specifications W2344T Display Sync Input Video Input 23 inches (58.4 cm) Flat Panel Active matrix-TFT LCD Anti-Glare coating Visible diagonal size : 58.4 cm 0.266 x 0.266 mm (Pixel pitch) Horizontal Freq. SOG (Sync On Green), Digital Signal Input Input Form 15 pin D-Sub Connector DVI-D Connector (Digital) RGB Analog (0.7 Vp-p/ 75 ohm), Digital Resolution Plug&Play Power Consumption Dimensions & Weight Max Recommend VESA 1920 x 1080 @60 Hz VESA 1920 x 1080 @60 Hz DDC 2B On Mode Sleep Mode Off Mode : 42 W(Typ.) ≤ 1 W ≤ 1 W With Stand Width...
... Sync. Specifications W2344T Display Sync Input Video Input 23 inches (58.4 cm) Flat Panel Active matrix-TFT LCD Anti-Glare coating Visible diagonal size : 58.4 cm 0.266 x 0.266 mm (Pixel pitch) Horizontal Freq. SOG (Sync On Green), Digital Signal Input Input Form 15 pin D-Sub Connector DVI-D Connector (Digital) RGB Analog (0.7 Vp-p/ 75 ohm), Digital Resolution Plug&Play Power Consumption Dimensions & Weight Max Recommend VESA 1920 x 1080 @60 Hz VESA 1920 x 1080 @60 Hz DDC 2B On Mode Sleep Mode Off Mode : 42 W(Typ.) ≤ 1 W ≤ 1 W With Stand Width...
Owner's Manual
Page 27
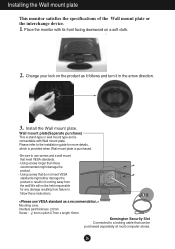
... arrow direction. .3 Install the Wall mount plate. Be sure to the installation guide for any damage resulting from the wall.We will not be purchased separately at most computer stores. 26 Please refer to use screws and a wall mount that meet VESA standards might damage the product. - Change your lock on a soft cloth. 2. Installing the Wall mount plate This monitor satisfies the specifications of the Wall mount plate or the...
... arrow direction. .3 Install the Wall mount plate. Be sure to the installation guide for any damage resulting from the wall.We will not be purchased separately at most computer stores. 26 Please refer to use screws and a wall mount that meet VESA standards might damage the product. - Change your lock on a soft cloth. 2. Installing the Wall mount plate This monitor satisfies the specifications of the Wall mount plate or the...


