
Owner's Manual
Page 4
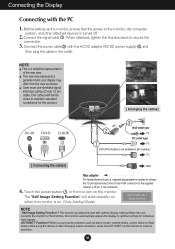
...monitor is needed to maintain standard compliance for individual input signals. 'AUTO/SET' Function? This function provides the user with ferrite cores to change the 15 pin high density (3 row) D-sub VGA connector on the monitor. NOTE This is not available in front to turn on ... resolution. your display may differ from the view as blurry screen, blurred letters, screen flicker or tilted screen while using the device or after changing screen resolution, press the AUTO/SET function button to a 15 pin 2 row connector. This rear view represents a general model; When attached,...
...monitor is needed to maintain standard compliance for individual input signals. 'AUTO/SET' Function? This function provides the user with ferrite cores to change the 15 pin high density (3 row) D-sub VGA connector on the monitor. NOTE This is not available in front to turn on ... resolution. your display may differ from the view as blurry screen, blurred letters, screen flicker or tilted screen while using the device or after changing screen resolution, press the AUTO/SET function button to a 15 pin 2 row connector. This rear view represents a general model; When attached,...

Owner's Manual
Page 7
... The message "OSD UNLOCKED" appears. OSD LOCKED/UNLOCKED This function allows you to lock the current control settings, so that these settings are not inadvertently changed. To lock the OSD settings, press and hold the MENU button for several seconds.
... The message "OSD UNLOCKED" appears. OSD LOCKED/UNLOCKED This function allows you to lock the current control settings, so that these settings are not inadvertently changed. To lock the OSD settings, press and hold the MENU button for several seconds.

Owner's Manual
Page 8
... state. Button ( ) For more information, refer to select or adjust functions in the On Screen Display. Button (SOURCE) AUTO/SET Button Use this indicator color changes to entering the On Screen Display(OSD). Control Panel Functions Control Function Buttons Use these buttons to page A16.
... state. Button ( ) For more information, refer to select or adjust functions in the On Screen Display. Button (SOURCE) AUTO/SET Button Use this indicator color changes to entering the On Screen Display(OSD). Control Panel Functions Control Function Buttons Use these buttons to page A16.

Owner's Manual
Page 13
The horizontal screen size will also change. To adjust the focus of the screen. This item allows you to remove any vertical bars or stripes visible on the screen background. To adjust the clearness of the display. CLOCK PHASE MENU : Exit : Decrease : Increase SHARPNESS SET : Select another sub-menu To minimize any horizontal noise and clear or sharpen the image of characters. VERTICAL To move image left and right. A12 On Screen Display(OSD) Selection and Adjustment Main menu Sub menu Description TRACKING TRACKING HORIZONTAL To move image up and down.
The horizontal screen size will also change. To adjust the focus of the screen. This item allows you to remove any vertical bars or stripes visible on the screen background. To adjust the clearness of the display. CLOCK PHASE MENU : Exit : Decrease : Increase SHARPNESS SET : Select another sub-menu To minimize any horizontal noise and clear or sharpen the image of characters. VERTICAL To move image left and right. A12 On Screen Display(OSD) Selection and Adjustment Main menu Sub menu Description TRACKING TRACKING HORIZONTAL To move image up and down.
Owner's Manual
Page 15
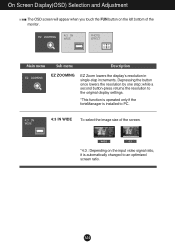
... by one step; while a second button-press returns the resolution to the original display settings. *This function is operated only if the forteManager is automatically changed to PC. 4:3 IN WIDE To select the image size of the monitor. On Screen Display(OSD) Selection and Adjustment The OSD screen will appear when...
... by one step; while a second button-press returns the resolution to the original display settings. *This function is operated only if the forteManager is automatically changed to PC. 4:3 IN WIDE To select the image size of the monitor. On Screen Display(OSD) Selection and Adjustment The OSD screen will appear when...
Owner's Manual
Page 16
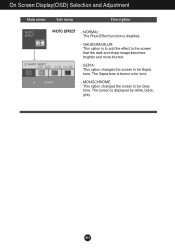
GAUSSIAN BLUR: This option is displayed by white, black, gray. The Sepia tone is disabled. - MONOCHROME: This option changed the screen to be Sepia tone. A15 NORMAL: The PhotoEffect function is brown color tone. - On Screen Display(OSD) Selection and Adjustment Main menu Sub menu Description PHOTO EFFECT - The screen is to add the effect to be Gray tone. SEPIA: This option changes the screen to the screen that the dark and sharp image becomes brighter and more blurred. -
GAUSSIAN BLUR: This option is displayed by white, black, gray. The Sepia tone is disabled. - MONOCHROME: This option changed the screen to be Sepia tone. A15 NORMAL: The PhotoEffect function is brown color tone. - On Screen Display(OSD) Selection and Adjustment Main menu Sub menu Description PHOTO EFFECT - The screen is to add the effect to be Gray tone. SEPIA: This option changes the screen to the screen that the dark and sharp image becomes brighter and more blurred. -
Owner's Manual
Page 18
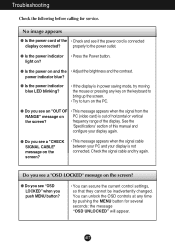
... signal cable between your PC and your display is connected display connected? You can secure the current control settings, so that they cannot be inadvertently changed. A17 properly to turn on the PC. ● Do you see a "OSD LOCKED" message on and the • Adjust the brightness and the contrast. frequency...
... signal cable between your PC and your display is connected display connected? You can secure the current control settings, so that they cannot be inadvertently changed. A17 properly to turn on the PC. ● Do you see a "OSD LOCKED" message on and the • Adjust the brightness and the contrast. frequency...
Owner's Manual
Page 19
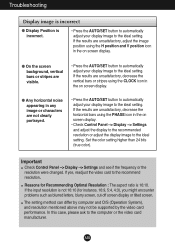
... to automatically adjust your display image to the ideal setting. Important Check Control Panel --> Display --> Settings and see if the frequency or the resolution were changed. A18 The setting method can differ by computer and O/S (Operation System), and resolution mentioned above may not be supported by the video card performance. Reasons...
... to automatically adjust your display image to the ideal setting. Important Check Control Panel --> Display --> Settings and see if the frequency or the resolution were changed. A18 The setting method can differ by computer and O/S (Operation System), and resolution mentioned above may not be supported by the video card performance. Reasons...
Owner's Manual
Page 20
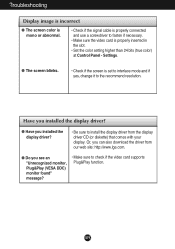
... (or diskette) that comes with your display. Settings. ● The screen blinks. • Check if the screen is set to interlace mode and if yes, change it to check if the video card supports Plug&Play function. Troubleshooting Display image is incorrect ● The screen color is mono or abnormal. •...
... (or diskette) that comes with your display. Settings. ● The screen blinks. • Check if the screen is set to interlace mode and if yes, change it to check if the video card supports Plug&Play function. Troubleshooting Display image is incorrect ● The screen color is mono or abnormal. •...

Owner's Manual
Page 21
... ˚C Humidity 5 % to 90 % non-Condensing Attached( ), Detached ( O ) Attached( ), Detached ( O ) Wall-outlet type or PC-outlet type NOTE Information in this document is subject to change without notice. Specifications Display Sync Input Video Input Resolution Plug&Play Power Consumption Dimensions &Weight Tilt Range Power Input AC-DC Adapter Environmental Conditions Stand...
... ˚C Humidity 5 % to 90 % non-Condensing Attached( ), Detached ( O ) Attached( ), Detached ( O ) Wall-outlet type or PC-outlet type NOTE Information in this document is subject to change without notice. Specifications Display Sync Input Video Input Resolution Plug&Play Power Consumption Dimensions &Weight Tilt Range Power Input AC-DC Adapter Environmental Conditions Stand...


